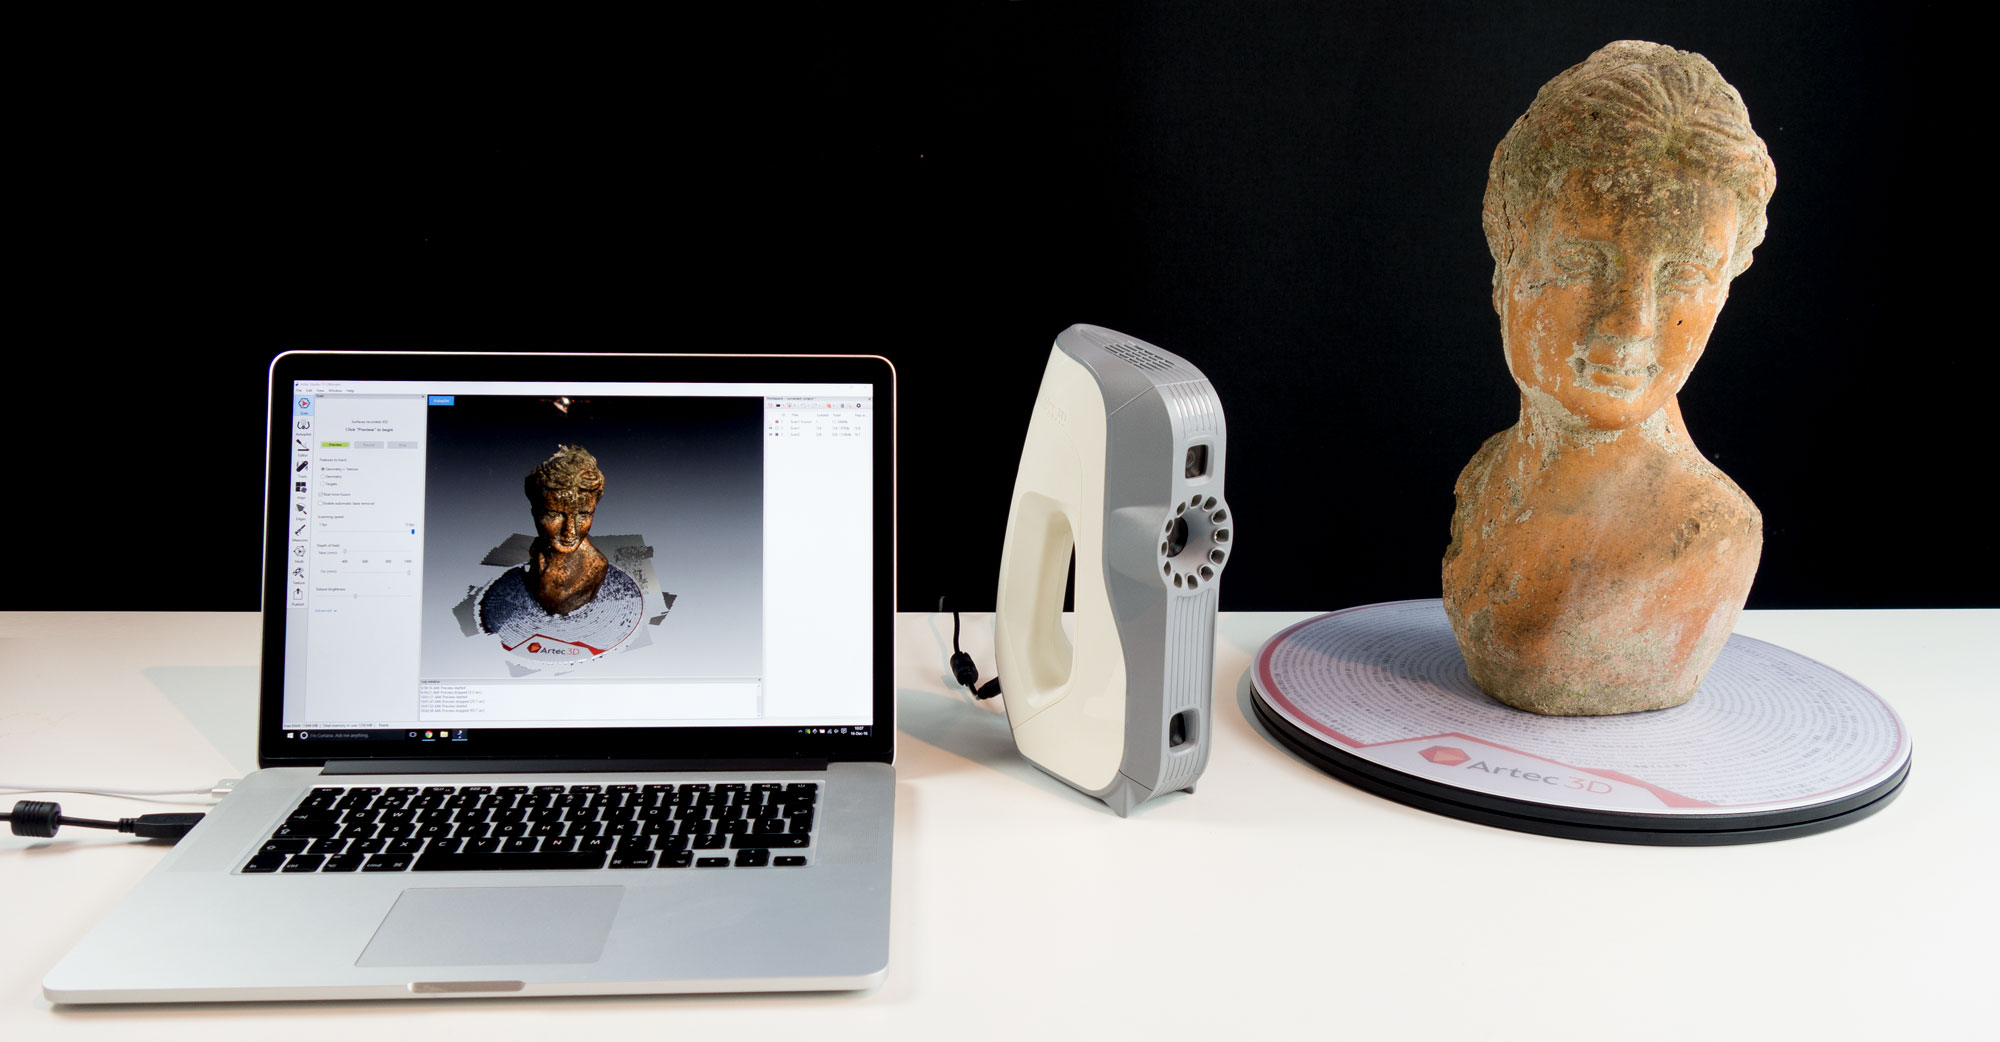
In the last two years, many new 3D scanners have entered the market. From entry-level infrared depth sensors to structured light scanners aimed at professionals. For this review, I’ve been testing the Artec Eva — a handheld 3D scanner that has been around since 2012. But if you think that means it’s outdated hardware, you’re very wrong. In reality, Artec is one of the industry-standard brands of handheld 3D scanners.
The Eva is their “general-purpose” white light scanner that can be used to capture anything from the size of a shoe to that of a car with a point accuracy of up to 0,1mm. For smaller objects or very small details (up to 0.05mm accuracy), Artec offers the Space Spider blue light scanner that can also be used… in space! I’ll review that one soon (on earth, unfortunately).
The Eva is used for many purposes, from quality control to cultural heritage and from rapid prototyping to medical applications. It’s also commonly used to create assets for games and visual effects for movies and TV shows, like the Batman-inspired series Gotham. The scanner was also used to create the very first presidential portrait in 3D of Barack Obama.
My review unit came with a complementary training by Dutch Artec Reseller MiniYours / 3D Scan Solutions, which got me started quickly. I’ve been testing the Eva for about two months.
Let’s dive in!
New Layout
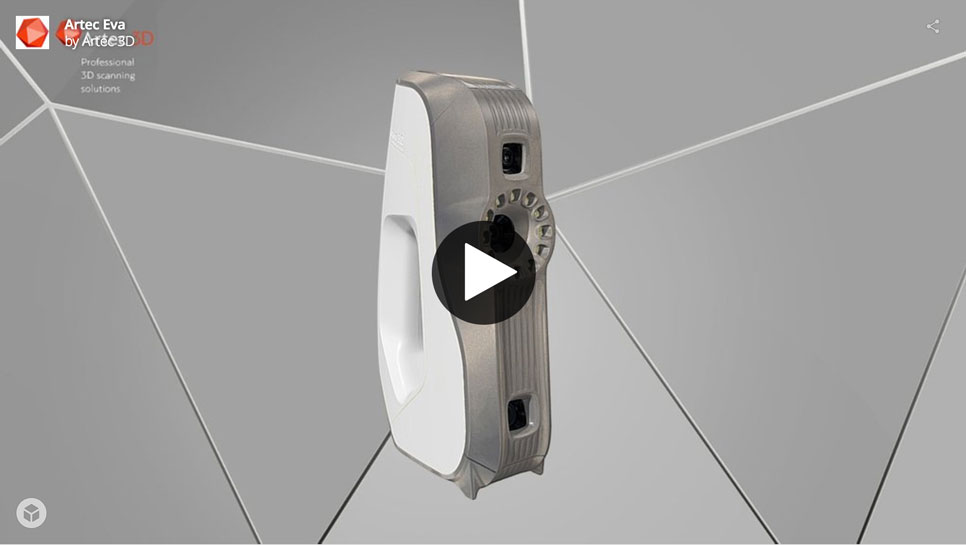
If you’re a regular reader, and you’re reading this on your computer, you might notice that I’m testing a new full-width layout for this review with light box pop-ups instead of inline Sketchfab embeds for the 3D content to increase the page loading speed. To show you what I mean, here’s a 3D scan of the Artec Eva (scanned with the Artec Spider):
Hardware Pricing
It’s probably no surprise that industrial-grade hardware comes at a price. But unlike competitors like CreaForm, Artec is very clear about their prices: The Eva costs €13.700. It can also be purchased as the Eva Lite for €6.700. The latter doesn’t have color capturing capabilities and some software limitations.
The good news is that these functionalities can be enabled at any time for the price difference between the two scanners. This means that if you don’t need color data for your current projects, you can save a lot of money on the Eva Lite and have the possibility to upgrade at any time when a fitting project comes your way. I tested the full-fledged Eva, since color capture is a necessity for my purposes, which are usually more of the aesthetic kind than technical measurements or engineering.
I’ve your a regular reader of my site, you’ve possibly read my review of the Shining 3D EinScan-Pro — a newcomer to the market of professional handheld 3D scanners with a price tag of €4590 (if you include the color module). Of all scanner I’ve reviewed so far, that one comes closest to the Eva at a competitive price, so I’ll be making a comparisons between the two along the way.
You can save a lot of money on the Eva Lite and have the possibility to upgrade at any time.
While I didn’t have one for the review, I would definitely advice to also purchase the optional battery pack if you’re planning to do freestyle scanning (walking around subjects). It’s €600, but give you a lot of portability for up to 6 hours. That way you don’t have to drag the power adapter and an extension cord around with the risk or tripping.
Software Pricing
I’ve said many times that the results and user experience of 3D scanning depend 50% on the hardware and 50% on the software. And this is where Artec’s years of experience come in. While the software of the aforementioned EinScan-Pro has just been updated to version 2.0, the Artec Studio software is currently at version 11—and it shows.
Artec offers two ways of purchasing their Studio 11 Pro software. You can either get a yearly subscription for €400 or a lifetime subscription for €1000.
Artec Studio software is currently at version 11—and it shows.
There’s also Studio 11 Ultimate, but the only difference is that this version also supports third party depth sensors like Microsoft Kinect and Intel RealSense, like the SR300 I reviewed recently. Ultimate is only available as a yearly subscription for €800. I used that version for this review, because this allowed me to show you the difference between a 3D scan from a <€400 depth sensor and a €13.700 device. Keep reading and you’ll see the comparison.
System Requirements
Artec doesn’t give concrete requirements, but has a list of example laptop configurations which you can use to cross-check your system. I did almost all of my tests on a mid-2012 MacBook Pro with an 2.3Ghz Intel Quad-Core i7 (3615QM) processor, 16GB of RAM and an Nvidia GeForce GT 650M with 1GB of RAM. I run Windows 10 natively, through Boot Camp.
That’s not at all a new system and the Eva and Studio 11 software ran fine with the default settings. I usually got around 15 frames per seconds (the maximum is 16), which offers a smooth scanning experience. A newer, faster processor could certainly speed up post-processing time though. One thing I would advice is to use the Eva with a machine with as much RAM as possible, especially when scanning large objects. To process all scan data at once, it must fit into the RAM and some of my full body scans turned out to be larger than 8GB, so system with 16GB RAM or more is highly recommended if you’re planning to scan people or large objects.
The same is true for hard drive space. If you just wan’t to keep the exported 3D models, it’s all good. But if you want to archive the raw scan data the gigabytes will quickly add up.
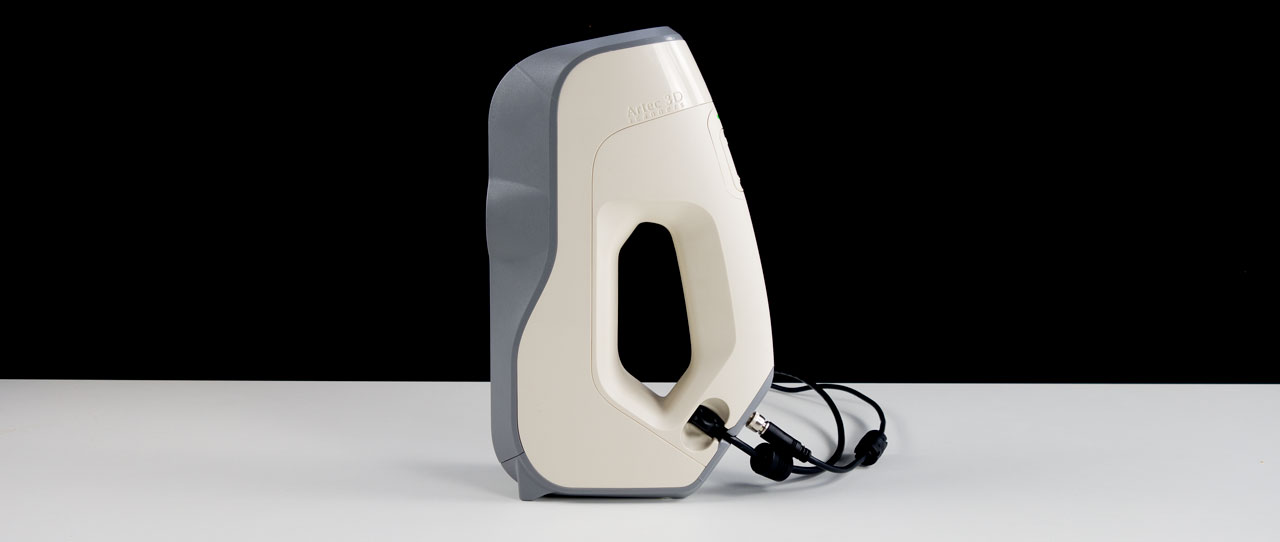
Hardware Design and Ease of Use
The Eva has a very clean design and the beige/grey color scheme gives the device the aesthetic of medical equipment. It’s certainly not offensive, which is good for scanning people. It feels very well build, too. At 0.85 kg /1.9 lb) it weighs about the same as EinScan-Pro, but I found the Eva easier to hold. The angle at the bottom of the handle allows you to hold it at an angle above your head, which is handy for scanning people or tall objects.
What I do like more about the EinScan-Pro, though, is that fact that the power and data are combined into a single cable to the scanner. The Eva has a separate USB and power supply port so you have to keep track of multiple cables. On the positive side, the special USB cable has an angled connector and the power cable has a screw thread, so both are secured pretty well.
Both the Einscan-Pro and Eva use visible white light, which means that it’s literally like a stroboscope when scanning. This is not a big deal for objects, but most people don’t like flickering lights close to their face. Subjectively though, the people I scanned found the flickering of the Eva (video played back at 25% speed) less annoying than that of the EinScan-Pro (video played back at 25% speed).
The Eva has a separate USB and power supply port so you have to keep track of multiple cables.
The Eva’s higher frame rate of 16fps compared to the 10fps of the EinScan-Pro might not seem like much, but it felt significant in practice—smoother scanning, better tracking and shorter scan times.
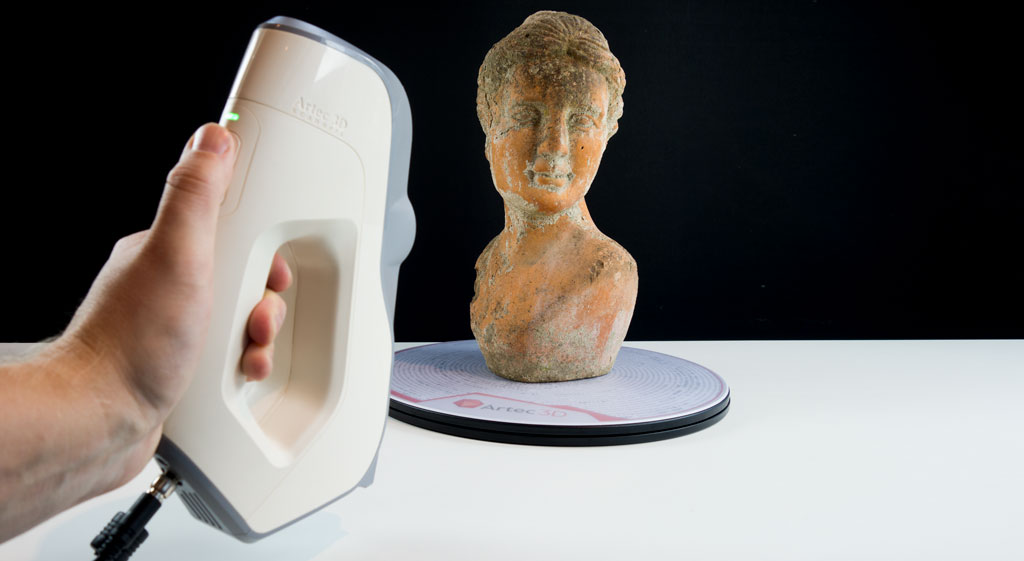
There are two buttons on the Eva: one to start/pause the scan and one to stop the scanning procedure. An LED indicator shows which mode you’re in: Green is the Idle mode, flashing red is Preview mode and steady red is Recording Mode.
Scan Modes
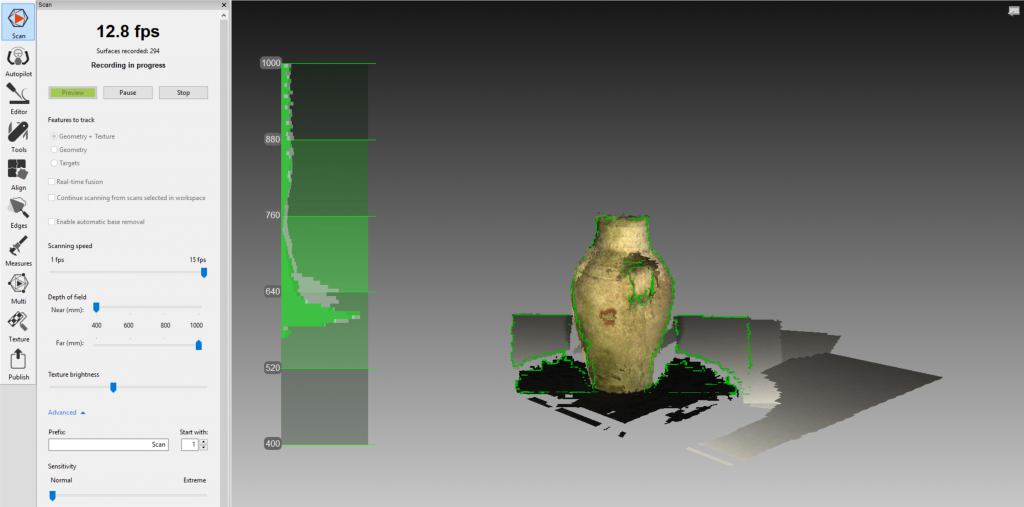
You can somewhat compare the recording technology of the Eva to a video camera: A complete capture session (your scene) is made up out of separate scans (the shots) which are a sequence of frames (16 per second in this case). From the moment you hit start, it will capture continuously. This means that it’s not the size of your objects that determines the file size of the scan data, but the time you you’re scanning continuously. This video gives you an idea of what the scanner sees. As you can see it records a color frame every so often.
Artec Studio 11 basically has two scan modes. The default one captures the raw scan data explained above. It does show a preview of the progress, but because this is in full color (unless you use the Eva Lite or turn texture capture off) I found it a bit hard to see which parts I still had to scan. Luckily, you can pause the scanning and orbit around the captured data to get a better look and continue scanning parts you missed. All this data can be processed and fused into a 3D mesh afterwards.
The second mode is to enable Real-Time Fusion (RTF). In this mode, the scan data will be fused into a 3D mesh on the fly. The preview of this is in grey, which made it easier for me to see which parts I still had to scan. After scanning, the geometric mesh is available instantly. You can export it right away to a format of your liking (see Exporting).
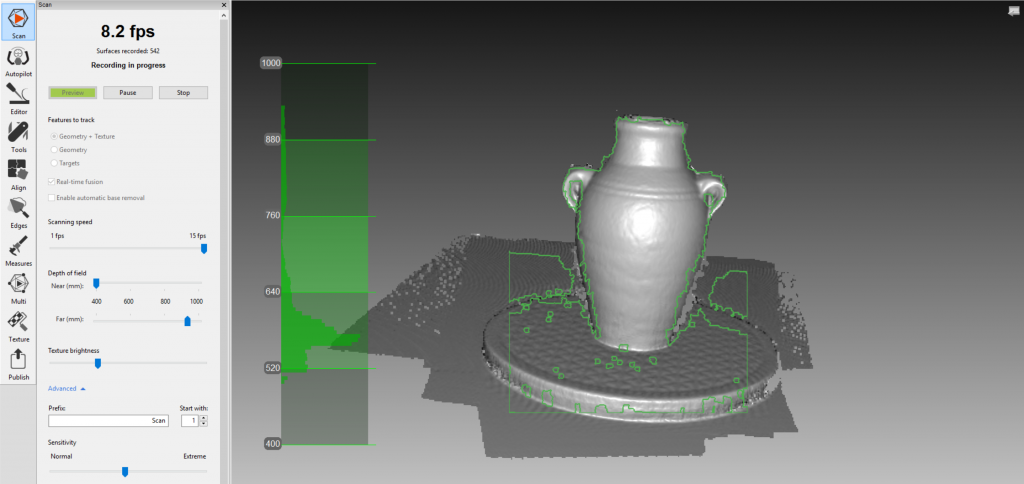
There are some trade-offs to RTF, though. Firstly, the results will be less detailed. I find the difference hard to quantify, because it seems to depend a lot on the subject. It will also depend on your purpose if the detail of the RTF scan is enough. Secondly, the initial scan is not textured. But because the raw scan data is also recorded, the software can automatically texture the RTF scan based on the captured color data. More about that later. Lastly, RTF-scanning uses your computer’s graphic card (GPU) instead of just the main processor (GPU). This means the performance depends on the actual graphics hardware and the maximum scan size on the graphic memory. I never encountered any problems with my (relatively old) GeForce GT650M with 1GB of memory, since RTF scans were never bigger than a few hundred MB.
If you’re going to make scans of objects or people in one session, I would advice to keep RTF on. This way you have a better preview and you get both the RTF result and the raw scan data which can be post-processed. This way you can determine if the RTF scan is sufficient (maybe as an early preview for a client) and can always generate a more accurate mesh later.
You may also like
Post Processing
If you wan’t to get the most out of the scanned data, you will have to process it. I will try not go too deep into the technical procedures, but going from raw 3D point data to an editable 3D mesh that you can import into other 3D software is done by running a series of algorithms. This starts with various alignment and registration algorithms, that will try to determine the exact location of the point data in 3D space, followed by fusion calculations that will transform the points in to polygons. This mesh can then be optimized to reduce the amount of polygons, decrease noise and smooth surfaces when needed. Finally, the RGB color data will be used to generate a texture map.
That’s a lot of computing and Artec Studio 11 allows you to control every step of it — in detail. You can set values and thresholds for every single algorithm so you can get the best result for each subject or purpose. It’s like editing digital photographs that were shot in raw format. It takes time to master all there settings, but the documentation is very helpful for this. If you put some quality time into this, you can operate this software like a true professional.
Autopilot will use a pre-set values for all the algorithms and will perform them all in an automatic sequence. It’s awesome!
But even professional photographers don’t always shoot with their DSLRs in manual mode and certainly don’t process every single raw photo manually. Sometimes that simply not necessary, or there isn’t enough time or budget to do this. That’s why professional cameras also have an auto-mode and photo editing software has presets to process raw images.
With the release of Studio 11, Artec added something similar to make processing 3D scan data faster and easier: Autopilot. In this mode, you basically answer a few questions about your subject like the size and if you want to automatically fill holes or not. Based on this, the software will use a pre-set values for all the aforementioned algorithms and will perform them all in an automatic sequence. It’s awesome!
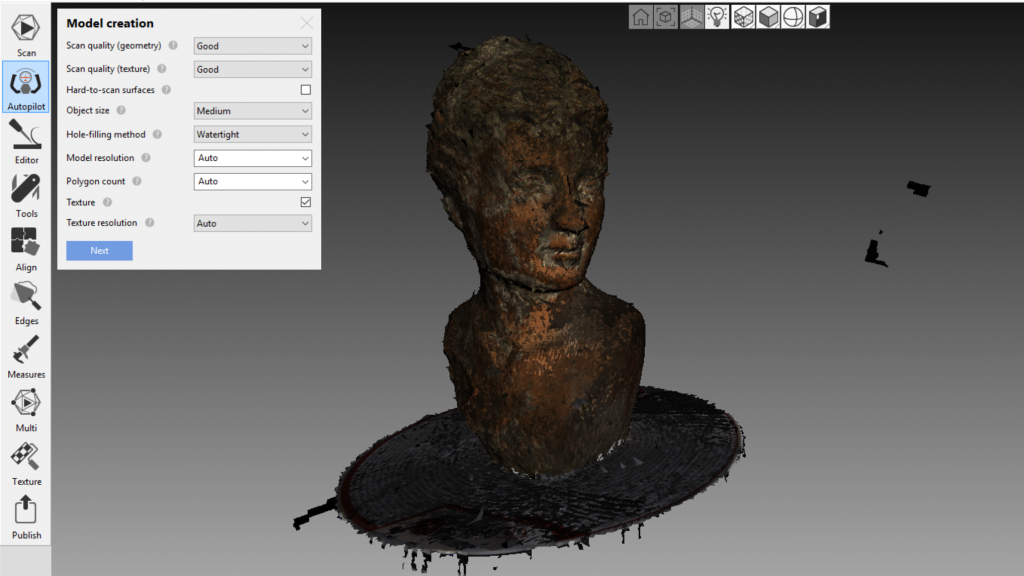
For most scans I made, I simply ran the Autopilot procedure first to check the result. Most of the times, it was great. In some cases I re-processed the scans manually to get a bit more details out of the data. For instance, the Autopilot seems to favor the “Fast Mesh Simplification” algorithm while the non-fast version gave some models a slightly better detail/polycount ratio. At the cost of extra processing time, of course (the fast simplification is indeed very fast).
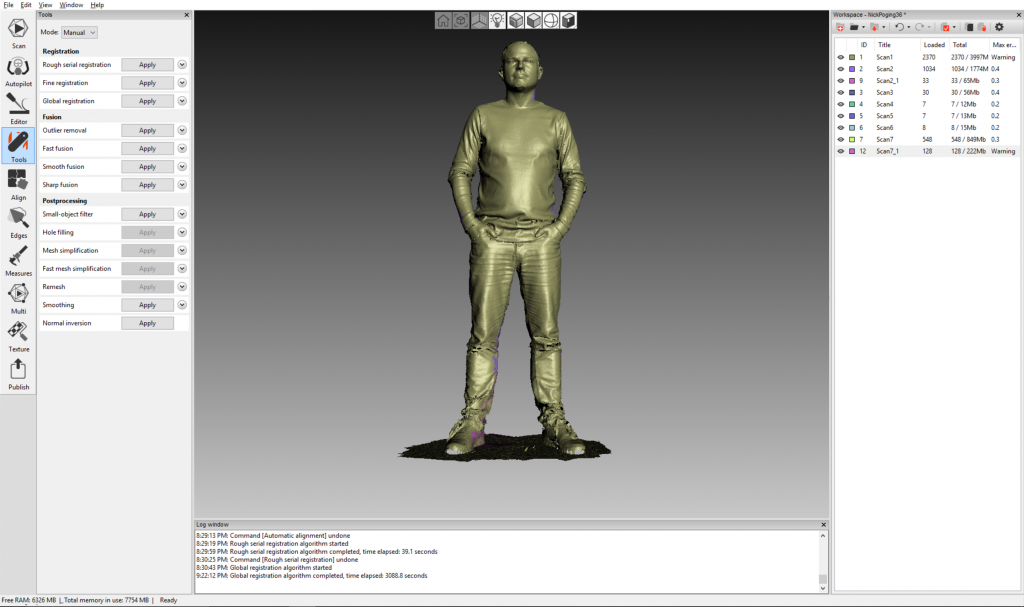
Being able to manually process scan data can also be a way to fix partially failed scans. For example, one full body scan of myself had a few weird parts because of tracking interruptions while scanning. This can result in parts of scans that aren’t aligned the way they should, like my legs in the image below.
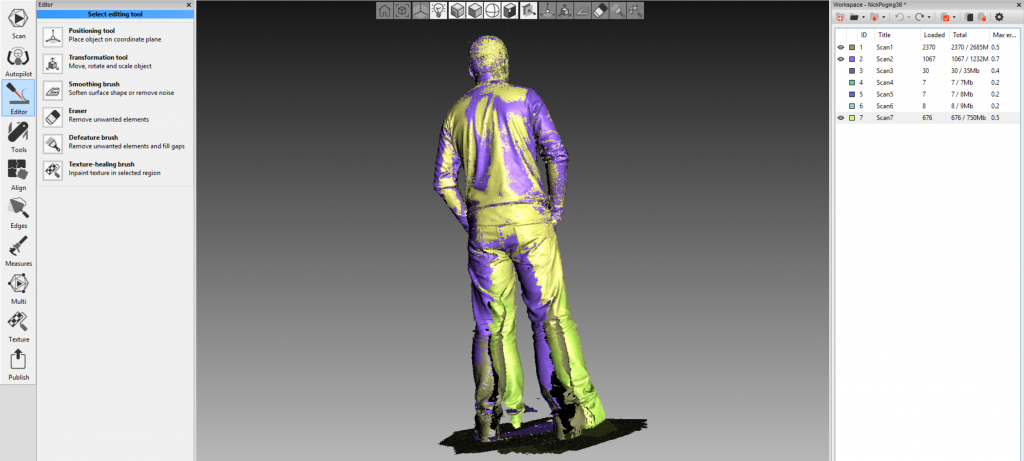
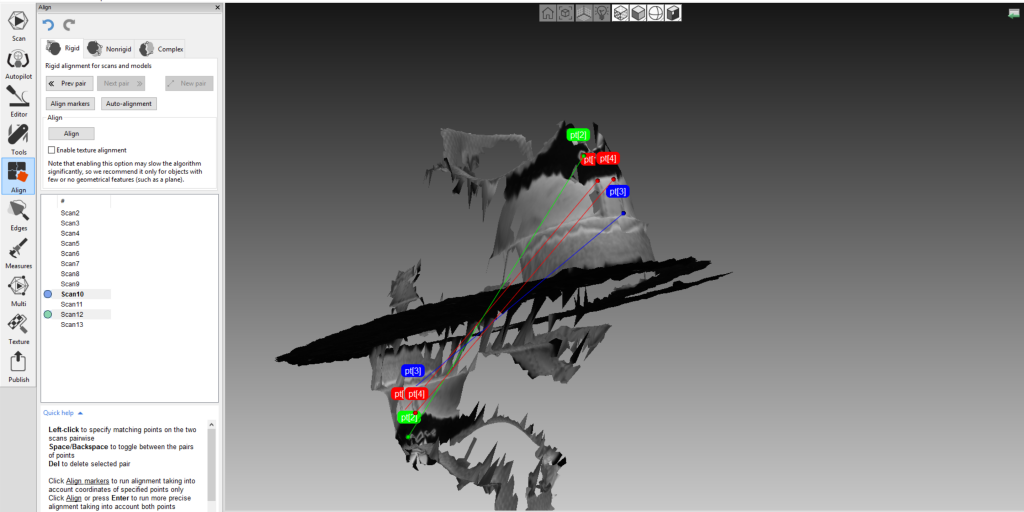
I could fix this by revealing the separate frames of the scan of that area. This allows you to re-play the scan sequence as an animation to detect where the interruption has taken place. At that point, you can simply split the scan into two separate ones, allowing the algorithms to re-align them. If that alignment fails, you can manually align scans, too. You can even perform non-rigid alignments, meaning that scans can be deformed to be aligned. Especially for scans of people this could really save your work if you discover an error after the person is already gone. You’re not going to call Obama for a re-scan, right?
It’s also good to know that the software can process scan data from multiple Eva scanners or a combination of Eva and Spider scan data. Theoretically, you can even include depth sensor data in the mix, but I’m not sure if anyone would do that.
Processing Times
Even on my quad-core i7 processor, processing of some scans took very long. I tried to quantify this somehow, but it totally depends on the scanned subject and the way it was scanned. One full body scan took almost an hour for the registration algorithm to finish, while another of the same person with the same settings finished in 15 minutes.
If you have any experience with 3D (animation), video or VFX rendering, you’ll know that this behaviour is not uncommon and that it’s impossible for software to estimate render times because it doesn’t now how complex the next bit will be. I guess that over time, you will gain the experience to somewhat predict how long certain scans will take to process.
But if you have only one computer, it’s certainly wise to do the processing when you don’t need it for a while. Once an algorithm has started, it’s very hard if not impossible to stop it. Trying that made the program crash more than a few times.
Editing
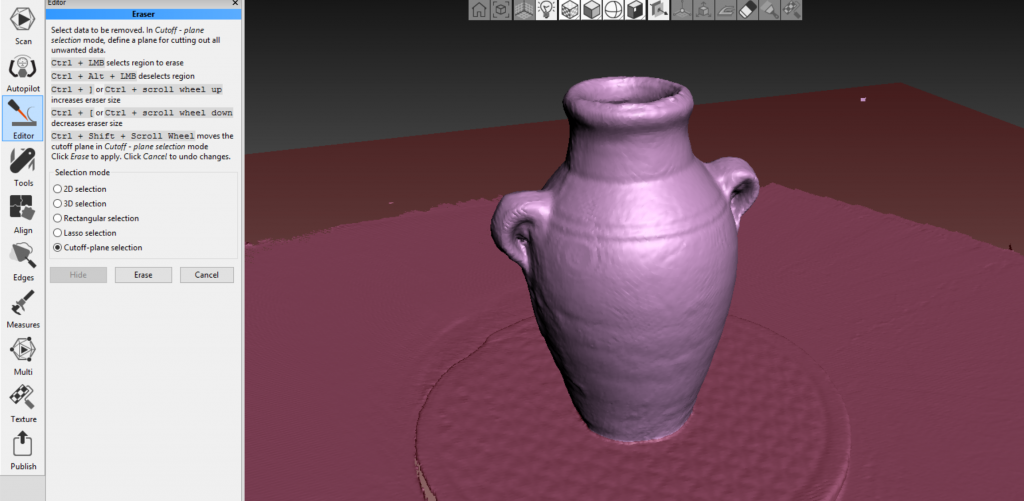
When running Autopilot, the software asks if you want to edit the scan data first. This gives you the opportunity to roughly remove data that you don’t need to have in the final model. This can be the floor or table surface (you can also enable automatic base removal but this has to be done before scanning) or random parts of other objects. Removing this before processing makes it easier and faster for the algorithms to process the data, since they don’t have to take in account stuff you don’t need.
Artec has taken a lot of care of integrating tools to allow people that don’t want to use an external 3D editing programs everything they need to clean up 3D scans
There are a few ways of selecting the areas of the scan you want to delete. You can paint them or select them with a rectangle or lasso selection tool like Photoshop. You can also perform a plane cut to remove any data below a certain level. Handy for removing floors and tables.
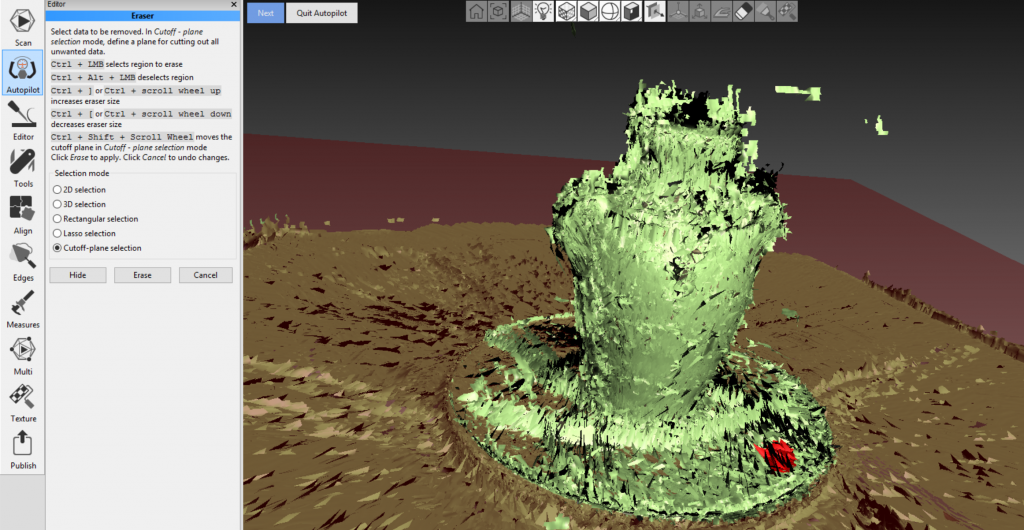
You can also use the editing tools on processed meshes. In some cases it was better to leave some unwanted parts (like the turntable) in the raw scan data because they helped the registration algorithms (these also take color into account, by the way). Then I just deleted the unwanted parts before exporting.
It’s beyond the scope of this review to go into every available tool and feature in Artec Studio 11, but it’s good to know that Artec has taken a lot of care of integrating tools to allow people that don’t want to use an external 3D editing programs everything they need to clean up 3D scans. For instance, there’s a smoothing brush that let’s you interactively smooth geometry similar to applications like ZBrush and MudBox. There are also decimation and remeshing features.
Texturing
Firstly, it’s important to set the correct texture brightness before scanning. This can be done by putting the scanner in preview mode, point it at your subject and move the designated slider until it looks well-exposed. Unlike the EinScan-Pro, the Eva doesn’t have hardware buttons for this so you have to place your laptop or tablet somewhere to adjust the slider while pointing the scanner at the subject.
Artec Studio 11 offers many options for texture mapping. I only used the UV-mapping feature since that’s what I prefer. In Autopilot-mode you can let the software determine the resolution of the texture map automatically or set a preferred size. And you can always manually redo the texture process if you need different settings. In this case, it’s nice that you can tell the software to use the same UV-island layout to save processing time.
In my opinion, the textures generated by Autopilot are too dark so I re-ran the texturing algorithm for every scan I made. This way you get the opportunity to adjust the brightness, contrast, saturation and gamma values before saving the textures. The Eva captures the color data in the form of 24-bit images so there’s a lot of data available for making adjustments without over- or underexposing the texture. The algorithms also corrects the brightness of the separate scans so it’s completely invisible that some areas were scanned at a closer distance than others. This is very impressive and a lot better than the texture maps generated with the EinScan-Pro software that I wasn’t very happy with.
The resolution and sharpness of the textures depend on the physical size of the subject. For large objects and people I think it’s sufficient but depending on the intended purpose you might find the textures of small objects too unsharp. For a human bust scan, I discovered that there was only a slight increase in sharpness between a 1K and a 2K texture map and no visible difference when generating a 4K map. But as far as I know, the only method of capturing very high res textures is with a multi-camera photogrammetry setup.
As a side note, it is possible to disable the LED flash ring on the scanner (the projector will still strobe, though) if you really want to use another light source. You can then set the exposure time for the color capture manually. But I discovered that the longer exposure time needed for continuous light greatly reduces the smoothness of the scanning experience and also made it harder to capture sharp textures. So all my test scans are made with the flash on.
Exporting and Sharing
Like I said earlier, you can export the meshes in many formats. Here’s the full list: OBJ, PLY, WRL, STL, AOP, ASCII, Disney PTEX, E57, XYZRGB. I used OBJ with PNG textures (you can also chose JPG and BMP).
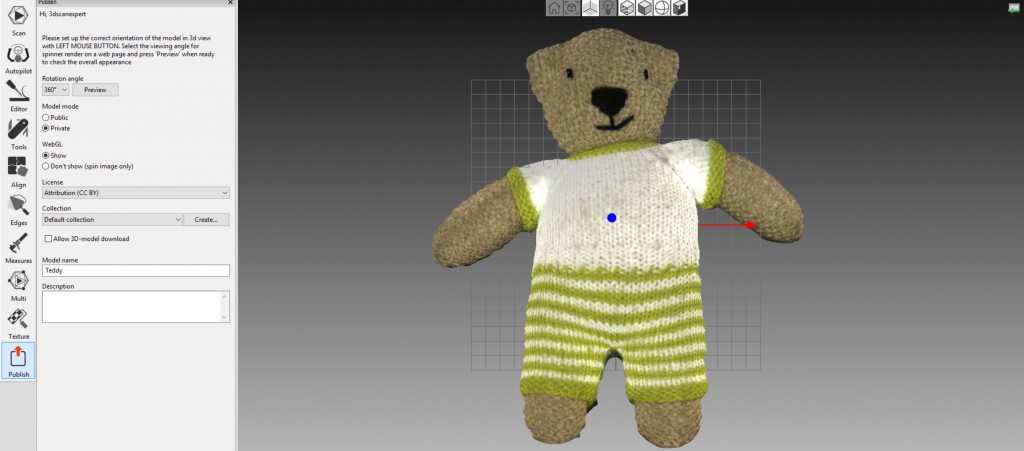
To share your model online, you can export directly to Artec’s own ViewShape community. Unfortunately the software forced me to reduce the polycount before publishing. Here’s an example of Teddy on ViewShape. If you turn off the textures, you will see that the geometry doesn’t seem very good while in reality it was. You can see the unedited result on Sketchfab here. More results — and an analysis of them — in a moment, almost there!
A while ago I wrote about the new Wacom MobileStudio Pro tablets that feature a RealSense 3D camera and Artec Studio 11 Ultimate Software. The introduction animation of that device (which is a great primer for the software in general) seems to implicate that you can also export directly to the popular 3D community Sketchfab, but I couldn’t find that option. I simply uploaded my OBJs to Sketchfab to embed them in this post. Just be sure to create a zip file of each scan containing the OBJ, MTL and JPG or PNG texture files and upload that.
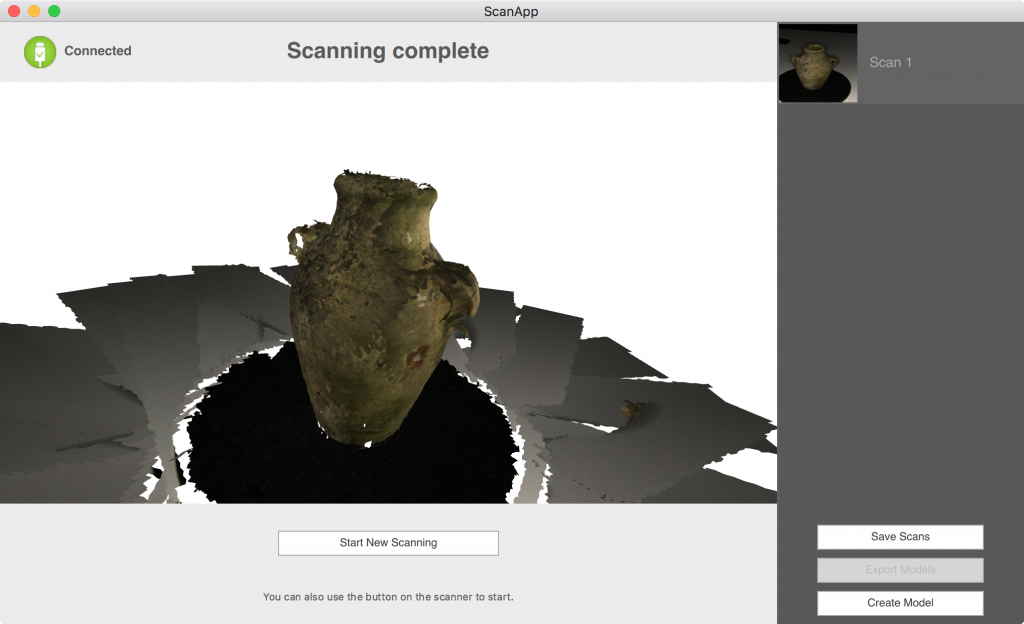
Mac Version
While Studio 11 is a Windows program, Artec has also started the development of a Mac version called ScanApp. It’s currently in beta and as the name implies, it’s a slimmed down version of the Studio software. At the moment it’s a very basic user interface that allows you to make scans and run most of the algorithms Autopilot-style. It works, but because it doesn’t have any editing features at all, it’s hard to say anything useful about it at this point.
Results
You might have expected the results to be scattered around the review like I did with other posts, but in this case I though it was better to save them for last. One reason for this is that some of them might take a while to load because of the many polygons. For that reason most 3D previews won’t work on mobile devices. It’s highly recommended to view them on a desktop computer or laptop.
Comparison to RealSense SR300 and EinScan-Pro
First, let’s take a look at the difference in quality between Real Time Fusion (RFT) and post-processing with Sharp Fusion. For comparison I’ve also added a RTF scan on the same bust made with the Sense 2 (Intel RealSense SR300) depth sensor — directly inside Artec Studio 11 Ultimate. For comparison, I also added the scan I made for my EinScan-Pro Review.
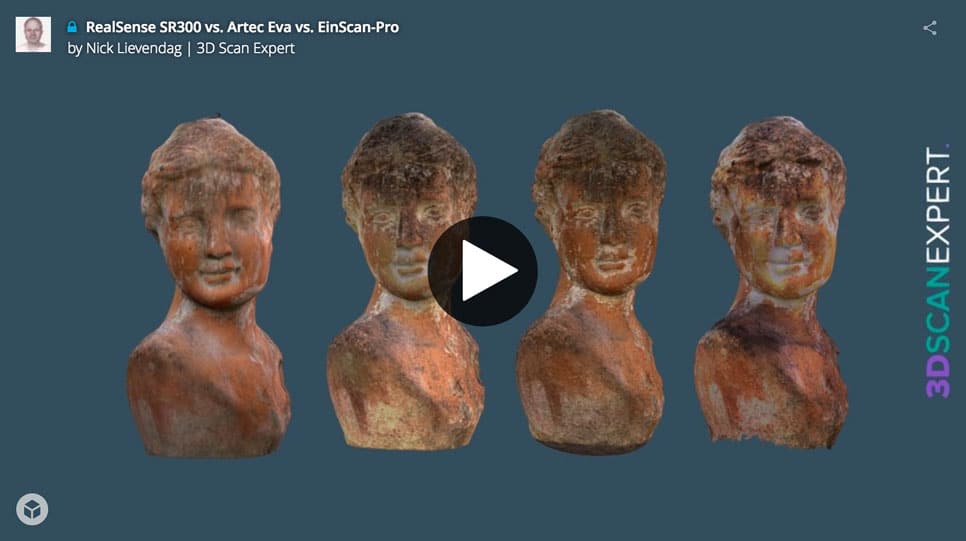
If you switch the render mode of the embed above to MatCap (use the gear icon in the bottom left corner), you can clearly see the difference in geometric quality. Although the RTF scans from the SR300 (first) and Eva (second) both about 600k polygons, there’s a clear difference in detail. The only post-processing used on both models is the texture mapping, which only takes a few minutes. Combined with a scan time of about 3 minutes (I used a manual turntable), the time from start to finish for both models was 10 minutes max, including export to OBJ.
It’s clear that the Eva gives better geometry and better textures compared to the SR300 depth sensor. The texture lighting is different, because I used the Eva’s build in LED flash and had to use a small soft box light setup for the SR300 which has no build-in light.
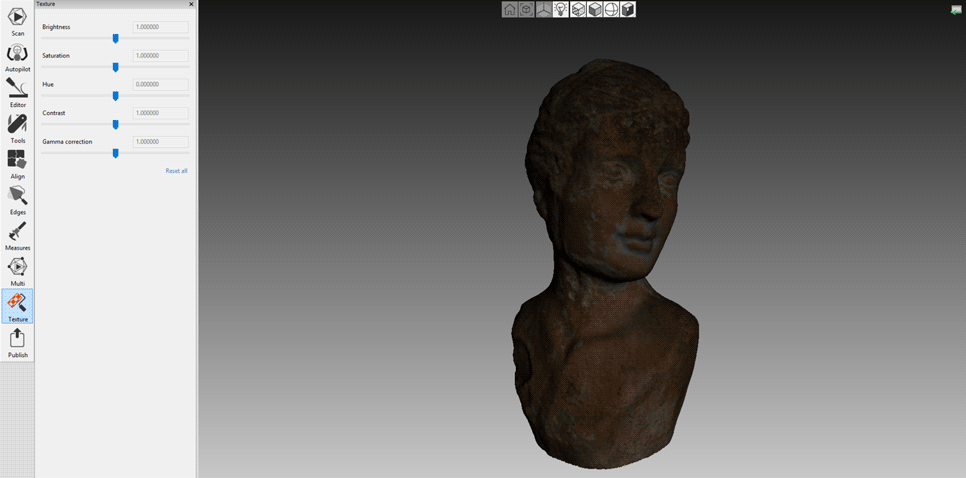
The third bust was processed using Artec Studio 11’s Autopilot feature. It took about 20 minutes on my quad-core i7. It has a polycount of 800k and contains a lot more geometric detail than the RTF scan—you can clearly see the surface imperfections and there’s a lot more definition in the eyes. To me, that difference is worth 20 minutes.
The fourth scan was made with the EinScan-Pro and EinScan software version 1.6.4 (important note: Shining3D recently released version 2.0 which might give different results). It’s important to note that for this scan, the EinScan-Pro was used in Rapid Handheld mode which compares best to the Eva. The polycount of 280,696 is the lowest of the four. The geometric detail is comparable to that of the Eva’s RTF scan, while the Eva’s Sharp Fusion contains a lot more detail in the geometry.
Comparisson to EinScan-Pro in Rapid and Fixed mode
The EinScan-Pro can operate in the Rapid Handheld mode mentioned above, but also in a Fixed Mode mounted on a tripod. Below is a scan of my Old Jar made with the EinScan-Pro in Fixed Mode (left), Rapid Handheld mode at the highest geometry setting (center) and Artec Eva.
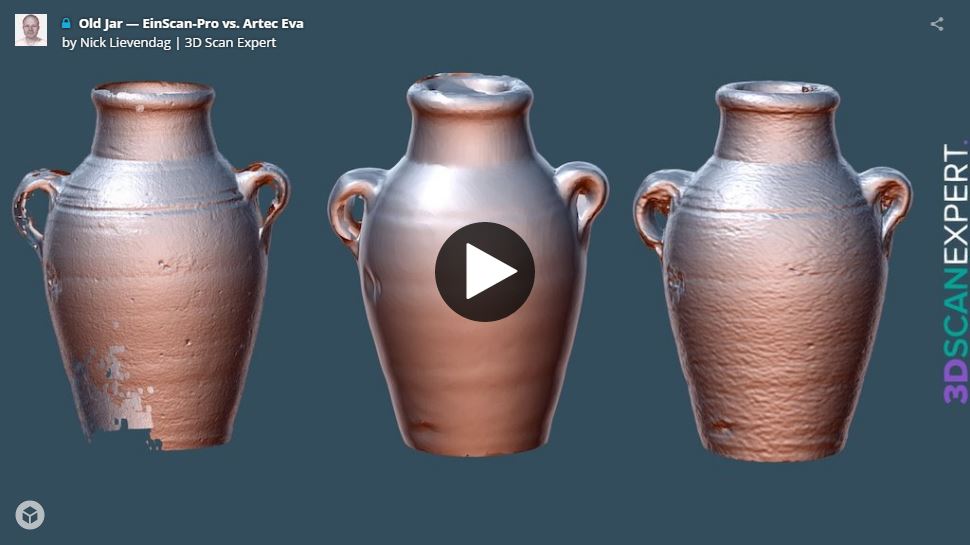
At 1.7 million polygons, the geometric detail in the fixed mode EinScan-Pro model is very high but as you can see the Eva (487,566 polys) also captured many of the imperfections in the old jar. The handheld Rapid EinScan-Pro model in the center is a lot less detailed in comparison — just 75,544 polygons.
For small objects, you’ll need Artec’s Space Spider model.
To compare scans of really small objects, I’ve made a comparison between a scan of a Toddler Sneaker made with the Eva (left) and with the EinScan-Pro (right) in Fixed Mode (mounted on a tripod). I had to decimated the 7 million polygons of the former down to 1.8 to be able to upload it to Sketchfab. The Eva scan is unedited and has 240 thousand polygons.
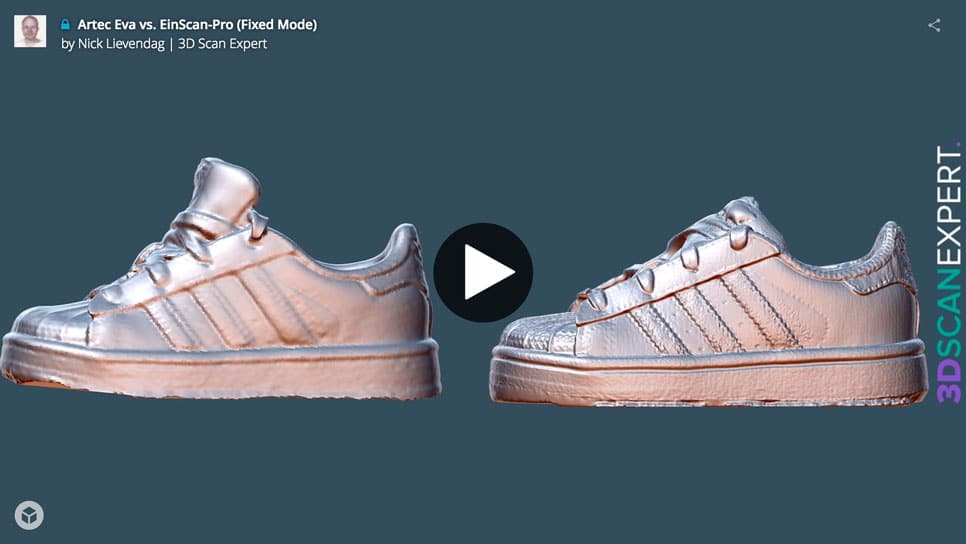
Let’s be clear is that the result of the Eva is still impressive for handheld at 16 frames per second compared to the ~0.5 frames per second of the EinScan-Pro in fixed mode. But it’s clear that if you need extreme geometric details on objects this small, the Eva might not be the ideal scanner.
For small objects, you’ll probably need Artec’s Space Spider model, which offers more accuracy than the Eva. That comes at the cost of a reduced frame rate of 7,5 frames per second. And at a price of €19.700 (you’ll get a €6700 discount if you buy both the Eva and Space Spider, by the way). I’ll review the Space Spider soon. There used to also be a more affordable (non-Space) Spider, but that model has been discontinued.
Real-Time Fusion and Mesh Simplification
The scan below is a 1:1 scale foam head. It’s white, so I didn’t capture textures. From left to right you see the unedited RTF scan (477,151 polygons) the RTF scan ran through mesh simplification (42,036 polygons) and the post-processed Sharp Fusion scan (800,000 polygons).
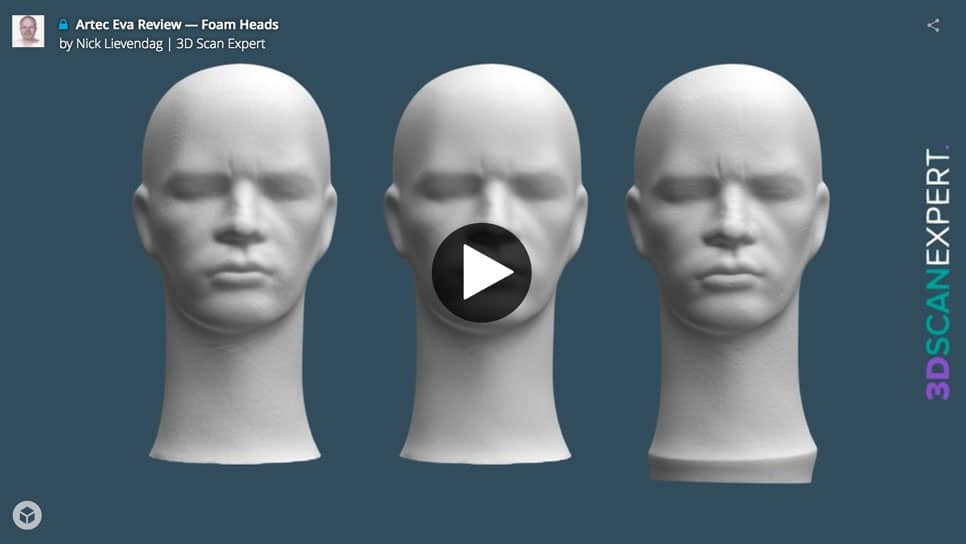
This test makes clear that the mesh simplification algorithm isn’t simply a decimation procedure. It really tries to keep details while reducing the amount of polygons. In this case by more than a factor 10. I lost the foam structure, though. Both the unedited RTF scan and the Sharp Fusion scan do contain the foam structure, but the later is detailed enough to see where the foam head has been glued together in production (the line on the neck under the ear).
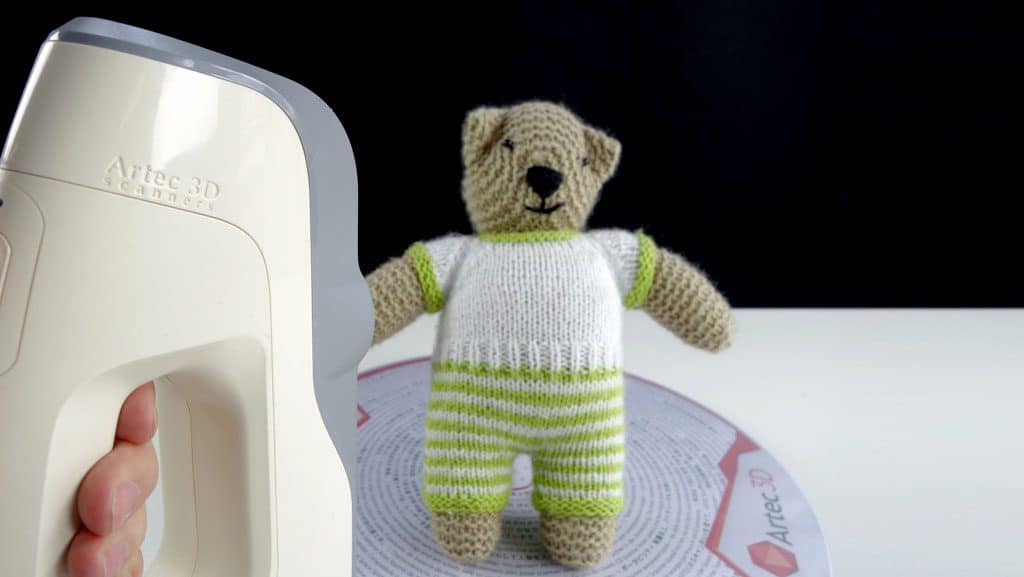
Increasing the Sensitivity
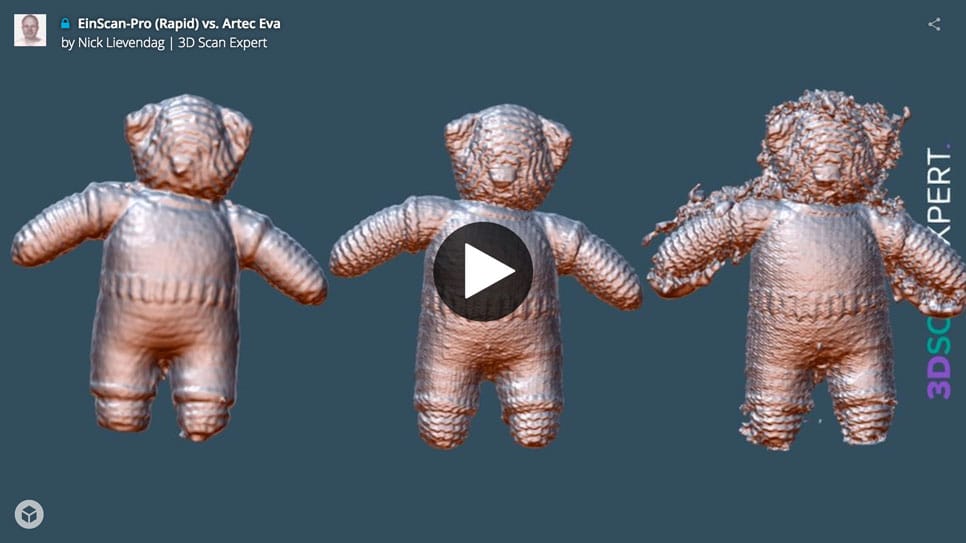
Artec Studio 11 has a slider to increase the sensitivity of the scanner meant for hard-to-scan objects, such as black and dark surfaces. I was curious if it also increased the geometric details, so I scanned Teddy with the default setting and with the slider maxed out. Below you can see that this made the scanner pick up the small hairs from the knitted bear, resulting in a deformed edge on the scan. It didn’t really add any more detail so it’s not worth the reduced user experience of a lower frame rate (it dropped from ~15 to 6-8 fps) for easy-to-scan objects.
Again for comparison, I added the EinScan-Pro (Rapid Handheld) scan which captured less detailed geometry than the Eva.
If you want to see the Teddy scan with textures, click here.
Combining two Scans
I also made a scan of one of my own sneakers, a Supra Ellington. For the example below, I made separate scans of the top and the sole and quickly stuck them together manually in a 3D editing program because I didn’t capture enough overlapping areas to let Artec Studio figure that out. But with better planning and enough overlap between scans, that should be possible.
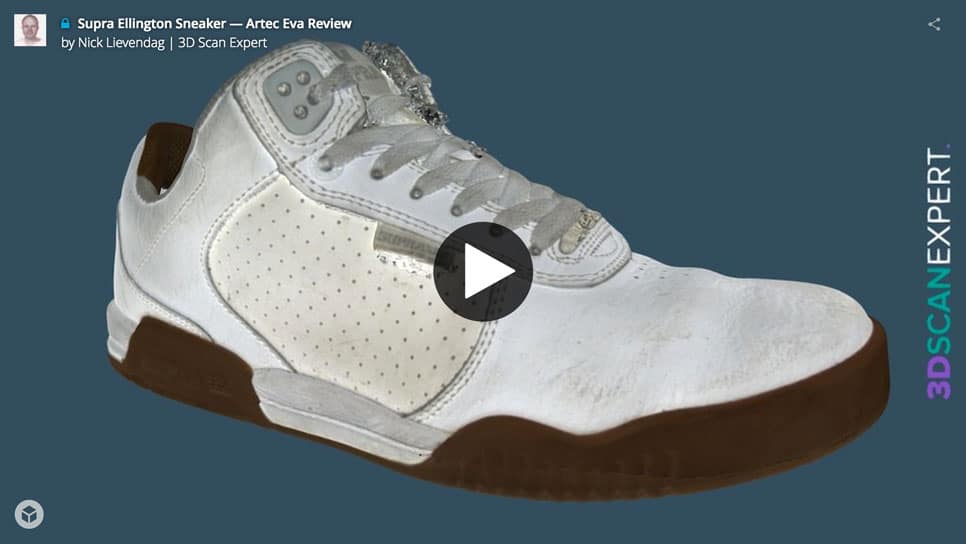
As you can see above. Sneaker-sized scans turn out pretty well with enough geometry and texture details for most purposes.
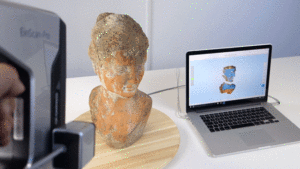
Bust Scanning
Last but not least, I’ve tested the Eva for body scanning. First up is a bust scan of myself. The ease of scanning depends on the characteristics of the person you want to scan. For example, the Eva had trouble scanning my business partner Patrick’s dark hair at the default settings. More about that later. Below is a scan of myself. For comparison, I’ve added the scan made with the EinScan-Pro (in Rapid mode).
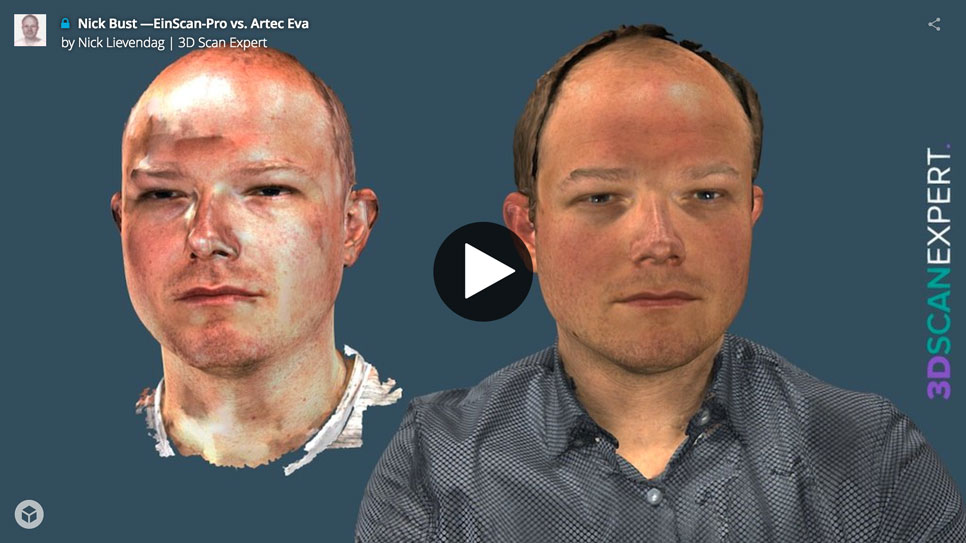
Scanning a person with blond hair — or very little hair at all in my case — is relatively easy with the Eva. For this example I was seated so it was easy for me to keep still and for Patrick to walk around me. Scanning took less than five minutes and processing was done within half an hour.
The first thing you notice is that unlike the EinScan-Pro, we were actually able to do a full 360° bust scan without any problems. Also, the texture is a lot better. Again, I want to note that Shining 3D has released a mayor software improvement since my review, so it could be that these issues are resolved by now by the new software, or maybe by the new EinScan-Pro+ scanner introduced at CES 2017.
Texture quality aside, if you set the render mode of the 3D embed to MatCap you’ll notice that the geometric detail in my face are very — very — similar when you compare both scanners. If you look very closely (for example at the mole on the right side of my jaw) you can see that the Eva captured a bit more detail, but they’re close.
Full Body Scanning
The Artec Eva was also usable to make full body scans. In fact, I know a few companies that use an Eva on a daily basis for making 3D-printed figurines of people. It must be noted that I really missed the battery pack for this because keeping track of the cables took away some focus on the scanning itself. Plus the Eva didn’t like one of Patrick’s medium grey jeans and black sneakers, which meant we had to reschedule his scan.
Also problematic was scanning the top of Patrick’s hair. He’s taller than I am and scanning his dark hair required a relatively straight angle and increasing the Eva’s sensitivity. This resulted in a decreased frame rate and more tracking problems.
To solve this, I chose to do a full body scan of Patrick at the default sensitivity level and a separate scan of his head at a higher setting while he was seated. Combining the two scans in Artec Studio failed because Patrick logically moved his head and face while getting seated, so I combined the two scans in an external 3D editing program. Here’s the result:
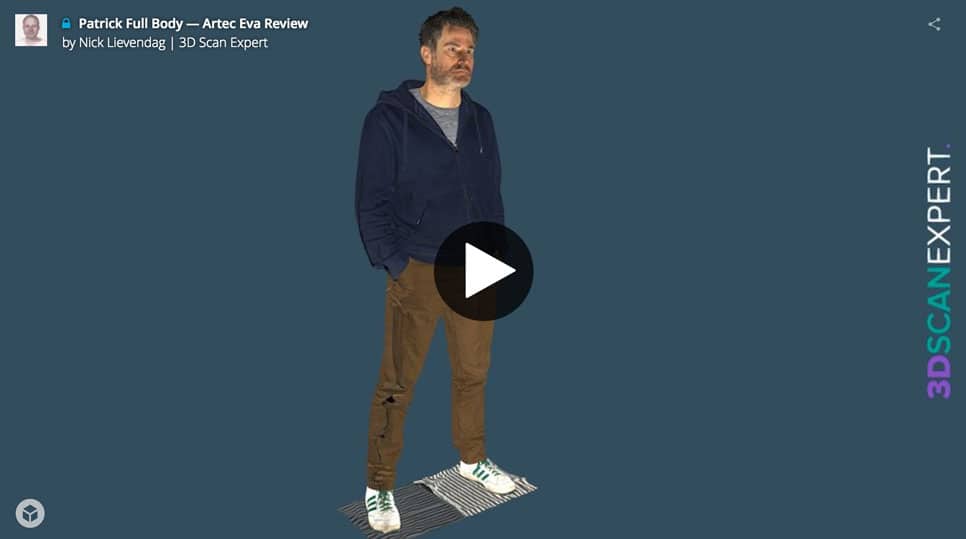
I’m very pleased with the result. The black line in the texture on one of the side is something that can be easily fixed in a texture painting program — even in Photoshop.
One of the sides of the front pocket of Patrick’s hoody seems to be misaligned, possibly because he breathed during scanning. I can’t blame him for that, because a full body scan can take up to 10 minutes, partially depending on clothing colors. And scanning the inside of legs requires a bit of acrobatics with a laptop in one hand and the scanner in the other. Putting some tea towels on our otherwise solid grey studio floor helped a lot for the registration of the lower legs and shoes.
The final example for this review is a full body 3D scan of myself. This is the one where I split one of the scans to re-align part of my legs.
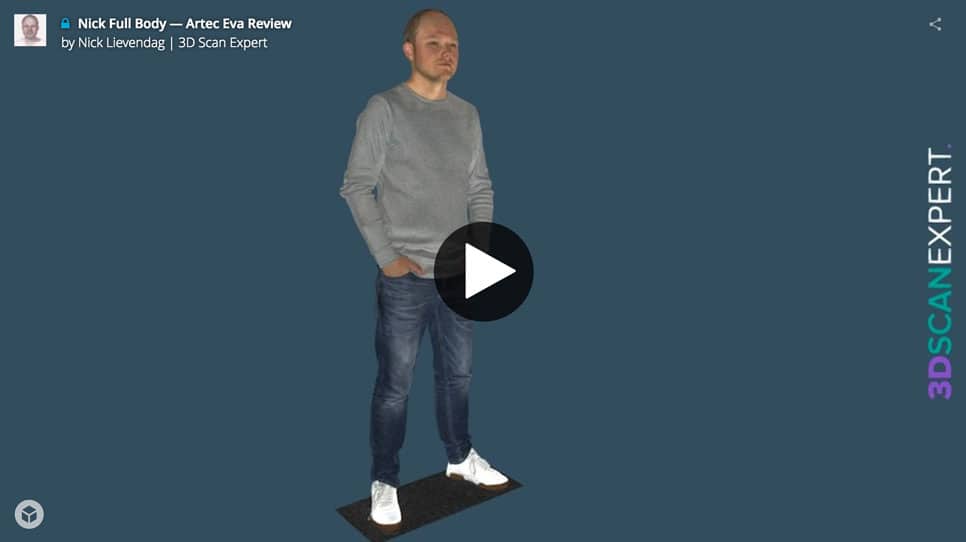
Although the Eva isn’t very gentle of reminding me of where my hair is getting thin (I’m pretty sure there’s still some hair on the top!) I like the result a lot. The geometry is awesomely detailed and the textures are both sharp and very uniformly lit, making it an ideal base for a 3D asset for use in VFX or games.
Verdict
Let’s start by saying that the Artec Eva is the best handheld 3D scanner I’ve tested so far. It offers great geometric detail that’s suitable for a wide range of applications. Geometry and textures might not be detailed enough for very small objects but for everything larger than an adult-size shoe their sufficient for most purposes. The LED flash ring lights the textures uniformly and the software is able to fuse both the geometry and the textures into a seamless and very realistic result.
The hardware is well build and easy to operate. The only thing I didn’t like about it was the standard-issue power adapter brick that drags over the floor when scanning freestyle. A longer power cable or a 2-in-1 power and data cable would have been less messy. For this reason I totally recommend getting the optional battery pack.
The Artec Eva is the best handheld 3D scanner I’ve tested so far.
Scanning at the default sensitivity works great, with good tracking and a relatively fast scanning speed for most objects. Scanning objects on a manual turntable is very easy and anyone would be able to do this perfectly after a few tries. Scanning people requires more training and it’s certainly worth watching the dedicated tutorial video for this. But after learning that some poses and some choices of clothing work better than others, you can capture people impressively.
But the Eva scanner itself is only part of what makes the overall experience great. I’d say that more than half of the experience comes from the excellent Artec Studio 11 software. The Real Time Fusion option greatly enhances the preview while scanning and it also delivers an instant 3D model. That might be lower quality than a post-processed result, but it’s great to have for projects that don’t require extreme detail or when time or budget is tight.
Depending on your computer hardware, post-processing can take a while (anywhere from 20 minutes to a few hours) but the procedure is very streamlined and thanks to the Autopilot feature most algorithms can be batched so you can don’t have to wait behind the screen while your computer is doing the hard work. Autopilot gives great results in 90% of the cases, but it’s nice to be able to also run every algorithm separately and manually fine tune their settings. If you buy this 3D scanner, it’s wise to also buy the fastest PC your budget allows. A faster processor will greatly reduce processing times and the amount of raw scanning data demands a lot of RAM and (external) hard drive space — especially if you want to archive all data.
Compared the the recently introduced — but more affordable — EinScan-Pro, the Eva wins in almost every possible way when comparing them as rapid handheld 3D scanners. However, the EinScan-Pro offers more versatility because it can also operate in a fixed mode with an automatic turntable that enables it to capture small objects with higher accuracy. In the Artec ecosystem, you’ll have to buy a second scanner in the form of the Space Spider to capture small details, but you can use that with the same excellent software.
It’s hard to say anything negative about the Eva — except for the price bump for enabling color capture — but if I had to make a wish list I’d want an even faster frame rate, less-messy cable management and a higher-resolution RGB camera. Artec just unveiled a new mobile 3D scanner with build in screen and processing at CES 2017, so maybe that will make my portability wish come true.
As a final note it’s also good to know that I’ve been in contact with Artec Support a few times with questions regarding both the software and hardware and I always got quick (within one work day) and clear answers. If you’re making an investment like this, good support is worth a lot in my opinion.
If you’re in the market for a versatile, industrial grade handheld 3D scanner and it fits within your budget, I’d highly recommend the Artec Eva.
Like I wrote earlier, I’ll also test Artec’s Space Spider model soon. But next up is a review of the HP/DAVID SLS-3 professional desktop scanner. Follow me on Twitter, Facebook or Instagram for in-between updates.
As always, If you have any questions or remarks, feel free to leave a comment or Tweet. And if you think this review could be useful for your friends or followers, I’d appreciate it if you shared it on your favorite social network.


Hello Nick,
Great review,
I have a question, is a combination of Eva & Artec studio 11 helpful for (beginners) to start a figuring business? Or it will be better to use a 3rd party editing software?
Eva or Scan booth?
Thanks
There’s no short answer to those questions. Please send me an email and I’ll pick it up from there.
Hi,
Very interesting review. I’m looking for a handled scanner for my business. Mostly for outdoor scanning project on construction sites. Did you or will you test the handyscan from Creamform 3d ?
Thank you
Keep in mind that your currently comparing a structured light handheld scanner (Artec Eva) with a laser scanner (Creaform Handyscan) which are totally different technologies. This makes a big difference for scanning outdoors as well.
Please send me an email if your interested in tailored advice about this.
Hi Nick,
I run a University/community makerspace and we are looking for a scanner that will allow us to scan an 8 passenger autonomus bus that our city is purchasing. They want us to produce quality scans that can then be imported into solidworks to create fasten on extras such as bike racks, wheelchair lifts etc.
Do you recommend this scanner for such a project? If there is something that would better suit our needs what would it be?
Please send me an e-mail and I’ll pick it up from there: https://3dmag.com/reviews/contact
hi,
I love your reviews !
i’m planning to buy a 3d scan, i’m struguling between David SLS-3, the EINSCAN-PRO or the Artec Eva.
The object i will most of my time scan will be 1000mm x 1000mm x 300mm, but with some very good details needed and the best mesurment accuaracy possible.
I thought about the Artec Eva but i would like to get your opinion has i’m a newbi into 3d scan but i’m used to 3d cad because it’s my work. (devlopping skydiving equipements, canopies, harness systems…) Thats why scanning the product would be a great way to make them fit better etc…
Thanks for your advises !
Hi nick,
Our business is in motorcycle accessoires and we would like to skip a part of the manual process in forming bodywork (parts). After doing some research and reading various of your reviews I would think the Artec EVA Lite is that suits our needs the most, but I am still a bit in doubt whether a more entry level scanner such as the Einscan Pro would suffice or not.
Should you say that for scanning motorcycles (color not needed) the Artec would be the best option, or would you think cheaper alternatives such as the Einscan or even the Fuel 3d or Sense would work as well?
Thanks!
(PERMISSION OF IMAGE USAGE FOR AN ACADEMIC PURPOSE)
Dear Nick Lievendag,
I am Dr. Fatih VAROL, working as a Dr. at Selçuk University Recreation Management Program in Konya, Türkiye.
Can I use some of the images in your article on this web page, citing your name, in a scientific article I have prepared?
Thanks for your understanding
Sincerely,