HP might be best-known for their printers and computers, but now they’re entering the market of 3D scanning as well. The company started experimenting with this technology back in 2016 when they released the original Sprout all-in-one computer with built-in 3D scanner, which I reviewed a while ago. Recently, they released the Sprout G2, which I’ll review soon.
But while the Sprout line is targeted towards consumers and education, HP took a step into the professional market by acquiring DAVID in 2016. They’ve finished rebranding the product website and software, so it’s the perfect time for an in-depth, hands-on review of what now known as the HP 3D Structured Light Scanner Pro S3 but is better known under its original name: DAVID SLS-3.
I’ll compare this solution to other scanners I’ve reviewed in the past, as well as the Sprout’s internal 3D scanner.
Hardware & Pricing
The SLS-3 single-camera base pack costs $3,995. I’m testing the full pack here, including the Stereo Camera Upgrade Kit and the TT-1 Turntable. Although prices may vary between resellers, this Complete Kit costs around $6950. When you buy it that way, you might get the DSL-1 — or Desk Scan Lever Pro as HP now calls it — for free. For this review, I’m testing with the regular tripod included with the scanner.
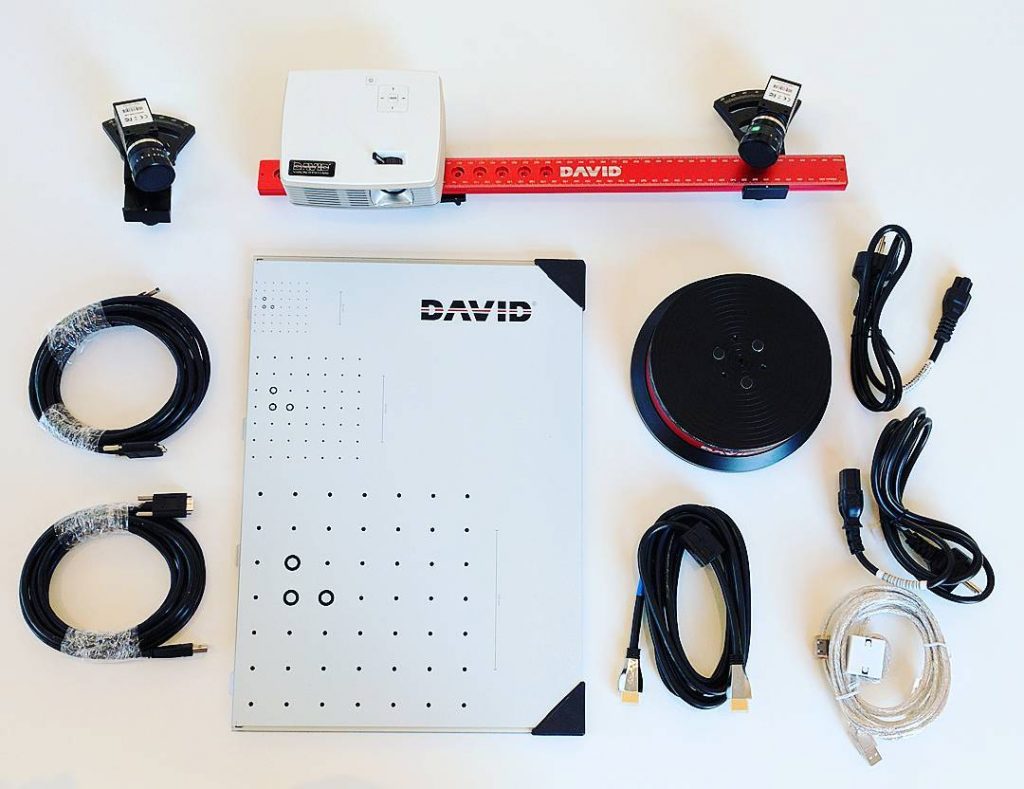
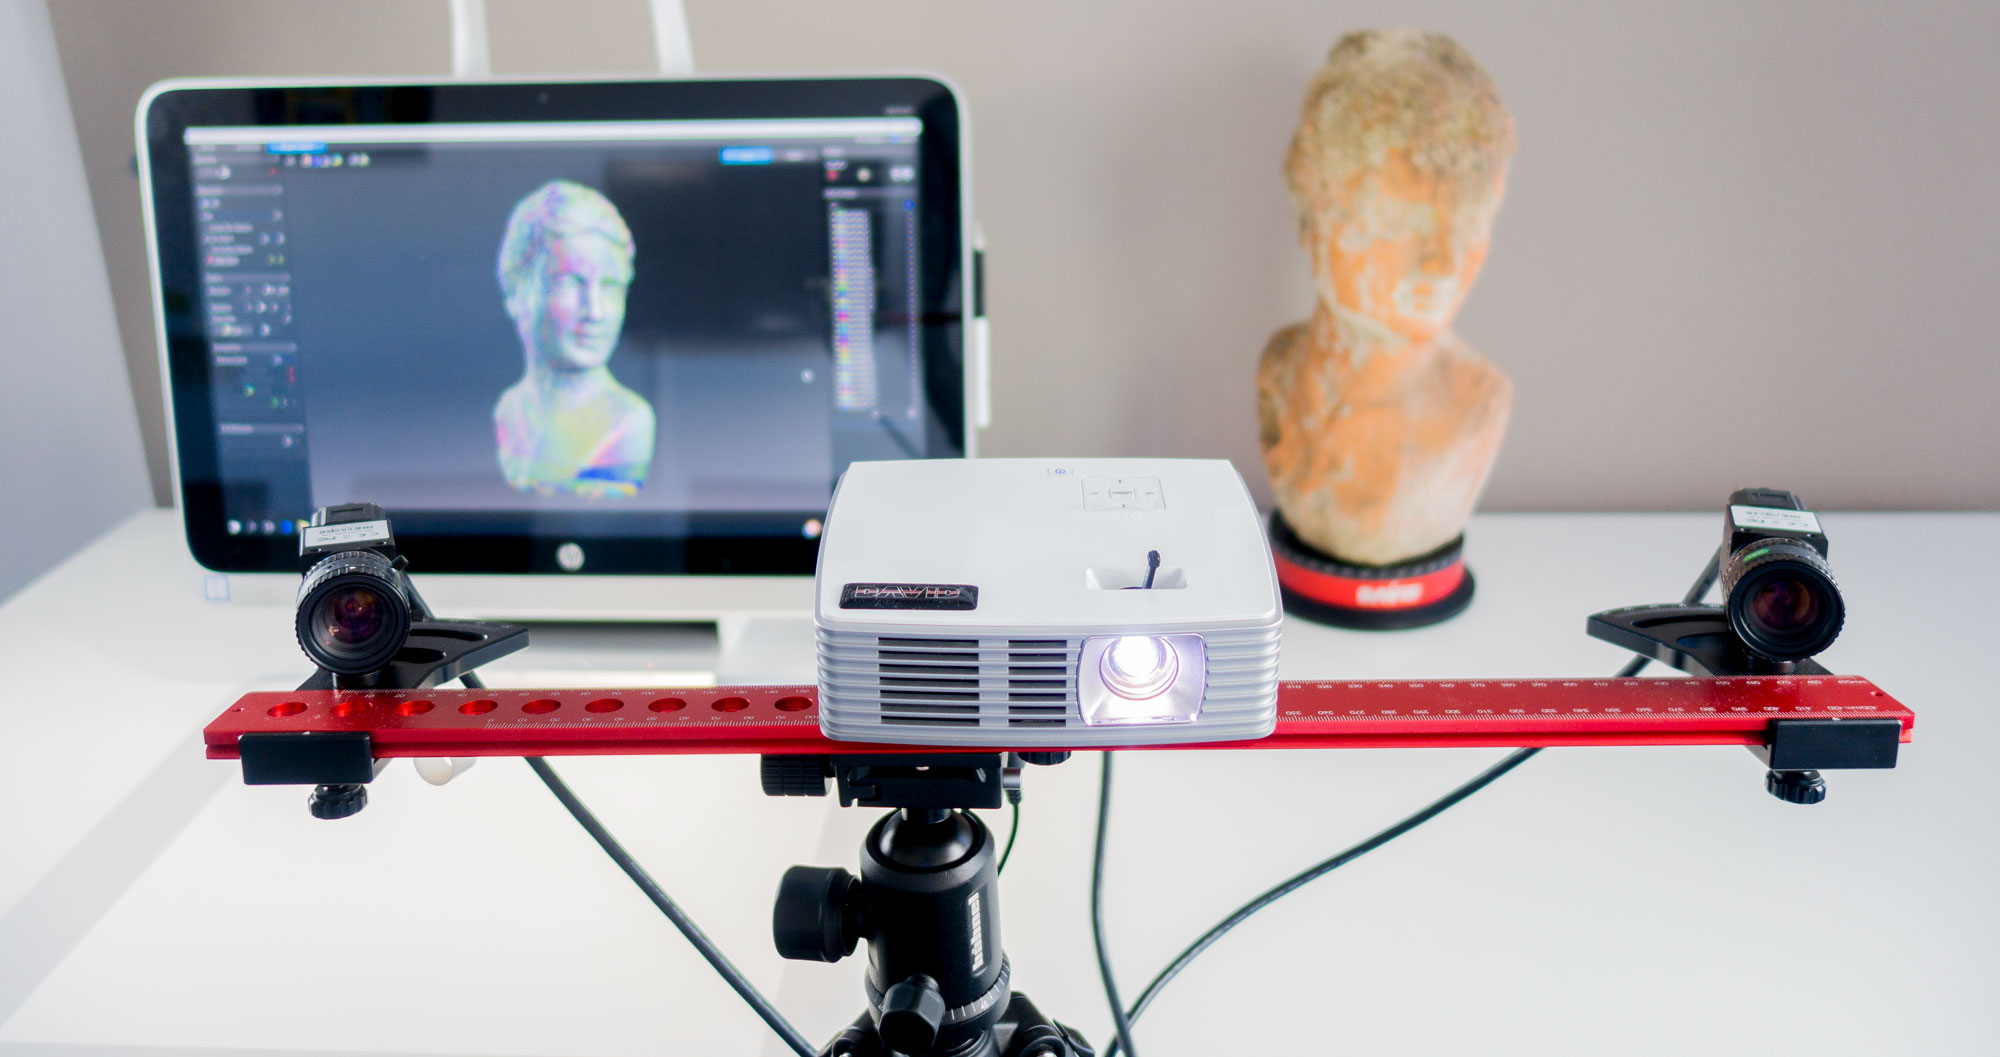
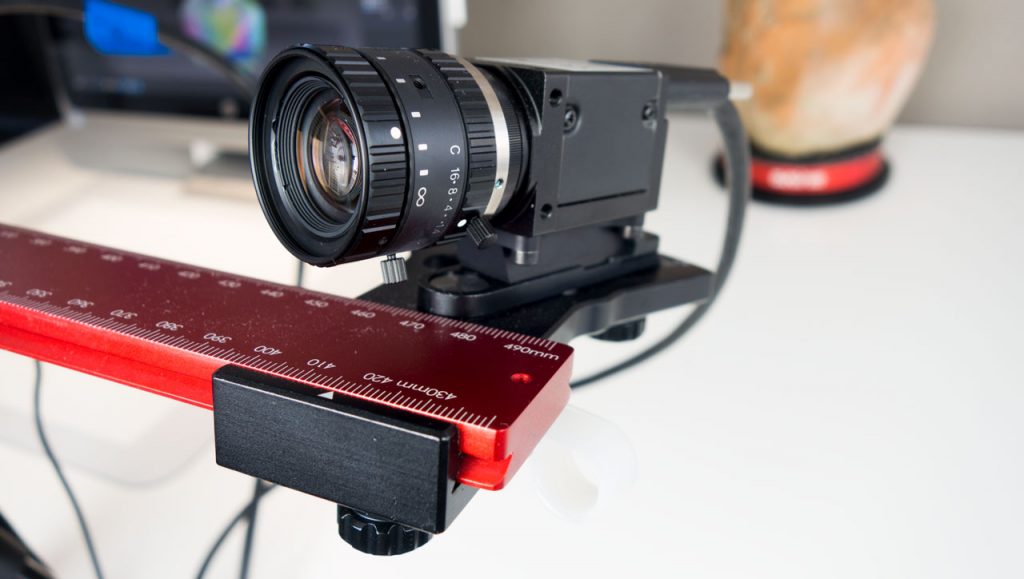
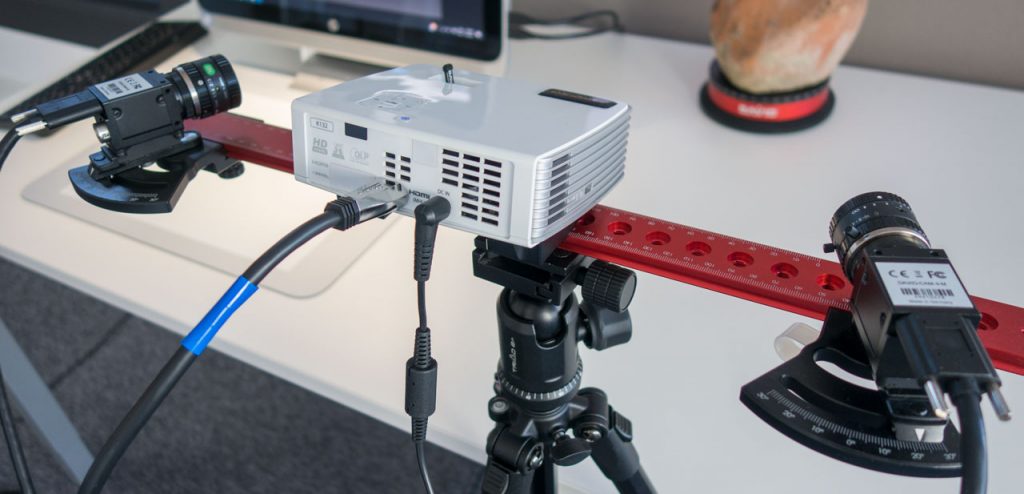
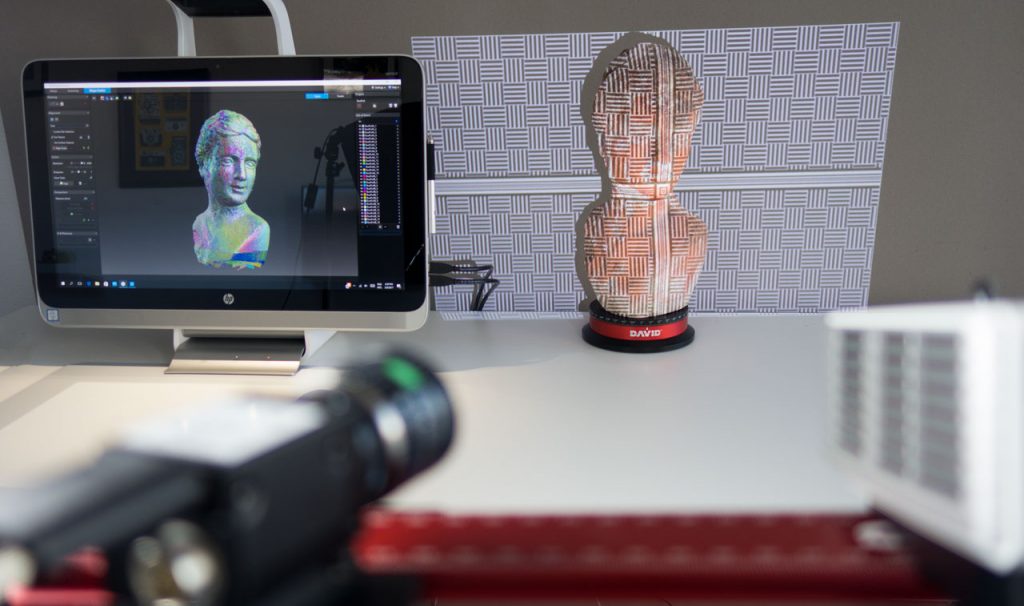
Unlike the Shining3D EinScan-S I reviewed earlier, the SLS-3 is a completely modular system. The base pack comes with the projector (which is actually an Acer K132 HDMI WXGA DLP beamer, but it has seemingly been equipped with a modified lens) and one industrial grade, monochrome HD camera module. Both contain custom mounts that slide onto an aluminum rail. The rail is mounted onto the included tripod. Also included is a huge glass calibration panel which was quickly named “the blast shield” in our studio. More about it later.
The whole contraption might be a bit daunting if you have no experience with this kind of hardware.
The whole contraption might be a bit daunting if you have no experience with this kind of hardware. Mainly because there are so many different components, including 2 power adapters (for the turntable and the beamer), an HDMI cable and no less than 3 USB cables. In total you need 4 free USB ports, because you also need to insert a USB dongle to run the software. And the two USB ports that connect the cameras must be USB 3.0 ports.
I’m testing the SLS-3 with the original HP Sprout and it uses all available ports, including the two USB 3.0 ports on the side of the screen. Of course, this scanner works with every PC that meets the system requirements. Apart from the USB ports, the software greatly benefits from a fast processor and lots or RAM.
Competition
So the full SLS-3 Kit is $6950. For comparison: You can get an EinScan-S for $1299 including tripod and turntable (or just $999 with turntable and fixed mount) and the EinScan-Pro is $5399 for the full pack with color module and turntable — about $1500 less than the SLS-3 — and can also function as a handheld scanner. However, both EinScan scanners have fixed cameras whereas the SLS-3’s cameras have a higher resolution, manual focus and exposure, and can be positioned and rotated freely on the rail. This makes for a single-scan size up to 50 cm while that of the EinScan-Pro maxes out at 20 cm.
It’s also worth looking at the new €2390 Scan in a Box product that offers similar flexibility as the SLS-3 but can’t be ordered with an automatic turntable. I can’t say anything about the scan quality and user experience of that product, but I’ll test it later this year. In the end, the quality of structured light scanning greatly depends on the cameras that are used and the ones on the SLS-3 are very high-end.
Software
I did all tests for this review with HP 3D Scan Pro 5.1.0. Before that, it was called DAVID V5. With the rebranding, HP changed a few of the red interface colors to blue. This makes the software a little more friendly looking, but it’s still an application that requires research before getting started.

The manual is extremely sparse and the interface includes no welcome screen with tutorials. I had to watch this 4-part video tutorial series from a DAVID reseller on YouTube to get started and advice everyone to do the same.
This is a big difference with HP’s 3D Scanning software on the first generation Sprout Pro (Review) that guides the user through the structured light scanning process through a series of clearly explained steps. The downside of the easy-to-use Sprout software is that doesn’t offer any control over the process at all. I’m hoping that future versions of HP’s 3D scanning software — or the software on the Sprout G2 — will be the best of both worlds.
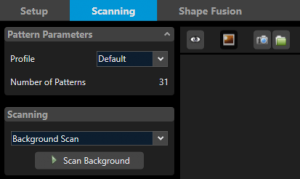
Basically the HP 3D Scan Pro software has 3 screens: Setup, Scanning and Shape Fusion. Let’s look at them one by one.
Setup
Setup let’s you check if all components are working and perform calibration. Basically, you’ll have to re-calibrate the system every time you change the position and/or rotation of the cameras on the rail. In reality, you’ll do that every time you want to scan an object in a different size range.
If you want to capture color textures, keep in mind that the calibration also sets the white balance for the specific distance. So in that case you have to re-calibrate if the distance between the object and the scanner changes significantly.
I found the whole calibration procedure quite a hassle.
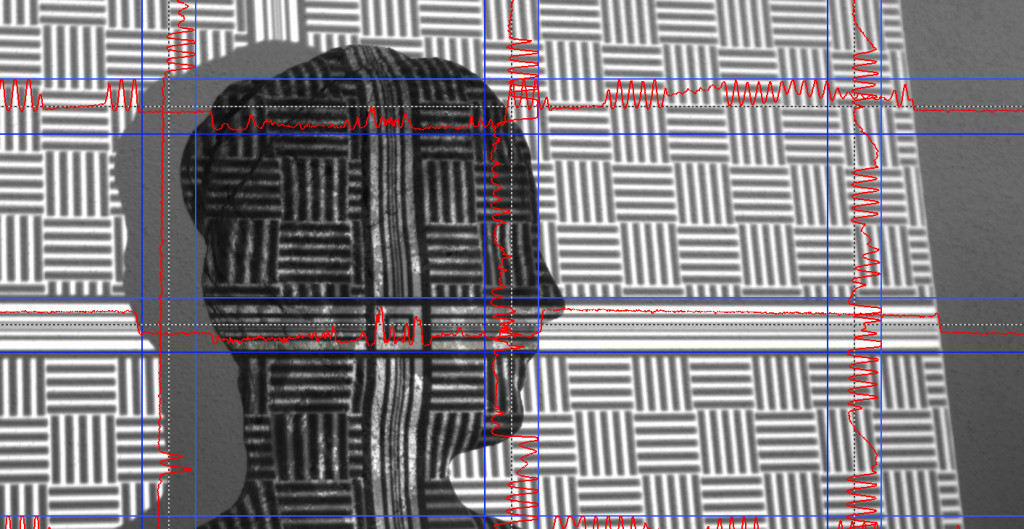
To calibrate, you’ll first put the object you want to scan in front of the cameras and move the cameras until both can see the object. It’s important to keep the angles of the cameras at 22 degrees or higher for best results. Then you’ll have to focus the projector and dial in the aperture and focus on both cameras separately. The red graph lines in the viewport overlays indicate if areas are over-exposed. You have to pay attention not to let the graphs be clipped.
Then you have to remove the object and put the calibration board in the place of the object. This contains a pattern at multiple sizes (a very big one is on the back). You’ll have to rotate the rail to point the cameras at the pattern that would fit the object and perform calibration. For best results (especially the texture white balance) you have to put the boards fold at the location of the object, so you’ll have to move the turntable as well.
While it get’s easier after a while, I found the whole calibration procedure quite a hassle, especially because only a huge (like 2 A3-sized sheets of paper kind of huge) calibration board is included. If you just want to scan small objects (and many people will) this makes no sense at all. In my opinion it would have been better if a smaller calibration board — that would fit onto the turntable like that of the EinScan scanners — was also supplied.
Scanning
Let’s start with the fact that I’m only scanning with two cameras and the automatic turntable for this review. Structured Light Scanning with just one camera is possible, but in general I believe that for professional results you should always use two cameras for accuracy.
You can also rotate objects manually or use a manual turntable but keep in mind that you’ll need a lot of separate scans for good results. Depending on the object, I advice at least 16-24 scans for a 360 degrees scan. And for most objects, you’ll need to do that twice at different heights and angles so the scanner can see every spot on the object. Just get the automatic turntable.
Before scanning, it’s good practice to perform a background scan first, especially if you’re scanning close to a wall or at a down-facing angle. The background data is stored and can be automatically removed from the scan data.
Using the turntable, you can set as many scans as you want. The beamer will project a series of structured light patterns (of which some are apparently patented and unique to the SLS-3) onto the object, followed by red, blue and green frames to capture colors with its monochrome cameras. The EinScan-S uses the same method for color capture but the SLS-3 delivers vastly better color textures.
When reviewing the EinScan-Pro, I liked the fact that it has a tracking pattern on the turntable and that the software is actually aware of its presence. This is not true with the SLS-3. After each separate scan, it will run registration algorithms to align it with the previous scan. And although the software knows how many degrees of rotation are performed it can sometimes mis-align separate scans completely. And if you perform two cycles at different angles, it will not automatically align the second cycle with the first. Luckily, this can all be done afterwards.
The EinScan-S uses the same method for color capture but the SLS-3 delivers vastly better color textures.
If you do plan on capturing multiple cycles, note that you can set the scan base name before starting. You can also reset the counter. This way you can name your scans Cycle1_## and Cycle2_##. Without this, it’s pretty hard to keep them apart in the next step.
Editing
The last screen contains all editing features in panels on the left and all scan data on the right.

The first panel on the left contains simple tools to select and remove any unwanted scan data. This let’s you easily remove geometry that’s not part of the object. Unfortunately, there’s no plane-cutting tool like the Artec Studio software that comes with the Artec Eva I reviewed recently has.
There are many alignment options. It’s good to know that by default, all scan data will be treated as separate scans. If you have captured multiple cycles, it can be handy to combine the scans of each one into a group. This group will be treated as a single scan for alignment. You can release the group into separate scans again at any time for finer registration if needed.
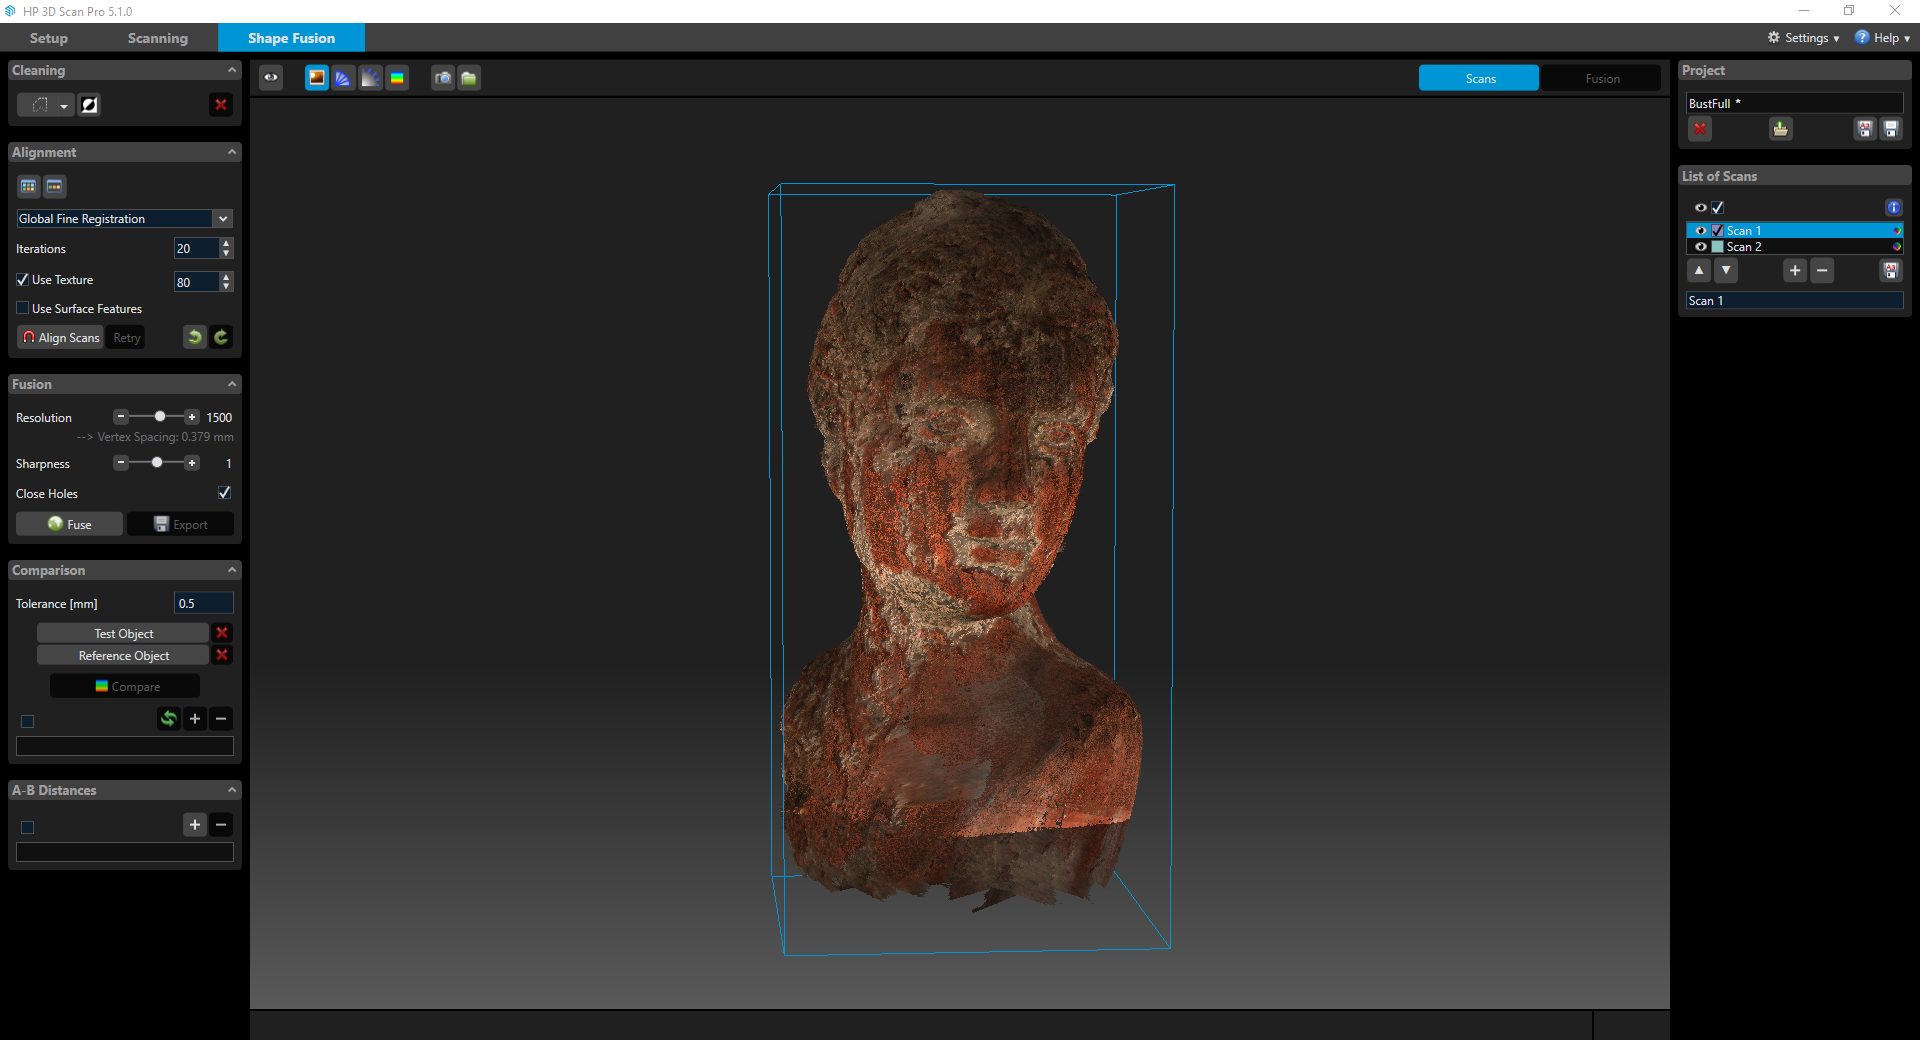
Free alignment let you align two scans (or two groups of combined scans) it works very well and relatively quick if you just use the texture data. You can also use the geometry for automatic alignment, but this takes a bit longer. You can also help alignment by selecting matching points, although I never had problems with the automatic algorithms in my tests. Once everything is aligned, it’s good practice to run the Global Fine Registration algorithm once before fusion.
Fusion
Fusion is the process of converting the raw scan data into a geometric mesh that can be exported. There aren’t a lot of settings here. The resolution determines the point-cloud-to-mesh accuracy and thus the polycount of the result. Sharpness can best be compared to a sharpening filter on photos: it can make details crisper, but at the cost of adding more noise.

The standard resolution setting of 1500 already delivers very usable results, especially for medium to large objects. Fusion is done purely on the CPU and pushing it beyond 2000 can take a lot of time, even on the Sprout’s 6th gen i7 processor. Depending on the amount of scans, it sometimes took an hour or more. And because fusion uses all available resources it can make your PC unusable for doing anything else in the meantime. In fact, it’s better not to touch the computer at all and turn off screen savers while fusing, because the software isn’t totally stable when doing this. This could be caused by the fact that the Sprout I’m using only has 8GB of RAM.
Fusion uses all available resources and can make your PC unusable for doing anything else.
The progress indicator is the worst I’ve ever seen in any kind of rendering software (and I’ve used a lot). It’s just a blue bar and it’s unclear where the end will be. There’s no percentage or time indicator and no visible log. The indicator sometimes jumps in quite big steps so it’s unclear if it’s still doing anything. Sometimes it isn’t because the program or the system has crashed without any indication. There’s also no sound notification when it’s done, so I had to walk to the Sprout all the time to check the status. This is just incredibly unfriendly to users. “Pro” software should give more and better feedback, period.
Another big miss in the software is control over hole-filling — it’s just a checkbox. A size threshold for hole filling would be the least to have, because structured light scanning will almost always leave a few small holes in a model that can fixed with a quick fill. If you’re not doing a full 360, the software also try to fill large holes or the one left by the floor plane. And it will only do rounded fills which is bad news if you want make a 3D print of it.
Exporting
After fusion, you’ll can check the results with or without textures. I discovered that when I combined multiple cycles, the software wouldn’t display the texture in the end result but it did get exported. Probably a bug.
Textures are just a series of photos with odd resolutions — very inefficient.
Exporting can be done to .OBJ, .PLY, .STL formats. Not a lot to choose from, but enough for most external software. I exported all test scans as .OBJ. Keep in mind that polycounts can easily go into the millions and file sizes into the gigabytes.
Unfortunately the software has no post-fusion mesh optimization, smoothing or decimation features. This is a big miss for professionals that want to export models for certain target purposes.
The textures are quite good resolution-wise but will always be exported as .PNG files so it doesn’t suffer from compression artefacts. The software doesn’t offer any features for texture editing, color correction or mapping them into islands. Textures are just a series of photos with odd resolutions — very inefficient and not really usable in a production or development pipeline. A lot of room for improvement there.
Results
Here are a few of the scans I made for this review, including comparisons with those from other scanners. It must be said that because of the many manual settings that have to be done on the SLS-3 it’s hard to rule out human influence on the scan results. Some scans might be improved with more time and experimentation.
Notice: The Sketchfab 3D embeds below are unedited 3D scans meaning they are very complex, have very large file sizes (up to hundreds of MBs) — so not mobile-optimized.
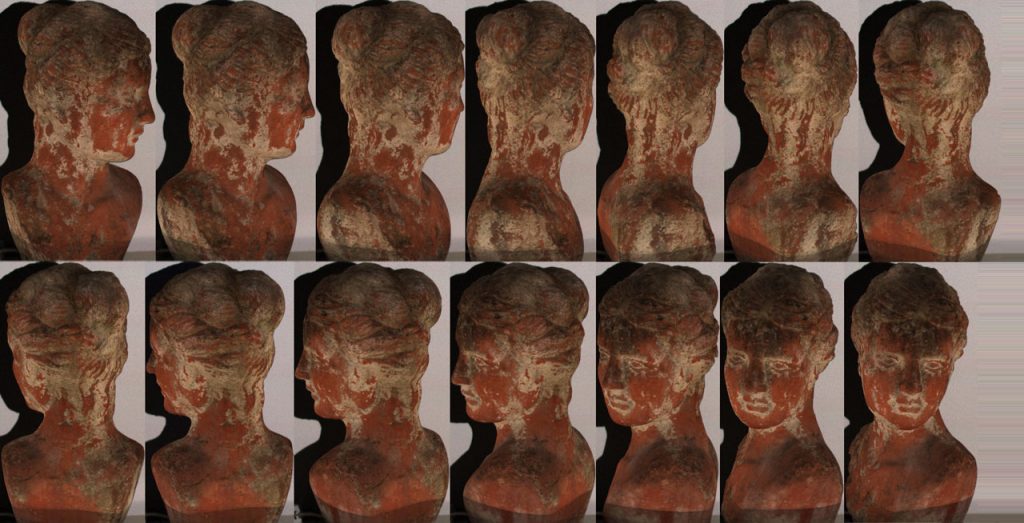
Let’s start with the bust:
The texture isn’t very bright, but that could be fixed in Photoshop. Sharpness-wise it’s okay. But I guess most people interested in structured light scanning are after very high geometric accuracy, not texture quality. I processed this scan at the default resolution setting of 1500, meaning a vertex spacing of 0.379 mm. If you set the rendering mode of the embed in MatCap mode (using the gear icon in the bottom right corner) you can see that the SLS-3 captured a lot of detail. With a polycount of 6.5 million this is already impressive. And keep in mind that you can push the processing resolution to 4000. That did crash my system.
For good comparison I (finally) made a graphic featuring different scanning methods:
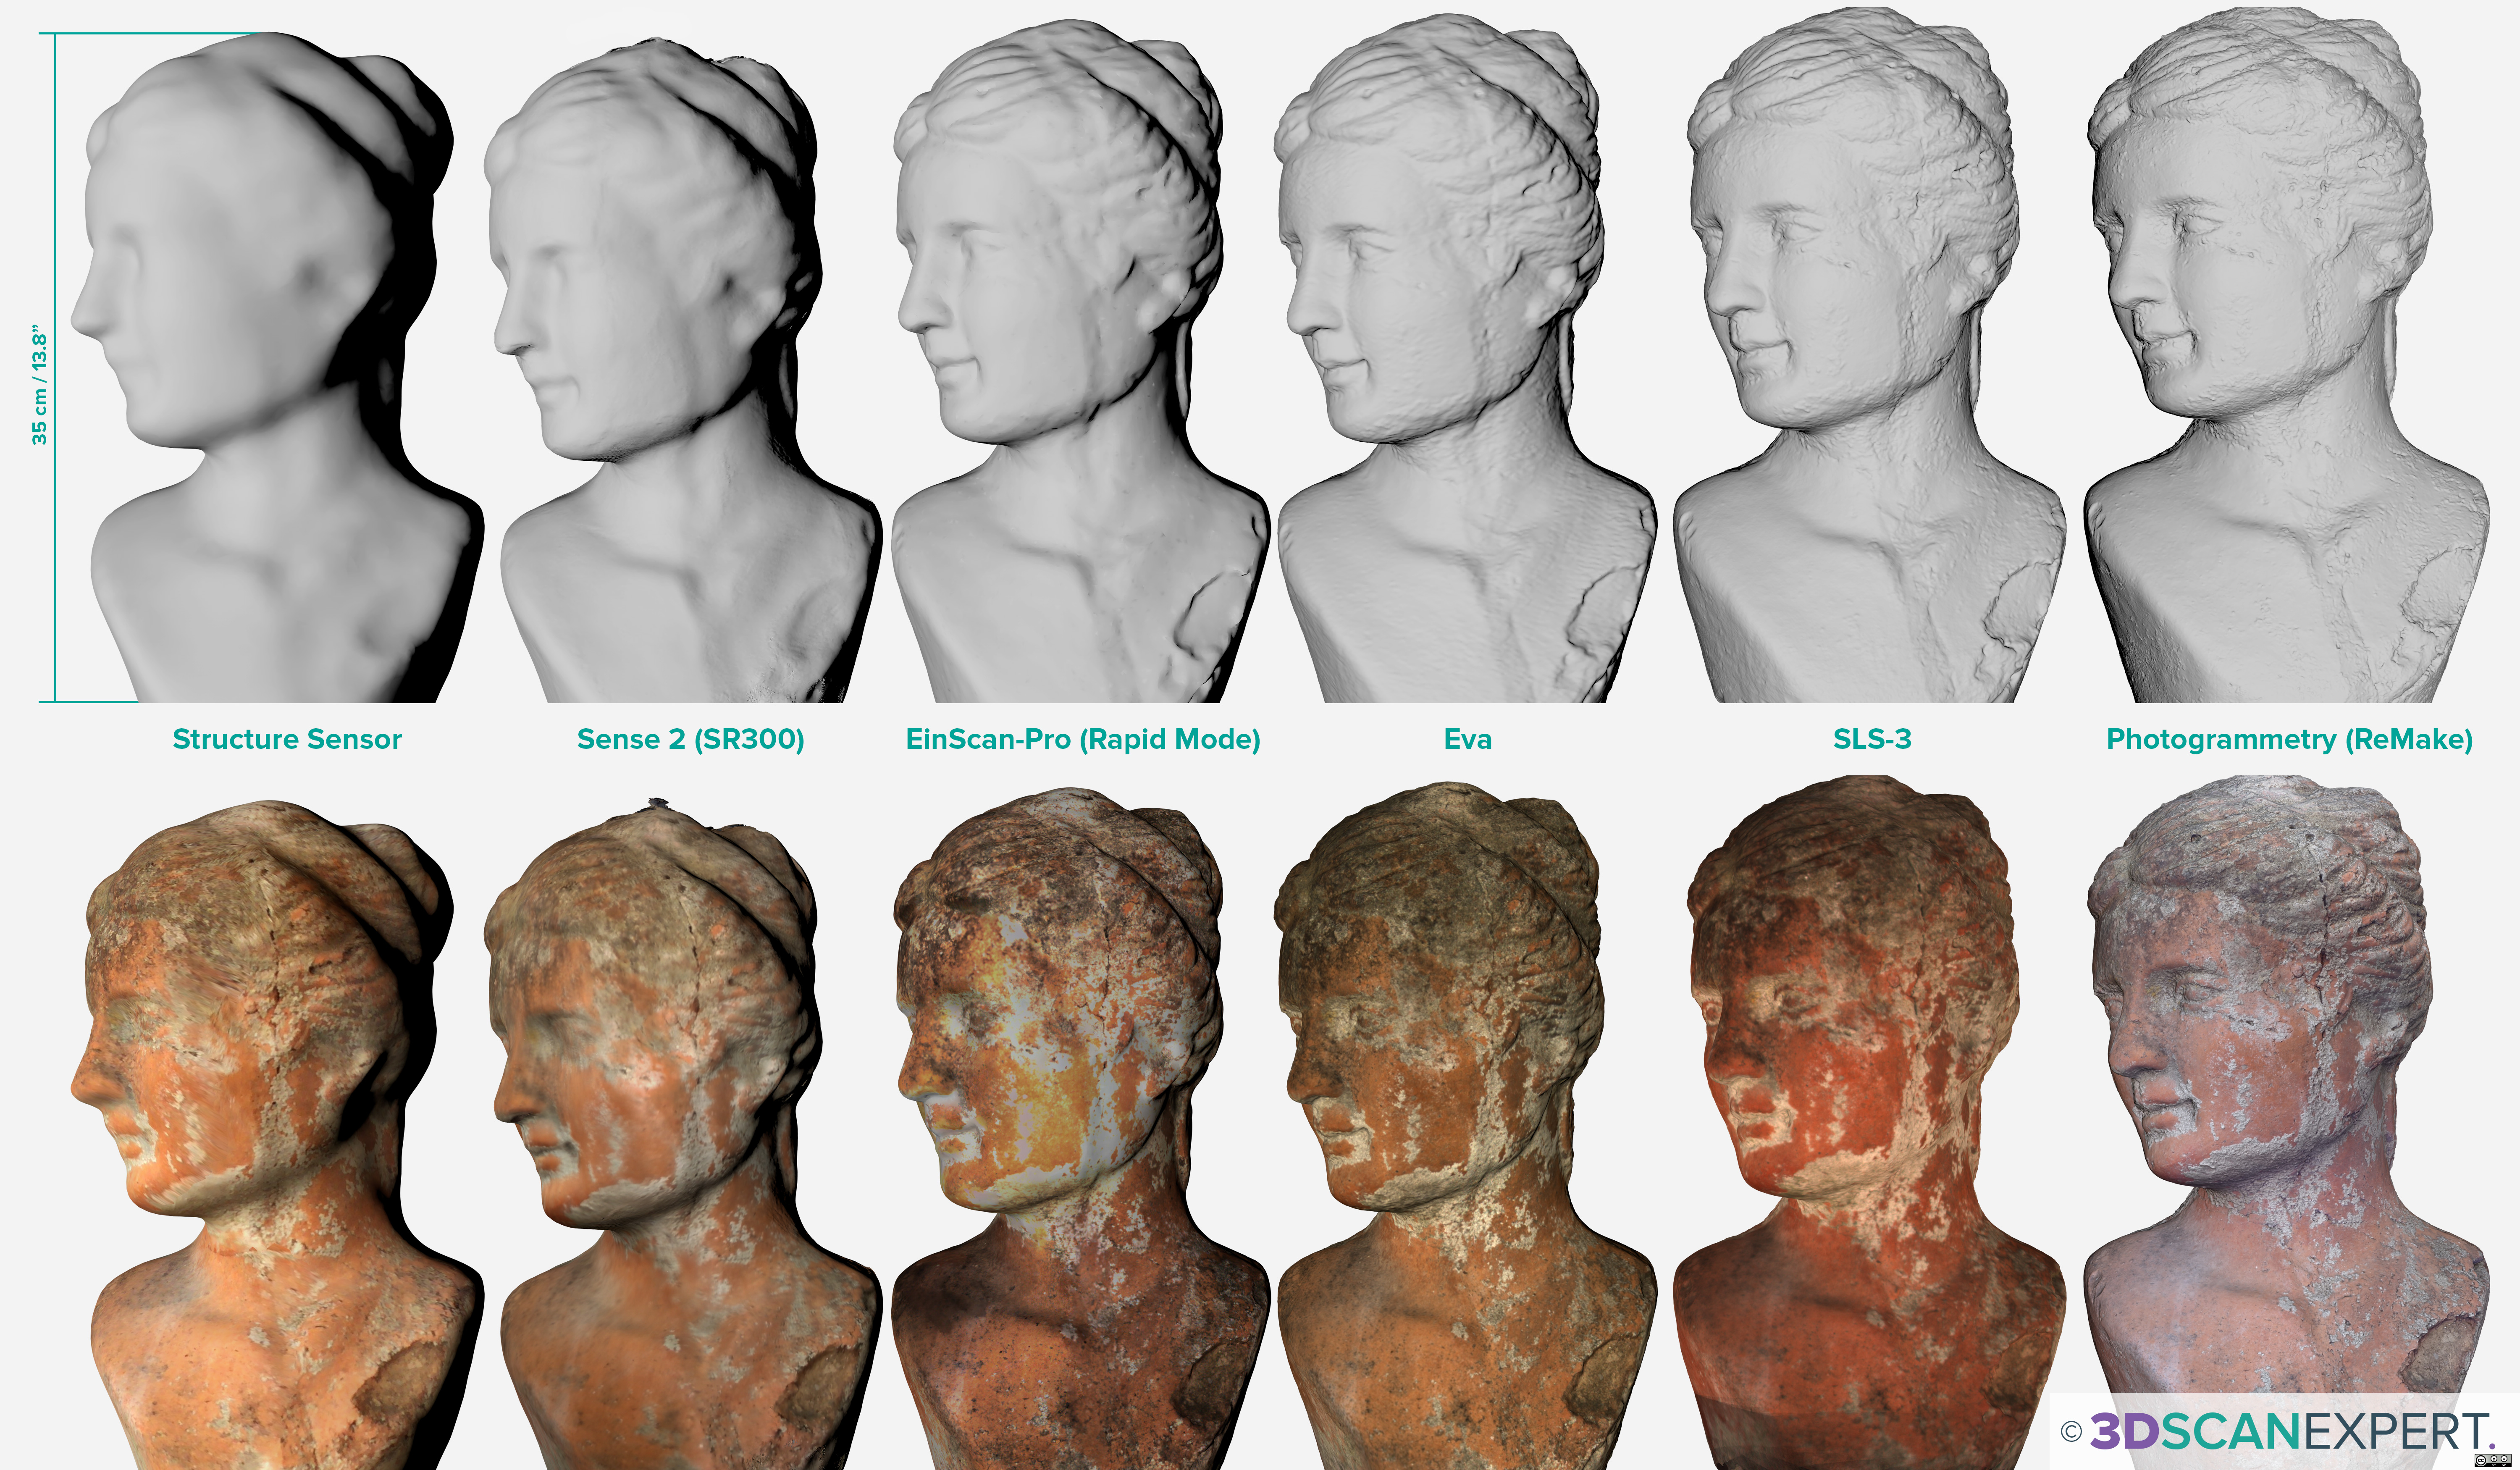
From the image above I conclude that the SLS-3 captures more details than the two professional (more expensive) handheld scanners I’ve tested. But it’s noteworthy that it’s very close to the result of a Photogrammetry capture I made with my $500 Sony camera and the $30/month Autodesk ReMake software. And the texture on the latter is a lot better.
Processed Resolution Comparison
Below you see the same scan data processed at a Resolution of 2000 and the maximum of 4000 (both with the default Sharpness of 1). It was one of the few models that didn’t crash the Sprout during that last process. The first one was processed in under an hour. I didn’t check how long the second took exactly, but it was multiple hours. They’re 13 million (1GB .OBJ) and 29 million polygons (2.3GB .OBJ) respectively.
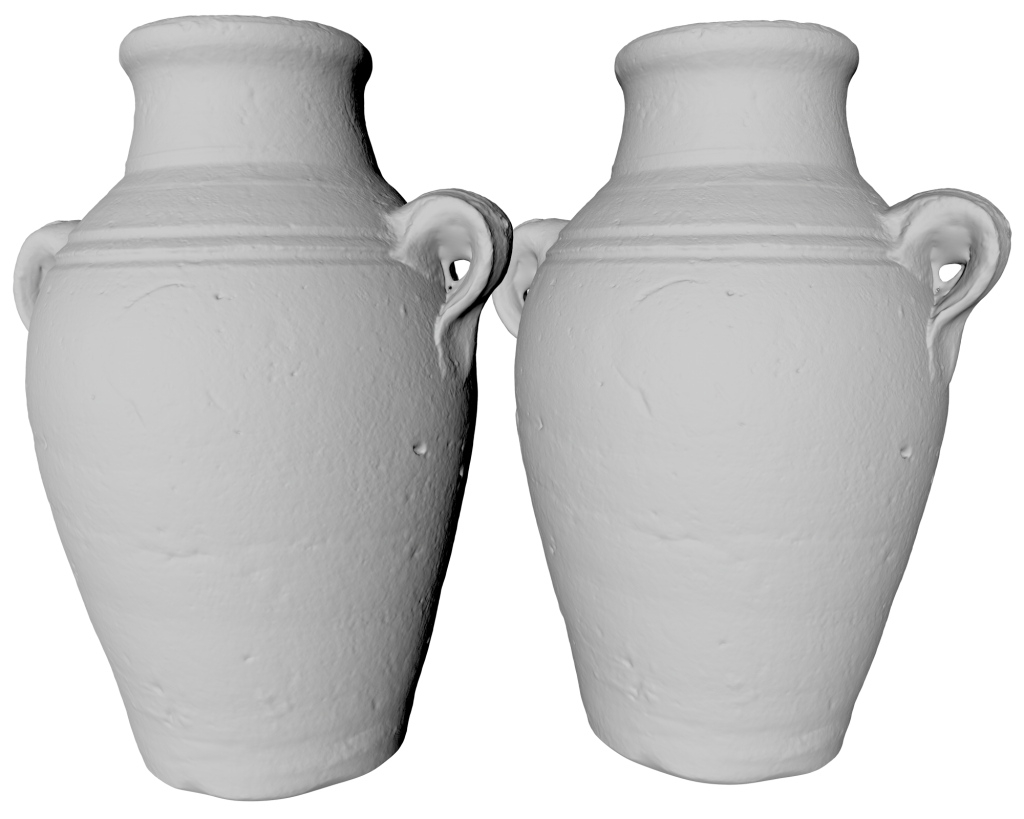
To me, and for my purposes, they are identical — especially for an object of this size (18 cm tall). Sure, if you zoom in (on the actual model) you will probably notice that the details on the right model are slightly sharper. But none of my PC’s could handle the second file very well. Loading it into Cinema 4D to make the render even took half an hour.
Comparison to first gen Sprout
I also thought it was fun to compare the HP’s professional 3D scanner to the built-in structured light scanner of the first generation HP Sprout. I chose the 12 cm wide wooden Buddha hanger. Both scans are made on laying flat on the turntable (the TT-1 and Sprout Capture Stage respectively) with the cameras facing down at a comparable angle.
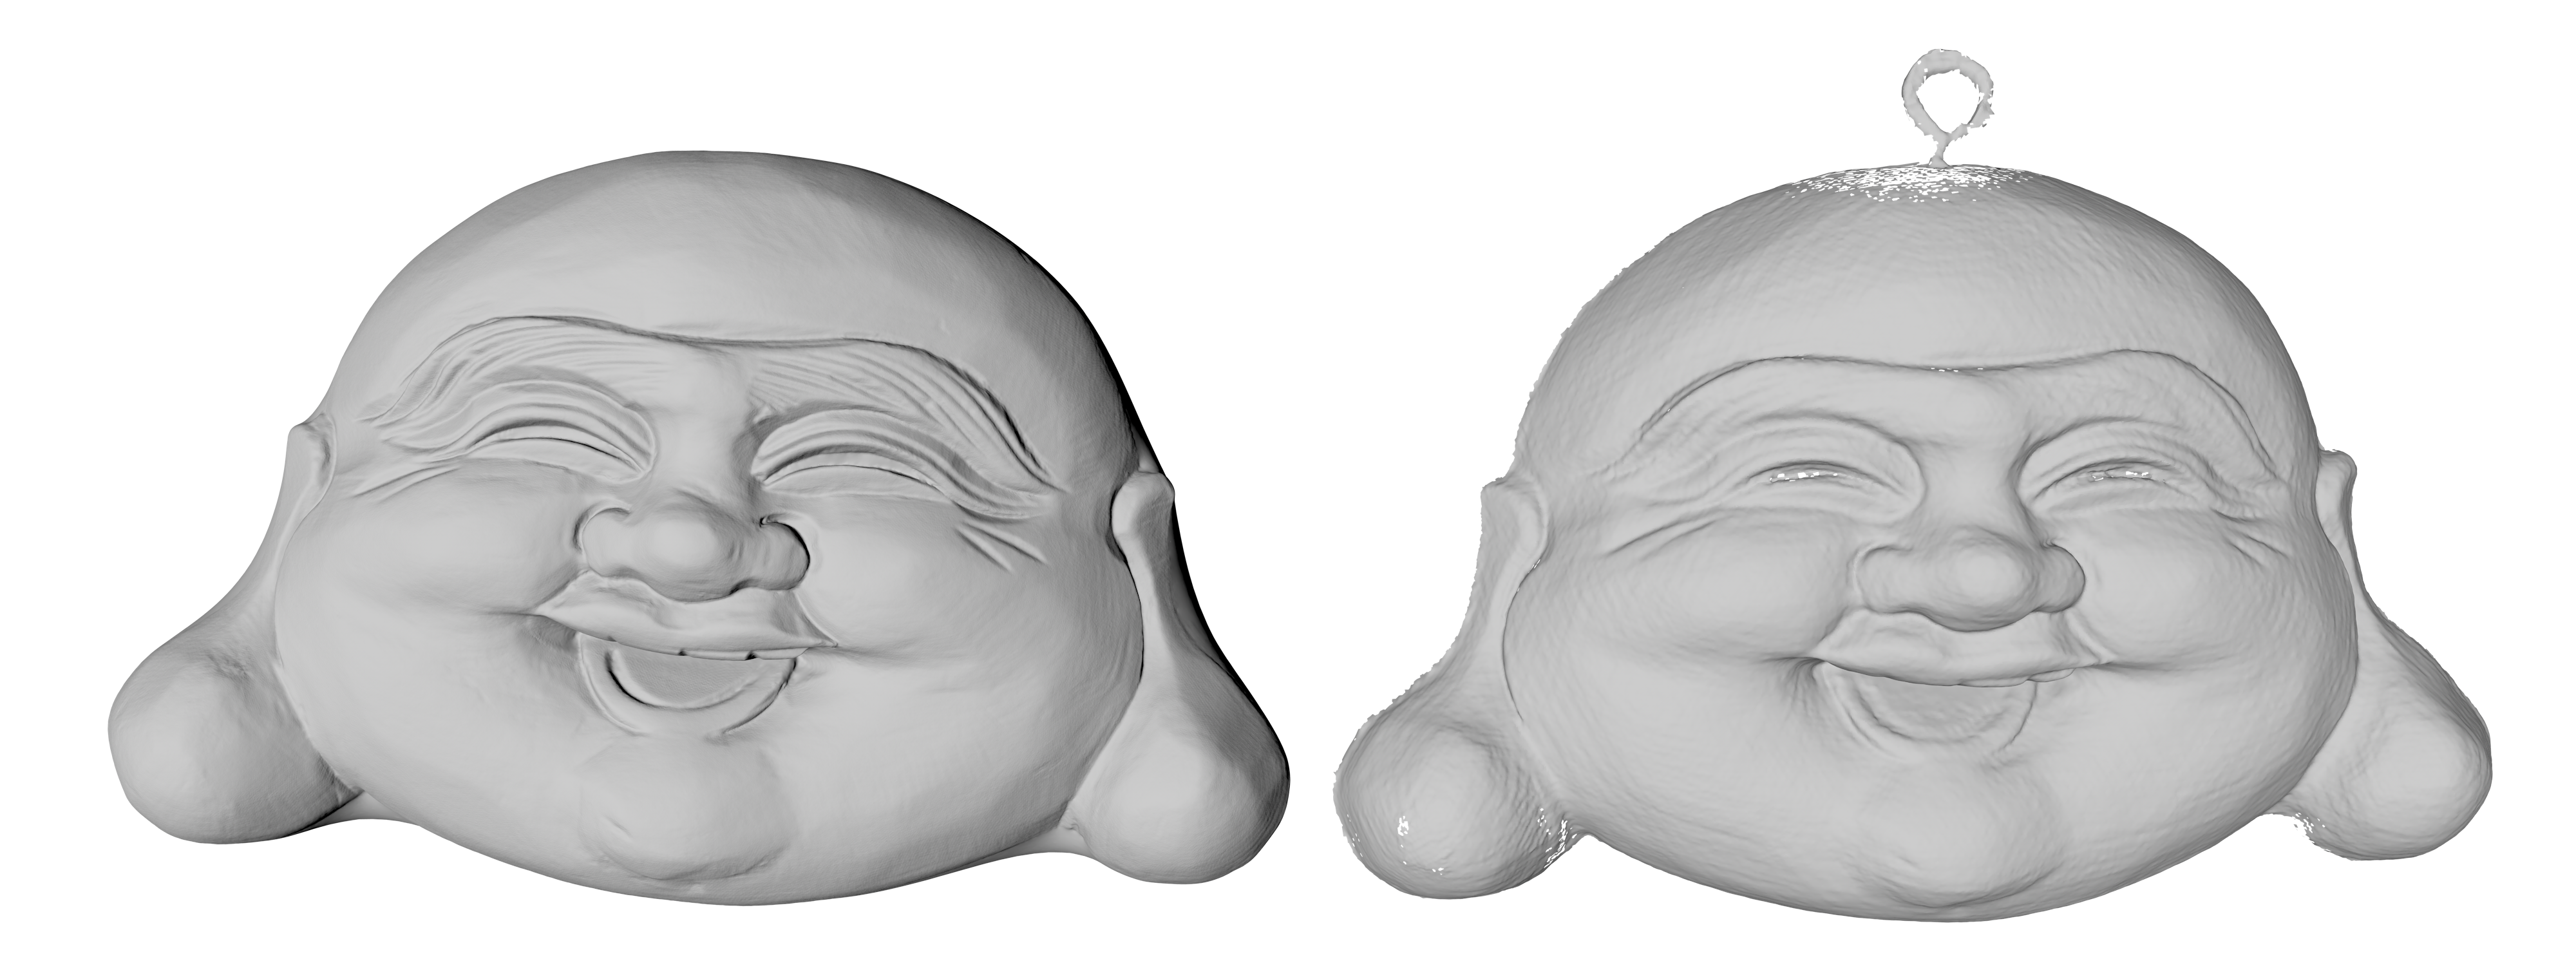
The SLS-3 scan is obviously better. Not only does it contain a lot more geometric details (check the fine wrinkles on the eyebrows), it also has a smoother surface with less noise. The Sprout did capture the metal hanger on top while the SLS-3 didn’t.
Comparison to EinScan-S
Below is the same 10 cm tall wooden juice pack toy scanned with the EinScan-S (top) and the SLS-3 (bottom) at resolution setting 2000:
At first glance, the differences are huge. As I wrote before, the SLS-3 does a better job at capturing colors than the EinScan-S while they both use a similar RGB-projection-monochrome-capture method. The EinScan-S even inverted the light and dark green colors.
If you turn on the MatCap render mode and zoom both embeds in on the top half of the pack, you can see the difference the SLS-3’s industrial HD cameras make for capturing geometric detail on small objects. We’re talking 8.5M vs. 850k polygons here. The SLS-3 has clearly captured the wood grain and the overal shape is crisper, less noisy.
Below is the same Toddler Sneaker made with both scanners. What I discovered when reviewing the EinScan-S was that it was great at handling objects that have both light and dark areas. Even the EinScan-Pro couldn’t handle the black details on the white mini adidas Superstar. The same is true with the SLS-3: When I pushed the exposure of the cameras to get details in the black areas I over-exposed the overall white areas. Maybe that could have been solved with multiple passes but I still like the fact that the EinScan-S has a special light+dark mode for that. That said, I know many people that use structured light scanning use matting spray to capture dark or shiny objects.
If you look past the fact that the black details on the SLS-3 scan (bottom, 11.8M polygons) have been filled with blobby geometry you can see it captured a lot of detail on the different surfaces. For instance, if you compare the rubber pars of the shoe (front and sole) to the scan of the EinScan-S (top, 7.2M polygons) you’ll notice a lot more details.
Last but not least
As usual, I end with the most-scanned bear in the world: Teddy! I scanned him in two cycles (from top and bottom) consisting of 16 scans each, standing on the turntable and processed him at Resolution 2000, Sharpness 1. First, here’s what that looked like in the software:
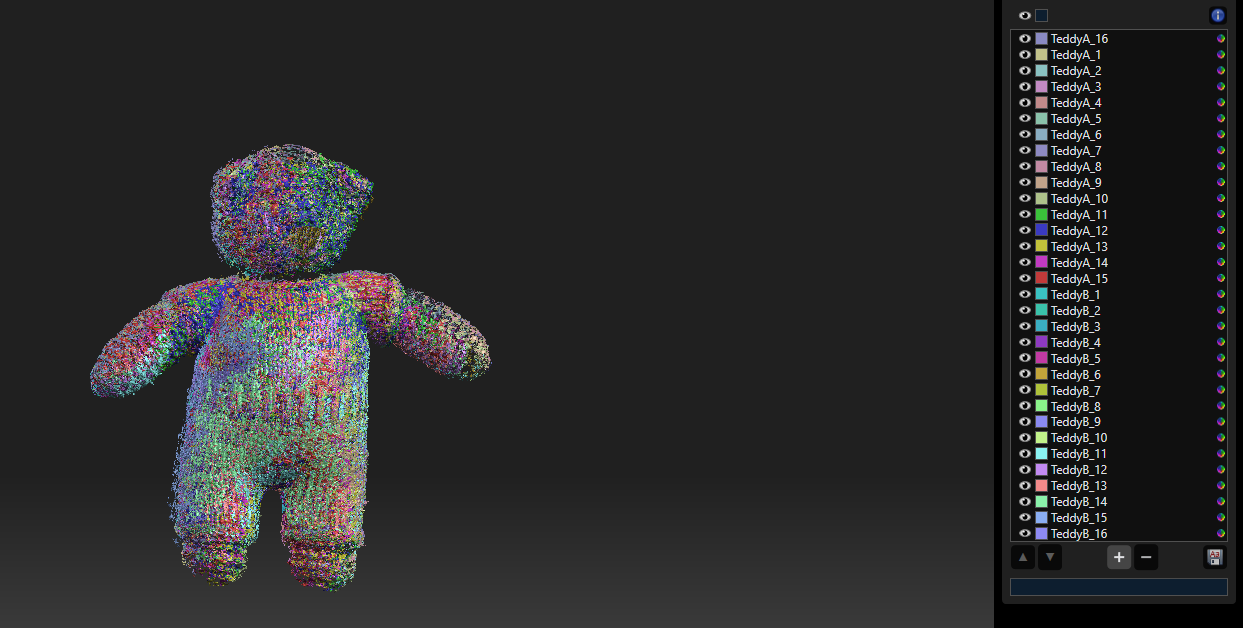
I had to perform multiple manual A/B align actions and did a global fine registration run before fusion. Because of Teddy’s knitted surface, was hard to see in the preview if all scans were aligned perfectly.
This is obviously not the best scan of this review. The SLS-3 couldn’t capture Teddy’s black nose and eyes and also missed the part in the fold of his neck — they are filled by the hole-filling algorithm.
And if you look at the MatCap of the embed above you’ll see that a few scans are misaligned. This could have been caused by the software not being able the align the scans properly or it could have been that 16 scans per cycle is too few for an object like this. But it could just as well be that Teddy has moved slightly at some point since the TT-1 turntable accelerates and decelerates quite fast which might cause problems for instable and light objects like this. Point is, I had to do a lot of manual fix work and still discovered that the result was imperfect hours after scanning.
While the amount of detail in the geometry is still the best of any of the active 3D scanners I’ve tested so far, I was clear to me that this scanner is not the easiest — and certainly not the fastest — way to scan an object like this.
For comparison, this is the result from the Artec Eva handheld 3D scanner:
The result from the Artec Eva (which is twice the price of the complete SLS-3 kit if you need color, but has a Lite version at a similar price if you just need geometry) might be less detailed, but it was a lot easier to point that handheld device at every part of the surface and scan the bear in a single, one-minute pass. Processing with the Artec Studio was also nearly automatic, while I had to perform quite a few manual actions on in the HP 3D Scan Pro software to get to the result above — and still see a lot of room for improvement.
Comparison to other 3D capture technologies
Before I give you my verdict about the HP 3D Structured Light Scanner Pro S3 a.k.a. DAVID SLS-3, let’s start with this question: Why would you buy a tripod-mounted structured (white) light 3D scanner (how is that for a definition!) like this? It’s a technology that has been around for a while and there are many brands offering solutions that make use of this principle.
For most people and purposes it’s because this technology offers the best balance between price and geometric accuracy. Light-based hand scanners are easier to use but if you want comparable geometric accuracy, you’re quickly looking at prices in the $20,000 range of the Artec Space Spider. Maybe the best alternative would be a tripod-mounted laser scanner like the NextEngine which also includes an electric turntable and is less than $3000. But, laser scanning is generally perceived to be less accurate than white light scanning. I will have to test the NextEngine (or a similar device) to judge if laser-scanning accuracy can match the SLS-3.
And then there’s the fact that Photogrammetry — using a regular camera and software to distill 3D data — is a lot cheaper and has been making big steps of increasing geometric quality in the past years. It’s arguably the fastest-developing 3D capture technology. But doing it with a single camera still takes a lot of time, so I’ll test soon if that process can be semi-automated with an electric turntable as well.
Needless to say, this topic is content for a separate post. Which you can expect on this website later this year.
Verdict about the SLS-3
With the acquisition of DAVID, HP has invested a lot of experience in 3D Scanning. The HP 3D Structured Light Scanner Pro S3 / DAVID SLS-3 is the third version of their structured light scanning product with better (HD) cameras than its predecessors — and almost certainly its competitors. On top of that, it’s good to know that HP/DAVID puts a lot of research into improving the structured light patterns that are projected onto the objects. This combination of hardware and software results in incredibly detailed scans. But it comes at a price, because the SLS-3 is one of the more (maybe even the most) expensive tripod-mounted structured white light scanners on the market. And for that price, I expected a more comprehensive software suite.
Scanning with the SLS-3 has relatively steep learning curve, especially for beginners and non-technical users wanting to step into 3D scanning. The fact that the full kit needs 4 USB ports (of which two are USB 3.0) and 2 power outlets to operate makes it incompatible with most laptops and even on a desktop the cables can get pretty messy.
The [industrial grade HD] cameras on this kit are its USP.
But while other structured light scanners are more user-friendly (and cheaper) they often feature fixed-distance and fixed-focus cameras that limit their flexibility. The SLS-3’s this modular system with its manually adjustable, industrial grade components allows it to scan objects of many sizes from many distances and angles and make replacing (or upgrading) parts possible and easy. The cameras on this kit are its USP.
Calibration in general requires some experience and patience, since you have to set two cameras and the projector manually. Plus I found the calibration with the large board quite a hassle. I’d rather have an extra, smaller calibration board for day-to-day scanning of small objects. It’s not a system that you can grab out of the box (or a closet or suitcase) and start scanning with within minutes.
My top feature requests are more control over hole filling, mesh-optimization features and UV-mapping for textures.
The software is at version 5 and the interface design is clean, but the workflow isn’t completely logical (there’s no clear “new project” button, for instance) and build-in tutorials are missing. And there are quite a few features missing compared to other professional 3D scanning software like Artec Studio. It would be nice to see more editing and retouching tools for both geometry and textures. In the current state, most users will have to optimize the models in an external 3D editing program.
My top feature requests are more control over hole filling, post-fusion mesh-optimization and decimation features and island-based UV-mapping for textures — the current implementations are too basic for me. The biggest downside of the software is the unusable fusion progress indicator, especially combined with the very CPU intensive process that has the tendency to make a modern Windows 10 PC totally unresponsive.
For almost $7000 for the full kit — and you want the full kit — the SLS-3 is one of the more expensive structured light scanners on the market. For $1500 less you can get the full Shining3D EinScan-Pro kit, that can function as both a desktop scanner and a handheld rapid scanner. That device has just one USB cable, but it has fixed, lower quality cameras, limiting it’s scan range and quality. Another difference is the turntable. While the EinScan turntable has tracking patterns, it’s made of plastic and the TT-1 turntable that comes with the HP/DAVID SLS-3 is a heavy piece of industrial-grade aluminum. Finally, there’s something to be said about the software of the EinScan that was in it’s first version (version 2 has come out recently) and very basic at the time of my review while the HP/DAVID software has been in development for many years.
Bottom line, if you want a tripod-mounted structured (white) light 3D scanner and have the budget, the SLS-3 should be on your list of contenders.


Hi Nick, have you tried a full body human scanning with David sls3?
Thanks
Hi
Dose it use to project a kitchen cabinets unit area and real size of each unit in the kitchen model on the wall like a kitchen mapping ?
I heard about some thing like a camera which can measure the walls that needs the kitchen cabinets to be install on it ,by 2D leaser sensor !!! ,then overture some kitchen plans which correspond whit the plan and then project it on the wall with real unit size and dimensions ,please help me to discover this so useful camera , 3D scanner or 3D projector or some thing like that too make an revolution in my work and professional life.
Thank you all so mach.
Hi
Nice review. I’ve just dug my original David SLS3 system out of it’s box as I’ve been getting more into photogrammetry, the main reason for which was the fact that whilst David produces more detailed meshes, I could never work out a good workflow to retopologise the mesh AND remap the UVs to reapply the scanned texture (something agisoft and realitycapture are both very good at). During your review/research process did you come across any techniques for applying the captured texture to a remapped mesh?
Thanks
There are tutorials on how to do that in Blender. But you should also be able to dit it with R3DS Wrap.