
The 3D scanner market is small compared to other markets like 3D printers but there are still a lot of options to choose from. This is especially true if you’re looking for a tripod-mounted structured light desktop 3D scanner. There are quite a few to choose from and on the outside they all look very similar: they all contain a digital projector and two cameras. So what are the differences then?
It turns out that beside differences in hardware specifications there are bigger differences in software. Manufacturers of scanners like this have usually built there software solution, including the structured light algorithms, from the ground up. This means they all offer a different user interface and workflow. And depending on your intended purpose one solution might fit into your own workflow than another.
After having reviewed the EinScan series of structured light scanners and the HP S3/DAVID SLS-3 it’s now time to test the Scan in a Box. Made in Italy by Open Technolgies, a company that also manufacturers industrial 3D scanners, this scanner is their first product aimed towards professionals with a tighter budget.
Let’s see how it works and how it compares to its main competitors.
Hardware & Pricing
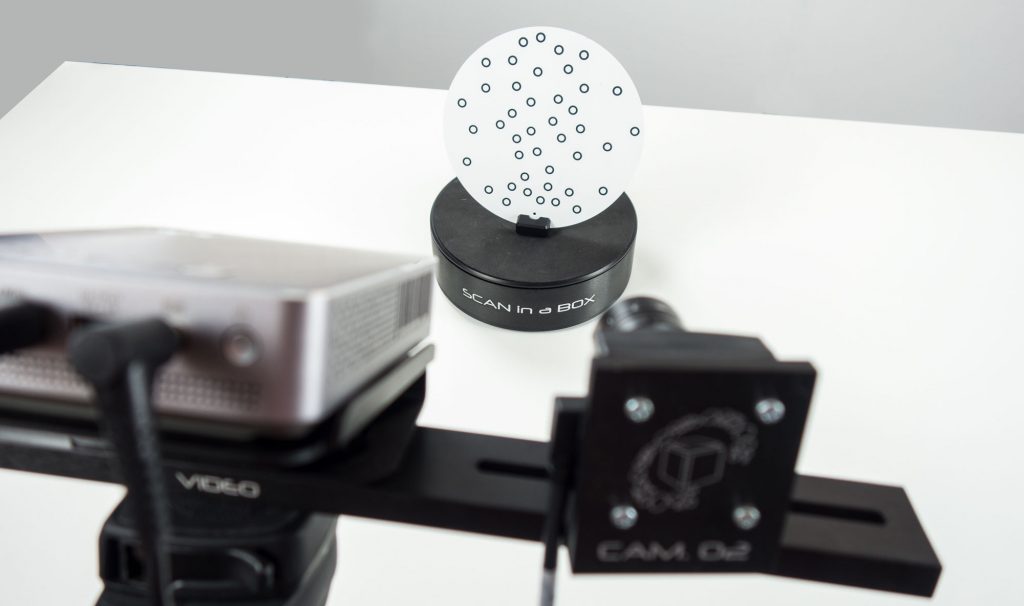
As with other scanners like this the “Box” contains a lot of different parts and cables:
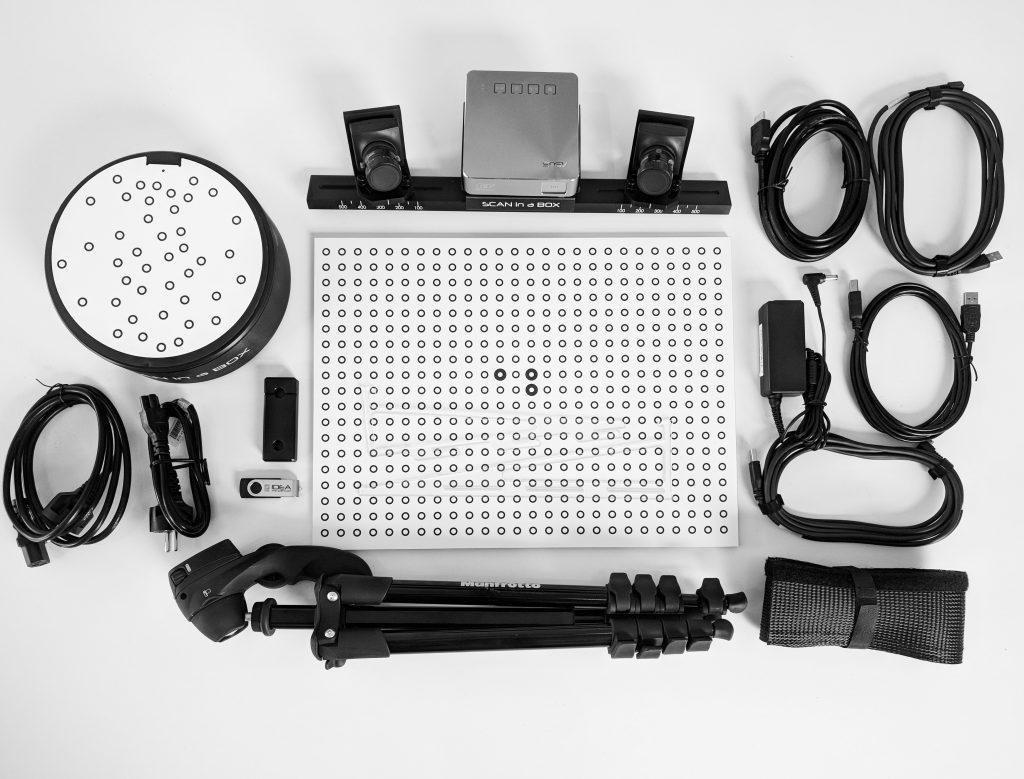
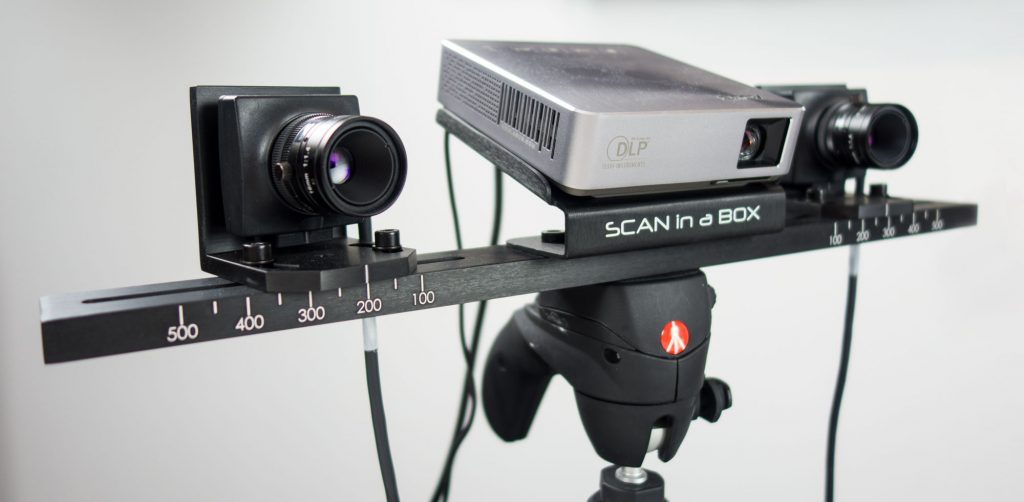
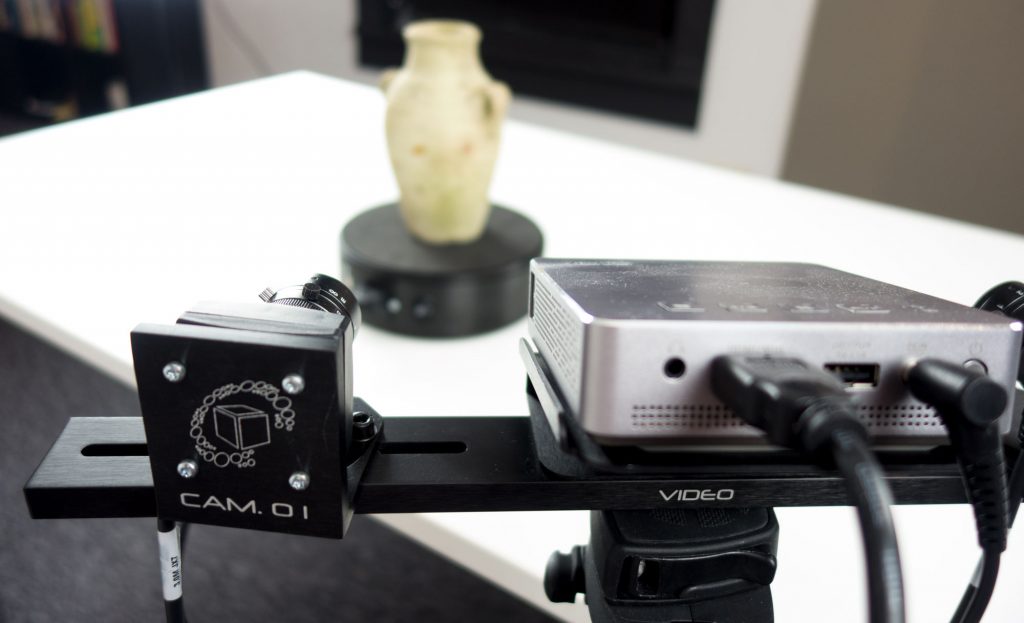
The base system contains a ASUS mini beamer (1280 x 800 pixels resolution) on a custom guide rail with two cameras. On the left there’s the optional turntable, in the center the calibration board and beneath it a Manfrotto Action Tripod (which I happen to also use myself for photography and photogrammetry). The cameras are USB-powered so there’s only an adapter for the projector and turntable.
The Scan in a Box sells for a very decent price of €2390 (ex VAT) which is a very aggressive compared to the ~€4000 (ex VAT) you’ll have to pay for HP’s latest S3 scanner (formerly DAVID SLS-3) if you want two cameras (and you probably want two cameras). It must be noted though that that scanner comes with USB 3.0 cameras that are a step up from the Scan in a Box USB 2.0 cameras. In that aspect, this scanner might be better comparable to HP’s older S2 model in terms of specs, which still sells for ~€2645 (ex VAT) which is considerably closer to the price of the Scan in a Box. But since I haven’t tested the S2/SLS-2 I can’t say anything concrete about that.
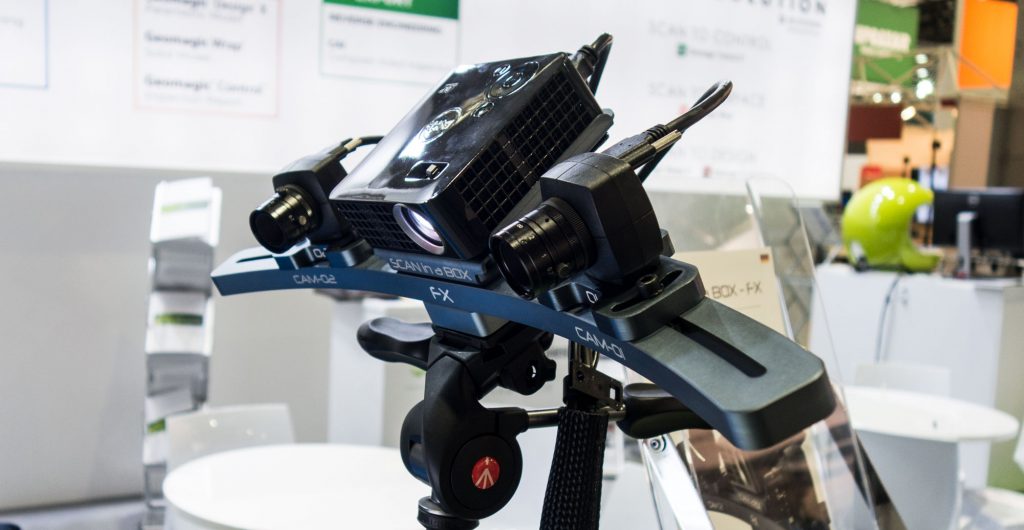
Recently a second model of the Scan in a Box was released, called the Scan in a Box FX which has a better projector, better cameras (2 megapixels) and additional software features. It’s priced at €4490 which makes that model a more direct competitor to the S3/SLS-3. I’ll review that model soon.
The turntable is optional but for object scanning it’s a time saver that pays for itself. The Scan in a Box turtable is heavy weight and has a larger diameter than the one that can be bought with HP’s scanners and it’s in the same price range: €890 (ex VAT) compared to €835 (ex VAT) for the HP Turntable Pro.

Installation & Calibration
In the box there’s a printed poster that’s usually a Quick Start Guide but in this case its rather comprehensive. There’s so much info on the poster that it’s a bit hard to follow so maybe a booklet would have been better.
As you might expect from a modular system there are quite a few cables to connect. If you want to use the turntable you need 3 USB ports which meant I couldn’t directly connect it to my Surface Book which only has 2. A hub might work but I guess it’s not a good idea to put both cameras on a hub. The projector connects with an HDMI cable. You’ll have to configure it as a second screen in windows but this is not very difficult if you have basic PC knowledge.
The Scan in a Box comes with the projector and cameras pre-mounted on the rail and pre-calibrated to use at a distance of 560 mm which translates to a field of view of 250×200 mm. This setting is great for medium-sized objects and in combination with the turntable. I made most scans with this setting.
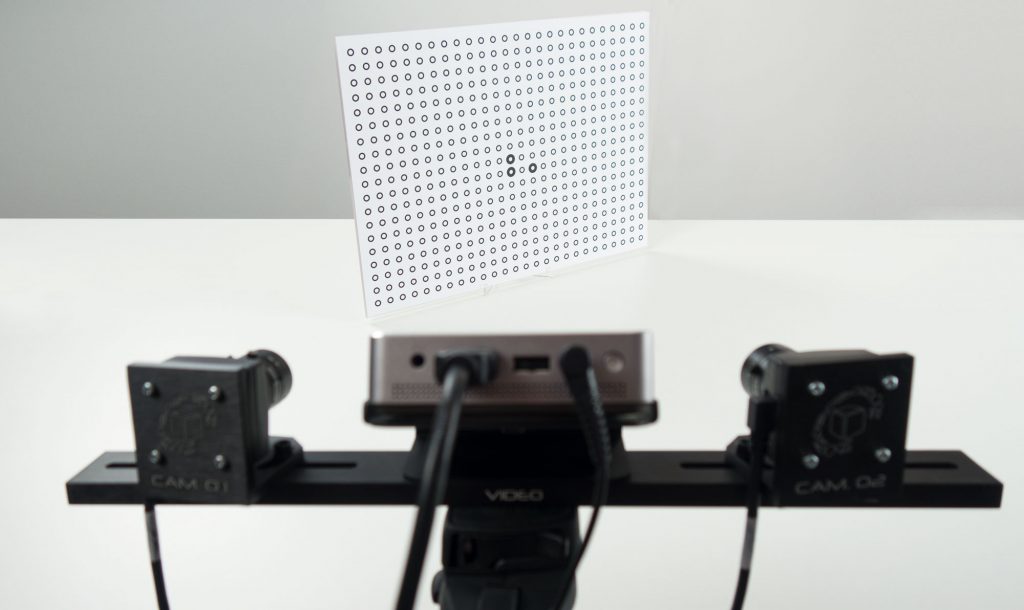
If you want to scan larger or smaller objects you can re-configure the distance of the cameras on the rail using an allen key. After this the system has to be re-calibrated. Although this procedure is clearly described in the guide it requires changing the position of the system 3 times and the position of the calibration board 9 times. And the calibration feature in the software isn’t entirely fool proof. It required me to re-read the instructions and study the illustration to understand what I was supposed to do.
I found that calibrating the Scan in a Box was more time-consuming and less fool-proof than HP’s approach with the pre-folded calibration board that comes with the S3/SLS-3. That system also projects visual feedback on the calibration board to assure you calibration was successful. With the Scan in a Box you have to trust yourself and the system. If the time-consuming calibration method is a problem will fully depend on how often you want to switch beween different fields of view.
The optional turntable comes with its own calibration board which you can use either laying flat or standing upright. You’ll have to use it to calibrate the center axis of the turntable every time you move it or the scanner but since this procedure is really fast that’s no big deal.
Software
Besides maybe resolution specs, the USP of structured light scanners like this usually isn’t the hardware, which is mostly a combination of existing devices. The true differentiation is the software. That’s there the actual user experience is created. Not only for operating the scanner but even more so for processing scan data, resolving problems and optimizing 3D models for further use.
The software that comes with Scan in a Box is called IDEA and for this review I’ve used version 1.1. It’s included with the scanner.
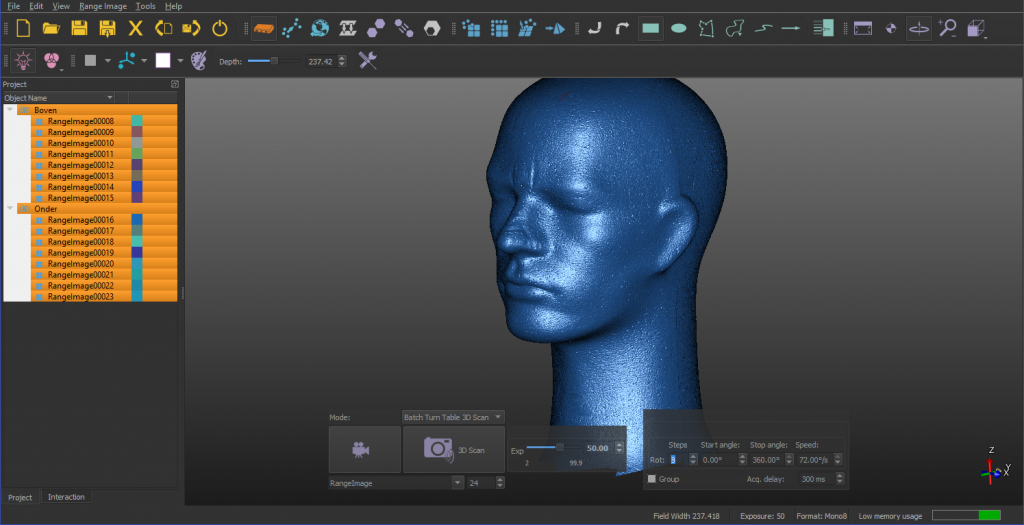
The software has a dark interface which will appeal to users of creative software. There are a lot of icons that are grouped by color to diversify between certain parts of the scanning, processing and editing workflows. I’ll cover most of them in the relevant sections below.
Overall the software ran stable and fast in my tests. It must be noted that my system has 32GB of RAM. The minimum required amount is 8GB although I generally advise 16GB for structured light scanning at high quality. The requirements also note an Nvdia Geforce graphics card. I used a GTX1070 for this review.
Scanning
While it’s totally possible to scan objects by rotating them manually or on a simple manual turntable the electric turntable is of course a real time saver. It’s really fast too. For this review I only scanned small and medium-sized objects on the turntable. It’s important to note, though, that the full size-range of this adjustable scanner is between 10 mm and 2 meters. And because the maximum working distance is also more than a meter so you can scan pretty large objects if needed.
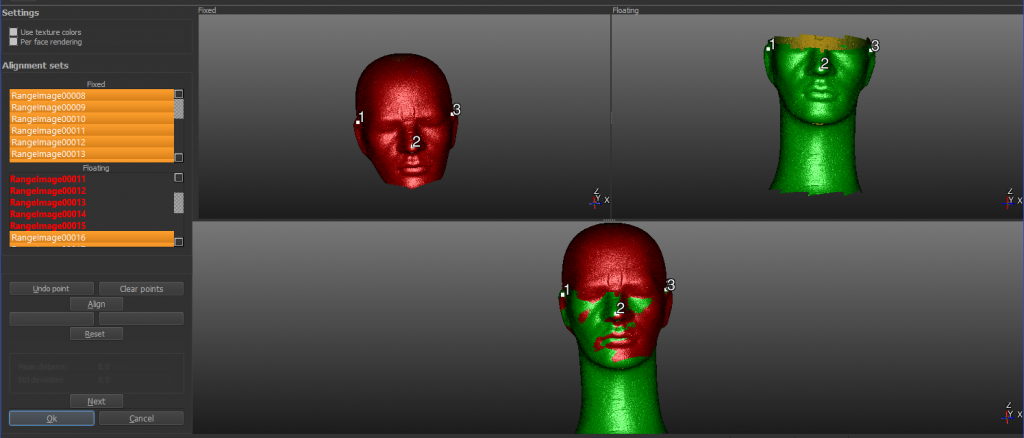
If manual rotation or scanning large objects are your intended use case it’s good to know that the IDEA software that comes with the original Scan in a Box only features only semi-automated alignment of separate scans. This means that you’ll have define 3 points on each scan to align them. The new Scan in a Box FX also comes with enhanced software. called the FX-version, which also features full automatic alignment of separate scans — right after they’re captured. I’ve seen this software in action when I got a demo of the FX at Formnext last month and it’s a real time saver for scanning large objects.
So I’ve used the turntable for my tests and like I wrote in the previous section this requires axis calibration after each scanner move. If you want good color capture, it’s also important to calibrate the white balance. Both can be done quickly and allow you to scan pretty large objects on the turntable. I was able to scan my 40 cm tall bust in three sections.
Scanning is fast at around 4 seconds for a scan and a bit longer if you also want to capture color. The turntable also rotates pretty fast and is sturdy enough to hold heavier objects like my stone bust. For light and tall objects, though, the acceleration of the turntable might be a bit fast as they might wiggle or move. But I had no actual problems with this. One thing I would have liked is that the software would show me every scan directly after it has been captured. Now it only shows the result after capturing all scans on the turntable. And even then you have to select the separate scans first. Selecting a group doesn’t automatically make all scans inside of it visible.
Although the Scan in a Box contains two monochrome cameras it can capture color by projecting red, green and blue frames onto the object and reverse-processing the channels. This works pretty well, except for surfaces that are not directly facing the scanner. Those areas will get a greenish or pinkish hue. Even if you scan those surfaces again under a different angle it requires you to manually remove the discolored parts before meshing.
For turntable scanning you can set the amount of stops within a 360-degrees rotation. 8 usually was enough, sometimes 12-16 for complex objects. It’s good practice to name your scans if you’re scanning multiple sections. A small but handy feature (which I missed in the HP software) is a checkbox that let’s you group the separate turntable scans automatically. This makes organizing and aligning different sections a bit easier.
After alignment, it’s wise to run Global Registration for all scans. Then you can clean the point clouds if necessary. This can be done by making manual selections or algorithms to automatically select outliers based on certain criteria.
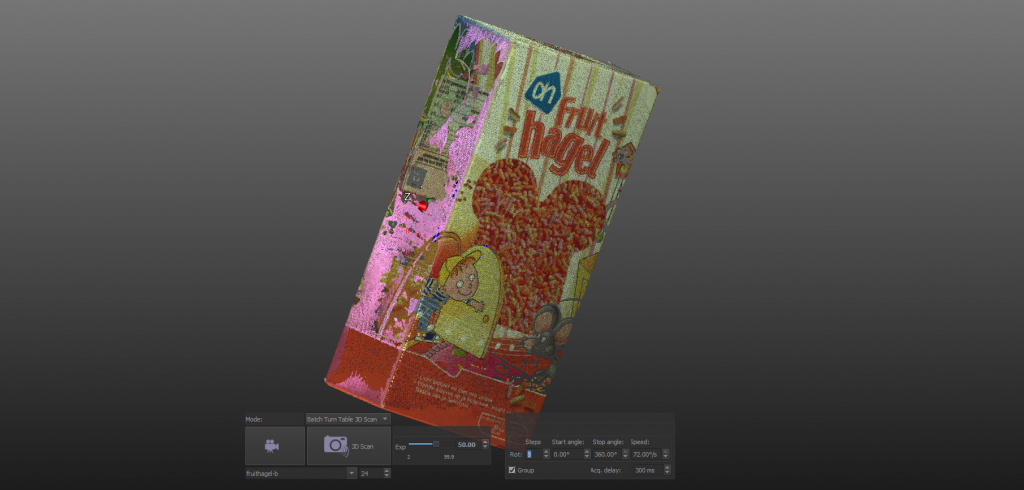
Meshing is done through four presets for various kinds of objects. The presets can be edited to fine tune them but they are pretty nice to use right away. I mostly used the “small artistic object” preset since it offers the highest resolution. It’s also the most resource intensive option but I was surprised by the fast processing speed, even on my PC’s 6th generation dual core i5 processor (the requirements state a quad core but I experienced no problems).
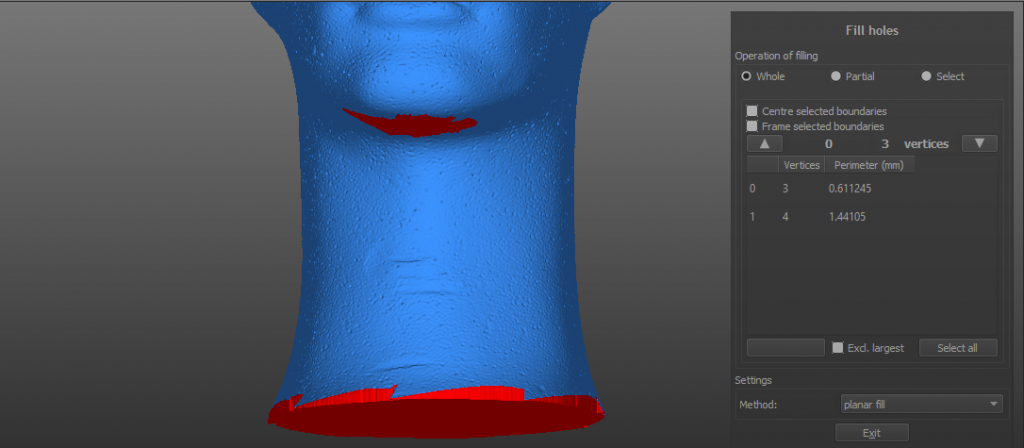
After meshing the object will appear in the scan list for further editing and optimization with algorithms like decimation and smoothing. There’s also hole-filling feature feature and it’s very comprehensive. I’ve never seen 3D scanning software that let’s you choose on a per-hole basis if you want a curved or a flat fill. It’s even possible to perform a planar fill which is handy for making totally flat bases for 3D printing.
Exporting can be done to .STL, .OFF .OBJ and .PLY. Color can be exported only as per-vertex information. Unfortunately, Texture mapping (atlas and triangle map) is only available in the new FX-version of IDEA that comes with the Scan in a Box FX. While I do understand the marketing behind this choice, I do believe it’s something that will be missed by many since it links the color resolution to that of the geometry. Creating a low-poly mesh with high-quality texture maps for gaming an VR/AR assets is therefore not possible within the software. Exporting point clouds is also strictly an FX-feature.
Are FX-only features are listed on page 4 of this PDF brochure.
Results
Let’s start by taking a look at the foam head from the screenshots above. It’s completely white so the model below is without color information.
It’s great to see that not only all the dents in the polystyrene were nicely captured but also the seams that show where the two halves. It’s also worth noting that there are no misalignment imperfections.
Next up is the Old Jar from the photos above. The first embed is the result from Scan in a Box (SIAB) and the second is the same object scanned with the HP S3 / DAVID SLS-3:
Firstly, while the SIAB’s colors are per-vertex they’re perfectly fine for many purposes. The SLS-3’s UV texture map is a lot more blurry — one of the critiques in my review of that device. If you switch off the colors and look at both models in MatCap mode by hitting the 3 key on your keyboard (hit 1 to return to the original render) you can see that the geometry of both scans is very similar. Yes, the SLS-3 result contains a bit more detail here and there but for that it needs a whopping 6.7M polygons vs. just 1.2M on the SIAB model. You will have noticed that while loading.
For another comparison I scanned a smaller object, namely a toddler-size adidas sneaker, with both scanners (SIAB first, SLS-3 second):
https://sketchfab.com/models/672cee7fac1f4242a3ee1126dc1821b8
Both have good color representation for scanners without RGB sensor although the SIAB model suffers a bit from the green and magenta hues I discussed earlier. The SLS-3 result doesn’t have that problem but is a bit less sharp color-wise.
Looking at the geometry in MatCap mode reveals that both scanners where unable to capture the black stripes on the side of the sneaker and instead largely relied on hole filling. Judging the nose and stitches, details are a bit crisper on the SLS-3 scan but that difference might be negligible for most purposes. And differences like that might just as well be cause by variations in light conditions, calibration and/or mesh fusion settings. Either way the SIAB model is again a lot smaller with 1.7M polys vs. 5.9M on the SLS-3 scan.
If you’re looking at the Scan in a Box because of your budget it might also be interesting to see how it compares to an even more affordable structured light scanner. Below is the same sneaker scanned with the Shining 3D EinScan-SE I reviewed a while ago. Although that scanner has a fixed field of view, it’s just $1199 and that price includes the automatic turntable.
Looking at the sneaker’s nose and stiching in MatCap, the EinScan-SE result is clearly less detailed when it comes to geometry. But it did manage to capture the black stripes on the side of the shoe, which is remarkable. The software that comes with that scanner also support UV texture mapping not found on the SIAB (only on the SIAB FX) which might be imporant for some use cases. It’s certainly a good texture and the EinScan-SE also has no RGB sensor.
Here are a few other scans with different materials and of totally different sizes.
The red parts of the small toy figure above are quite glossy and that resulted in noise in the scan. The matte parts like the face are a lot cleaner. So it might be best to apply matting spray to objects like this for the best results. Regardless of that, if you look at the bottom plate you can see a clear definition of the screws and imprints. Unfortunately the SIAB didn’t catch the holes in the back correctly. That might be because I only used 8 rotational stops. For that, and other details like the small black switch at the bottom and the details of the chrome screws, you probably need something like the blue-light Artec Space Spider handheld scanner (see result of the same object here)
Here’s a scan of a 10 cm tall 3D print of Yoda bust. I turned off color because we all know he’s green and the reflections in the green PLA material didn’t make him look any better.
Pretty nice scan. Maybe a bit noisy. But while that noise might not be an issue for Yoda it might be for technical objects. So I scanned my Surface Mouse and meshed it with the Small Artistic Object and Technical Object respectively:
As you can see the Technical Object preset does result in a smoother surface (some pun intended) but at the cost of losing some details that might be relevant for (reverse) engineering. I’m really curious if the Scan in a Box FX’ better cameras and projector will result in less noisy range images.
Finally, let’s scan something big. I put my 40 cm tall bust on the turntable, which I calibrated by puting the calibration disc on a box. I scanned the bust in 3 vertical segments, because I was too lazy to re-calibrate the scanner for a larger field of view. But it worked out well.
Great scan with a lot of detail in the geometry. And even though the color is per-vertex there are enough of them for a convincing result.
Verdict
At €2390 (ex VAT) the Scan in a Box sits nicely between the more affordable, but less flexible Einscan-SE and the more expensive HP Pro S3 (DAVID SLS-3). But the latter has better cameras that are probably better comparable to the recent Scan in a Box FX model which costs €4490. But that model isn’t replacing the original Scan in a Box, which will stay available as an affordable alternative.
And for an affordable alternative it’s a very good scanner, especially combined with the optional turntable. That upgrade does set you back €890 but if you are planning to scan small to medium objects regularly it will be for itself over time.
Calibrating the SIAB is a bit of a hassle, especially compared to HP Pro S3’s more solid and faster method. But then again calibration is never fun and you only have to do it when you change the position of the two cameras. On the other hand, calibrating the turntable is very fast and isn’t present on the HP scanner. Because of this axis calibration, separate turntable scans are already aligned almost perfectly after scanning without the need of feature alignment after each scan. Global Registration can and should always be done afterwards but is surprisingly fast in the IDEA software.
As with all modular structured light scanners, the software is what sets the total solution apart from the competition. The IDEA software is designed well and has a lot of features. Scanning is easy and there are a lot of post-processing features. Unfortunately direct automatic alignment is only available in the FX-version of the IDEA software, forcing you to align scans semi-manually by selecting 3 points on each scan or group of scans. Another feature that’s FX-exclusive is UV texture mapping so the original SIAB scans can only have per-vertex coloring. Depending on your purpose you’ll have to decide if missing these features are worth the price difference.
Scanning with the SIAB is surprisingly fast, especially with the turntable. I’d almost say that could be tuned down a bit because the fast acceleration can cause some objects to wiggle but they always stopped doing that just in time. Geometry capture is good although some surfaces can contain a bit of noise. The IDEA software has presets to filter out most of this so it won’t be a big issue but it does come at the price of sacrificing detail sharpness. I expect that the FX model’s better camera/projector combo will solve this but you’ll have to wait for my review of that scanner to be sure.
The scanner does deliver more detailed geometry than the similarly priced EinScan-SP and the IDEA software is also a lot more comprehensive. But although that device has a fixed field of view, it does connect to your computer through a single USB cable. With the turntable, the Scan in a Box needs 3, plus a HDMI port and two power outlets, making the complete kit less portable. And while the manually controllable cameras and projector on the SIAB offer fine-grain control for professionals, it could be a bit much for beginners as opposed to the fixed-focus EinScan-SP.
Altogether the Scan in a Box is a solid and versatile solution that comes with comprehensive, but still easy-to-use software, for an attractive price. It should certainly be on your list if you’re in the market for a modular structured light scanner.
Thanks for reading! I hope this review was valuable for your decision-making process. If you think it can also be interesting for your friends or followers, please do share it on your favorite social network.
Of course I can imagine you want to know if the new Scan in a Box FX is worth the extra money. I will test that one soon so follow me on one of the social media channels below if you want to be the first to know.


Hello, I’m interested in buying a 3d scanner to scan small pieces like jewellery or mechanical parts. I’m currentrly hesitating between the einscan pro , Scan in a box FX and the HP SLS 3 pro.
As I run a small business I would like it to be as multipurpose as possible but the most scans will be small parts.
What would be the best choice between those or in the same price range.
Also, do you kwnow when you will review the Scan in a Box FX ?
In advance, thank you for all your review and articles on your website. It is a goldmine of usefull informations !
Please send me an email and I’ll be glad to give you advice about this.
[…] Many types of scanners exist, such as laser based and structured light (SLS), and these can be handheld or stand-alone machines. 3D scanners greatly range in price too; from 400 to 80.000 euro. In a time that archaeological project budgets are predominantly tight while simultaneously research aims are increasingly technologically and digitally demanding, a need for low-budget but metrically precise solutions is met in this workflow. This blogpost describes the procedure pottery scanning with a not-a-too-expensive stand-alone structured light-based device: the DAVID SLS-3 (HP Scan Pro 5), costing approximately 4500 euro, including an automatic turntable – which is optional. (Unfortunately, this scanner is no longer produced. A good alternative, same SLS technique, similar pricing, is the Scan in a Box) […]
Hello, I am using the Scan-in-a-box with the IDEA Software. Unfortunately we borrow the scanner in a partner and now the License Key is not working. Is the key registered to their laptop? What can I do to take back my license key?