Update 6 December 2016
Shining 3D announced a big update to the EinScan software that promises a lot of user experience improvements that are not reviewed below.
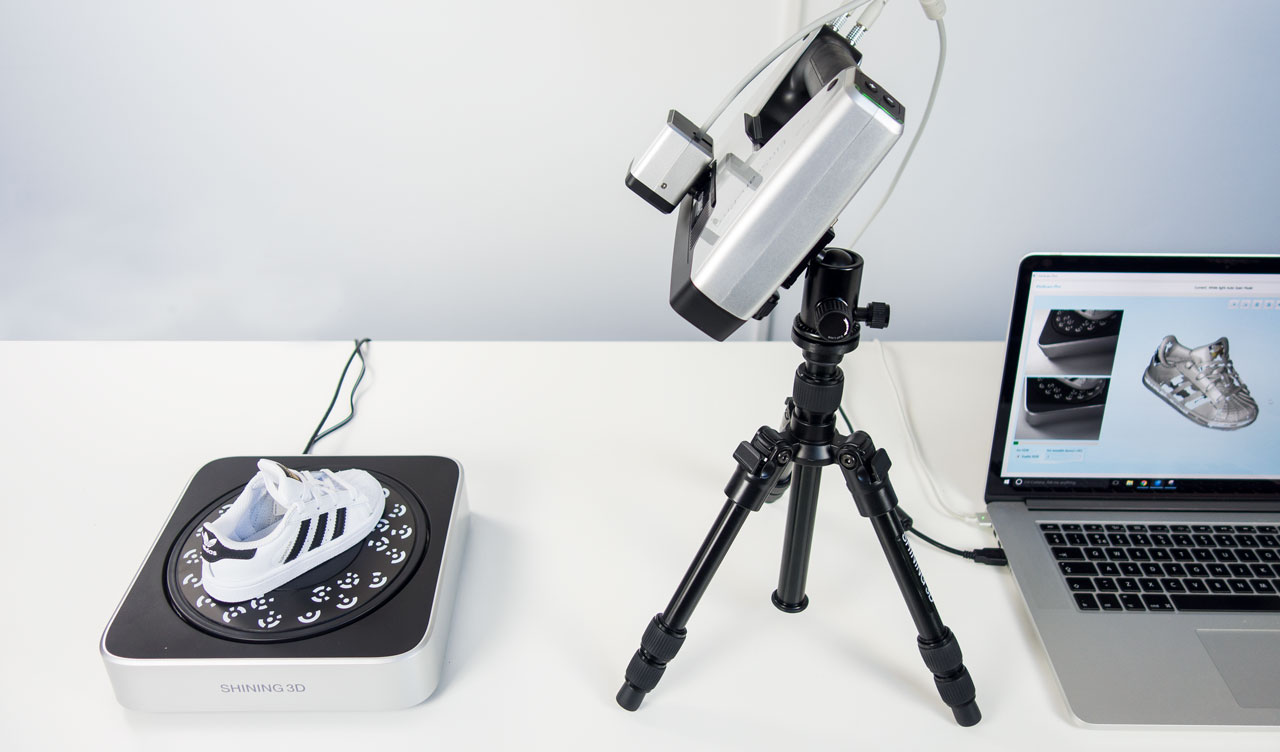
A few months back I reviewed the Einscan-S, an affordable (€1090) desktop 3D scanner manufactured by Shining 3D. In this post, I’ll take a look at their latest device, the Einscan-Pro, kindly supplied by the France-based 3D Printing and Scanning store Machines 3D.
As the name suggests, this new model is aimed at professionals. When it comes to structured light scanning from a tripod, the Pro is a greatly improved version of the S. But on top of that, it’s also a handheld 3D Scanner. That makes it a direct competitor to established handheld 3D scanners like the Artec EVA and Creaform Go!SCAN. But while those and similar scanners are priced in the €15,000 – €20,000+ range, the Einscan-Pro starts at a competitive €3990.
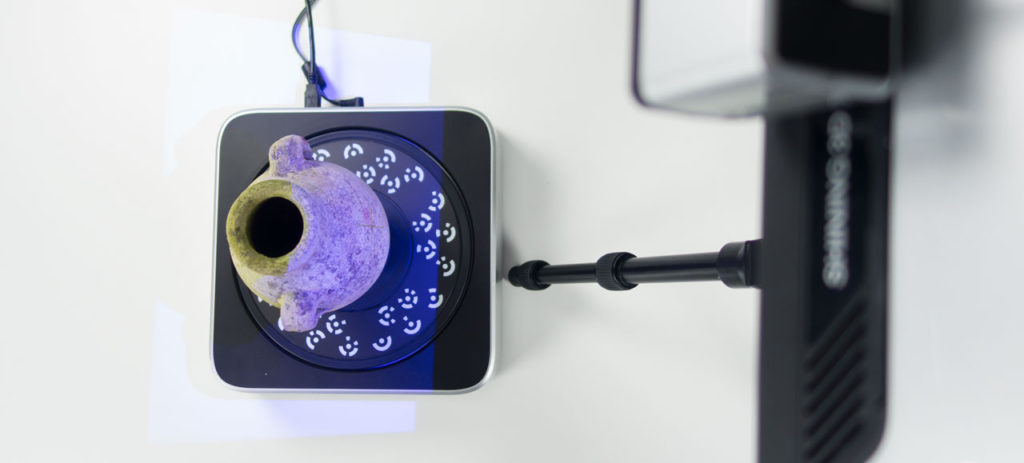
However, this base model cannot capture color out of the box. If you also want to scan textures you can get the Color Pack for an extra €600 (€700 is you buy it later). And for yet another €600, you can get the Industrial Pack, which includes a Tripod and an electric Turntable. As you can see in the header image, I’ve tested the scanner with both packs.
So it’s 3-4 times more affordable than it’s industrial competitors. That’s a great USP to have. I haven’t done in-depth tests with the EVA and Go!SCAN yet, so I’m only able to make comparisons with those based on specs. Of course, I will compare it to the Einscan-S and other scanners I’ve reviewed.
Hardware
Let’s start by taking a closer look at the scanner itself:
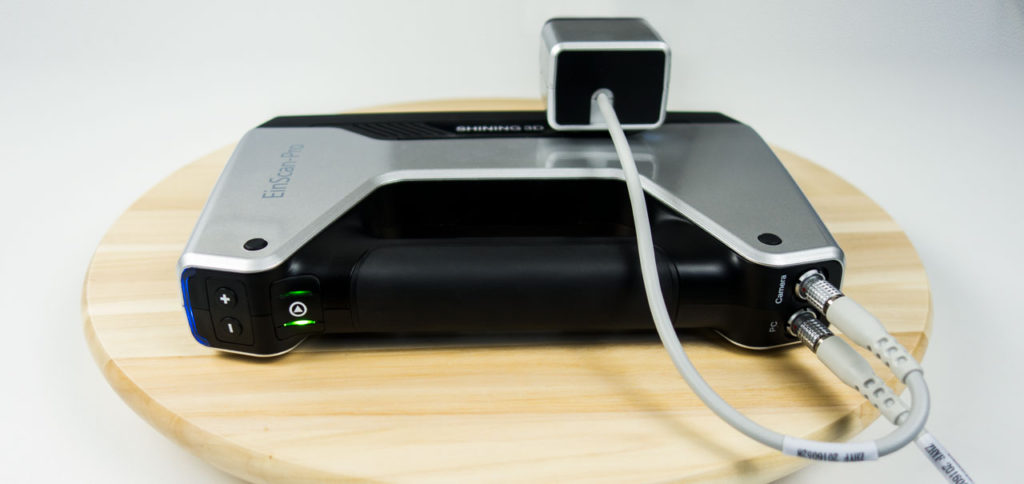
As you can see it’s quite a large device. The scanner alone weighs 0.8 kilograms (1,76 lbs) so with the color module and cables attached, you have to hold about 1kg. This isn’t very heavy, but I definitely felt it’s weight kick in after a few minutes of continued handheld use. Because of the way the scanner is balanced, I found it quite hard to scan above my own height at an angle for longer periods of time (e.g. scanning people).
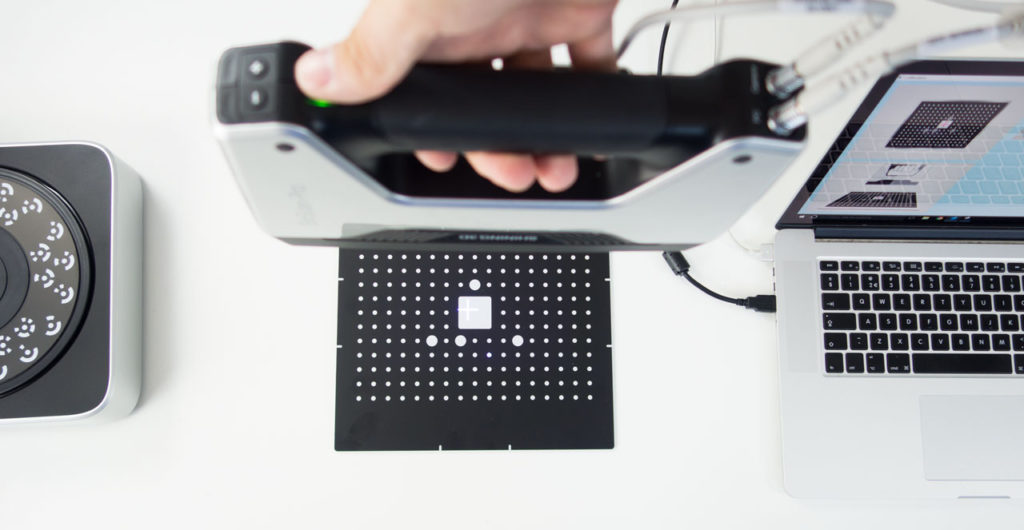
Looking at the front, you see an array of cameras and sensors you’d find on most Structured Light scanners: a projector in the center with two monochrome cameras on each side. And if you choose to get one, you’ll have to attach a third camera on the side, which is as simple as turning a bolt and attaching a cable. Other than the Einscan-S, all cameras have white LED’s for illumination.
Let’s take a look at the back of the scanner:
Starting on the left, you see a multi-colored LED that’s used to indicate if you’re too far (blue), too close (red) or at a perfect distance from your subject (green). In reality though, I never looked at this because I was always looking at the (more detailed) indicator computer screen. The plus and minus buttons can be used for adjusting the camera exposure before scanning and let you zoom in and out of the 3D preview while scanning. The play button is used to start, pause or resume the scanning session. It can also be double-clicked in some modes to view the exposure window before scanning.
[The tripod] mount is only included with the Industrial Pack, not with the scanner.
On the right, you see the cable from the color module going into the scanner as well as the cable that connects to your computer through USB. It’s good to know that while the scanner isn’t powered by the computer over USB, the power supply is fed into the main cable through an Y-splitter at computer level. So you’ll just have to be aware of a single cable while scanning. The camera signals also travel over this cable, which a vast improvement over the VGA-connector of the Einscan-S.
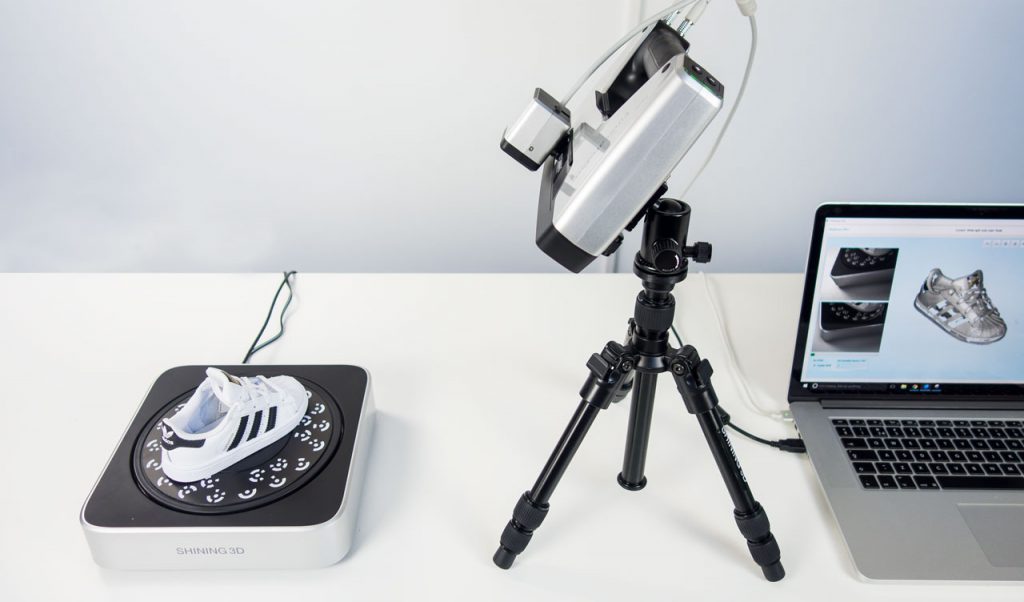
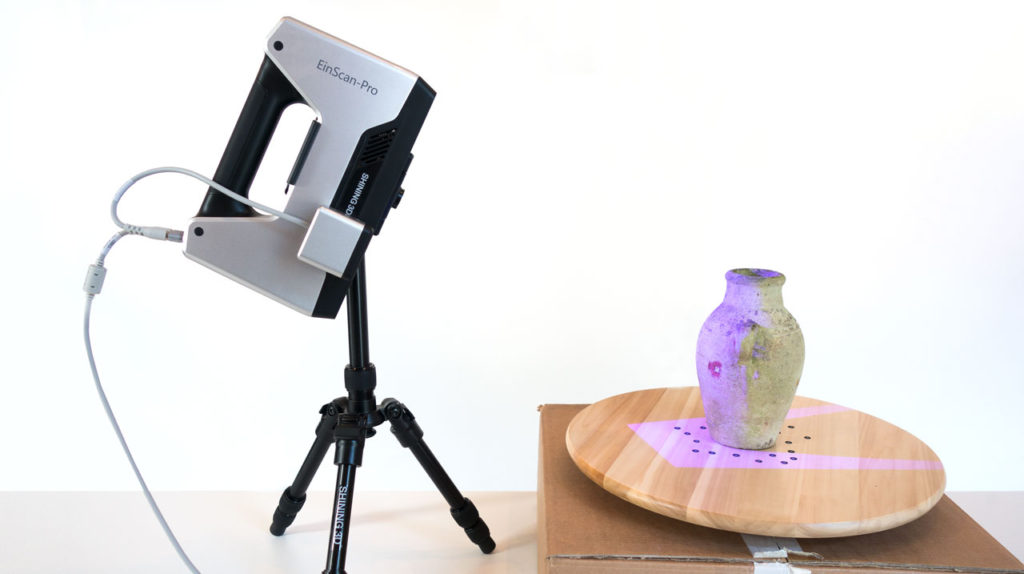
If you also get the Industrial Pack, the setup will look like this:
It’s good to know that the scanner itself has no tripod mount. Instead, you’ll have to attach it to a mount that does. This mount, however, is only included with the Industrial Pack, not with the scanner. So you’ll have to spend €600 on the Industrial Pack to attach the scanner to your own tripod, even if you don’t need the electric turntable.
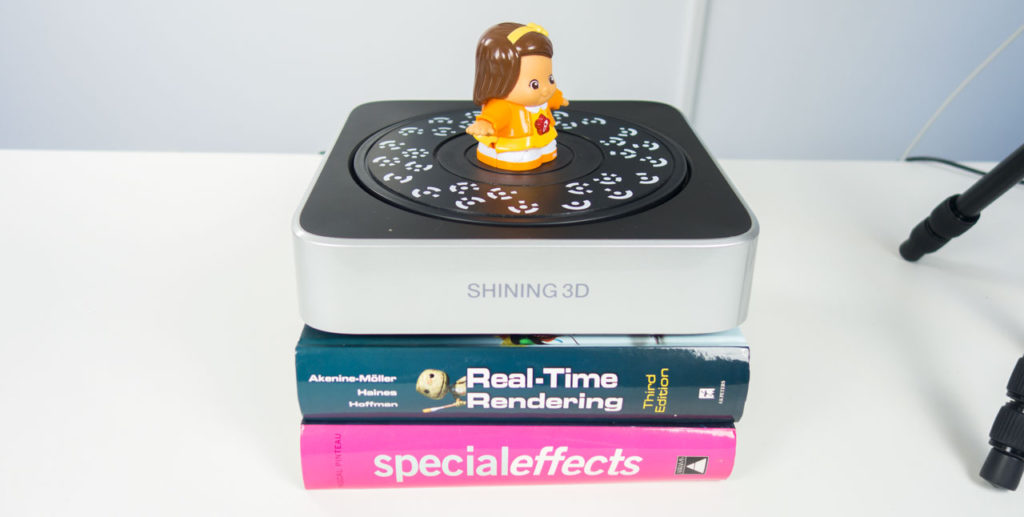
The included tripod isn’t the best in class, but it’s light, portable and versatile. The electric turntable is similar to that of the Einscan-S, but has a pattern printed for auto-calibration and better alignment. This small tweak is a huge time-saver if you need to scan small objects often.
Software Installation
I downloaded the latest (1.6.4 at the time of testing—newer versions are available at the time of writing) version of the scanner software from Shining 3D’s 3Dker website.
The installation process took a while on my Macbook Pro Retina (running Windows 10 natively through Boot Camp). My laptop has a 2.6 GHz Intel Quad Core i7 processor 16 GB RAM and a Nvidia GTX 650M with 1 GB of memory. It’s important to note that an i7 processor and 16 GB of RAM are the minimum required, so you’ll need a high-end PC for this scanner. My graphics card is actually a bit under-powered, because the manual states a GTX 660 with 2 GB of memory as the minimum requirement. As far as I can tell I experienced no performance issues.
The installer is relatively straight forward, but it does ask a few questions during the process—in Chinese:

It’s noteworthy that a USB drive is included with the scanner containing a license key file for the software that has to be copied next to the installer. It’s a bit cumbersome and in my opinion unnecessary since the software doesn’t start without the scanner attached to the computer. I experienced that last fact as a downside, because I made a few scans at the office wanting to turn the raw scan data (point clouds) into meshes at home in the weekend because that can take a while. No luck there because I left the scanner at work.
An i7 processor and 16 GB of RAM are the minimum required, so you’ll need a high-end PC for this scanner.
The software is an improvement of that included with the Einscan-S in terms of both looks and usability. It runs reasonably stable on Windows 10.
Calibration
The first thing you need to do is calibrate the scanner. But unlike the Einscan-S, you only have to do this once in a while on the Pro instead of every time your setup moves even slightly. A calibration board is included. It’s made of glass instead of the foamboard as with the Einscan-S. Calibration is a 5-step process clearly guided by the software:
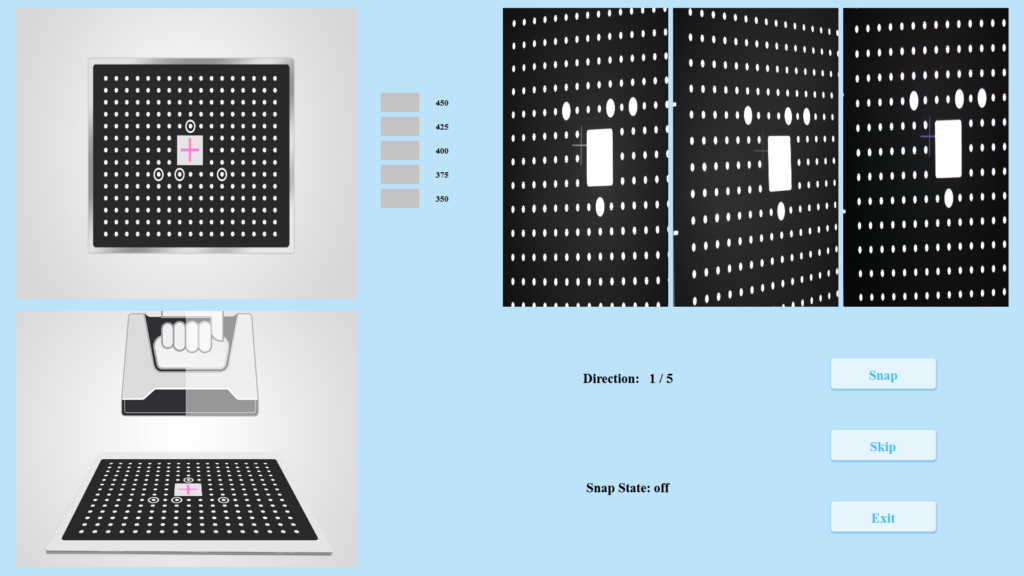
You’ll be instructed to make an up-and-down movement above the calibration board in different positions. After that you’ll use the white back of the board to calibrate the color module and HD mode.
Fixed Scanning
I’ll start with scanning in Fixed mode from a tripod. This way it’s easy to compare the Einscan-Pro to the Einscan-S I reviewed earlier. This is important, because if you want to buy a scanner for just scanning small objects, there’s a huge price gap between the two models.
As you can see in on the photos above, the first thing I wanted to scan is the adidas sneaker of my toddler daughter to compare it to the scan of the same object made with the Einscan-S.
The first thing I noticed is that while the Pro used the same Structured Light Scanning method as the S, it’s a lot faster. But while I managed to scan the black stripes on the sneaker with the S after a few tries, I wasn’t able to capture them with the Pro. I tried different room lighting conditions, including complete darkness and testes all brightness settings of the software—including the HDR mode that isn’t explained in the manual.
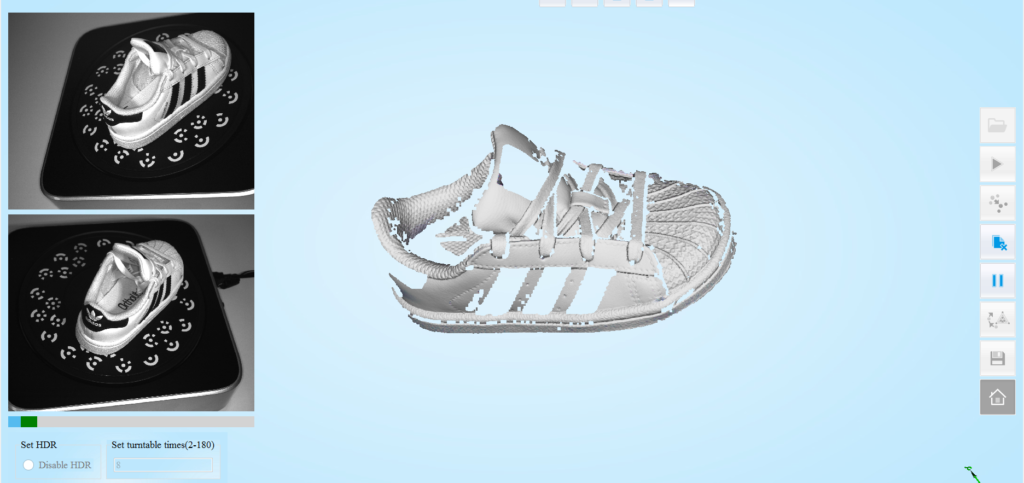
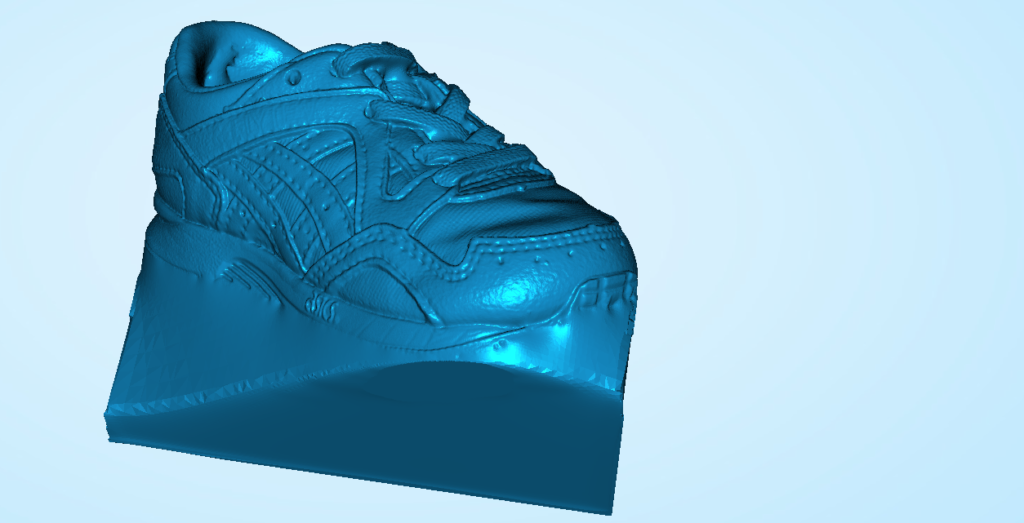
So I simply chose another pair of sneakers from my daughter’s collection: an Asics Gellyte of the same size. Below is an interactive Sketchfab embed the result without color textures. The amount of geometric details is similar to the sneaker scan done with the Einscan-S—both have a polycount in the 1.5-2M range. However, it’s noteworthy that the Einscan-S software could only rotate the turntable in 8 phases, while the Pro let’s you enter any number between 2 and 180, allowing for more accurate scans of complex objects.
You might notice that the model contains a few smaller holes and a big one at floor level. With the Einscan-S software used for my earlier review, the bottom plane of automatic scans was filled by default. This way I could simply use the hole-filling feature to close smaller holes. But with the Pro’s software, the bottom plane is left open.

To fill all holes and create a “manifold” object, you’ll have to choose the 3D print icon when you start the meshing procedure that converts the point cloud into a polygonal 3d model. The other generates a mesh without automatic hole-filling. Depending on the complexity of your model and the speed of your computer’s processor, meshing can take while. The 3D-print-ready option with hole-filing can easily take up to 30 minutes—and while it fills small holes nicely, it has no clue what to do with the missing floor plane:
This is something that needs to be fixed, because hole-filling is essential if you wan’t to export the scan for 3D printing purposes.
Hole-filing can easily take up to 30 minutes and it has no clue what to do with the missing floor plane.
In my earlier review, I discovered that the Einscan-S could capture color data even though it only has monochrome cameras. It uses a trick where it projects red, green and blue onto the object and backwards-engineers the colors. That didn’t give pleasing results, so I advised agains buying the S to people that need color data. The Pro would be capable of the same trick, but doesn’t support color capture without the dedicated RGB module—probably for the better.
Below you see the result made in Fixed Automatic mode with Color turned on. I’m not completely blown away by the color quality, but it’s a massive improvement over that of the Einscan-S. It’s surely usable for many cases.
It’s noteworthy that the textures are somewhat over-exposed (more about this later) which is hard to fix in Photoshop. The texture map is a JPG file with the strange resolution of 1296 x 1282 pixels, while it’s good practice to use square textures in power-of-2 resolutions (1024 x 1024, 2048 x 2048, etc). I couldn’t find the camera specifications of the color module anywhere, but the texture resolution naturally depends on the size of the objects. Honestly, I expected the texture resolution to be a bit better for a separately sold color module.
What’s important to note is that the build-in white LEDs allow color capturing without the need of a studio light setup. You can operate this scanner in complete darkness if needed. The flipside of white-light structured light scanning is that it works less well in a brightly lit room and won’t work outdoors in bright conditions.
Geometry-wise the result above is similar to this doll’s best friend, scanned with the of the Einscan-S: about 2 million polygons. Again, Einscan-S software did a better job with hole-filling, especially the bottom.
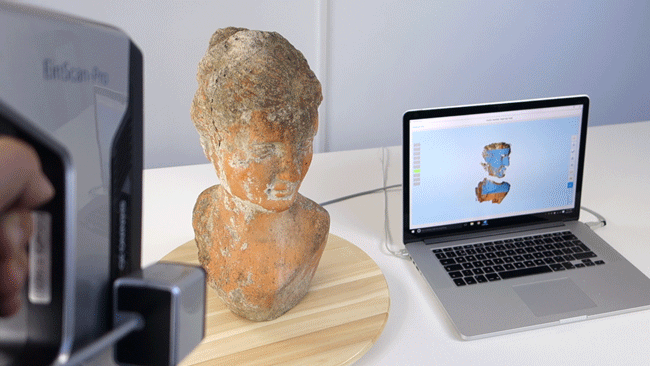
To test the maximum size of objects that can be scanned automatically—and to widen my choice of subjects beyond the toy box of my daughter—I found a 18 cm tall old jar in my parent’s garden:
Again the result is shown below and as you can see when you select the MatCap render mode (through the gear icon in the bottom right) the geometric detail is very impressive with 1.7M faces. The texture is also okay (it’s a ~1.5K texture map). There are some notable parts missing (including the rounded top edge) from the scan due to the angle of the scanner. Unfortunately, the Pro’s software won’t let you continue a scan at a different angle in Fixed Automatic mode, unlike the Einscan-S software.
To try to get a more complete scan with the same quality, I switched from Fixed Automatic to Fixed Manual mode and used my trustworthy IKEA SNUDDA turntable (you can read more about that in this post with 3D scanning must-haves). Because the projection area as a landscape orientation, I rotated the scanner to get better coverage. The tripod mount isn’t really made for this, so be very careful if you’re going to try this!
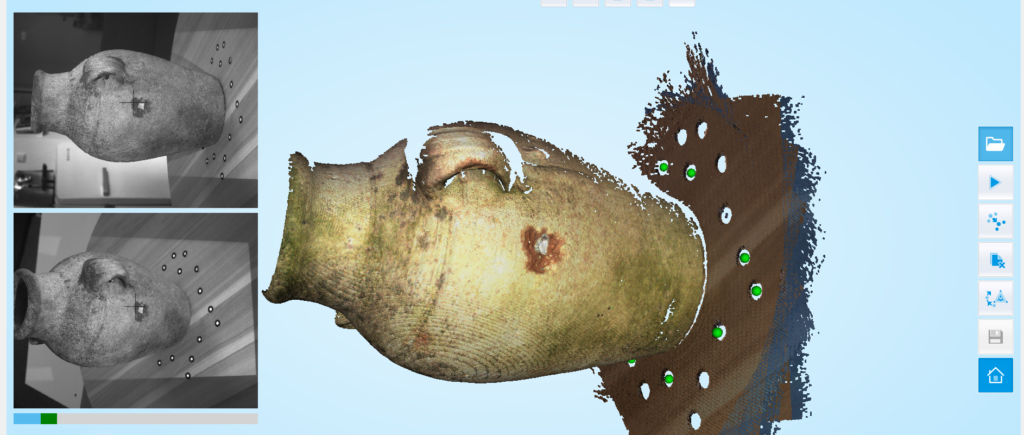
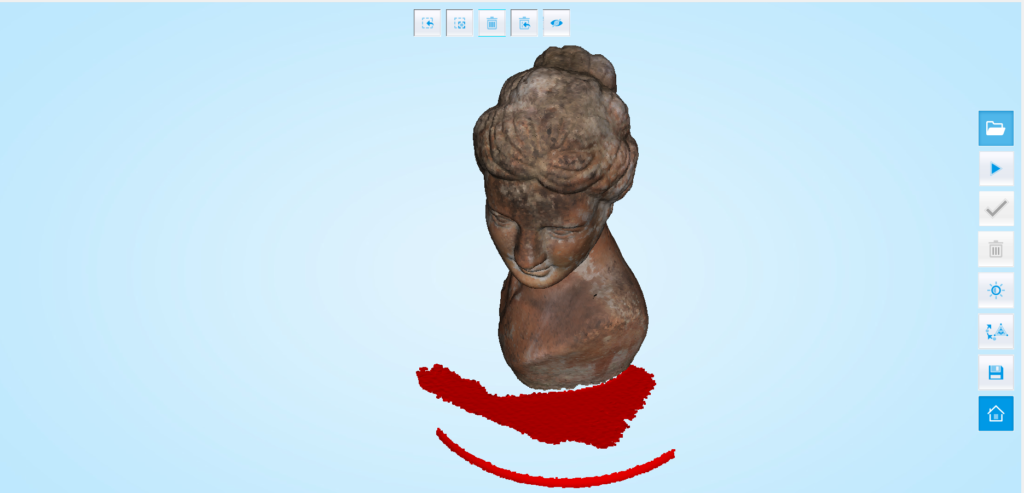
The black dots you see on the turntable are reflective marker stickers. Many sheets of stickers come supplied with the scanner and they help a lot for registration in this mode. In the screenshot below, you can see that they’re recognized as green dots. I put them on the jar at first with the idea of retouching the texture later, but unfortunately the markers create holes in the geometry (visible on the floor in the preview). And with the current hole-filling feature that will never work out.
I did a 360° rotation in 10 steps and because of the dots the software aligned all parts perfectly. Without the markers, however, the jar seemed too uniformly shaped solve. Unfortunately when I tried to change the angle to fill in some holes, the automatic alignment failed to add the new parts on the right locations and I couldn’t get it perfect in manual align mode either. The result is only slightly better than the automatic version, so probably not worth the hassle if you have the electric turntable. But if you don’t, you can always use this method by trie-wrapping the scanner onto your tripod.
It’s good to know that the advertised maximum object size of 20 x 20 x 20 cm for Fixed scanning is unrealistic. In Automatic mode many of the markers on the turntable have to be visible to the scanner, so you can’t cover them with an object that has a 20 x 20 cm footprint. And if you want to scan the sides and top of an object, my 18 cm tall old jar was already a stretch. I’d say the actual maximum for a full 360° scan lays between 10 and 15 cm on all sides and depends a lot on the shape of the object. Fixed Manual scanning gives you a bit more flexibility in theory, but the success of this mode really depends on the shape and unique visual and geometric features of the chosen object.
Handheld HD Scanning
If you want to scan objects from a greater variety of angles than the fixed mode allows and need very accurate results, there’s the Handheld HD mode. In this mode, the scanner projects a few horizontal lines onto the subject to capture the geometry.
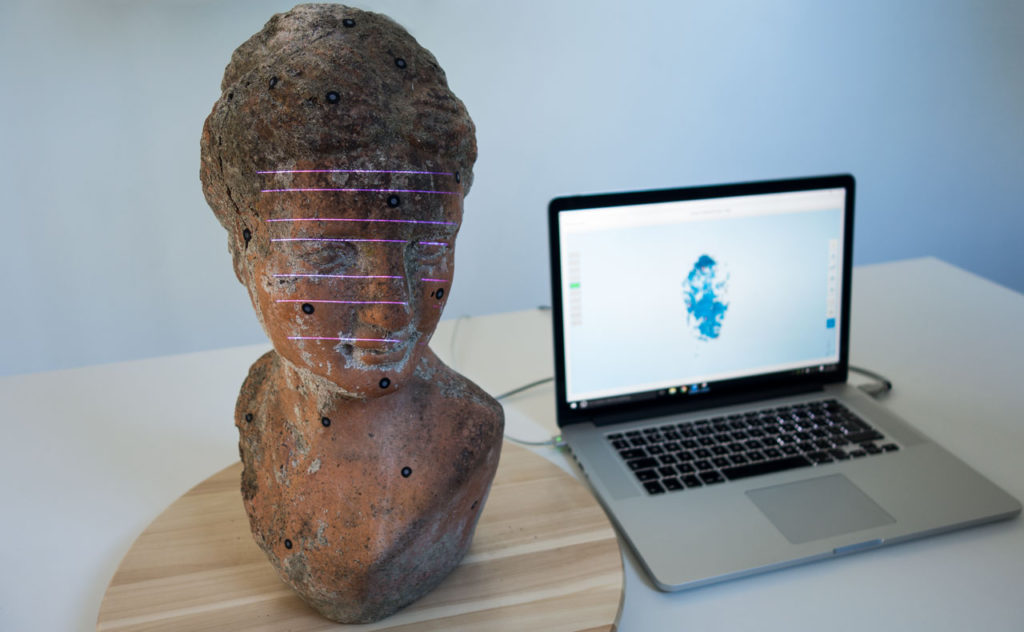
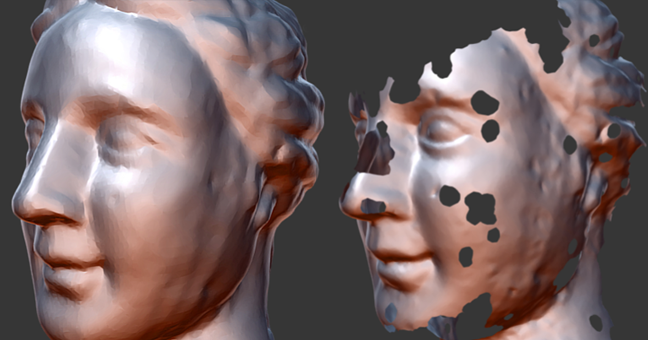
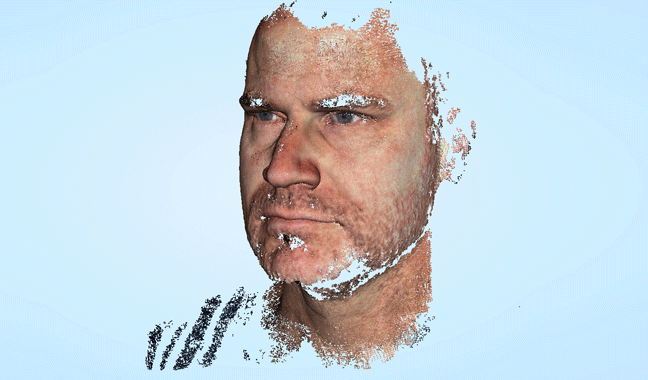
As you can see I’ve placed many maker stickers onto the surface of the bust. This is mandatory in this mode. Texture-wise this is not a problem, because color capture is disabled in HD mode—you can only capture geometry. That makes this mode less interesting for me as a creative professional, but I imagine this mode is targeted towards engineers.
You need a lot of markers for [HD] mode to work, and they turn up as holes in the model.
Either way, I found this mode hard to work with—at least with my example objects. You’ll have to move the scanner up and down very slowly to fill in the details between the projected lines. This requires a lot of patience, because the scan area is only 15 x 21 cm (half the size of a regular sheet paper).
Also noteworthy is that you need a lot of markers for this mode to work, and they turn up as holes in the model. This isn’t very practical, but the reseller I that supplied the scanner to me, Machines 3D, told me that this would be solved in future software versions.
Because this mode is obviously not meant for my purposes and needs to be updated to work better, I decided not to spend much time on it. To give you an idea of the amount of extra detail captured in HD mode, I’ve put the partial scan of the bust I made next to the same part scanned in Handheld Rapid mode (which I will cover in the next section). As you can see below, the difference is significant.
Handheld Rapid Scanning
Next, I started the Handheld Rapid mode. In this mode the Einscan-Pro projects a noise pattern to detect the geometry. The GIF below gives an idea of that, although it was hard to capture on video:
If you watch closely, you also see some white light flashes in between the projections. Those are the LED lights flashing for a split-second. Those of the color module flash independently of those around the two monochrome cameras. I captured this psychedelic light show in slow motion (4 times slower than reality):
If you imagine this in realtime, you will understand that you should keep this device away from people that suffer from any kind of epilepsy. I’ll get to this later when scanning people. First, I scanned the old jar and the bust statue again. For both I used the IKEA turntable. With the 1.6.4 version I used, the markers weren’t recognized in this mode, but according to the changelog this feature was added in 1.6.5. I didn’t have any tracking problems in Rapid mode without the stickers, so it makes no difference for these objects. I scanned both objects with the quality set to High (there’s also Low and Medium).
First, let’s take a look at the old jar:
At 75.5K faces the decrease in geometric detail compared to the Fixed Mode (3.8 million faces in the manual example) is enormous. But I guess that can be expected if you take in account the speed increase. To put this in perspective: in Rapid Mode the scanner takes 10 scans per second, so a single capture takes 0.1 seconds while a single capture in Fixed mode takes about 2 seconds and this needs to be repeated at least 8 times for a full 360° scan.
The resolution of the texture map of the Rapid scan was slightly higher than the Fixed scans (~2.2K) but notably less sharp. Probably because of the motion blur (remember, this is handheld).
The Rapid mode is by far my favorite mode of this scanner.
While the geometric quality is lower, Rapid scans as a whole were more complete because I could scan at many angles while interactively watching the preview on screen fill with information. It was easy to return to spots I missed. While scanning in this mode, it was helpful to use the plus and minut buttons on the back to zoom in and out of the preview for a closer look.
I’m really impressed by how well the software can recover when it loses tracking. When this happens, it’s usually sufficient to point the scanner at a part—any part, not just the last-scanned area—that has already been scanned for a few seconds. In 90% of the cases, the software recognized the patterns and correctly restored tracking so I could continue. It’s also no problem to pause the scanner mid-scan with the dedicated button on the back. You can then inspect the preview interactively to find spots you missed and resume scanning again.
I’m really impressed by how well the software can recover when it loses tracking.
When the model is complete, you can perform a quick clean-up using the tools on top. They aren’t very comprehensive, but work good enough to remove stray geometry.
Due to the lower amount of polygons, the meshing procedure is pretty fast in Rapid mode. Here’s the result of the bust scan above:
At 280K faces, the geometric detail is pretty good. Keep in mind that this is a statue without a lot of sharp facial details. The texture is ~4K, which is reasonable for a 38 cm tall scan. But what you might also notice is the overexposed texture. Some spots became completely white after the meshing procedure was done. I’ll have more examples of this later and I’m not sure why it happens, because the pre-meshing preview looks a lot better color-wise.
Scanning People
I scanned a few people with the Einscan-Pro and they all found the experience very unpleasant because of the intense stroboscope effect of the flickering light. In science fiction terms: some described the experience as if they were going to be teleported to another time or dimension.
Apart from the experience, scanning people proved to be hard as well. I wanted to test bust scans and full body scans, but I felt limited to face scans. This is mainly because the scanner seems a bit too slow if you want to cover every angle and the weight of the device becomes an issue after a few minutes at extreme angles.
[The Einscan-Pro] couldn’t register dark brown hair—at any brightness setting
Let’s start with Naomie who also volunteered for my earlier Structure Sensor / itSeez3D review:
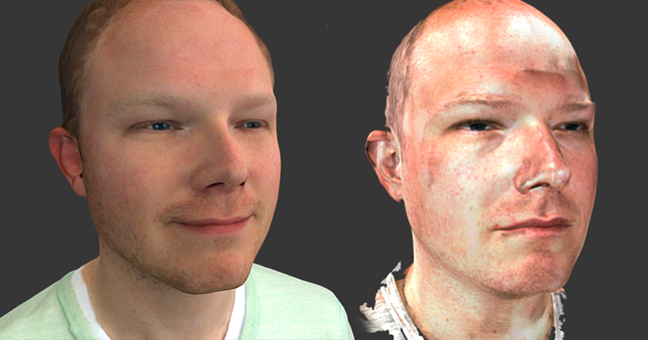
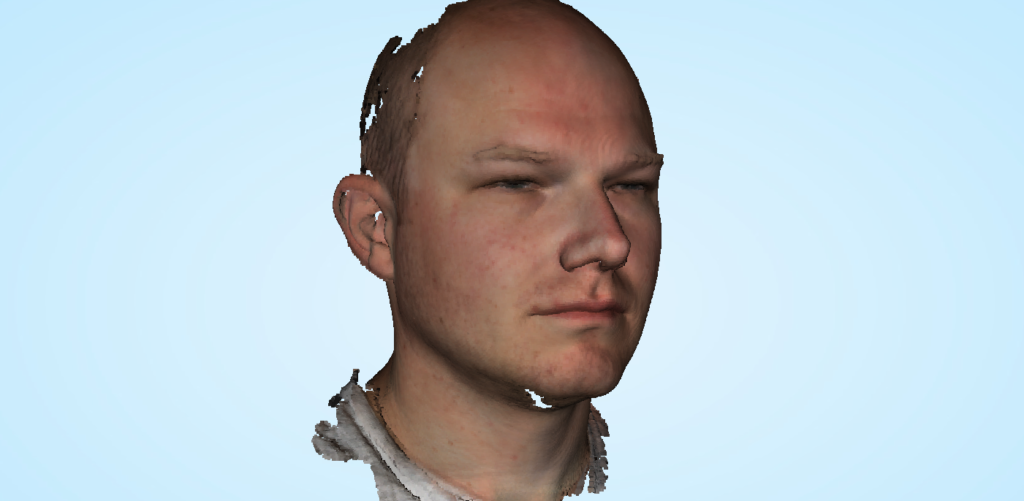
Again, the texture is oversaturated and overexposed, but more notably: where is her hair? Turns out the scanner had no problem with scanning Naomie’s face, but couldn’t register her dark brown hair—at any brightness setting—under the angles that are possible while both standing. Maybe this would have worked better at a straight, top-down angle, but that’s not realistic when scanning people. The same was true when scanning my business partner Patrick. In this example the scanner failed to capture both his hair and the bottom part of his beard—also a difficult angle to scan straight-on with a large device like this.
Geometry-wise, the scans are impressively good. Just put the Sketchfab embed in MatCap render mode and judge the detail. Ironically, in my testing the Low (Patrick, above), Medium (me, below)and High (Naomie, above) settings resulted in counterlogical polycounts of 867K, 331K and 91k respectively. This could be a coincidence, or the settings have been implemented in reversed order.
Some spots [of the texture] became completely overexposed after the meshing procedure.
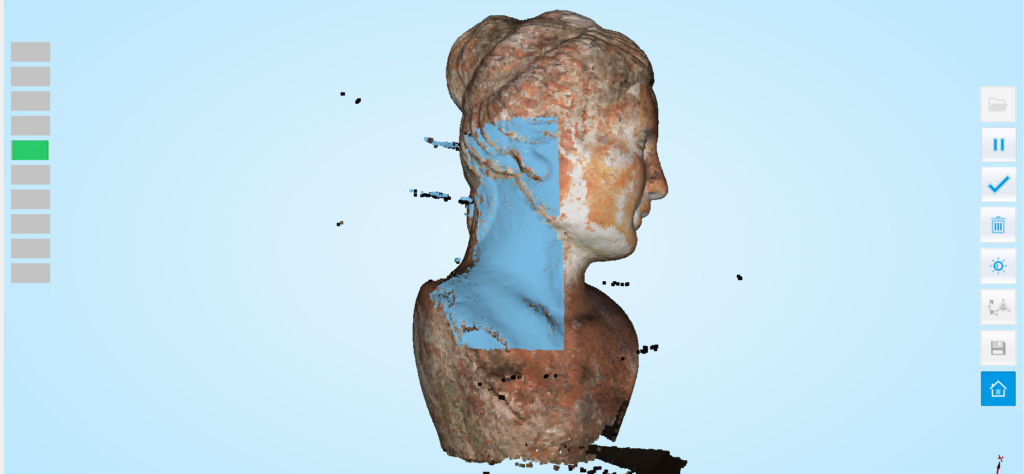
But let’s take a closer look at that color problem. I’ve made a GIF of 3 states of Patrick in the Einscan-Pro Software: Point Cloud (during scan), Preview (after scan), Result (after meshing):
Somewhere in the meshing process things clearly go wrong. I’m sure this can and will be fixed in a later software version. I did tests at various exposure settings (according to the changelog, version 1.6.6 of the software adds an overexposure warning to this setting), but got similar results. So I conclude that this issue is not directly related to the chosen exposure setting. Plus the manual states that the exposure should be judged by looking at the preview while scanning and as you can see colors in the preview look good but this changes after meshing.
The ideal scanning distance of the Einscan-Pro is relatively close, so for larger subjects it captures only a small part in a single scan.
Maybe something like realtime auto-exposure and/or flash compensation could also be possible in the future, because the actual exposure of the color photographs greatly depend on the scanning distance, since the white LEDs are very bright. When scanning in handheld mode with a turntable like I did with the old jar I could keep the scanner at more or less the same distance from the subject throughout the session. But this is difficult when walking around a subject, like with scanning people.
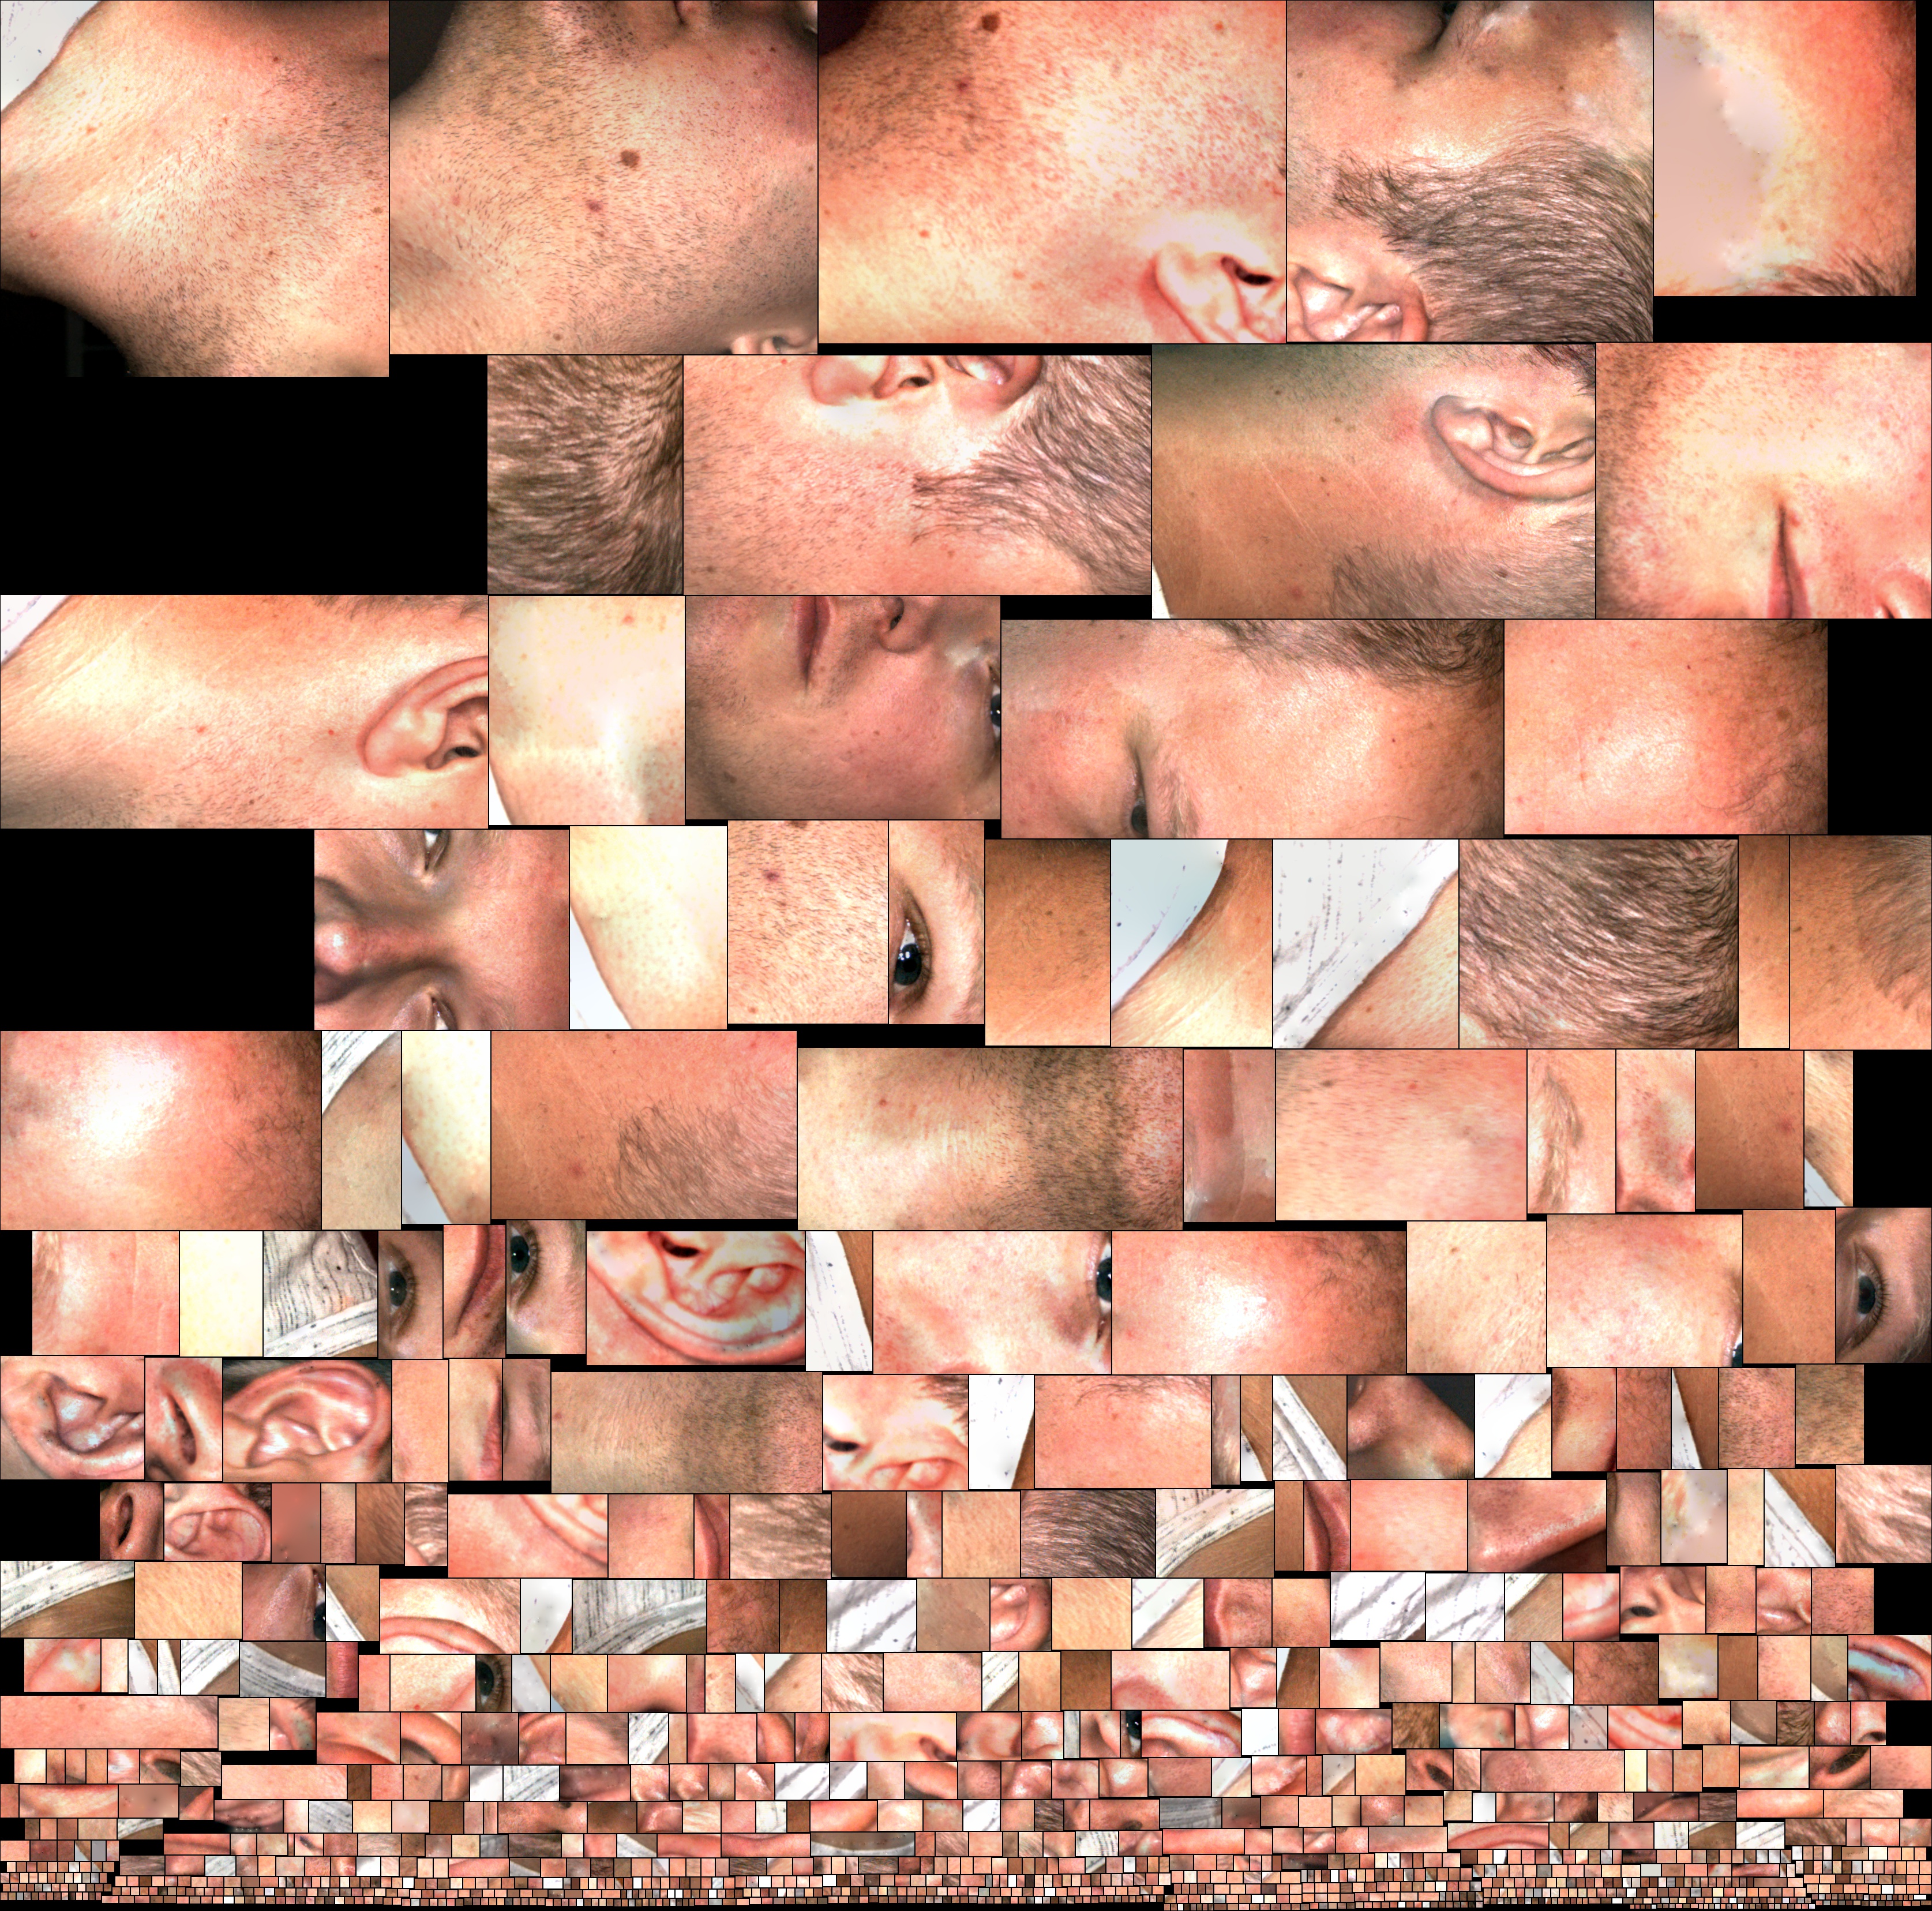
For that purpose, the ideal scanning distance of the Einscan-Pro is relatively close, so for larger subjects it captures only a small part in a single scan. That’s no issue for the geometry, but for the color scanning it results in a texture map with a lot of small parts. Below is a scan of me that clearly shows the impact of varying the scanning distance during a session—and that variation is only a few centimeters. I’ve also uploaded the unedited texture map so you can see how that’s build up from a lot of different photos.
Comparison with other 3D scanners
Geometry
The Einscan-Pro enters the market at a competitive price. You can get the complete kit for ~$5,000 compared the ~$15,000 – $20,000 price range of its industrial-standard competitors. Like I said in the introduction, I can’t compare its quality to more expensive scanners yet, so I simply won’t say anything about that until I have hands-on experience with those.
I can however, compare it to a 3D Scanner I own and have a lot of experience with, the Structure Sensor (read my full review) which comes at a price of ~$500 — ten times cheaper than the Einscan-Pro.
Let’s start with geometry. Below is a comparison between a Structure Sensor scan of my face made on an iPad mini with the itSeez3D software (left) and the Einscan-Pro scan embedded above (right), made in Handheld Rapid mode:
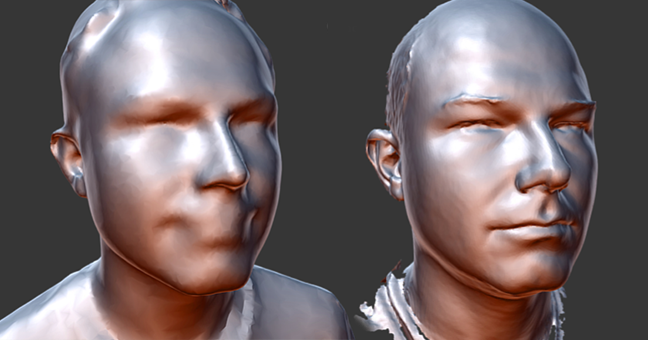
The difference is pretty clear. While the Structure scan somewhat resembles me, the Einscan-Pro scan offers a great lot more detail—that really is me. It’s really impressive and both visually and in terms of polycount, it actually is 10 times better.
But that’s just my face! The Structure Sensor let’s you capture a full 360° bust scan effortlessly in little more than a minute. Even on an iPad mini, Occipitals approach feels fluently thanks to the scan rate of 30-60 frames per second, the fact that you can scan from a further distance and can more easily use this smaller device at odd angles.
The Einscan-Pro scans at 10 frames per second in Rapid mode and from a closer distance (it’s not specified in the specs, but I measured the working distance to be between 30 and 50 centimeters). The face scan above took about 5 minutes. It was especially hard to capture noses and chins from all angles. It’s really hard for human subjects to stand completely still for longer periods of time. For comparison: the Artec EVA scans at 16 frames per second—60% faster—and can operate at working distance up to 1 meter, allowing more coverage in a shorter time.
It’s really impressive and both visually and in terms of polycount, it actually is 10 times better [than entry-level infrared 3D scanners]
And then there’s the fact that the Structure Sensor scans with infrared light. It has no problem with dark areas like brown hair, while the Einscan-Pro does. And because the Structure Sensor’s infrared light is invisible to the human eye, it’s comfortable for people to be scanned by it—not different than being filmed. The many flickering visibile lights on the Einscan-Pro aren’t pleasant to look at (in case you wonder why I’m not smiling) and it’s very hard keep your eyes open.
Of course that’s only true for scanning people, which is admittedly a niche and surely not the main target audience for the Einscan-Pro. So for another comparison of geometric accuracy, I’ll use my standard test subject Teddy: a 18 cm tall teddy bear knitted by my grandmother (he gets fan mail these days!).
But I’m not only going to compare it to a scan I made with the Structure Sensor, but also a Photogrammetry capture I made with Autodesk ReCap (reviewed here). If you’re new to this, Photogrammetry is a solution that requires no 3D scanning hardware—just a standard digital camera—and is known for its very detailed results.
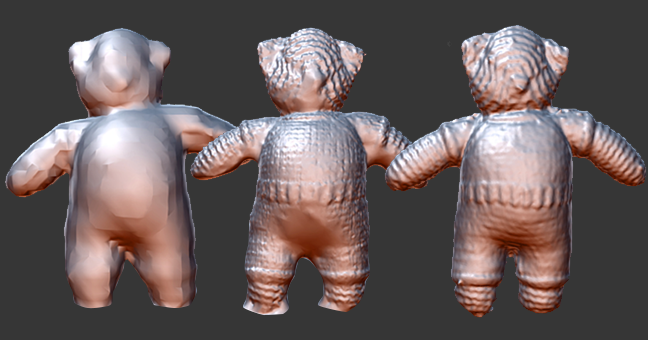
While the Structure Sensor can only capture the overall shape of the teddy bear at 16k faces, the ReCap and Einscan-Pro captures are very close and are both in the ~250k polycount range. I’m really impressed by this!
For objects like this it’s good to know that scanning with an actual 3D scanner is a lot faster and more interactive than Photogrammetry. This scan took a few minutes with the Einscan-Pro and the meshing took no longer than 5, while I made about 40 digital photos for the ReCap example, uploaded them and wait about 30 minutes for cloud processing. That is significant if you have many objects to capture.
So the Einscan-Pro clearly wins from the Structure Sensor when it comes to capturing geometry. But it’s slower and doesn’t work well on objects with dark parts. In my tests, it’s not flexible enough for 3D body scanning. But for small-to-medium sized objects, it’s faster than Photogrammetry while delivering similar geometric detail, which is impressive at this price point.
Textures
Now let’s compare the textures. Here are unedited the texture maps of the Structure Sensor (exported directly from itSeez3D) and Einscan-Pro. They’re hard to compare this way, but at 100% scale facial details like eyes are more or less the same size. And former is from an low end iPad 2 mini RGB camera—better iPads give better results. You can notice that the Einscan-Pro texture map contains a lot more small parts (called islands in texture terminology) than that of tSeez3D, which manages to cover my face in a single photo.
It’s important to note that the Structure Sensor scan was made with a light setup (which only costs €200, more details about my lights can be found here) and the Einscan-Pro scan was made in an unlit room during daytime, using the LEDs on the scanner itself.
As I said the exposure problems become a lot more pronounced after meshing and I totally believe this can be fixed with a software update if it isn’t fixed already at the time of reading. So for an as-fair-as-possible comparison of texture quality (at least in terms of color) here’s the very same scan in preview mode before meshing:
As I wrote before, I couldn’t find the camera specs but I don’t think the Einscan-Pro’s color capture module is technically as good as the cameras on recent iPads, but if the software could output a texture with the colors and contrast of the preview, I think it will be usable for many purposes.
To wrap up, here’s the result of Teddy. Again, splotchy textures on the final output but great geometry like I showed before. The Einscan-Pro even managed to capture the wooden skewer that holds Teddy upwards. I use that on all my Teddy scans, but it’s almost never captured as you can see in my new Teddy 3D Scan Comparison Gallery.
Verdict
The Einscan-Pro is better than the Einscan-S in almost every way. Its built quality is a lot better and it’s a lot easier to connect.
The Pro’s scan quality in Fixed more is similar to its “Smaller”, more affordable, brother. But automatic scanning on the Pro is a lot faster and doesn’t require constant recalibration. The only downside is scanning dark colors: In my tests, the Einscan-S performed better at this. But you can always use temporary matting spray to solve this problem.
But while the Einscan-S is purely a table-top scanner, the Einscan-Pro is a lot more versatile because it can also be used handheld. I’m not convinced by the current implementation of the Handheld HD mode—lacking color capture and leaving holes where the mandatory trigger markers are placed. But this could be because this mode not meant for creative professionals like me, but for engineers.
Those problems aren’t present in Handheld Rapid mode. This trades geometric quality for speed and flexibility. It works great for most small to medium objects and the amount of geometric detail is still impressive and sufficient for many purposes. The Rapid mode is by far my favorite mode of this scanner and I dare to say that it makes the Einscan-Pro the handheld 3D scanner with the best geometric accuracy/price ratio currently on the market.
For capturing geometric details, it’s leaps ahead of more affordable infrared-based scanners like the Structure Sensor, Intel RealSense of Kinect. Even in Rapid mode, you won’t be disappointed by the geometric detail of captured objects. And because of the excellent recovery of lost tracking, this mode is very easy to use. However, I found that 3D body scanning is hard because of the relatively low 10fps capture rate and 21 x 15 cm scan area. And the problems with capturing dark areas and/or odd angles can become problematic for this purpose.
[Rapid Mode] makes the Einscan-Pro the handheld 3D scanner with the best geometric accuracy/price ratio currently on the market.
For capturing colors, you’ll need to buy a separate module. The included RGB camera in that module is not the best of it’s kind and I might pay extra for a better model. But the main issue with color capturing is not the hardware but the software implementation. Setting the exposure manually is a bit counterintuitive—an auto-exposure feature would be welcome. And while the colors seem to be recorded fine while scanning, the software somehow messes up the brightness and contrast settings when generating the UV texture map. I’m sure this will be fixed through a software update but because I think color capturing is getting increasingly important for 3D scanning—especially for non-engineering purposes—this issue weights quite heavy in my verdict.
It’s important to know that I’ve tested the Einscan-Pro right after its release. Since I tested the scanner a few weeks ago with software version 1.6.4 there have been two software updates—that’s fast! So it’s safe to say Shining 3D is working very hard to improve the software. I advise to check the changelog on this page after reading my review to check if any issues I found have been resolved since the time of writing or contact either Shining 3D or resellers like Machines 3D with specific questions before purchasing.
That said, as an entrepreneur and small business owner, I know that while investing in ~€5,000 hardware requires a good amount of research (you’re probably reading this for a reason) it’s a lot easier than investing in a scanner in the €15.000+ range. But it’s a big investment nonetheless.
If all quirks are ironed out, the Einscan-Pro might just become something that one can call disruptive
It’s also good to realize that the Einscan-Pro is just released while its competitors have been around for many years (for example, the Artec EVA was released in 2012 and its software is currently at version 11). But if Shining 3D keeps updating their software at this pace, I expect many good things.
If all quirks are ironed out, the Einscan-Pro might just become something that one can call disruptive in an industry that hasn’t got a lot of players (and big product changes) at industry level. Anyway, between the entry-level (~€500 – €1500) solutions and industrial-grade hardware (~€15.000+), there’s now officially a mid-range of professional, handheld 3D scanners. With a starting price of less than €4000, the Einscan-Pro is definitely a 3D scanner to consider when you’re in the market for a high-quality 3D scanner.
I want to emphasize that I review 3D scanners from the perspective of a creative professional and my blog in intended for a similar audience that wants to get into reality capture for creative, cultural or commercial purposes.
I’m saying this because I realize that the more I move into industrial hardware, the more likely it will be that my posts attract readers that are looking for 3D scanning solutions for industrial applications like (backwards) engineering. If that’s you I’ll say (in Stormtrooper voice): this is (probably) not the review you where looking for. But I hoped you enjoyed reading it anyway!
I hope this review was useful for you. If you own an Einscan-Pro and have something to add (maybe because of later software updates), please let me know in the comments and I’ll consider it for an update.
If you want to be the first to know when similar posts are live, please follow me on Twitter, Facebook or Instagram. And if your think this article can be useful for your friends and followers I’ll appreciate it if you share it by clicking one of the social sharing buttons below!


how much is this ? I was in Vietnam is not whether to buy?
Hi Nick, I’m going to buy the scanner “Einscan Pro” and the new MacBook, too. The characacteristics of the MacBook are the following: Intel Core i7 quad-Core Art 2,6Ghz (Turbo Boost up to 3,5Ghz), 16GB of memory at 2133MHz and Radeon Pro 450 with a memory of 2 GB. I’d like to know whether the scanner and the MacBook are compatibile, in other words: Does the MacBook recognise the scanner, if I use Windows in Bootcamp, or do I need the graphics card Nvidia GTX 660 (or higher)?
Did you make any measurements and check them? I’d like to know how you qualify any comments on accuracy/ price. Thanks, and love your series
No I didn’t. I still have to get a good digital measurement device to accurately measure the real object. But I have the objects and scans and I’m planning to do that at some point. Not a priority currently.
I am an artist and I purchased the Einscan to capture the human form. It’s an awful device. Actually to be fair the device might be OK but you’ll never know because of the dismal software. It loses tracking all the time, slows up if it has to capture too much data, generates junk artifacts all the time and is virtually unusable unless you like frustration and interminably fighting a computer.
And I’m sure about this. Why? because I tried the Artec Eva and the results could not be less like this epic waste of money. The Eva works because it has amazing software and it’s been thought through. Do yourself a favour and find the extra money because this isn’t even going to be a good short term investment.
Paul Fryer– thank you for this response. I am looking to purchase a hand scanner for the company that I work for– they had an EinScan Pro when I first started working here and it was just awful in my experience for the same reasons you mentioned. I was considering getting an Artec product– the Artec Leo specifically, so its good to hear that Artec makes good products.
Hi Nick,
I just scanned with color pack but when i import it in to 3D program such as Maya, Blender. I can’t take the texture to rebuild the object. But when i add it in Sketfab, it look well with texture.
How can i take the texture separately?
Try R3DS to extract the textures. I works great on photogrammetry,should work fine here.
Very interesting tool! I’m surely going to write a post about that in the future. Thanks.
[…] Source: 3dscanexpert.com […]