When I reviewed the EinScan-Pro last year I concluded that it was a good new entry in the professional handheld 3D scanner market at a competitive price of $3990 plus an optional $699 for the Color Module. Add another $699 for the Industrial Pack, and you also get an automatic turntable and tripod to use the EinScan-Pro as a desktop 3D scanner.
I liked the scan quality of both the Rapid Handheld Mode and the Fixed Tripod Mode but wasn’t convinced about the HD Handheld mode. That mode promised higher handheld scan quality with a laser scanner-like line-based projection, but it was too slow to work with professionally.
I also didn’t like the color quality of some scans, especially larger objects and people. The texture maps where very uneven and not pleasing to look at.
What I also mentioned was that back then I tested version 1.6.4. of the included software and that it needed some improvements to work well enough for professionals.
This year, Shining 3D launched the EinScan-Pro+. This Plus-model is not a replacement for the Pro but an alternative option. According to the product website it has everything the Pro has, but offers a new HD scanning mode, larger scan area and faster scanning speed. It also comes with Shining 3D’s latest scanning software version 2.5.
The complete package was provided to me by Shining 3D in return for an honest, unbiased review. I’ve used the scanner for 3 weeks on an almost daily basis before writing this review and actually learned a lot about both the hardware and the software. Many of those things also apply to the EinScan-Pro so I’ve updated that review in some points to reflect my new experiences.
Hardware Specs & Pricing
Let’s start with the price. The EinScan-Pro+ base model costs $5199 — $1209 more than the Pro. But the price of the Plus does include the new R² Rapid Scanning Function that would costs an additional $499 if you want it on the Pro. More about that later. The optional hardware is priced the same: $699 for the Color Module and $699 for the Industrial Pack, As with the Pro, you get a $100 discount per module if you order them directly with the scanner.

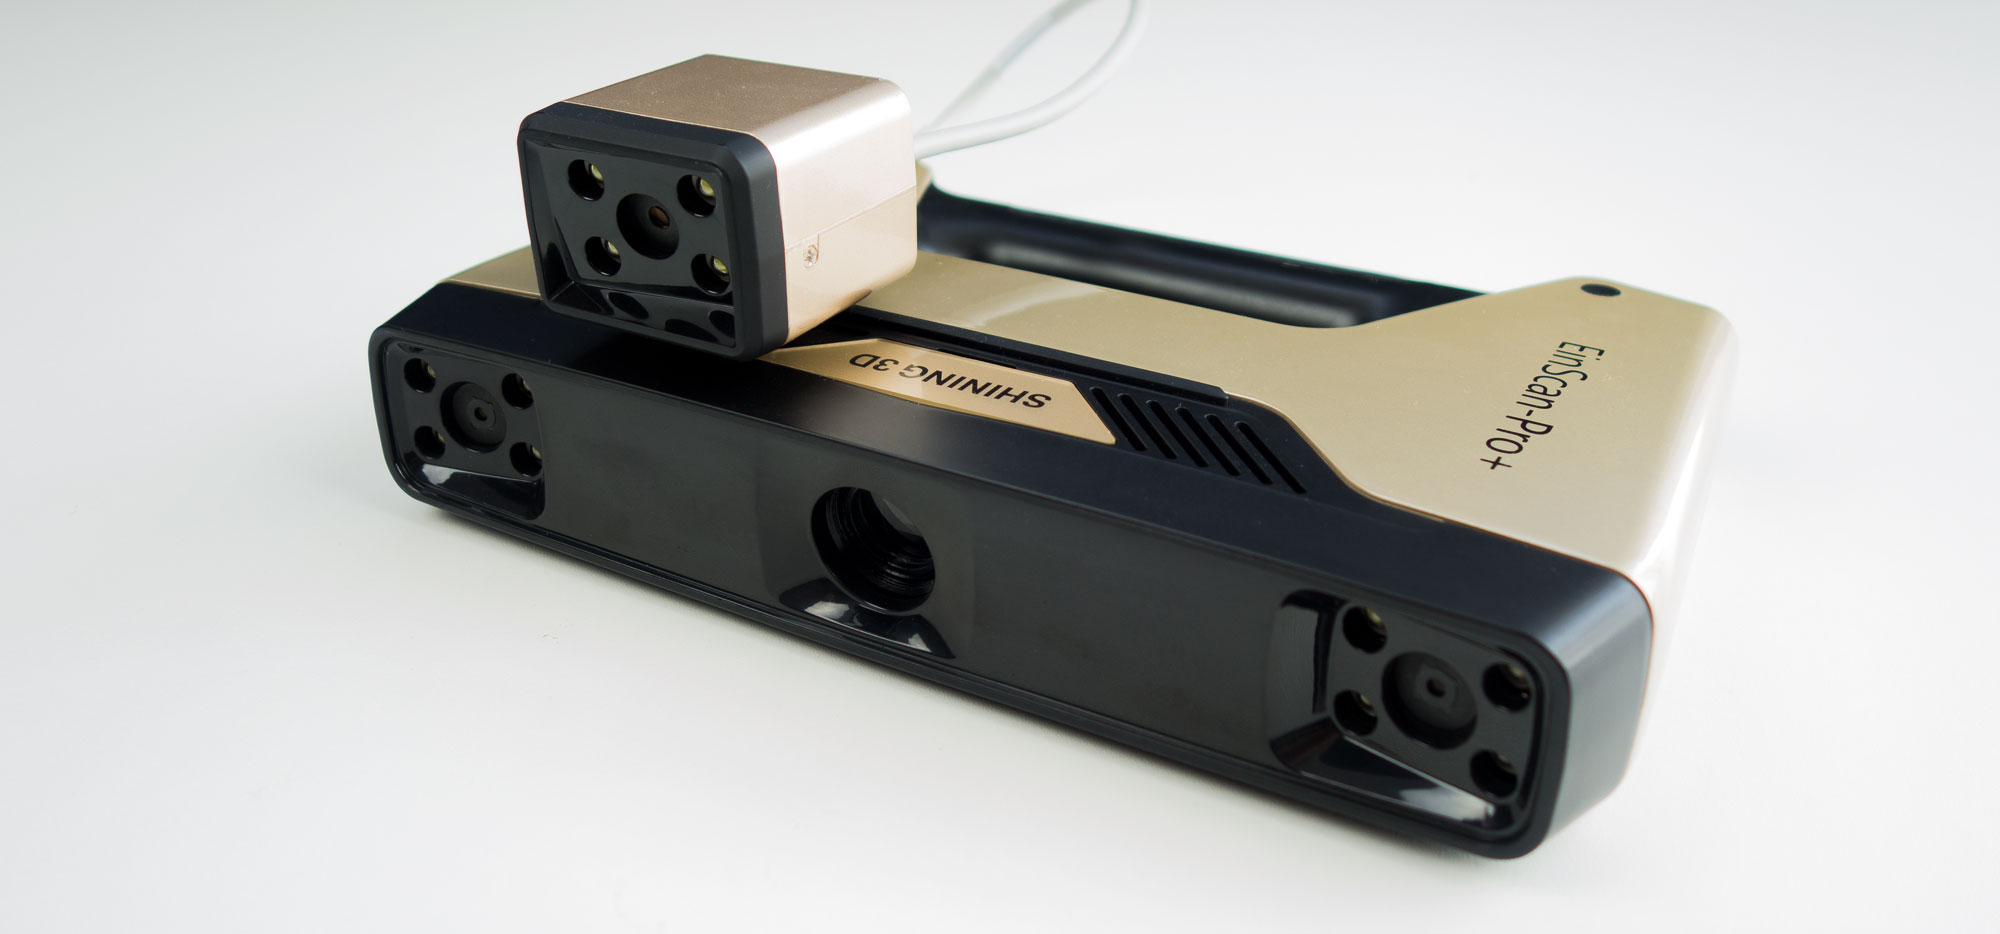
On the outside, not much has changed. The Pro+ looks exactly the same as the Pro but with a champagne gold finish instead of silver. That means it will match your new Macbook if you have one, although there’s no Mac version of the software yet (it’s in development). And my old 2012 MacBook Pro didn’t run the software well on Windows 10 through Boot Camp. So I did all tests on my Alienware Aurora desktop gaming PC with i5 processor, 32GB of RAM and a GTX1070 GPU. That machine ran the 2.5 software flawless without any crashes or instability — none!
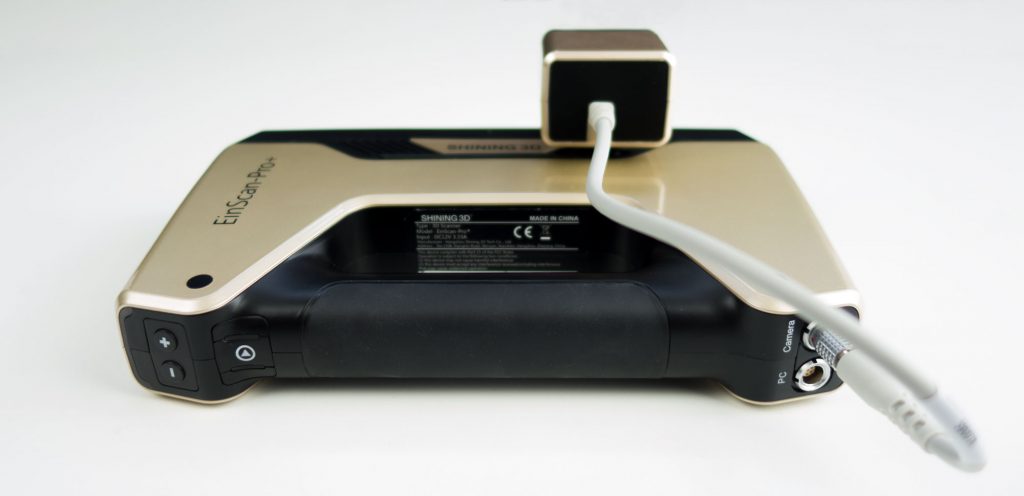
Like the Pro, the Pro+ still has the excellent single power/data cable so you don’t have to drag around two cables like the Artec Eva. It does need external power, so you can’t power it over USB from a laptop but the power adapter connects to data cable at the computer side. Aside from a button to start or pause the can, the additional + and – buttons make it easy to adjust the brightness level (now indicated more clearly in the software) and zoom in on the model while scanning.
Internally there have been some updates to the hardware. Instead of writing about them first, let’s just dive into the new features while looking at how they work in practice.
Improved Calibration Wizzard
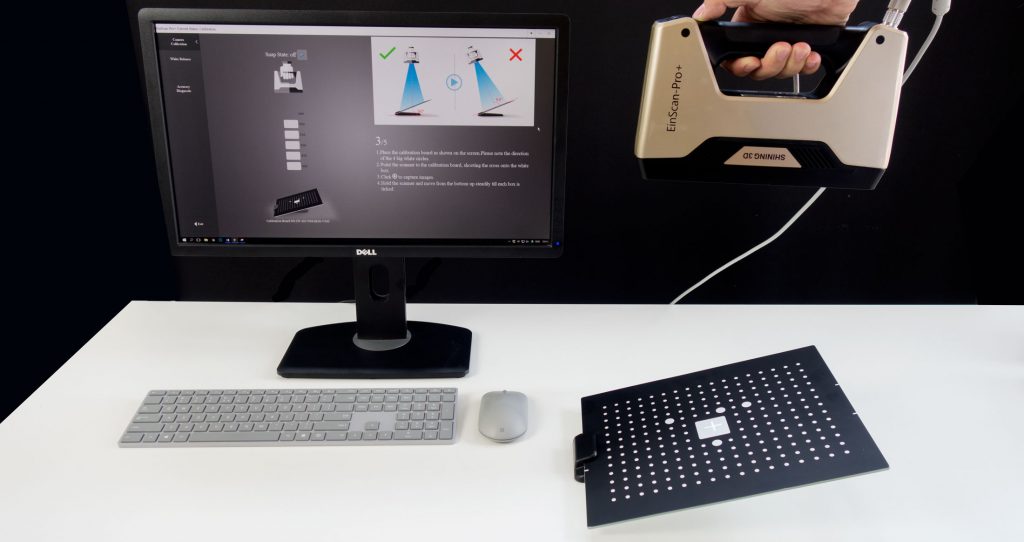
This is not really a Pro+ feature but a software improvement that also benefits the Pro. The calibration procedure — which you don’t have to do very often, by the way — is now guided with some nice videos that demonstrate exactly how you should orient the calibration board and scanner in each step. It’s a nice improvement that makes the on-boarding proces a lot smoother.
Fixed (Turntable) Scanning
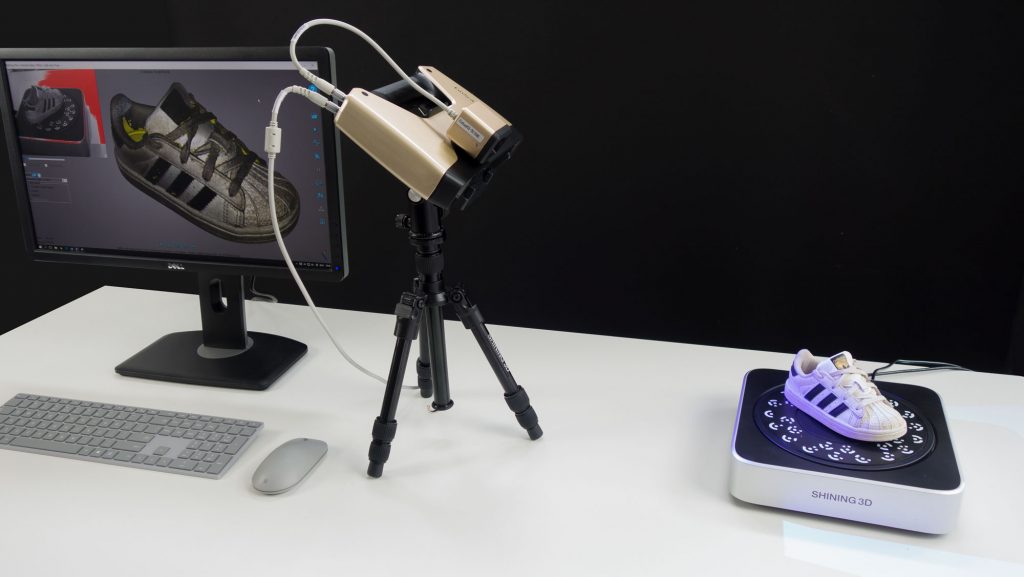
The fact that you can use this handheld scanner as a desktop 3D scanner is still something I really like. It’s very versatile that way because it let’s you scan small objects at a very high quality that wouldn’t be realistic for large objects.
It’s also faster in Fixed Auto Mode than Shining 3D’s new dedicated desktop scanners — the Einscan-SE and SP which I reviewed recently and really liked. If you only want to scan small objects, it’s really worth checking out those scanners. The SP offers similar features as the Pro and Pro+ in Fixed Mode for a lower price tag of $2299 and the slightly more basic SE is just $1299!
Fixed Auto Scanning with the Pro+ is easy and very fast.
Here’s a adidas toddler sneaker scanned with the Pro+, followed by one I made with the EinScan-SP. And if you’re curious: the SE offers similar scan quality but lacks professional workflow featured like the coded targets on the turntable and a industrial grade calibration board (vs. one made from foam board) that the SP, Pro and Pro+ all have.
If you look very closely at both models in MatCap Render Mode (which you can enable through the gear icon in the Sketchfab embeds) you’ll notice that the result of the Pro+ (3.9M polygons) has a bit more detail in the nose and sole areas than the result from the SP (2.4M polgons). But in my opinion that results is negligible for most purposes.
Fixed Auto Scanning with the Pro+ is easy and very fast. Especially with the Coded Targets detection turned on, it’s quick to scan multiple cycles and the software usually combines them perfectly without any help. And if automatic alignment does appear slightly off, you can help the algorithm by manually defining 3 similar points on each scan.
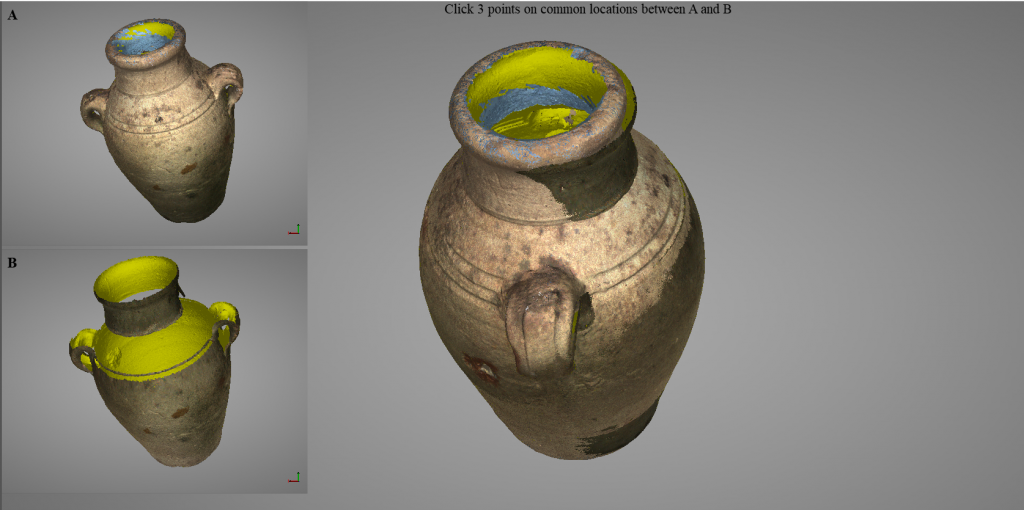
That Old Jar is 18cm tall and that’s the tallest object I could scan in Fixed Auto Mode. The exact maximum size will very from object to object. For this object, I simply did one 8-scan cycle facing upwards and another one upside-down. I helped the software a little with the alignment and then it was aligned perfectly. Here’s the result:
https://sketchfab.com/models/62e46e4e7768492ba62c8a8271d3923c
Color quality is also similar between the Pro, Pro+, SE and SP, even though the latter two use monochrome cameras with R, G, B projection to capture color and the Pro+ has a dedicated RGB Color Module. But as with the Pro, the Pro+ cannot capture color in Fixed Mode if you don’t buy the module even though it could technically use the same method as the SE and SP. But then again you won’t buy a Pro+ just for turntable scanning.
It’s worth noting that with the SE/SP, I captured the sneaker while the scanner, tripod and turntable where covered by big cardboard box. The Pro+ (and probably the Pro too) can also give better color quality in complete darkness but I discovered that color capture also worked in dim office lighting conditions. Just be sure there’s not too much sunlight coming through windows (the summer in Holland is perfect for structured light scanning this year: cloudy and rainy…yay!). I scanned the Old Jar without a cardboard box and it turned out very well both in terms of color and geometry quality.
If you’re into the details, you might also want to know that the SE and the SP have a point distance of 0.16 – 0.20 mm, the Pro 0.16 mm and the Pro+ 0.24 in Fixed Mode. Most people probably can’t tell the difference but it might be crucial for some applications.
Handheld HD Mode
When I tested the original EinScan-Pro I didn’t really get the HD mode. In that mode, the scanner projected 7 lines and you’re supposed to move it up and down to slowly fill in the details. And slow it was indeed. It also required tracking markers, which the software version back then didn’t remove and fill. I didn’t like HD Mode.
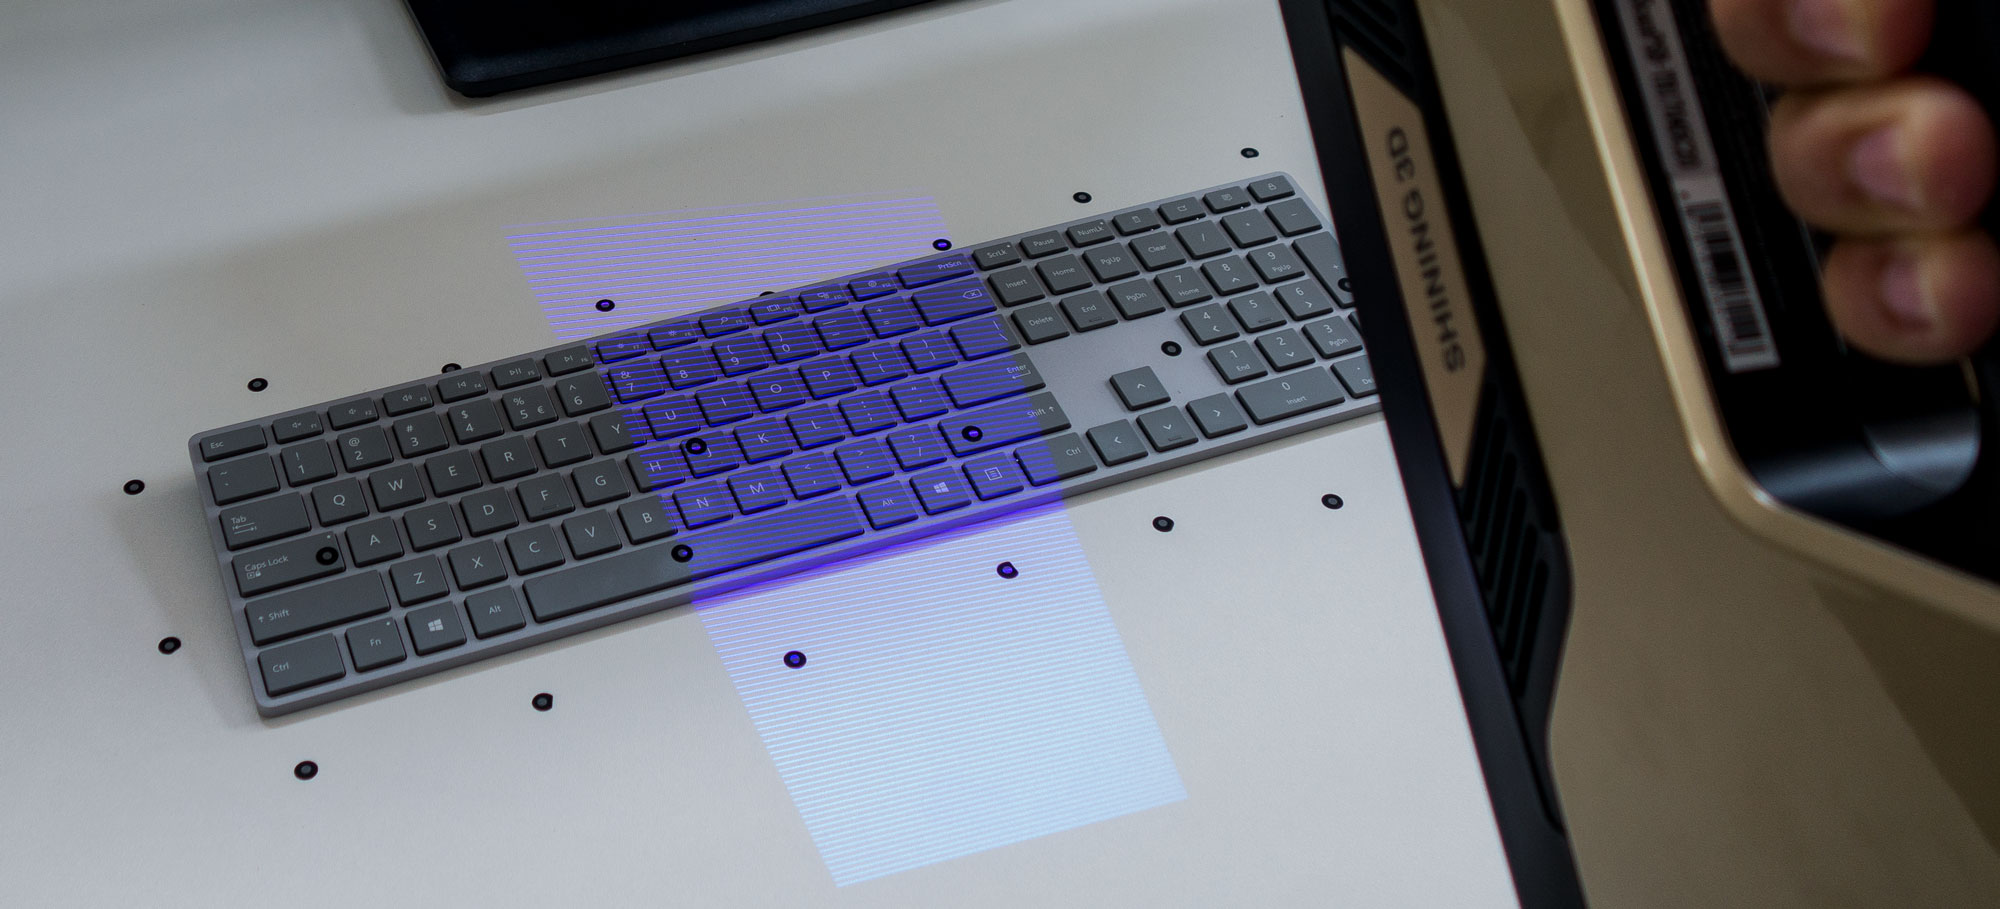
With the Pro+ the HD Mode has been updated significantly — and it actually works! There are now 100 scan lines (you can click the image above to enlarge it to see better see them) which makes the procedure a lot faster. And because of the larger scan area, you need less tracker makers to always have 4 in view (which is required). Interestingly, the projected pattern actually alternates between the line pattern and the noise pattern that the Rapid Handheld mode (which I’ll cover in a bit) also uses, so it’s kind of an hybrid mode now.
With the Pro+ the HD Mode has been updated significantly — and it actually works!
For technical objects, which don’t require color capture, this mode now works fine and offers an alternative to fixed scanning for larger objects like the keyboard above.
Here’s the result (warning: large downloads ahead):
![]()
My friends at Sketchfab — the de facto standard service for sharing 3D content online and in VR —where kind enough to upgrade my Pro account to Business so I could upload 3D models up to 500MB! Great for sharing high-resolution structured light scans. The EinScan 2.5 software has a one-click export feature for this.
Did you know you can get a Free Sketchfab Pro account simply by inviting a few friends?
As you can see it captured both the straight geometry and the curved surfaces of the Surface (no pun intended) keyboard and mouse in a detailed way. If you look at the edges of the scan, you can see some of the scan lines. The fact that this mode fuses the individual lines means that the scan quality is determined but how well you fill in all blanks while scanning instead of letting the software do that afterwards.
Still not my favorite mode, but I’m not an engineer and I’m pretty sure this is aimed at (reverse) engineering purposes. Nevertheless, the HD mode has improved siginificantly with the EinScanm-Pro+!
Handheld Rapid — and R² — Mode
So the size of a single scan has increased 1.6 times from 210 x 150 mm (half an sheet of office paper) to 300 x 170 mm. That difference is mainly noticeable with handheld rapid scanning, because you can scan objects a bit faster.
Unfortunately, the stand-off distance is still very narrow between 400 and 600 mm. For comparison, the stand-off distance of the Artec Eva (Review) is 400 to 1000 mm. That allows that scanner to have a maximum single scan area of 536 × 371 mm which is more practical for scanning larger objects and people in a shorter time. And the scanning frame rate of the Pro+ is still 10 frames per second like the Pro. This makes scanning and tracking slower than with the Artec Eva’s 16fps handheld scanning mode, especially on large or complex objects.
R² feels like a hidden feature while it’s a USP of the Pro+
But with the new EinScan software, the Rapid mode now actually contains two modes. One is the original mode that can scan both geometry and color (if you get the color module) and depends on object features for tracking. New is what Shining 3D calls R²-mode. Just like the HD mode it relies on marker stickers for tracking. This not only allows you to scan objects with less pronounced physical features, but R²-mode also offers an improved scanning resolution of 0.1mm vs 0.3mm in regular Rapid mode.
I could find the R² feature at first but Shining 3D told me that it’s activated automatically when the scanner detects 4 or more markers in the first image. They show up as green dots on the scan preview, so it’s easy to check. But the Pro can scan with markers as well, so it would have been nice if the software clearly indicated that it is using the R² feature. Now R² feels like a hidden feature while it’s a USP of the Pro+ since it’s included in the price (it costs $499 extra if you want R² on the Pro).
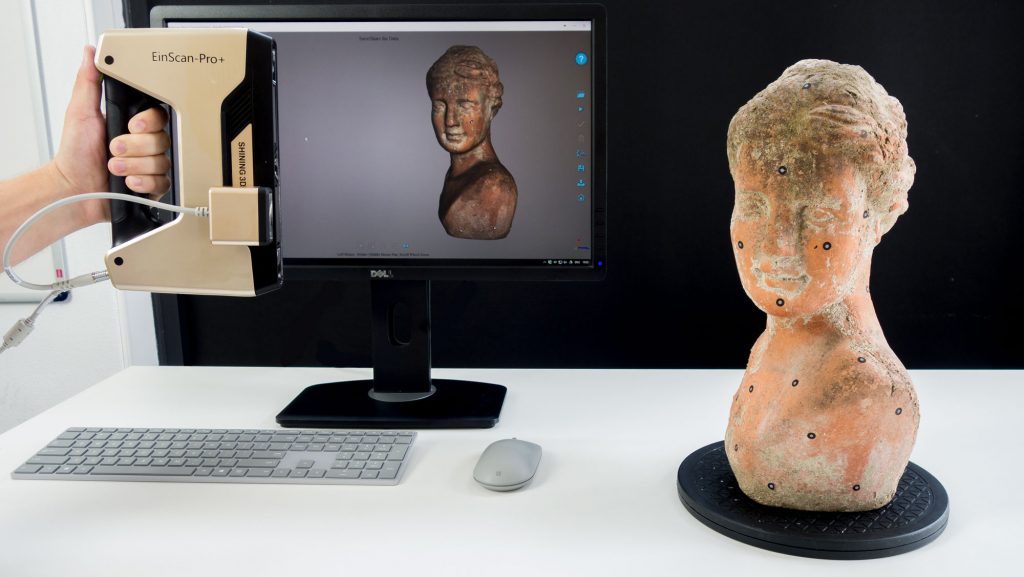
To check the difference, I scanned the bust above without markers. Both scanned and processed at the highest quality settings. First the session without markers, which I performed using a manual turntable. The bust has enough geometric and texture features, so I got no problems at all with tracking. And 10 frames per second is enough for scanning with a manual turntable. Here’s the result:
The texture was a bit dark bit dark by default. I kind of did that on purpose by not lighting the object too much, hoping to prevent overexposes areas since the software still doesn’t handle those well (more about that later). So captured an underexposed texture and color corrected that with Photoshop’s Level adjustment to get the results above.
Switching to MatCap render mode, you can see that the geometric detail is pretty nice. It’s still not the same amount of detail you can get with an Artec Eva (click here for that result) but it’s a lot more detail than a depth sensor can produce and surely enough for many purposes. That said, if you don’t need color capture, the price gap between the EinScan-Pro+ without color module and the Artec Eva Lite is around $2000. I let it up to you if that’s “still” or “just”.
Next I scanned the bust in R² mode. Interestingly, while R² can remove and fill the markers in the geometry it does not remove them from the color texture. Some kind of content-aware fill would have been nice there.
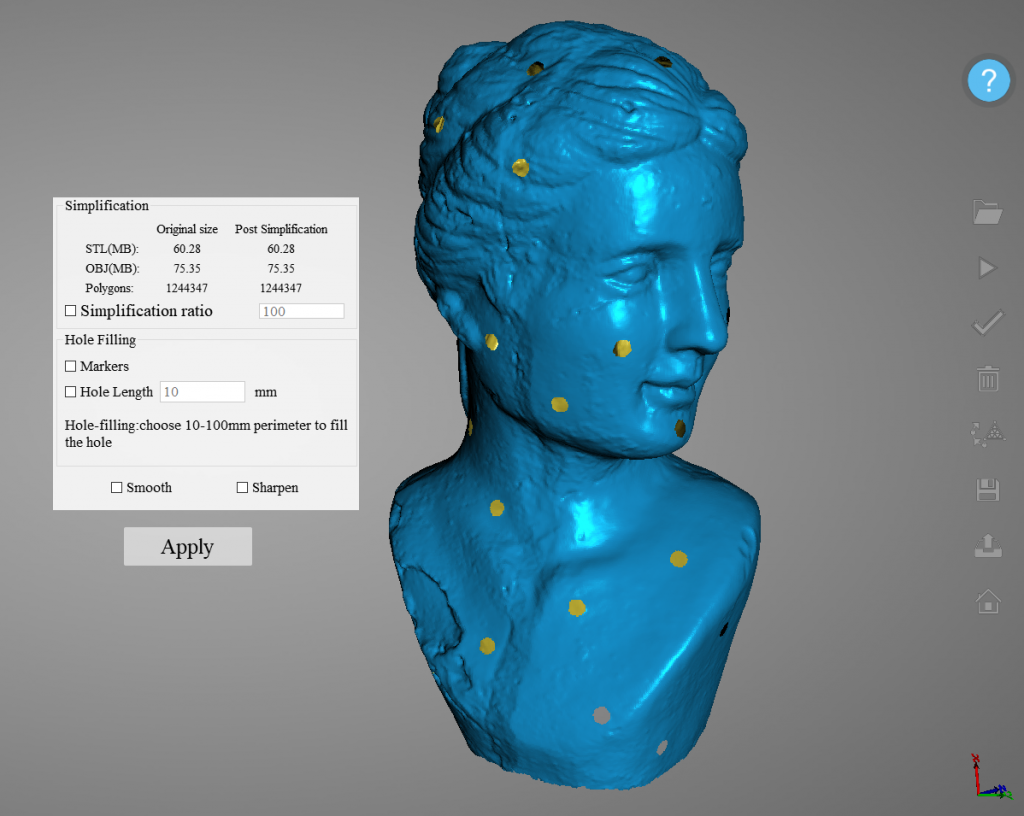
Here’s the result:
Interestingly, I see no difference in geometric quality between the regular rapid scan and the one done with R² enabled. Both models also have the exact same polycount of 1.9 million.
So I re-scanned my keyboard and mouse with R² to compare it to the HD mode. Workflow-wise, the R² scanning experience was a lot smoother than HD mode. I could do the scan in a fraction of the time. Here’s the result:
This result is a lot smoother (which works epecially great for the mouse) than that from the HD mode. It has just 600k polygons while the HD mode scan has 8.1M. If you do look closely, you can see that HD mode captured the extruded lines on the F, J, down arrow and End keys. So there’s some extra detail but the HD mode also got confused by the printed letters and delivers a messier mesh overall. So I guess you’ll have to experiment with both modes to see what works best for each object. Either way, I also tried to scan the keyboard in rapid mode without stickers, but that completely failed due to the similarities in the key-patterns.
So for the keyboard a handheld scan with markers is a good option. Of course, if you just need a scan of the mouse, it’s a lot easier to just put it on the turntable and perform a Fixed Auto scan. That way you can do a full 360-degrees capture as well, which looks awesome:
The combination of using markers in Rapid Mode in combination with a larger scan would also allow scanning of larger objects with few geometric details for tracking. Although the Pro can do this too, I didn’t have the time for that when I reviewed that scanner. So for this one I made some more time to scan a vintage fridge we have in the office. It’s non-operational and used as regular storage just because it looks cool. (it also has some nostalgic value because it was the inspiration for the name and logo of my first company — Frame Fridge — 11 years ago).
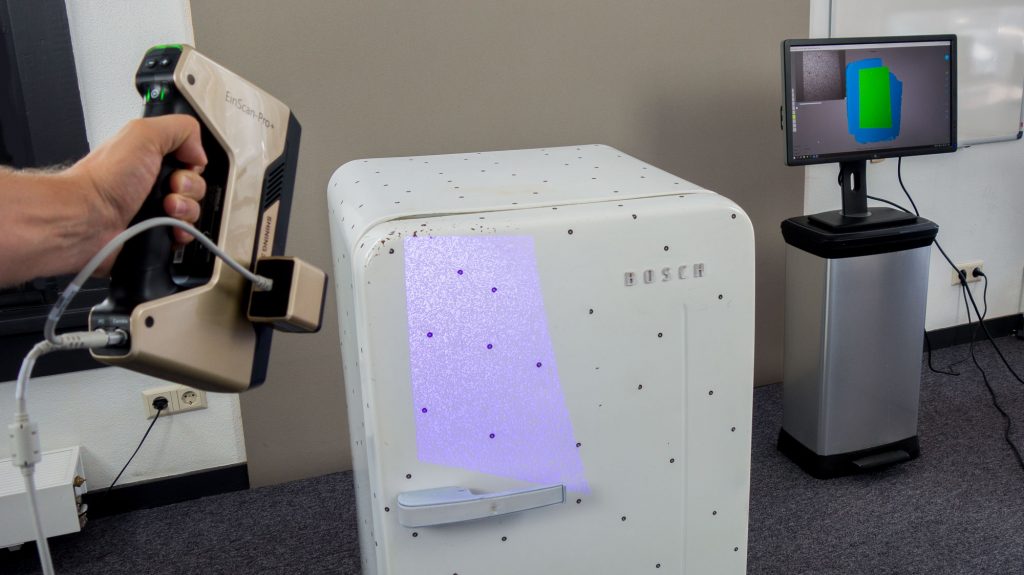
The photo above proves the larger scan area — this would be a lot harder with the normal EinScan-Pro. Also note the amount of stickers I had to put on the fridge to make this work. I first tried it with half the amount but that made tracking unreliable. Putting this amount of stickers on (and spraying the chrome details with white hair spray to be able to scan them) cost me an hour but I experienced no tracking problems at all.
I could easily pause the scanning at any time and continue scanning anywhere without delays.
As an extra bonus, I could easily pause the scanning at any time to rest or reposition myself and continue scanning anywhere without delays. Total scanning time was about 20 minutes but much of that was trying to get the right angles to scan the back-bottom details — very doable.
Here’s the result, which I couldn’t resist rendering in Sketchfab’s new Metal MatCap mode:
That result truly impresses me. At 7.2M polygons it contains a lot of details en you can see every crease and dent in the fridge’s surface. The software also did a great job of removing most marker stickers. Note that you should not put them on if they’re curled to much (which is hard to not do when pulling them from the sticker sheet) because they won’t be detected and end up in the scan result.
Scanning People
So far, so good for scanning objects from tiny toddler sneakers in Fixed Mode to fridges in Rapid Mode. Now it’s time to see if the Pro+ also offers improvements when it comes to scanning people, something I didn’t quite like doing with the Pro.
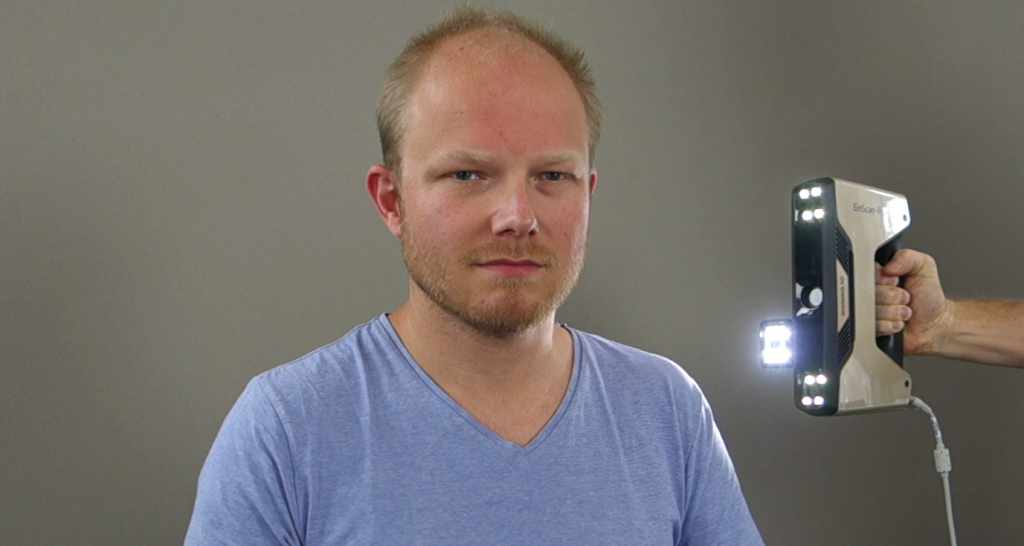
One thing that hasn’t changed is the fact that the strobing lights on the scanning, combined with the small stand-off distance, is incredibly uncomfortable for the person that’s being scanned. And even though the Artec Eva also uses flashing lights, all my test subjects and myself found that scanner less disturbing. Even if you can stand it, it makes it very hard to relax your face during scanning.
The scanner is still unable to scan hair.
That fact aside, I didn’t really discover improvements when scanning people. For this purpose, the low frame rate and close stand-off distance make tracking unstable. Any interruption in tracking is frustrating when scanning people, because you only have a 1-2 minute window for them to stay totally still. In that period, it’s not possible to scan a bust with the EinScan-Pro+.
Also, the scanner is still unable to scan hair. It doesn’t matter what hair color (or how much…), so I guess it has something to to with interference of the projected noise pattern. Lowering the brightness sometimes helps a bit, but not enough for a complete scan.
One big disappointment I had with the EinScan-Pro was the inconsistency of the texture output. That hasn’t really been improved with the new software but I discovered that the two meshing options — Watertight and Unwatertight — produce vastly different coloring results. Specifically, Watertight meshing produces a 3D model with both an image texture map and per-vertex colors, while Unwatertight only generate the latter. And even though per-vertex is usually less sharp than a texture map, the results from the EinScan 2.5 software are more pleasing that way.
Here’s an example of a scan of me meshed in with the Unwatertight option, using per-vertex colors:
And here’s the same scan, processed with the Watertight meshing option and displayed with the texture map enabled:
So that’s a big difference when it comes to color representation and the per-vertex example would be very usable for purposes that don’t require high-res textures, like full color 3D printing. And if you don’t need color at all, the geometry is very detailed. Just put one of the results in MatCap mode and check my beard.
I still wouldn’t recommend the EinScan-Pro+ to people that are looking for a scanner just to quickly scan people
It’s good to realize that if you want to implement people-scanning into a VFX or Game Development workflow, the inability to scan hair is probably no big deal. For these purposes, it’s very common to scan people with a hair net on because hair will always look weird on scans and can better be recreated digitally.
So all things considered I still wouldn’t recommend the EinScan-Pro+ to people that are looking for a scanner just to quickly scan people on location for one-on-one reproduction like 3D printed figurines.
Exporting
With the 2.5 software Shining 3D added a few new export formats, including the 3MF 3D Manufacturing Format that’s becoming increasingly popular in 3D Printing. There’s also a Sketchfab exporter which works fast but unfortunately doesn’t export color (neither textures nor per-vertex). On top of that, I still really like the fact that I can tick multiple export formats at once. This is something every 3D application should have!
Verdict
The EinScan-Pro+ is an improvement of the EinScan-Pro in many ways but it really depends on your intended purpose if you will benefit from them. If you plan to use it mainly as a desktop scanner for small objects, you won’t notice the difference. And you might be better off buying the EinScan-SP at less than half the price.
But the USP of the Shining 3D’s Pro-line of scanners is their versatility. There’s simply no other brand that offers a 2-in-1 high-res desktop scanner and handheld scanner. And if you have or are starting a business where you have no idea what you will be scanning, that’s a very nice place to start. And with the EinScan-Pro+’s larger scan area it’s a bit easier to use for scanning larger objects. On large objects this will reduce scan time and improve tracking — scanning a complete fridge was realistically doable with makers. But for medium object that fit on a small, manual turntable the difference in scan size is negligible, at least in Rapid Mode.
The Pro+ features an improved HD Handheld mode, which is now actually usable with 100 scan lines instead of 7. While my test objects might not be the best fit for it, I’m sure it can be a benefit for larger technical objects that are impossible to scan in Fixed Mode but require more detail than Rapid Mode.
With the EinScan-Pro+ Shining 3D has made the most versatile professional 3D scanner on the market even more versatile.
That Rapid Mode now also features improved resolution when using marker stickers, called R². While it costs $499 extra on the Pro, it’s included with the Pro+. Unfortunately I couldn’t really tell the difference in my tests between R² and Rapid Scanning without trackers. Maybe it wasn’t activated, but that would then be a UI design flaw since it’s not clearly indicated enough. The R² feature also isn’t explained in the manual so it’s hard to judge if I’m doing something wrong.
What’s also not documented is the fact that the two meshing modes use different colorization techniques. The watertight meshing mode produced image texture maps besides vertex-colors while the unwatertight option only uses the latter. This is important to understand, because for small to medium objects the texture maps usually seem to improve the appearance of color while the vertex-colors look better on large objects and people, albeit less sharp.
Scanning people still isn’t the Pro-lines strong suit. It’s a bit faster on the Pro+ because of the scan area but it’s still hard because of the relatively low 10 fps frame rate and the scanner has a hard time scanning hair.
So it’s not a dedicated people scanner in my opinion, but it’s great for scanning objects and probably the most versatile scanner for that purpose. You can scan anything from a tiny toy (in Fixed Mode) to household appliances and small vehicles (in Rapid Mode). But tracker markers are required for many non-organic objects.
On the software side, things have also improved. The new calibration wizard is easy enough for beginners and the software ran completely stable in my tests, which might be the most important thing for professional use. The new software can now export to more file formats and directly to Sketchfab but the latter unfortunately doesn’t export textures.
All things considered, with the EinScan-Pro+ Shining 3D has made the most versatile professional 3D scanner on the market even more versatile for people that are interested in scanning large more quickly or medium objects with more detail. If those features are worth the higher price, is up to you.
I can’t wait to see what they come up with next!
Full disclosure: I gave a paid presentation (about the Future of 3D Scanning Beyond Engineering) at the Grand Opening of Shining 3D’s EMEA office in Stuttgart but the company stressed that both my presentation at that event and reviews of EinScan products after that should be unbiased. This review was published independently without being read by anyone beforehand.


Could you make the 3d sneaker or the texture for the sneaker available for download?
Hi, i need to buy a 3D scanner for small medical devices for my university. What would be your top 3 recommendations? Thanks!
Hi,
Artec Eva vs Einscan Pro
What would you recommend for a startup business in scanning objects like gearbox housings, castings,…with accuracy of 0,05mm?
thank you
Please send me an email for tailored advice on that.
День добрый. какие оптимальные системные требования к ноутбуку, для работы с этим сканером?
Oh, 3DScanExpert,
I am currently using a XBox 360 Kinect for scanning, but it cannot process the fine details the automotive door panels I am scanning. I am interested in an Einscan, but I am unclear if I need to spend the additional money on the Plus model. Please help.
Thanks, Blurry Models
Hello!
Can you please make a review of the HD prime pack of the Einscan Pro plus?
Their official video reveals insane details from free hand scan and it would be good to know if you can scan persons well with this addon, or should I go for EVA Lite?
Also, if HD prime is set, the colors from the color pack are lost? Because I think you cannot put both in the same time.
Thank you!
would like to see a review on their pro 2x plus.
Hi Good day.
What is the useful life of this scanner? And how long can it be used for high circulation?
I want to scan for furniture pieces.
Hi
i hope you are doing well.
i am looking forward choosing a scanner for automotive industry in which two features so important to us including :
1- scanning without using pattern document and
2- scanning fast and doesn’t need to use aluminum oxide.
i really appreciated can help me.
best regard
Vahid