Little over month ago I wrote a preview post about the EinScan-SE & SP desktop 3D scanners, after attending the launch event in Shining 3D’s new office in Stuttgart, Germany. Now — after a few weeks of testing both devices — it’s not only time for a full in-depth, hands-on Review, but also a comparison between the two.
Pricing
I wanted to test them at the same time because there’s quite a price difference between the $1199 SE (E standing for Elite) and the $2299 SP (Platinum). So after reading this post you’ll know exactly what you get more for $1100. You’ll also know if you get less when buying one of the EinScan desktop scanners instead of a HP Structured Light Scanner Pro S3 (a.k.a. DAVID SLS-3) that I reviewed recently, which costs about $6950 for the complete kit with two cameras and a turntable.
And of course, I’ll also go into the difference between the EinScan-SP and the EinScan-Pro (Review), that now look like brothers but are still $3300 apart if you want the latter to also have both an electric turntable and a color scanning module.
Original EinScan-S Review Summary
When I reviewed the EinScan-S my verdict was that I was naturally amazed by its very competitive price, but also the detailed scans the scanner could make. On the downside, I found the amount of cables — and especially the thick VGA cable — quite a hassle to set-up and operate. On top of that the included stand was to light for the top-heavy scanner head and could easily be moved accidentally, requiring re-calibration. Finally, at the time of the review the software was obviously underdeveloped in terms of stability and interface design.
Different Colorways & Tripod Compatibility
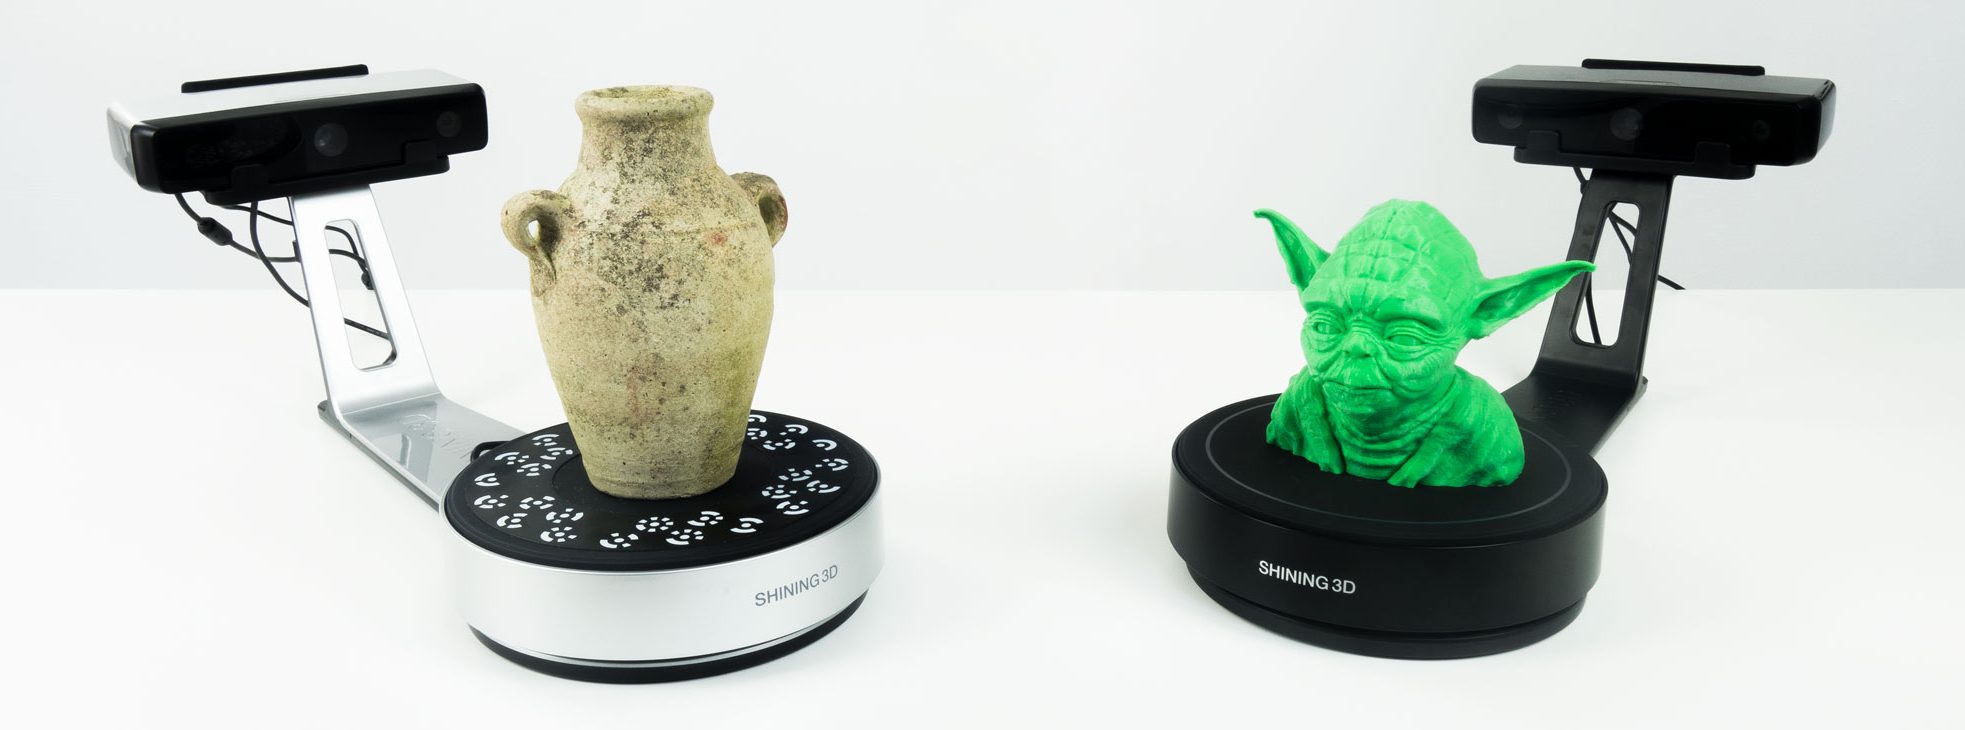
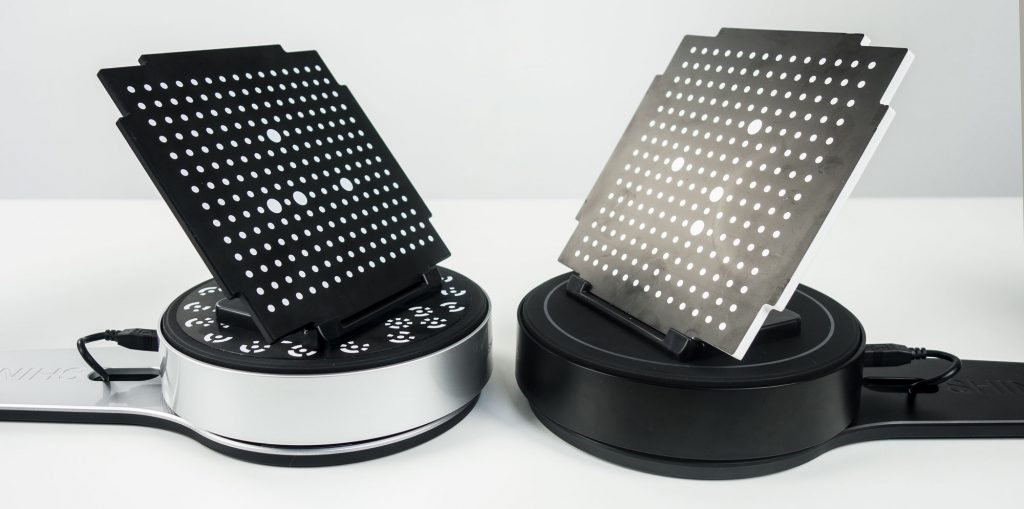
The EinScan-SE (pictured, right) and SP (left) look very similar. The SE comes in matte black which makes it follow the aesthetics of the S and the SP has glossy silver elements, which makes it look like a small EinScan-Pro. And while the P officially stands for Platinum, SP could just as well stand for Small Pro.
I personally like the matte black color better. That is subjective and largely influenced by the fact that I’m a Batman fan (read about how 3D Scanning was used to create VFX for the Gotham TV series here) and all my other computer peripherals are black.
Small enough footprint and look good enough to have a permanent place on your desk
Opinions aside, both the SP and SE have a small enough footprint and look good enough to have a permanent place on your desk — especially compared to the original S. And now you have only one USB cable (compatible with 2.0 and 3.0) and one power cord running across your work space and you accidentally moving the scanner head — which the S would do if you breathed to hard — is almost impossible now. That’s both true when the head is in the stand or on a tripod. Which, by the way, is included with the SP but not with the SE.
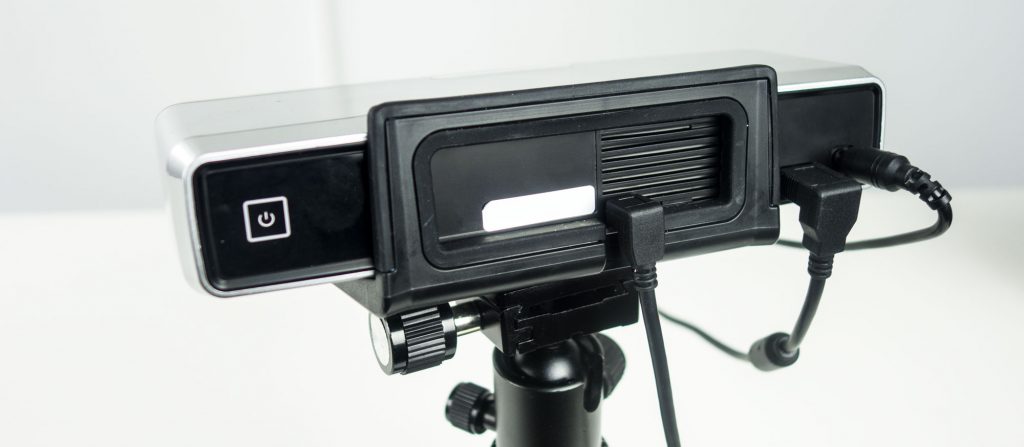
Luckily, both scanners now have a standard tripod thread so you can use any tripod you have for added flexibility. And as you’ll see later, you are going to need a tripod to scan most objects. I used a $80 Manfrotto Action Tripod which I personally find a bit easier to use (quicker to adjust and easier quick-release) than the tripod that came with the SP. That said, the included tripod (pictured below) is portable and sturdy.
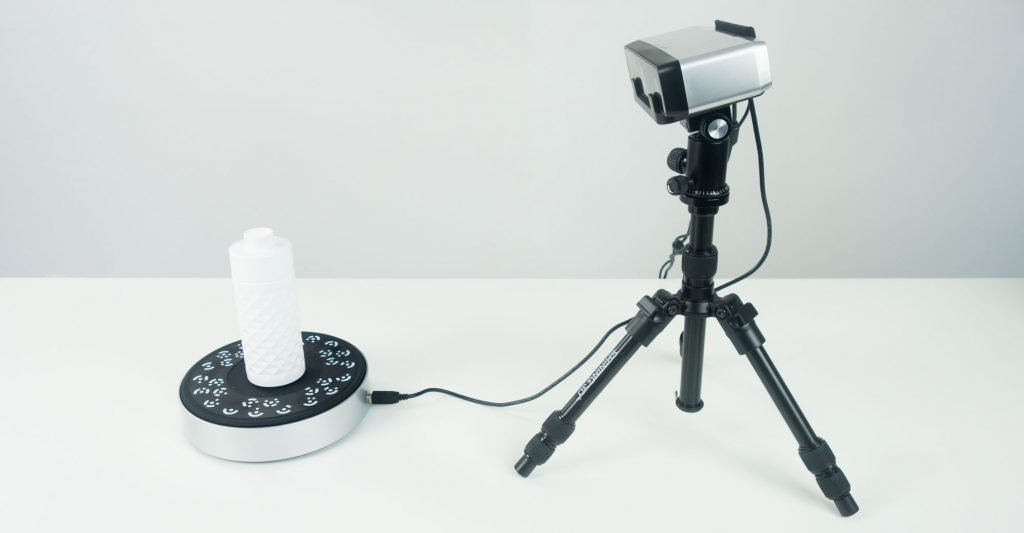
As a last note about the new design, I found it a bit awkward that when the scanner heads are in the attached mounts they seem to be tilted a bit to much upwards. This allows you to scan slightly larger objects but doesn’t scan all the way to the turntable. I actually put most models on a 1cm stack of Post-its to elevate them a bit.
Software & User Interface
The EinScan software has improved a lot since my review of the original S. I’m going to be completely honest here: it look better but it still won’t win any UI-design awards. But it’s functional and a lot more stable, which might be the most important part. The interface does change depending on if you’re using the SE (light blue with dinosaurs) or SP (grey with stylized icons) so it’s clear what target audience Shining 3D has in mind for the two models.
What I dislike about the software is that it’s basically a collection of completely separate programs made to look like a single one. And every separate program loads very slow. Not only are the Fixed Scan mode, the Auto Scan mode (with the electric turntable) and scanning with or without textures in both modes, are completely separate. You also have to leave either of them if you discover you have to recalibrate the scanner.
It’s basically a collection of completely separate programs
The same is true if you discover the colors aren’t captured correctly. You’ll have to go back to the “main menu” and reload the scanning mode because that’s the only time it asks if you want to calibrate the white balance.
The in-between loading can take minutes, even on a 6th generation i5 processor with 32GB of RAM. In my opinion it would be a real improvement if I could just toggle between fixed and automatic scanning, textured or color-less scanning and perform the calibrations without leaving my project.
On the upside, the software is pretty stable. I only encountered crashes — as in complete system freezes — when I chose to process the scan data as a watertight mesh at the highest quality setting. The crashes were always at 85% but it only happened with a few objects. Otherwise the processing cycles of the software are fast — a sheer contrast with the startup times. What’s especially fast — and good — is the registration algorithm. Whether it’s a complete 360-degrees cycle in Auto Mode (which the software sees as a single scan) or a separate scan in Fixed mode, I encountered almost no problems with registration and it was all done in seconds.
What’s especially fast — and good — is the registration algorithm
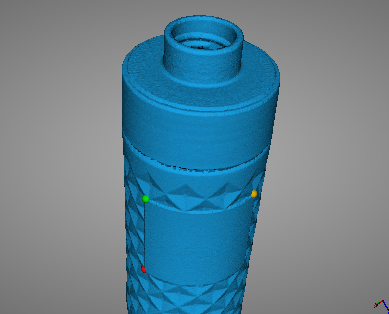
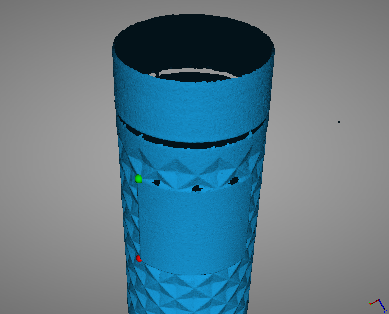
And in the rare case of a forgivable registration mismatch it’s pretty easy to help the algorithm by manually selecting 3 points on both scans. You can see this in the example below where I took two scans of a bottle — one facing up and one facing down with the scanner head in the same position. The automatic registration made both the top and bottom facing upwards, but after selecting these 3 points (It took me a moment to discover you have to SHIFT + click in the two small viewports to place points) alignment was fixed in a blink of an eye.
What also has improved is setting the brightness. An over-exposure indicator now helps you find the best setting.
System Requirements + Mac Version
According to the product website the SE requires an Nvdia graphics card with 1GB of VRAM or more and the SP requires a Nvdia GTX 660 or higher with at least 2GB. My test PC has a brand new GTX 1070 with 8GB of VRAM. It’s also good to know that the SE required 8GB of regular system RAM and the SP 16GB. My test system has 32GB.
But since most low-end computers, laptops or tablets don’t have a discreet Nvidia graphics processor, I was curious if that is really necessary. So I completely disabled by GTX 1070 and ran Windows 10 on the integrated Intel HD Graphics 530 GPU. To my surprise everything worked fine. I could capture, do registration and mesh processing without any noticeable difference in time, quality or experience. The only difference might be that viewing the mesh at the highest quality is a slightly less smooth experience because 15.5 million polygons is probably a bit much for an integrated graphics processor. But it was not distracting at all.
I want to stress that I’m not claiming anything here. Just wanted to check the EinScan software would run on integrated graphics and it does.
Currently the software is only available for Windows. At the Shining 3D event I was told that a Mac version of the software is development, but I’m not aware of a release date.
Calibration (Board) & Light Conditions
Of course there are more differences to be expected on the SP for almost twice the price. One thing you might not notice on product photos is that the SE comes with a calibration board made from foam board and the one that comes with the SP is made from heavy duty material, I’m guessing ceramic or something. It comes in a protective pouch and feels a lot more pro. It probably won’t matter for calibration but I’m sure the foam board one will not last for years. It’s also more prone to fingerprints and harder to clean.
While the board is now bigger and the stand (which is the same on both models) is studier than the original S I still don’t like the calibration method on the EinScan-S series. It still requires you to rotate the board in 3 positions and the calibration process still has no smartness built in to let you know you’re doing it right. You can put a potato on the turntable and it would still continue to the next steps, only to let you know “calibration has failed” when crunching the numbers at the end — which takes surprisingly long.
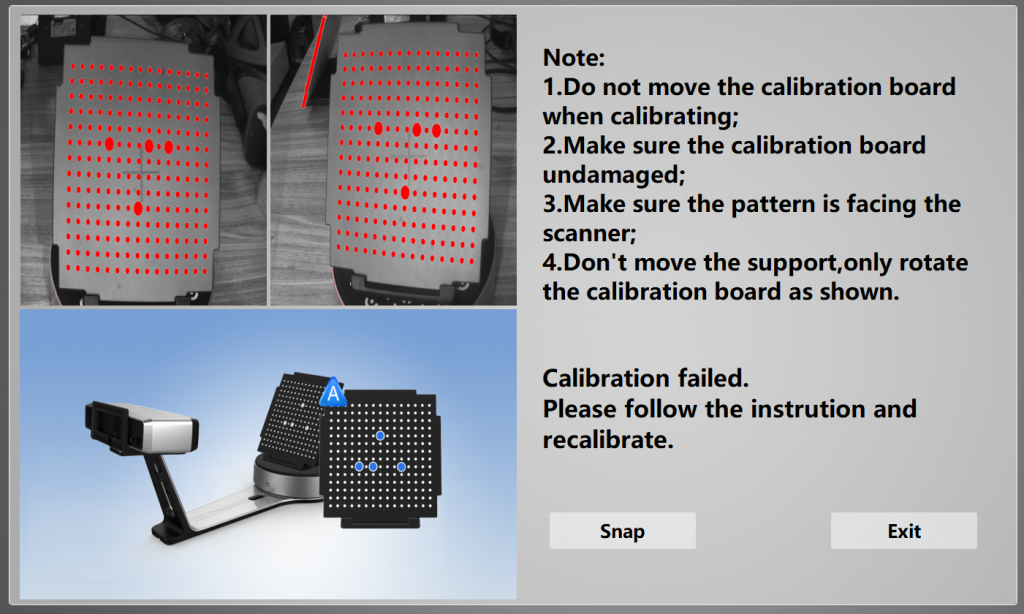
It can also be hard not to move the calibration board holder when removing, rotating and re-installing the board — especially with the lighter foam version that comes with the SE. Quite a few times I accidentally moved the holder at the second or third step. And because there is no back button I had to quit the calibration program and wait for it to restart. During which, for some strange reason, my monitor-mounted RealSense SR300 depth sensor (which I use to log into my PC through Windows Hello’s facial recognition, but also reviewed for 3D scanning here) also turns on a few times. (I smiled every time!)
For optimal results, these scanners should be operated in complete darkness
At first I had a lot of failed calibrations and couldn’t figure out why. I took me a while to realize that it had to do with the fact that my office is nicely bright lit and it’s almost summer. Structured Light Scanners don’t like other light in general but the SE and SP basically hate light. Even in a dim-lit room, the geometry would capture but the color wouldn’t. For optimal results, these scanners should be operated in complete darkness. For this Review I took all scans in complete darkness (unless noted otherwise) and for this I simply used the large cardboard shipping box my two scanners (which themselves come in beautiful boxes) were delivered in.

Turntable Coded Targets
Another aesthetic difference is the turntable. The one that comes with the SP has 12-bit coded targets printed on it, similar to the ones I used when reviewing the Agisoft PhotoScan photogrammetry software.
The benefit of the coded targets would be that you can move the scanner head when it’s on a tripod. I tested this effect by scanning an object with a very generic shape with both the SP directly after calibration and then again after rotating the scanner a bit. Here’s the result without and with the Coded Targets feature turned on:
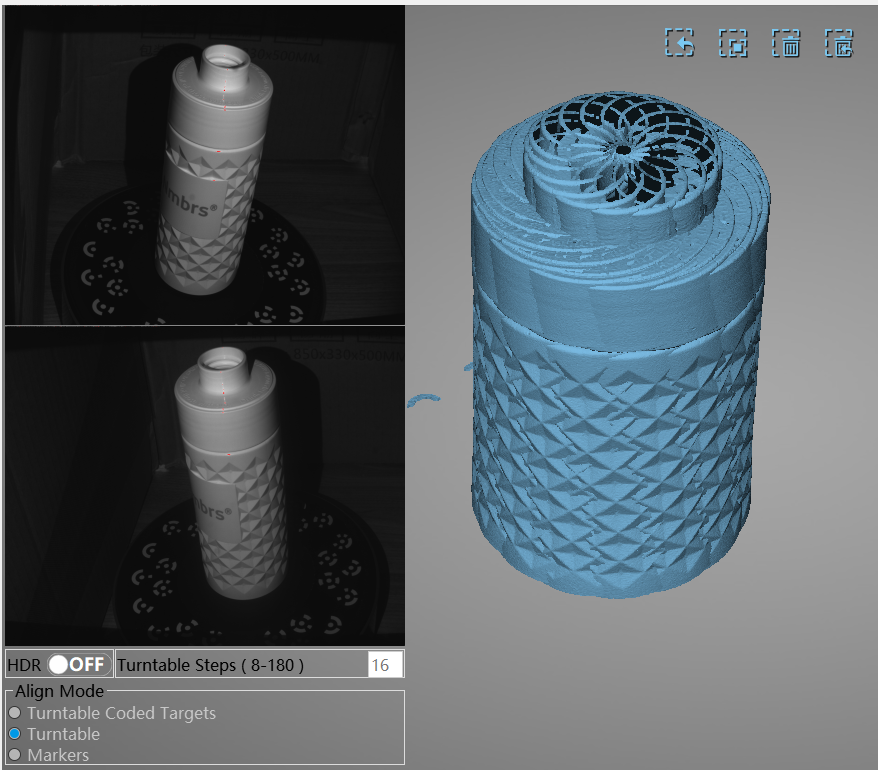
So yes, they can make a difference but there is a catch. I discovered that this feature only works on a tripod and at a relatively steep down-facing angle like you see in the camera viewports above. With a straighter angles the recognition became less robust, sometimes missing a few scans entirely (without giving any error messages). And of course this is also an ideal object because it’s a cilinder that fits nicely on the turntable and doesn’t obscure any targets. Wider objects can easily do that.
That said, unless you’re planning to move the camera and use the turntable and have generically shaped objects, I won’t think you’ll use the Coded Target feature often. This is mainly because the registration algorithms in the software are great and fast.
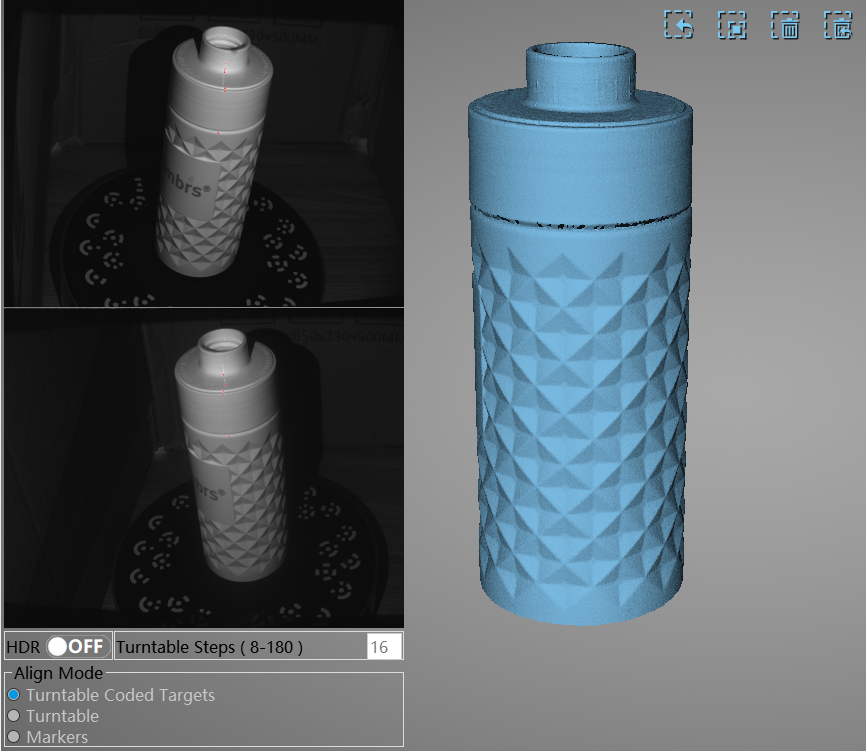
Here’s the result processed at “Middle” quality. It’s from the SP but the SE could also scan this object with similar quality (more about that in a bit) — but in twice the time (also more about that in a bit)
I think the result is great. The little surface noise it has can easily be removed by smoothing and/or decimating and I’m confident that it would be a great basis for a CAD project.
Markers
The SP comes with a big pack of marker stickers that you can put on objects to make scanning easier. I didn’t test them since none of my test objects require them but they will probably come in handy for scanning technical objects with a lot of symmetry or very little surface detail.
Speed
Maybe the biggest difference between the SE & SP for everyday use is the speed. The SP is twice as fast as the SE. A single scan takes just 4 seconds and a complete 360° automatic scan is completed in 1 minute — 3 times faster than the original EinScan-S! However, keep in mind that that last number is based on 8 scans for a cycle. This works on very simple objects, but I would generally advice to set it to 16. I performed all tests with this number and felt no need to go higher. So that would mean 2 minutes on the SP and 4 on the SE. And if you want to capture color it takes almost twice as long.
This might not seem like a big difference, but if you want to scan a lot of objects like I did for my tests, everything does add up. And if you’re working in a time-is-money production environment, the double speed of the SP is certainly nice.
Scan Size
The scan size of the SE is about the same as the original S: 20x20x20 cm for an automatic turntable scan and 70x70x70 cm for a fixed, manual scan. For the SP the latter is 120x120x120 cm. I haven’t tested if this is a hard software cap but I guess it has more to do with the fact that the SP requires 16GB of RAM instead of 8GB.
Keep in mind though that unlike the HP/DAVID SLS-3 the EinScan devices have cameras at fixed distance. This means that even when scanning manually the stand-off distance must stay between 290 and 480 mm and the size of a single scan is 200×150 mm — half the size of a sheet of office paper. This is small, so you will have to scan big objects in segments. If your mainly want to scan very big objects, you’re probably already looking at handheld scanners like the EinScan-Pro but it’s good that the option is there to use occasionally.
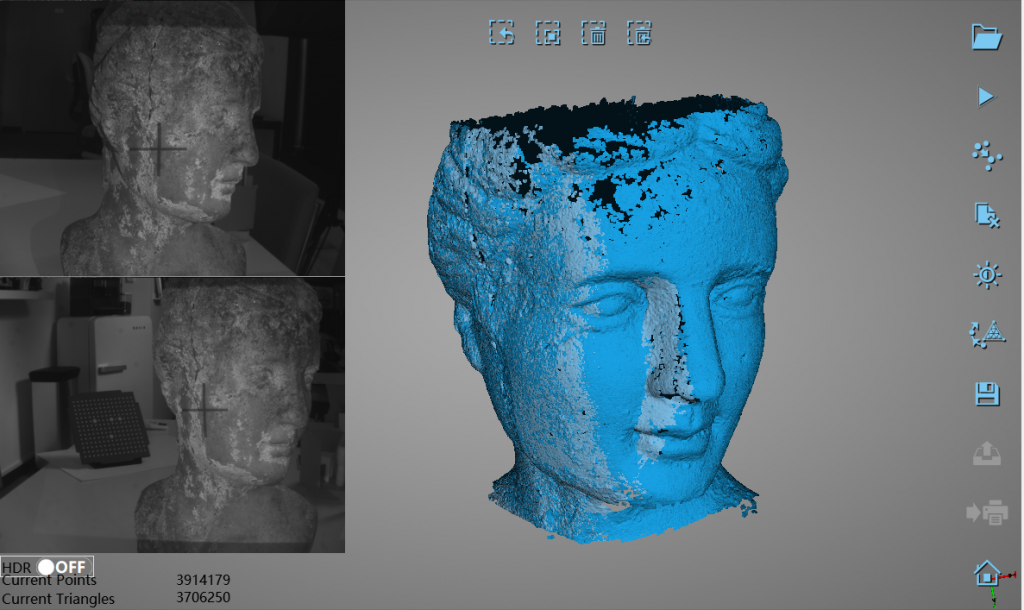
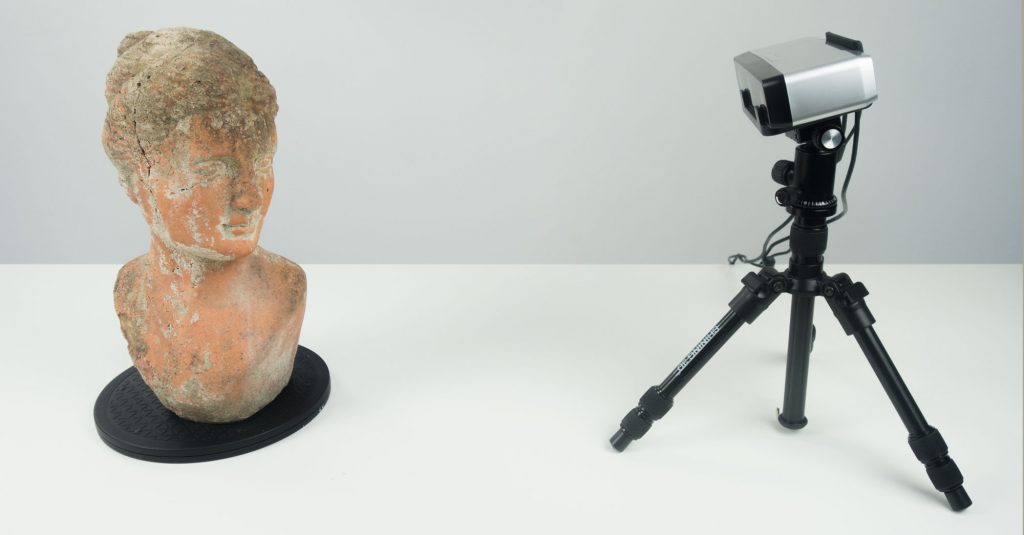
To test if it works, I tried scanning my infamous 40 cm tall bust. It’s good to know that before doing this you also have to calibrate the scanner with the automatic turntable at about the same location as the object will be. The USB cable between the scanner head and the turntable won’t allow you to put it out of range, so that’s kind of handy. After calibration I chose to scan the bust without color to save time and also because I can’t make our studio completely dark during the day.
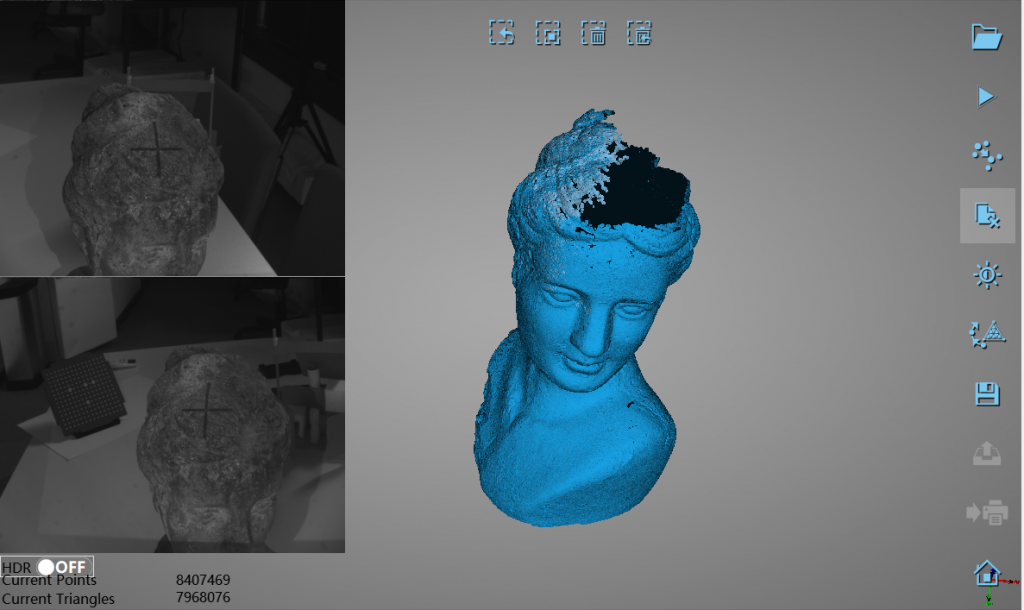
The whole process worked very well. I used the SP and did 3 cycles at different heights, starting with one at face level with about 10 scans Then I did the lower section with about 8 scans followed by the top section with another 8 steps. Again I discovered that the registration algorithm is good and fast — it always placed the piece in exactly the right position within seconds. The last-added part is highlighted and it’s clear which parts are still missing.
Everything combined it took about 15 minutes to scan the bust and (just) another 15-20 minutes for watertight processing at the highest quality setting. Here’s the result:
For comparison, here’s the result from the SLS-3 which you’ll have to put in MatCap render mode to turn off the texture (which that scanner is better at capturing):
The result from the EinScan-SP is very similar to that of the SLS-3 in terms of geometric details — it’s actually more detailed. But before jumping to conclusions it must be noted that I processed the SLS-3 result at the default “1500” quality setting because anything higher (the highest is 4000) would either take extremely long or lock up the system I was using for that review (which was the first gen HP Sprout (Review) with just 8GB of RAM which simply isn’t enough for stuff like this).
It’s also noteworthy that the SLS-3 can scan the bust in a single scan (I scanned it in two 16-scan cycles from different angles) on the automatic turntable because of its variable camera distance. That was a lot faster but it also means that the SP result is build from much more separate scans as a closer range which will naturally result in a more detailed scan.
That said, I’m still impressed by the fact that manual scanning an object this size on a simple manual turntable was with the EinScan-SP surprisingly doable, that the amount of detail is impressive for a scanner of this price and that the processing time was very usable for professional purposes.
Accuracy (updated)
The original review stated that I couldn’t visually tell the difference between the results from the SE and SP and I concluded that that the difference in accuracy ( ≤ 0.1 mm on the SE and ≤ 0.05 mm on the SP) is therefore negligible.
That is still true for my, mainly aesthetic, purposes but if you want to purchase a structured light scanner for metrology purposes it’s good to know that the accuracy specification reflects the size
According to the manufacturer the SP’s accuracy specification is better because
- The parts specification on the SP is
different. - The SP uses a more robust
calibration plate, which accuracy is certificated by a serious accuracy verification process. - The manufacturing and test
process of each SP is also following the accuracy verification requirement of metrology-level scanners.
Since both scanners have the same pair of 1.3 megapixel cameras I wasn’t sure how the SP could deliver higher accuracy but according to Shining 3D the “SP uses a senior arithmetic to ensure better accuracy” hence the necessity of a more powerful Nvidia GPU.
Geometry Quality
I already went into this a bit in the section above but I wanted to do the actual comparison with some smaller objects because I think that’s what most people will be scanning with the SE and SP.
Like I wrote in the panel above, even though the SP is double as accurate measurement-wise, non-technical users won’t notice a significant difference in scan quality. I tested both scanners in complete darkness and almost always performed calibration before scanning just to make sure I wasn’t influencing variables.
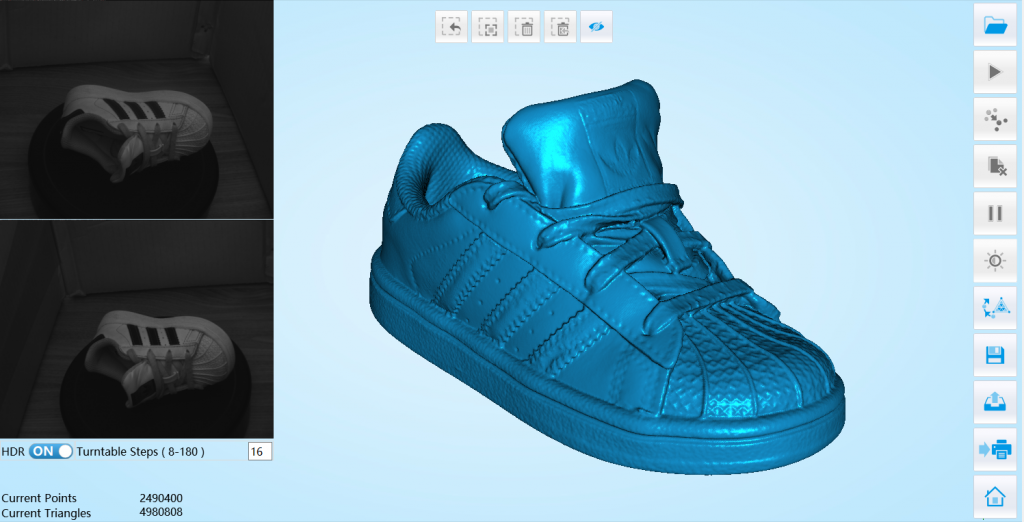
To do the best possible quality comparison for small object, here’s my toddler daughter’s adidas sneaker scanned with the S, SE, SP and SLS-3. I took the time to make a render of it because the total polycount is far beyond realtime-friendly.
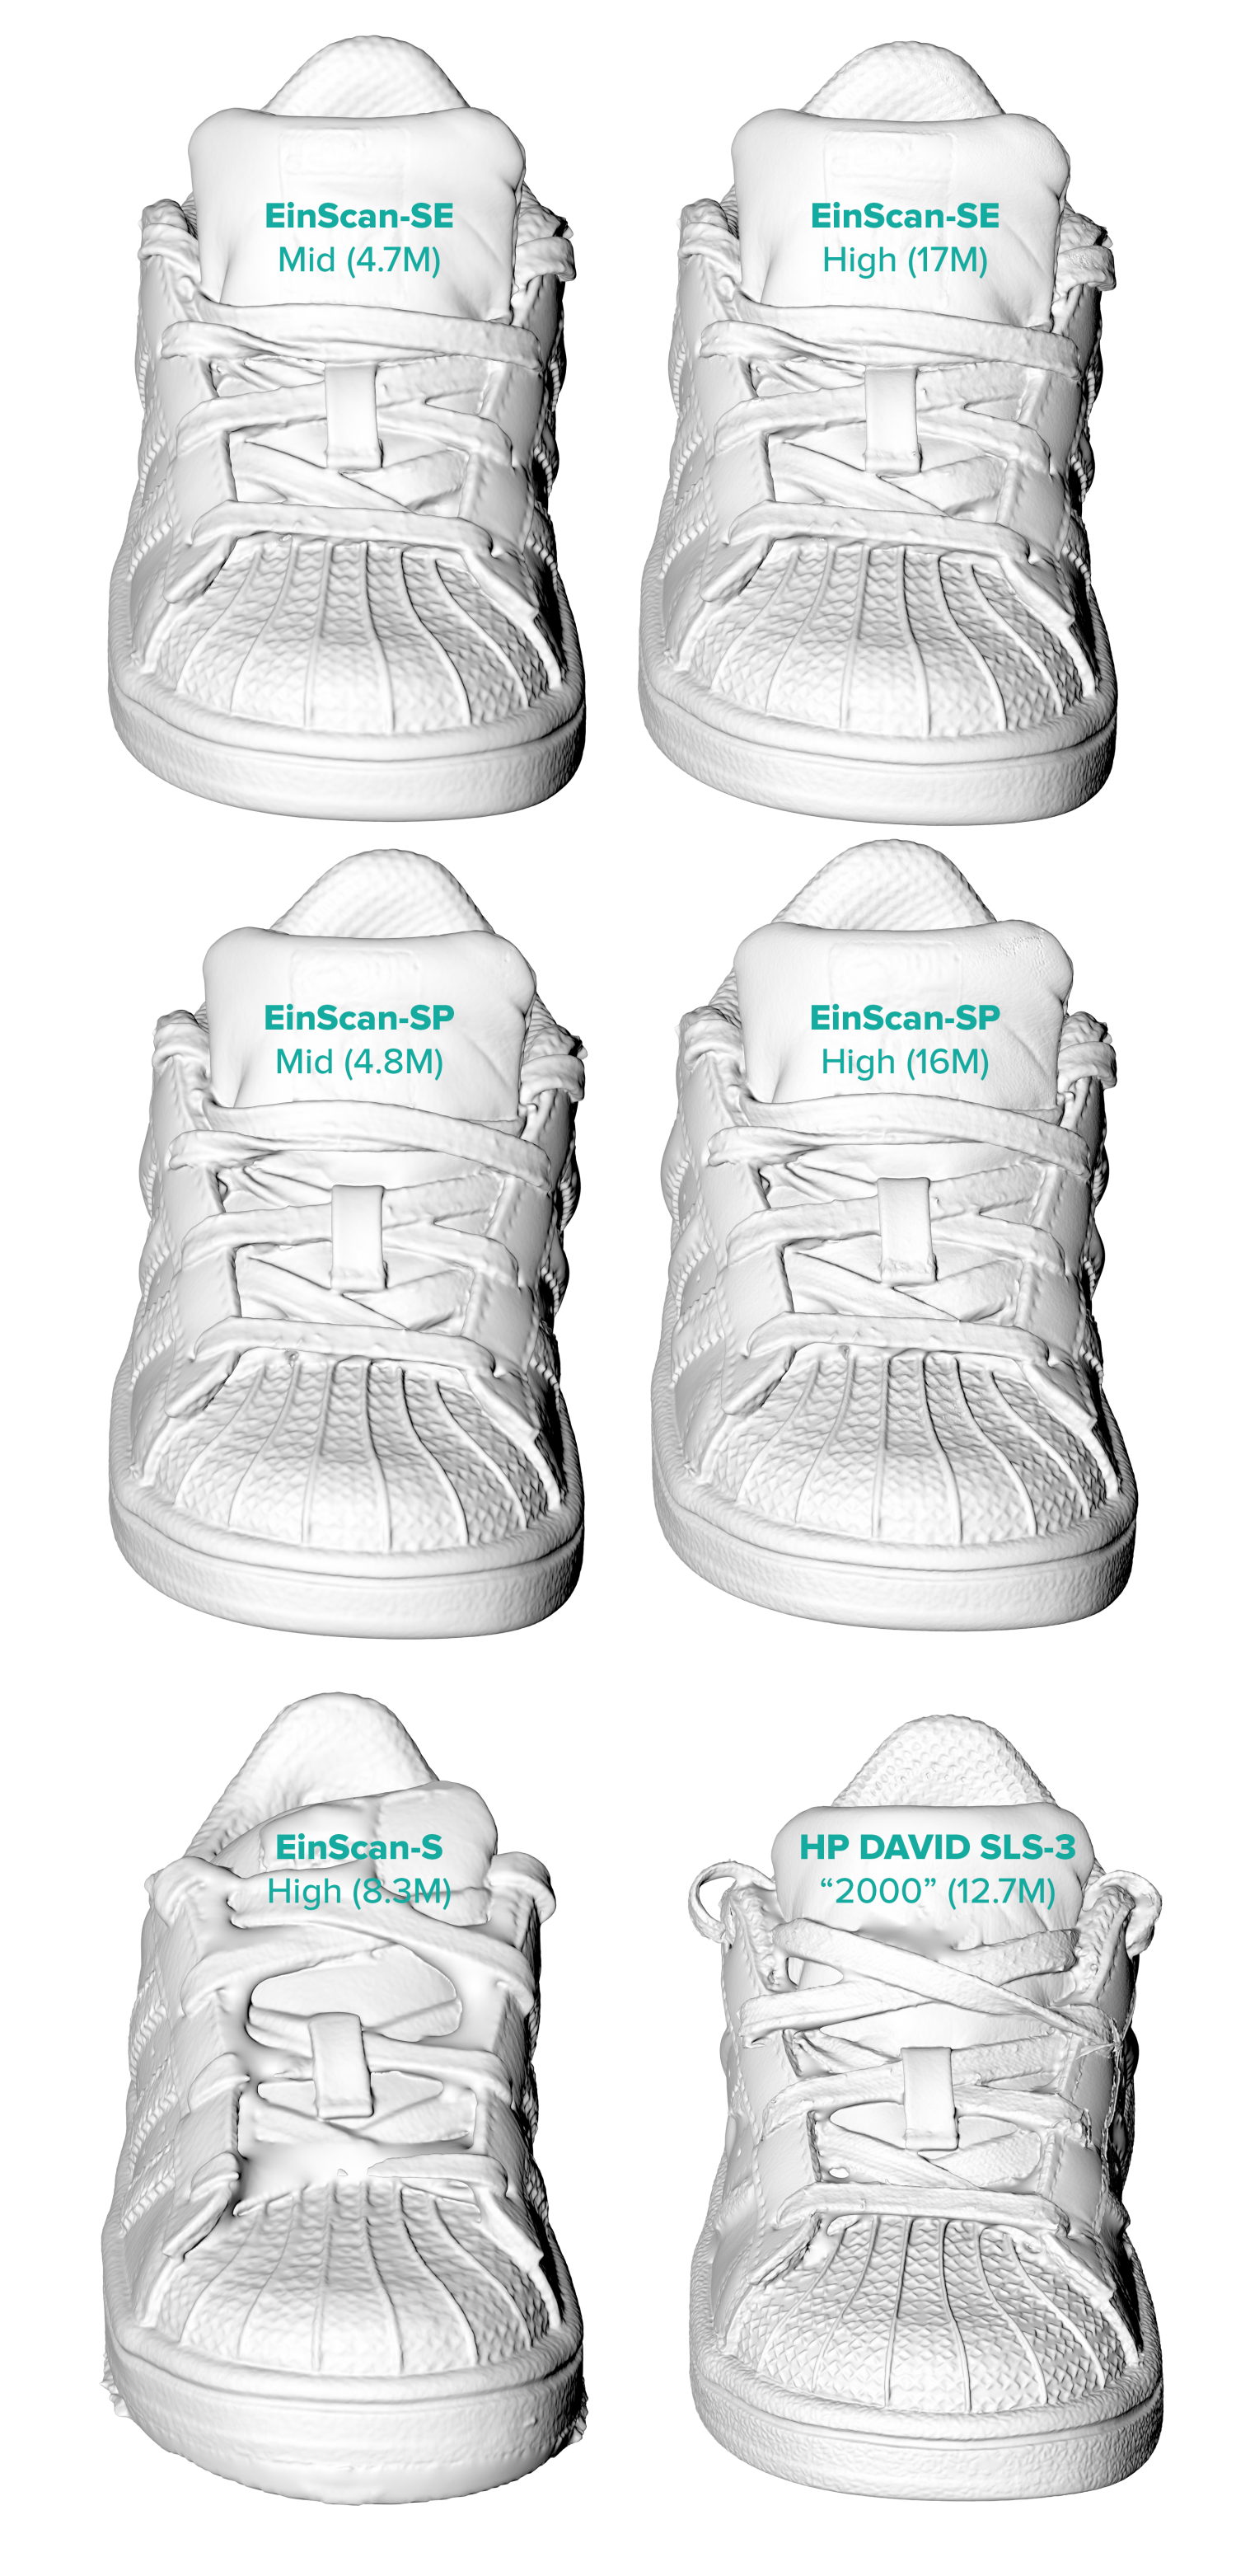
Based on this comparison — and those from other scans I made with all these scanners — I’d say that the SE is probably a small step up from the S in terms of scan quality, but not huge. But I don’t find the difference in scan quality between the SE and the SP significant. Surely not double the quality in any of my tests. And again, I scanned in complete darkness and calibrated a lot following the calibration instructions closely.

Also, while watertight processing on High delivers more than three times the polycount, it also takes at least three times longer and made my system unstable on some occasions. And while there are some differences if you look very closely, I wouldn’t call them significant and not worth the extra time and resources.
For completeness sake, I also added the result from the HP/DAVID SLS-3, processed at “2000” which is kind of the Middle quality of that software. As you can see the polycount is lower than the SP/SE’s Highest quality result but the actual detail is higher. Here’s a closer look of the results of the SP (left) and SLS-3 (right):
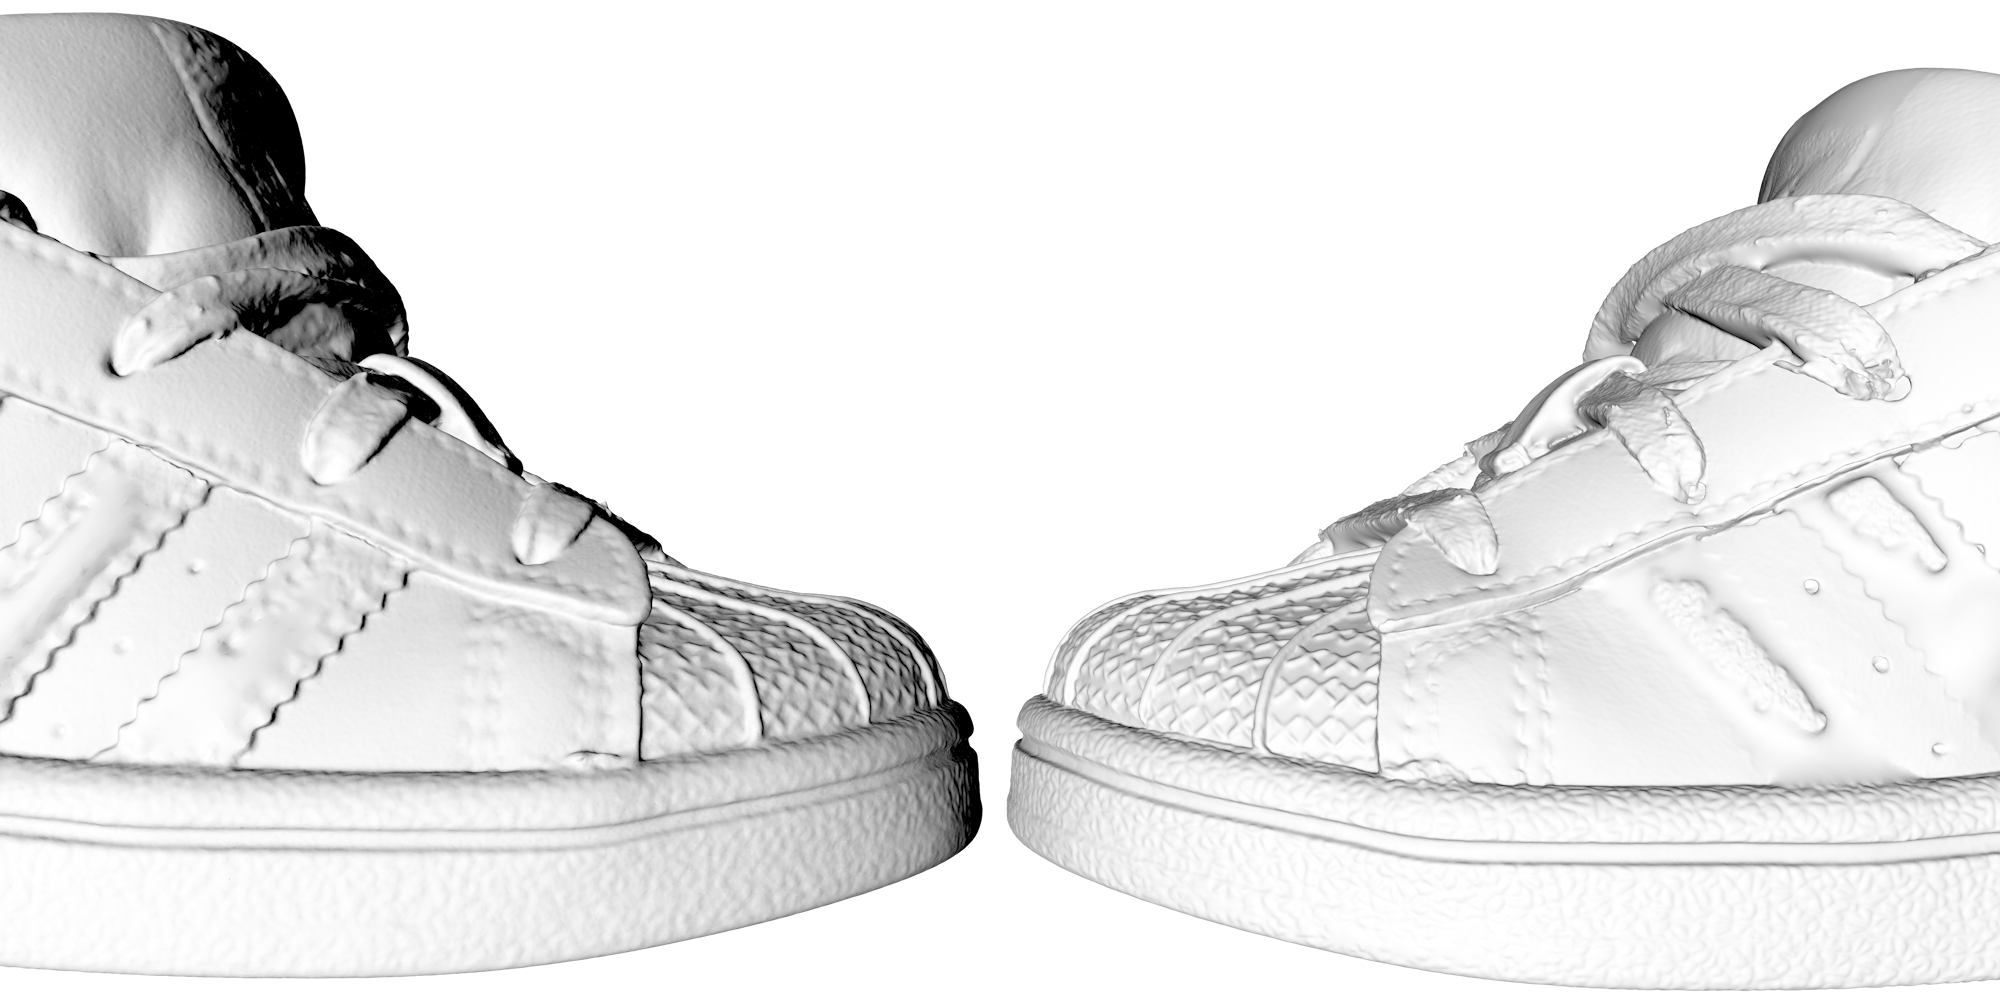
The rubber nose and sole of the sneaker the show much crisper details and structure. Also the SLS-3 was able to capture the stichting in a better way. There’s even some texture on the laces. The SP did capture the black stripes on the side better (just the sides though, the middle part is a fill), but I didn’t test the SLS-3 in complete darkness like the SP so I’m not going to claim the SLS-3 isn’t be able to capture that black part at all.
For this price it’s almost impossible to be disappointed about the geometry quality.
All things considered, I’m actually very excited by the geometric quality of both the Einscan-SE and SP. I would like to say that it’s the best in this price range but a bit easy to say because there really aren’t any other structured light desktop scanners in the $1000-$2500 range. I think it’s best to say that for this price it’s almost impossible to be disappointed about the geometry quality.
Color Quality
The problem with the color is that, like the original S, the SE and SP only have two monochrome cameras. The scanner captures color by projecting red, green and blue frames onto the subject and rebuilding the the colors in an inverted way. The problem with this method is that the color green is a lot brighter when projected than red and certainly blue.
In complete darkness the colors turn out pretty good
So unless the room is totally dark, it can’t capture all three colors and you basically end up with textures with a magenta (which is the opposite of green) hue. But in complete darkness the colors turn out pretty good as you can see below (and please note that unlike in earlier reviews, this sneaker is now actually worn by a toddler so the dirt is physical):
It’s must be noted that I at default all textures from the software are way to dark. All examples in this review are .OBJ exports with a separate .JPG texture which I color-corrected in Photoshop by adjusting the levels. Here’s the original texture and the edited one so you can also see that the UV mapping isn’t very efficient. Textures also have random sizes instead of the desirable 2K or 4K variants. This one is 2901 x 2740 pixels:
Editing the textures isn’t hard and I’m glad they are underexposed instead of overexposed and that there’s still a lot of information in the dark parts even though it’s a .JPG file. These textures actually aren’t bad for a scanner of this type and certainly not this price — and a lot better than the original S. Here’s the result from that scanner (first) followed by the result form the SP (second)
I’d say the texture is actually very usable for many purposes and for me it was completely worth putting the scanner in a cardboard box — kind of a mini film development dark room.
Texture is actually very usable for many purposes
Here’s another Auto Scan with the turntable from a Tripod. I scanned this Old Jar two times with 16 scans per cycle: first facing up, then facing down. The software automatically fused the two scans together correctly. I used the Unwatertight meshing option here, which somehow doesn’t offer any following quality options and is also the fastest meshing option.
I corrected the dark texture not by editing the texture but by simply using the Tone Mapping post-processing filter on Sketchfab (Type: Lineair, Exposure: 95, Brightness: 0, Contrast: 0, Saturation 2.2) which works very well indeed:
This combination of doing two auto scans, meshing them unwatertight, exporting to OBJ, uploading to Sketchfab and tone mapping it there is a very fast way of getting a detailed quality scan with decent texture from an object.
Exporting & Sharing
Before I go into exporting and sharing, it’s good to know that there is no Save function to save projects in the software. You basically give your project a name when starting a new project and the software will create a small reference. Then it will simply create a depth file and a a color file for each separate scan and put it in the same folder. This isn’t necessarily a problem, since you don’t have to think about saving — every scan is always saved. It’s just a good idea to save each project in a subfolder to keep things organized.
The software also doesn’t save the meshed results, so you really have to export it. You can do this to .STL, .PLY and .OBJ formats. When choosing the latter it will also save the texture as a .JPG file.
What’s handy is that the export formats are tick boxes so you have the option to save multiple formats at the same time. As you can see you can also export the point cloud data to ascii format (and ..)
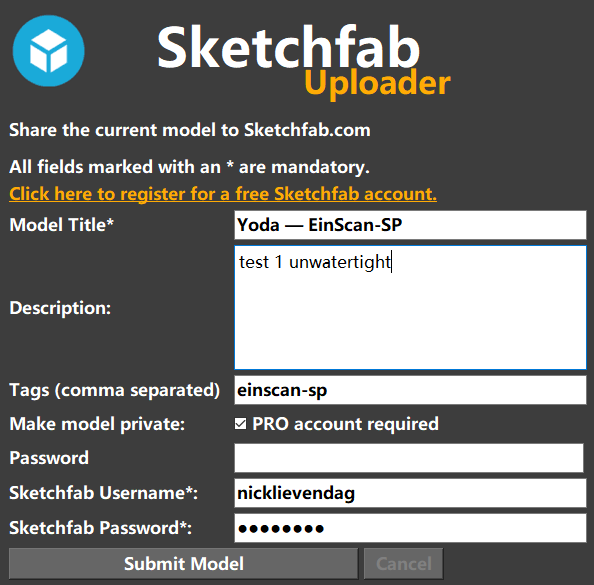
There’s also a button to share your scan directly online through Sketchfab — but it’s a bit too basic. For starters, it doesn’t remember your login credentials. It also doesn’t include textures on export which is why I didn’t use the sharing feature.
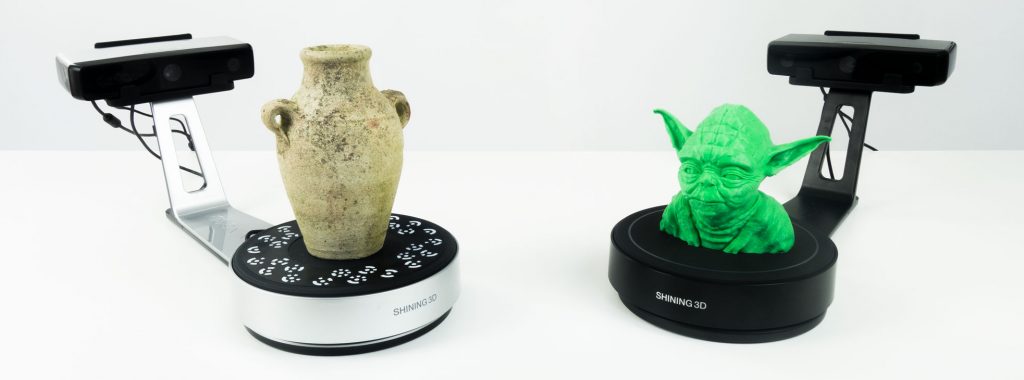
Final Comparison
To finish this review I made a scan with the EinScan-SP (second embed) of the 3D printed Yoda bust I also scanned with the original EinScan-S (first embed). In both cased I did an Auto Scan with the scanner heads mounted in the default position (no tripods). I didn’t use the color for this comparison but both models are processed at the highest quality the software could generate.
What strikes me is how different these scans are. The Einscan-S scan (first) has 9M polygons and the SP scan (second) has 15.5M polys but the former seems to contain more detail but it’s also noisier. The latter is smoother and if you look closely you can even see that it captured the 3D printing layers.
Verdict
EinScan-SE
With the original EinScan-S, Shining 3D disrupted the desktop 3D scanning market by introducing a device that is affordable for many and delivered surprisingly detailed scans. The drawback was that the device wasn’t particularly easy to setup and use.
With the EinScan-SE all these issues have been fixed while keeping the price at $1199 — the same as it predecessor originally was. The original S is still available for $999 but I’d advice anyone to spend the extra two hundred bucks and get the SE. Keep in mind that these prices include the turntable, which is often a separate purchase a with other brands.
The SE looks great and the turntable can be connected to the scan head for scanning small objects without requiring re-calibration. For added flexibility, the scan head now features a standard tripod thread. There’s none included but you can get a good and portable one from a respectable brand like Manfrotto for $75. In practice, I think most people will use the scanner on a tripod because it allows scanning from a more sensible down-facing angle.
Maybe the most important upgrade to the user experience is the fact that the EinScan-SE can be connected to a Windows PC (Mac support is in development) with a single USB cable. Other than that there’s just a single power cord. This device is truly plug-and-play.
Calibration will always be the Achilles heel for structured light scanners and even though the calibration board is now bigger it’s still made from foam board and has to be manually rotated three times to calibrate. The upside of this calibration method is that is sets the clipping distance which means that objects or walls behind the turntable will not be captured.
While this allows you to put the scanner in almost every place it prefer’s a dark place. Geometry capture of light-colored objects will work fine in dim-lit rooms but to capture dark objects or capture color at all the scanner needs to be placed in complete darkness. This can be as simple as putting a box over it but the scanner is also small enough to be put inside of a cupboard.
Quality wise the geometric accuracy of the SE is similar to the original S but color capture (in darkness) delivers better textures. They’re dark by default but this can be corrected afterwards. It would be great if this simple feature was integrated in the software.
The software has improved since I tested the S but still feels a bit underdeveloped. In-between loading times between scan modes is long and the user interface if functional but needs some updates to attract creative types (and future Mac users). The software is stable overall but processing watertight meshes at the highest quality settings crashed my very capable PC more than once.
If you want to scan mainly small (and occasionally medium-sized) objects, you won’t be disappointed.
Bottom line, the S was already a good scanner for the price and the SE is better in almost every way and costs about as much. If you want to scan mainly small (and occasionally medium-sized) objects, you won’t be disappointed. The EinScan-SE delivers a quality that’s miles ahead of depth sensors like the Sense 2 (Review) and Structure Sensor (Review) and with more ease and speed than Photogrammetry.
Anyone can operate this scanner so it’s very suitable for new comers and education and in my opinion more flexible than integrated solutions like the HP Sprout (Review) (I’ll test the Sprout G2 soon) — both in terms of usability (flexible scanning angles) and budget.
And you don’t need an expensive PC to use this scanner. According to my tests the EinScan-SE (and SP) don’t really require an Nvidia graphics card and should work a entry-level PC, laptop or Windows tablet that has integrated Intel HD or Iris graphics. But since the manufacturer’s requirements state otherwise, that’s strictly at you own risk.
EinScan-SP
At $2299 Shining 3D is trying to bridge the price gap between the SE and the EinScan-Pro (Review) and Pro+. The scanner has similar looks and adds (sofware) features like detecting the Coded Targets on the turntable and (supplied) Marker Stickers. If you really need these two features depends on the objects you want to scan. For flat-surfaced, generically shaped engineering subjects they might prove handy but the software’s registration algorithms are so good that I didn’t need them at all. And the Coded Targets really only work with very small objects that don’t occlude them.
For metrology purposes the SP’s factory-verified ≤ 0.05 mm single-scan size accuracy might be important, but for other purposes (and the focus of this website) this is negligible because it doesn’t result in a significant quality increase compared on the final 3D model.
But the scan speed is undeniable. If you’re going to scan many objects from multiple angles (the software is great in combining multiple scan cycles) or do a lot of manual scanning you’ll realize that the total scanning time of the SP is great to have.
The speed alone might be worth the extra $1100 for professionals.
While the higher price might put off hobbyists and educators, the ~$2K range is still affordable for small businesses. And even if you don’t really need the targets, markers (or higher quality if there really is any for objects other than mine) the speed alone might be worth the extra $1100 for professionals. And while the tripod might not be a system seller, the more durable calibration board might be.
But you could also get 2 EinScan-SE scanners for that price — if you have two capable (16GB RAM / 2GB VRAM) PCs.
So that’s it, my opinion about the new scanners from Shining3D. The only EinScan scanner I haven’t tested yet is the Pro+ but I’ll ensure you I’ll give it a spin later this year. First up are the Orbbecc Astra S depth sensor and a $89 smartphone 3D scanning gadget called Bevel.
This post has been updated after publishing to better reflect the difference in accuracy between the SP and the SE.


I can see you’re mostly into organic shapes, and textures.. Could you show a scan of something more geometric, for example I’d like to scan my wireless thermostat, which is mostly a box, and slightly reflective.
The Juice Box and Bottle examples are non-organic, geometric shapes. Both are also slightly reflective surfaces.
Oops, good point that, nice and sharp. I guess (switching the juice box to matcap and rotating), the bottom isnt flat because you didnt rotate that one? The jar is impressively merged..
Indeed the bottom is automatically filled by the software. As you can see that isn’t always a very smart and useful way of hole filling 😛
Great Review, Thank you Nick
Thanks for making clear what the differences are!
You’re welcome!
Dear Nick
Thank you for all great reviews you done on our website.
I wonder what do you think (based on your big experience with 3D scanners) if SE and SP scanners are suitable for scanning detailed and precise small objects like dental models?
Thank you
hi Nick,
for this SP, based on your experience, can we use it to scan people body or head?
Dear Nick, has Einscan SE this Ability to use target points(marker stickers) for large size scanning?!
If you want to scan bigger objects (full body scan), is it possible with this scanner?
No for that you need a handheld scanner like the EinScan-Pro, Pro or Artec Eva.
I have had this scanner for weeks and still can’t get it to work….
i noticed you didnt really cover Fixed scan mode for the SE / SP
the Einscan SP “fixed scan” size limit is 1200 ×1200×1200mm which is about 47in x 47in x 47in
and the Einscan SE “fixed scan” size limit is 700×700×700 mm which is 27in x 27in x 27in
I honestly don’t really want to use the turntable very often, I want to scan hand-held style or at multiple angles on a tripod
My question is… is SE/SP a feasible entry level replacement for an Einscan Pro or an Artec Eva Lite…
usually larger objects such as a part i have that is about 2 inches x 12 inches x 10 inches… or larger which is relatively flat… and i would like to scan both sides of it probably standing up straight
I would also like to go further and use it in cases where the object is less flat and the size of a human head or in the ball park of 12″ x 12″ x 24″
the accuracy and resolution are pretty much the same as Artec Eva Lite or Einscan Pro… or at least as good as I would ever need in order to reverse engineer close enough solid models in Autodesk Inventor…
is it a waste of money to get a $2300 scanner only to get a hand-held scanner later on for speed purposes, better software, and only having to calibrate every month as opposed to every day? (haha)
I am asking in terms of speed, convenience, software, and calibration!!! and even if it isn’t the best user experience… DOES IT WORK? and can there be workarounds… such as a special camera tripod that orbits around scanning objects on a track? removing the need for the nice grips on the EVA lite and Einscan Pro… and solving the ability to move the scanner to different positions quickly without a handle… am i gonna find out that einscan’s specs arent legit and stitching a 24″ object doesnt work… would you be able to do a test of the fixed scan on as large an object you can find? and post the results unlike Einscans shoddy Chinese marketing vids? where they basically scan a relief sculpture and never actually orbit around to capture the back or sides…
maybe test scanning a 24″ tall by 10″ wide marble statue or something moving the scanner itself around the object rather than a turntable in “fixed” mode??
thanks!
-Joe
I have a brand new Lenovo V130 which has 8 gig RAM, Intel CORE i5 8th generation CPU @1.60GHz 1.8 GHz integrated Intel® HD Graphics 620 in display adapters it also says Radeon (TM) 530.which lists memory as Shared. are these laptops able to handle the scanners.
The scans works with bigger parts? I mean bigger than the roundtable?
I was planning to buy Einscan SE by Shining 3D but was concerned about the auto-alignment of multiple scans when the scanner is on a tripod. (as I can’t use markers)
even though I need to scan small to medium-sized objects while providing an ideal environment for scanning. should I expect 0.5 to 0.7mm volumetric accuracy for around 500 mm white painted non-reflective part?
PLZ, can anyone help me out and clarify about its accuracy?