
Update December 2016
Shining 3D announced a big update to the EinScan software that promises a lot of user experience improvements that are not reviewed below.
Update April 2017
Shining 3D announced new versions of the EinScan-S, namely the SE and SP.
I learned about the Chinese manufacturer Shining 3D in late 2014—back when I was still reviewing 3D printers—when they released their Einstart-S Desktop 3D Printer. And although I wasn’t actively blogging in 2015, I did notice thesuccessful Kickstarter campaign for their first 3D Scanner, the Einscan-S, which was released in July 2015.
I’ve also reviewed the Einscan-Pro an compared it to the Einscan-S in every aspect—read my Einscan-Pro Review here.
Specs, Price & Competition
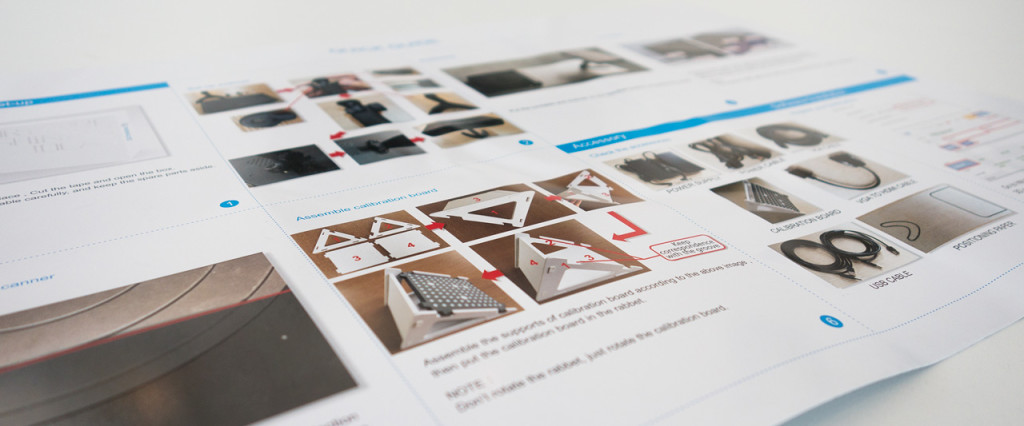
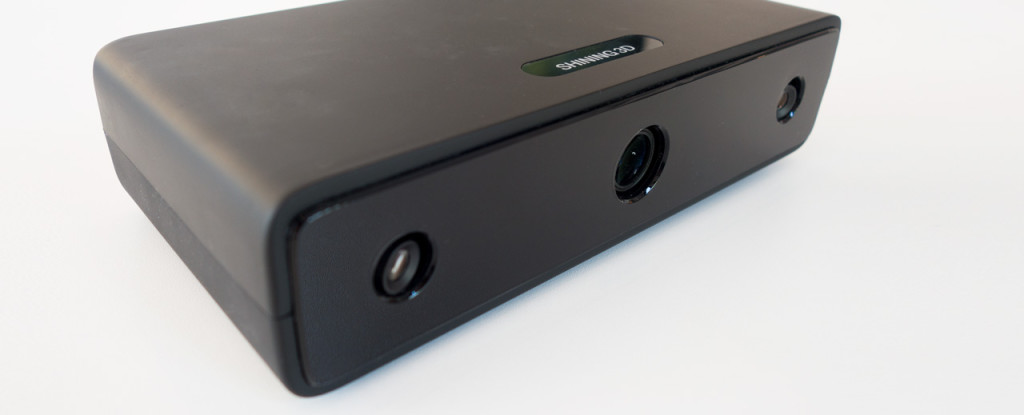
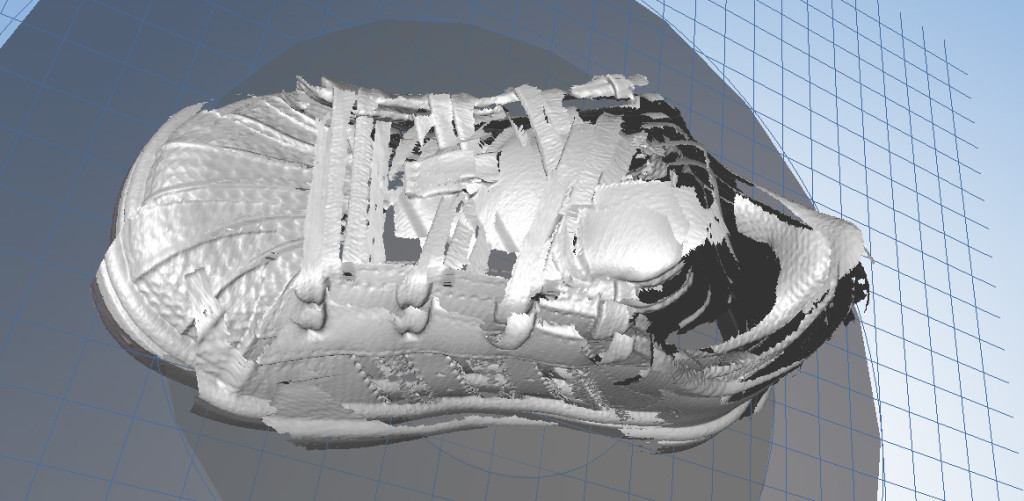
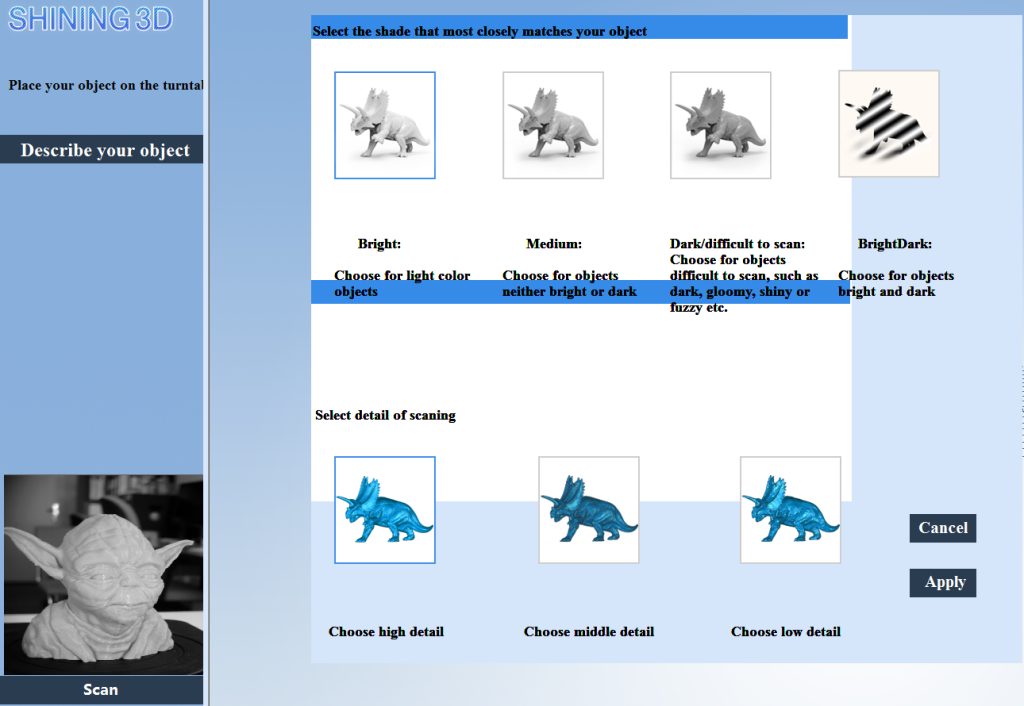
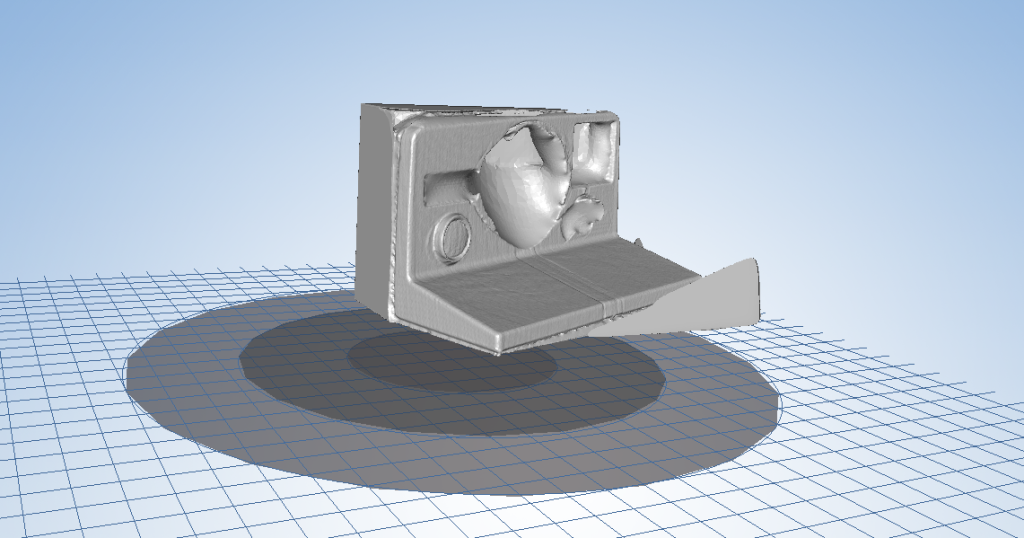
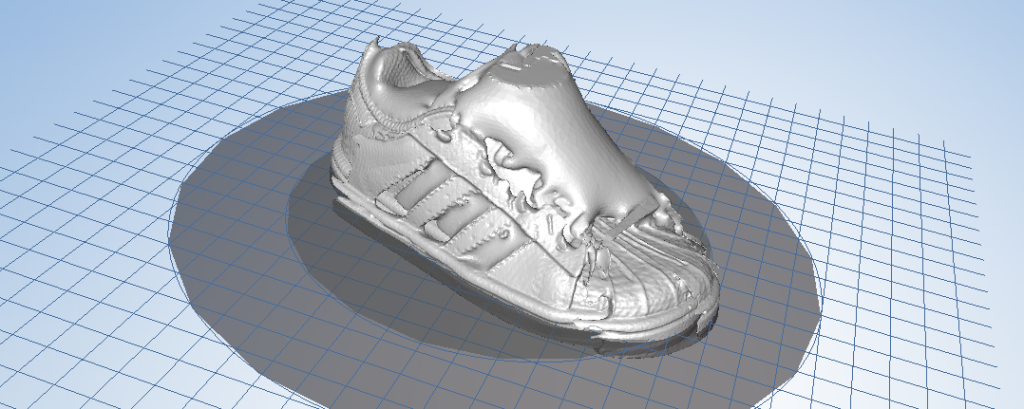
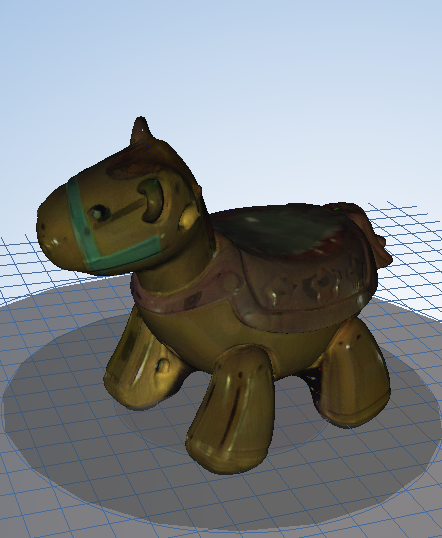
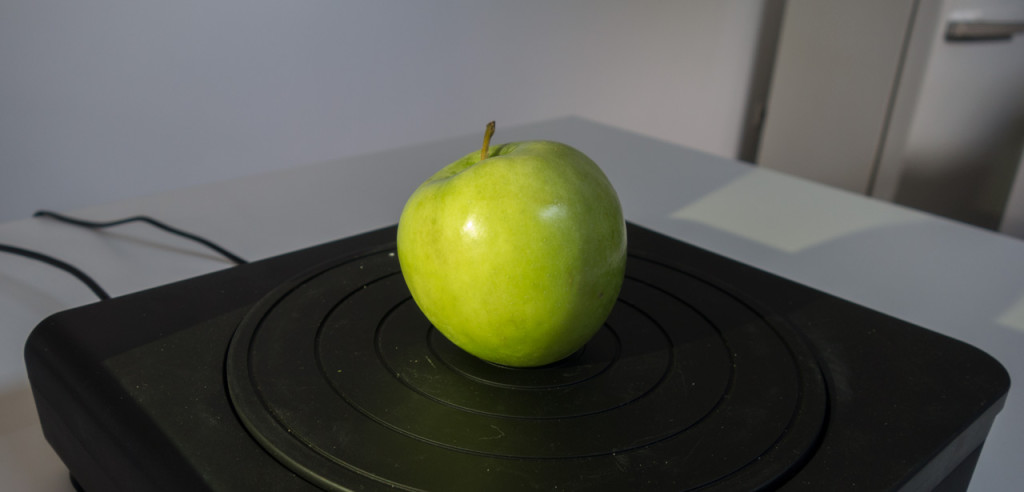
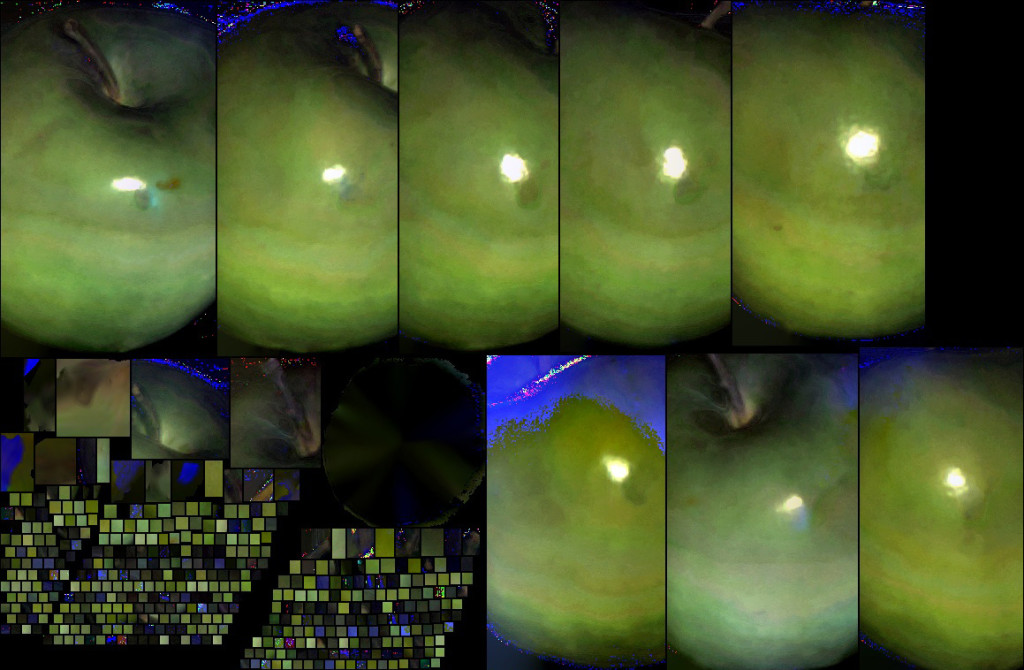
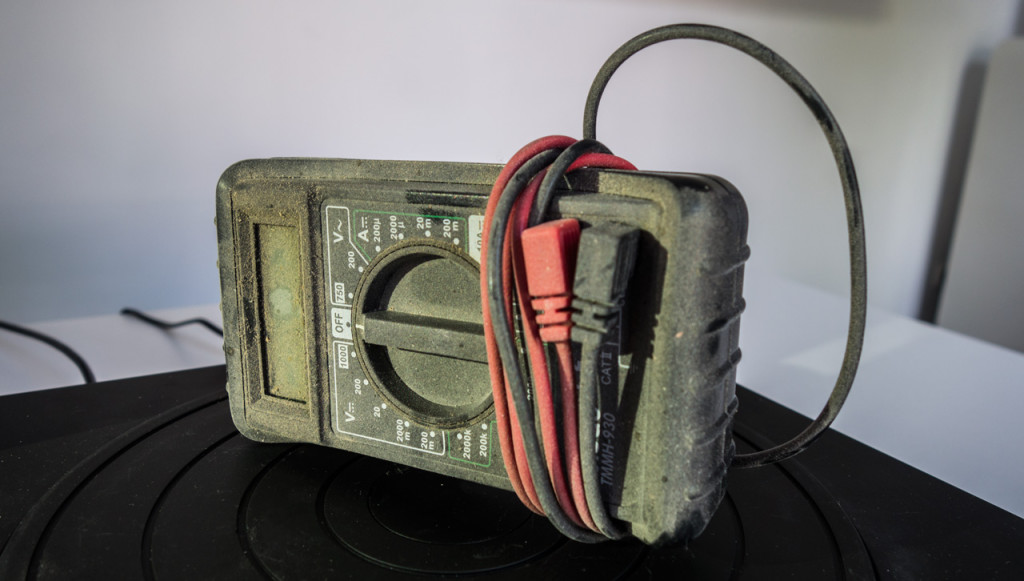
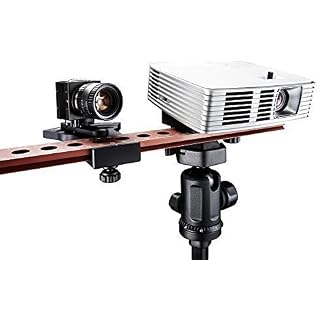
The Einscan-S (also known as the ScanMaster Plus in Australia) is a combination of a structured light 3D scanner and a turntable which On the higher and there’s the $2995 NextEngine Ultra HD 3D scanner (0.1 mm accuracy) and the DAVID 3D scanning system (0.05 mm accuracy), which starts at $4435 is you take the non-HD SLS-2 (the HD SLS-3 is $720 more) and the separately-sold TT-1 Turntable. These high-end scanner do offer mounted Free Scanning to scan larger objects. Shining 3D’s own brand new Einscan-Pro (0.05 mm accuracy in turntable mode) joins these high-end scanners by also offering a bundle with tripod & turntable for $4984 (a separate color-capturing module is $849 extra), but adding a handheld scanning mode on top of that. So the Einscan-S is positioned as an offering with high-end accuracy for a low-end price. Seems like a good place to be in, so let’s find out if it’s indeed great value for money. I got the bundle without the tripod and the scanner didn’t fit on any of my own tripods because it has no standard tripod thread. You could, however, make your own tripod adapter by 3D printing this or this adapter. For this review I’ll mainly focus on scanning with the turntable. The system comes in a large box with shiny letters. It’s pretty light and has a handle which makes it kind of portable if you keep the box. Inside you’ll find all components and a Quick Guide. This sheet guides you through the hardware assembly and software installation, and also shows you how to solve the calibration board puzzle: The scanner itself contains three parts: an RGB projector (which projects light visible to the human eye) in the center and two monochrome cameras on the sides. The first thing I noticed while setting everything up is the amount of cables: both the turntable and the scanner have their own power supply and are connected to the computer with a USB cable. On top of that, the scanner’s projector is connected through a very thick VGA cable. So you’ll have 5 cables on your desk, which is quite a lot in this increasingly wireless world. After connecting the turntable and scanner to their power supplies, the logos on both lit blue and the scanner’s vent started making a humming sound. Nothing too noisy. Although it seemed that everything was powered on, I noticed that the projector wasn’t projecting anything. I couldn’t find out why, until I wanted to turn the scanner off using the blue-lit power button on the back. Then the projector started beaming a blue image on my wall. So, while the turntable and the rest of the scanner turn on directly after connecting them to a power source, the projector has to be turned on separately. Strange behavior if you ask me. There’s no Mac version of the software, so I tested the scanner by running Windows 7 through Boot Camp on my Macbook Pro. Since the last Apple laptop with a VGA display connector was the 2001 Powerbook G4, I used the VGA-to-HDMI adapter that came with the scanner. I didn’t get it to work at first, but after some research I discovered that VGA needs an active power current, which HDMI ports don’t deliver. That’s when I noticed that the VGA-to-HDMI adapter also has a micro-USB port to power it (like a Chromecast). It’s nowhere in the manuals and no micro-USB cable was supplied, but after plugging-in one of the thousands of cables from my cable drawer I got my Windows desktop wallpaper projected on the wall. Since the the HDMI adapter needs a third USB port for power, and my Macbook Pro only has two, I powered it with a USB phone charger. Since this only added to the amount of cables on my table, I just ended up using a (generic brand) Mini DisplayPort to VGA adapter which doesn’t need external power. According to the Quick Guide, the resolution of the projector has to be set to 800 x 600 pixels at 60 Hz. Since that setting was missing from the option in the Windows Display Panel, I had to manually add it through the Nvidia driver. Nothing shocking for expert users, but certainly not the most user-friendly experience. Or maybe I’m just a spoiled Mac user… Installing the software is straight forward and takes a few minutes. After that, the scanner has to be calibrated using the triangle-shaped calibration board assembled earlier. The software gives clear instructions about the process: As you can see in the screenshot above, the software shows the video feed from one of the monochrome cameras in the bottom left corner. It instructs you to place the calibration board in a certain way and then performs a 360 degrees rotation on the turntable. This process has to be repeated two more times with the board in different positions. While the board itself is made from plastic, the white stand is made from cutout foam board. I noticed it had very tight tolerances, which makes it hard to insert and remove the calibration board without moving the stand, which could mess up the calibration. If you have a 3D printer, you might want to take a look at this alternative stand. Calibration takes a few minutes in total, which didn’t seem very long at first. Except when I realized that this calibration has to be performed every time the scanner or the turntable is moved out of position. Unfortunately this is very easy to do, because the stand of the scanner isn’t very heavy and easily moved by accidentally touching one of the many cables—especially the thick and heavy VGA cable—or simply bumping the table. The production version of the Einscan-S comes with a placemat with pre-printed footprint of the stand and the turntable to ensure the right distance. I discovered that the original design pitched on Kickstarter featured a less portable, but sturdier design: I personally like the original design better, because it ensures the angle and distance between the turntable and the scanner. If something moves even slightly, the result is visible in the scan result. Below is a screenshot from the software where the geometry captured from different angles isn’t correctly aligned due to a small movement of the scanner without re-calibration: After seeing the screenshot above you’re probably curious about the scans made with the Einscan-S when I made sure I didn’t mess up the calibration. Almost there, because starting a scan takes only a few clicks. First you have to select the brightness of your object. This choice interactively changes the exposure of the camera feed, so I just went with the setting that made Yoda look natural grey instead of over or under exposed. The second and last setting is the level of detail. Scanning in high detail takes a little bit longer to scan and process, but the differences are not significant for an object this size (Free scanning something bigger might require a lower setting). Since the software has a feature to decimate the level of detail after scanning I went for the highest setting. After hitting the Scan button, the scanner will start to project all kinds of animated patterns onto the object. If you’re new to 3D Scanning and curious to how “Structured Light Scanning” works, you can check this Wikipedia page. Because the projector uses regular light (instead of infrared, like the Sturcture Sensor I reviewed earlier) you can see what’s happening with the naked eye. Below is a video of the scanning of two of the total of eight angles—in real time: As you can see this all goes pretty fast. The total scanning time in high detail mode without color is just 3 minutes. After this, the “point cloud” recorded by the scanner is automatically processed into a 3D polygonal mesh. On my 2.6 Ghz Quad-Core i7 processor this took about 10 minutes for Yoda (which is a 3D Print of this model made for my ZYYX 3D Printer Review), which is very reasonable for the fact that it has 9 million polygons. After processing, you can either safe the raw point cloud as ASCII data or the 3D mesh as .STL—the standard format for most 3D printing slicing software—or .OBJ, which I prefer. The output file is 360 MB, so I decimated it to ~1.8 million polygons so it fits within the 200 MB limit of my Sketchfab Pro account and is a bit faster to load. Keep in mind that it’s still 140 MB before you load the model below if your reading this with your mobile data connection. I really like the amount of detail in the scan and the 8 angles are fused perfectly. Maybe I’ll 3D Print it again to compare it to the original! Yoda is the ideal 3D scanning subject: he’s organic, opaque, matte and evenly colored. The next subject is the other end. If you follow me on Instagram you would have seen this scan in progress of a vintage Polaroid camera. A hard subject because it has both very light and very dark parts. And the bottom part is very glossy black. As expected it didn’t turn into a great scan. As you can see in the screenshot above, only the light front part of the camera was captured. While scanning, the preview showed some stray geometry of the back but they were automatically removed during the meshing process. This procedure also automatically makes the model watertight, which is great for some models, but not for others. If you take a close look at the Yoda model, you can see a few spots in his ears where hole have been filled, which isn’t very noticeable. It’s important to know that it’s not possible to to deactivate the hole-filling procedure. I would have preferred to have it off and fill the holes manually, or not at all, in most cases. Next up I tried to scan one of my daughter’s sneakers. At first I saw a large hole in the scan. Turned out that a virus protection warning popped up over the structured light pattern (see below). This is a result of the projector simply being a second screen in Windows. I also had an occasion where the mouse cursor had moved to the second screen. Although I selected the preset for subjects that have both bright and dark parts, the scanner failed to recognize the black stripes on the sneaker at first. Also, the software tried to fill all holes during the meshing process and this time around it was horrible: While it’s not possible to disable hole-filling, you can work around this problem by exporting the raw point cloud in ASCII format and convert it into a 3D mesh using the open source software MeshLab. I had to switch off all lights in my studio and close all window shutters to create enough contrast in the projection so the cameras can recognize them. I was basically working in complete darkness. I don’t know the exact specs of the projector and cameras, but a brighter projector and/or more light sensitive cameras would make it easier to scan dark objects in normal office environments. I noticed that the default angle of the scanner wasn’t sufficient to see inside the shoe. I solved this by putting the stand on a stack of books, but it would have been better to have a adjustable stand. I would advice anyone to get the bundle with the tripod, also for turntable-based scanning. And you have the added flexibility of Free Scanning object up to 70 x 70 x 70 cm. As I said I’m not going in to this in this review because I don’t have the tripod, but the Free Scanning means the software will pause after each scan so can turn the object manually by aligning projected crosshair and comparing it to an earlier capture. You can watch a video from the manufacturer about the procedure here. It’s important that this mode is tripod-based, not handheld. What I also discovered is that the initial placement of the object matters a lot. In the failed example above I placed the sneaker with its front straight towards the camera. Since the scanner only scans from 8 angles, it didn’t have enough data about the laces. So in all other tests I did, I put he object under a slight angle from the camera. This worked a lot better and after my third try I got a great scan from the sneaker. Again I have decimated the model from 7.2 to 1.8 million polygons for preview purposes: While the scan above is good in terms of geometric detail it really shows the limitations of fixed-angle 3D scanning. I was able to get a bit more detail of the inside of the sneaker with the stack of books, but placing it any higher would result in losing details on the bottom. Also, while the specs say you can scan objects up to 20 x 20 x 20 cm on the turntable, the height is a real problem. A reader commented on this post in my special Review Request thread on 3D Hubs’ Talk forum noting that it’s possible to reposition a model after the first automatic scan and press the “continue” button instead of the “complete” button. This initiates a new cycle and the software matches the two (or more) scans based on similarities in the geometry. I was unaware of the feature at the time of writing this review, but this way I could have scanned the inside of the sneaker and the sole by putting it on it’s side. Or scan larger objects. Read more about scanning oversized objects with the “Continue Scanning” feature in this Shining 3D blog post. Below is the result without the horse (more about that later) scanned on the highest quality setting. I didn’t decimate this one, because it was just under 200 Mb, so it’s a direct upload of the .OBJ file to Sketchfab: I noticed that the scan surfaces aren’t very smooth while the plastic of this is. This is probably because of the science behind scanning with light, but it would have been great if the software offered some kind of smoothing option (instead of hole filling). While the scanner captured most of the toy, it completely discarded the semi-transparent button on the front. If you do want to capture glossy or very dark objects, you can try to make the subject matte with some kind of washable spray paint or hair spray. I personally don’t like this because it’s messy. It’s the same kind of messiness that I didn’t like about treating 3D Printer build plates for better adhesion. I don’t see myself spray painting my vintage camera collection, let alone apply this treatment to museum artifacts. This, of course, is my personal opinion and capturing dark, definition-less or shiny objects is difficult or impossible with almost any technology, including photogrammetry. Now we get to the part about the horse… So if you just want to capture geometry of small objects often, the Einscan-S can offer good results under the right circumstances for a reasonable price (keep in mind that $1199 is not very expensive for a 3D scanner with electric turntable). But if you’ve read my Review of the 3D Systems Cubify Sense scanner, you know that I really want to be able to scan in color. The concept of scanning just geometry might have worked when filament-based 3D printing was all the buzz. But technology is moving fast and 3D is becoming popular online with services like Sketchfab. And with Augmented and Virtual Reality technology becoming accessible for the masses, colorless 3D is literally like watching black and white TV. In other words: it’s almost impossible to sell a 3D scanner without color capturing. The original release of the Einscan-S didn’t offer color scanning, but Shining 3D added this feature post-release via a software update. If you’re tech savvy, you might have been noticing that I wrote that the scanner hardware contains two monochrome (as in black-and-white) cameras. So how can it suddenly capture color with a software update? The solution is pretty clever in my opinion: the RGB projector beams a sequence of completely red, green and blue screens onto the object and the software reverse-engineers the color information from the monochrome captures. Color scanning only works when selecting the Low Detail geometry mode. After selecting this, you will be asked if you want to capture color or not. If you do, you get the possibility to calibrate the white balance. This is done by projecting the RGB sequence onto a sheet of paper as you can see above. After that, the scanning procedure is exactly the same as monochrome scanning, except that the projector will do the RGB sequence at each of the 8 capturing angles. This only takes a minute longer in total. While scanning the toy figure on her cute horse I watched the preview (first image below) and did notice that the top of the head and the back of the horse where missing due to the angle of the scanner. But I was really surprised when the software solved this problem by completely removing the figure altogether in the meshing process (second image below). Maybe it’s because the software has build-in protection for scanning VTech toys… While the scanner was perfectly able to capture the 8 cm tall doll separately, it couldn’t do so when it’s was mounted on the horse. The combination is only 15 cm tall, so I would say the actual maximum automatic scanning height is closer to 15 cm than the advertised 20 cm. You might have already noticed that the colors in the preview aren’t very good but below is the actual result after exporting to .OBJ with .JPG texture map and uploading it to Sketchfab (the software does have a direct “Share” feature by the way, but it can only share to Shining 3D’s 3DKer platform). As you can see the final color isn’t any better than the preview. On top of that one side of the horse has blue areas. This is something I noticed on allother color scans as well. Below is another scan of a wooden juice pack from my daughters kitchen with the same blue error on one side: That this color capturing method isn’t perfect becomes clear when you look at the dark and light green parts of the juice pack scan and compare them with the actual object—they got reversed in the process. Since the scanner is Windows-only I scanned an apple to keep my mind at ease. To ensure you we eat fresh apples at the office, here’s a photo followed by the 3D scan: It must be said that geometry-wise the apple scan turned out fine (set the Rendering in the Sketchfab embed above to “MatCap” to see this). Especially when you consider that this is kind of uniform object with no real definition in geometry in texture or geometry is difficult to capture for most handheld 3D scanners (without markers) or through photogrammetry. Color-wise it’s kind of a mess. The top of the apple is unlit by the projector so it looks rotten. I tried to conquer that with a softbox light, but then that had a negative effect on the geometry capture. You can also see the hotspot from the projector at each of the 8 angles. The hot spots in the texture could be fixed in Photoshop, but removing the blue noise will be hard for some objects. For my final test scan I chose a more complex object. In this case I was lucky that the otherwise black and glossy multimeter was very dusty: Again the geometry is okay. The color information is kind of usable, but somehow the white text around the dial disappeared almost completely. As with every technology, pros and cons depend on your purpose. Turntable-based 3D scanners are a logical choice for people that want to make 3D scans of small objects frequently.The many cables don’t make for easy portability or plug-and-play, but the footprint is small enough to keep it in a dedicated place, always ready for use. For precision optical technology like this, I imagine this would be a sturdy table or desk with a dedicated desktop PC. This scenario would be ideal for the Einscan-S, although I would certainly attach the base of the scanner to something heavier to prevent it from accidentally moving. Hardware and software installation requires above-average knowledge of configuring displays in Windows. Shining 3D should be more clear about the fact that the HDMI-to-VGA adapter needs to be actively powered and supply the required USB cable. Including a smoother, thinner VGA cable cable could also solve some stability issues that result in the need to calibrate often. Fortunately, calibration is an easy and relatively quick procedure. Scanning with visible structured light has the advantage of getting high resolution models from a relatively simple projector and camera setup. The downside is that it works best in a dark environment, especially when scanning dark objects. And because the projector is set-up as a second display it can display unwanted pop-ups when Windows feels like it. If you’re a creative professional like me, a Mac version of the software would be nice, but it does work perfectly on a Macbook Pro through Boot Camp. The included software is stable, even when meshes beyond 10 million polygons. However, it will benefit from some user interface and user experience updates. Since the automatic hole-filling feature doesn’t always produce the right result, it would be great if it could be te turned off. It would also be nice if the system could be set to scan more than 8 angles for complex objects. With 3 minutes per scan, the system is fast enough to make scanning 16 angles worth the extra detail. Color capturing is literally an afterthought (a clever solution, though) and if it’s important for your purpose this scanner is not for you. Since color capture is only possible in low detail mode, it kind of contradicts the USP of the high resolution. For $1199< the Shining 3D Einscan-S 3D scanner is a unique and competitive proposition. For geometry-only scanning of small objects it does indeed offer fast, high-end accuracy for a low-end price. On top of that, the Free Scanning mode enables the occasional scanning of larger object from a tripod with manual rotation. I think the existing product could be improved by supplying a lighter, more flexible VGA cable and a micro-USB cable to power the HDMI adapter. But the biggest improvement could be done on the software side, by adding a settings menu with options to have some control the meshing process. All things combined, I would personally pay more for a version that has a better color capture, less cables and a more plug-and-play workflow. On paper it seems the new Einscan-Pro is designed to be exactly that while also adding the freedom of handheld scanning. It’s true that the Pro is 4.5 times more expensive than the S, but it’s still a lot more affordable than other handheld 3D scanners like the Artec EVA, the Creaform Go!Scan and the Thor 3D. Thanks again for reading! As always, feel free to ask me anything by posting a comment below of sending me a Tweet. If you liked this review and think it’s valuable for your followers, I would greatly appreciate it if you shared it by clicking one of the social buttons below! Update June 21: Made the part about the maximum scanning height more clear.The scanner didn’t fit on any of my own tripods because it has no standard tripod thread
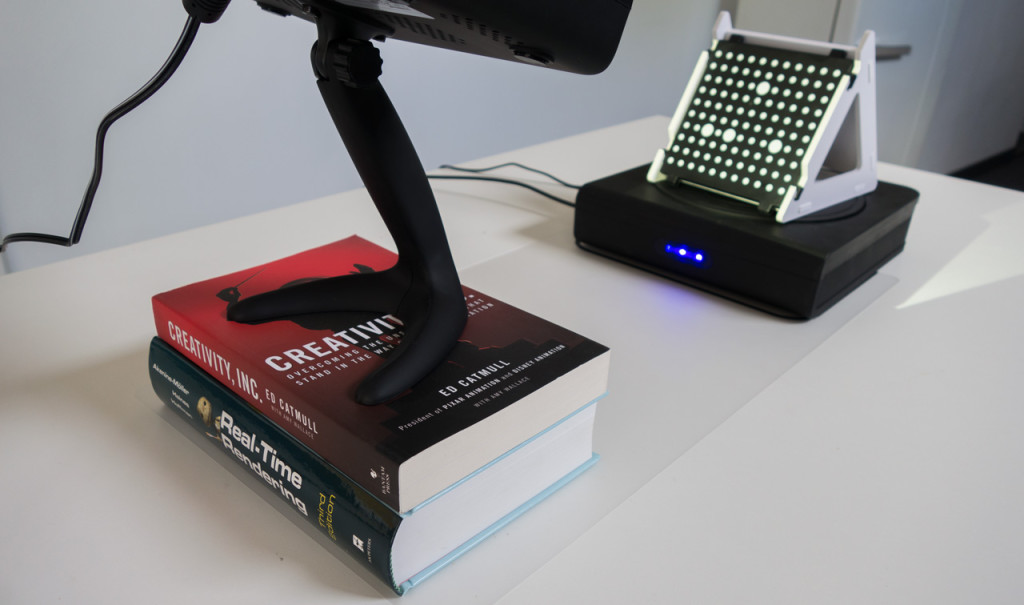
Hardware Setup
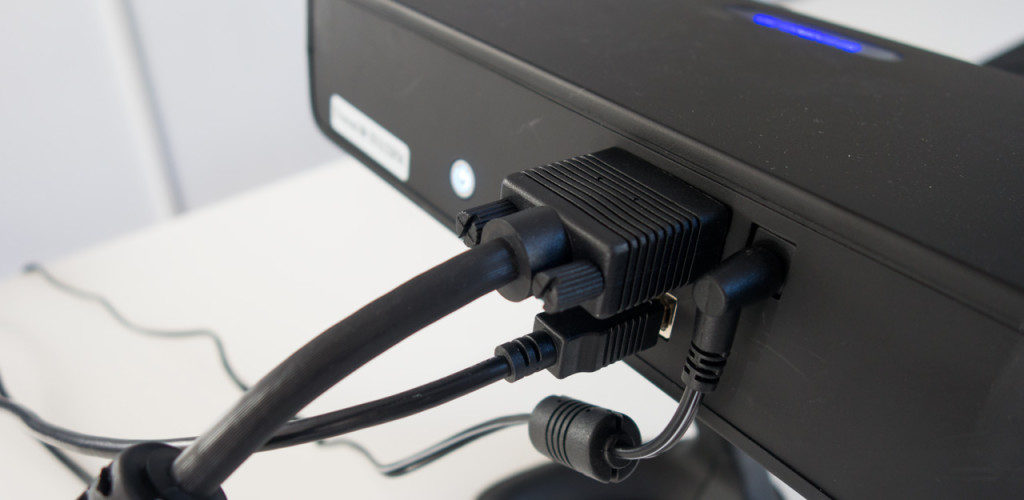
You’ll have 5 cables on your desk, which is quite a lot in this increasingly wireless world.
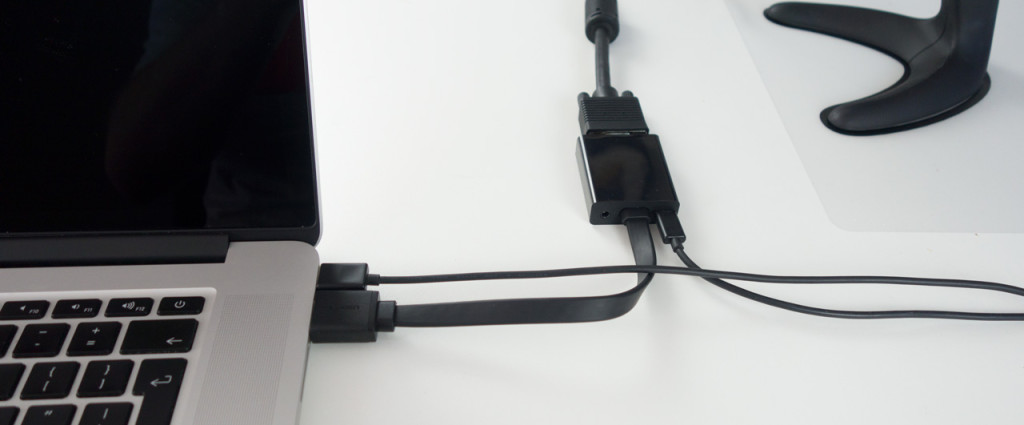
The VGA-to-HDMI adapter also has a micro-USB port to power it (like a Chromecast)
Software Setup & Calibration
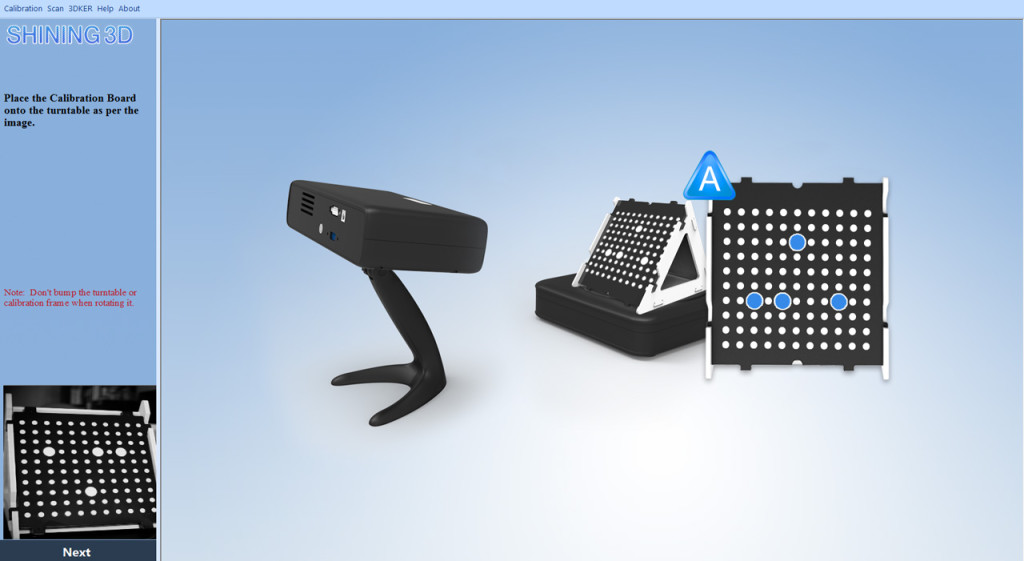

Calibration has to be performed every time the scanner or the turntable is moved
Scanning without Color

Pro Tip
Update about the Continue Scanning feature
The last monochrome scan I did was this toy from my daughter (her room is a perfect source for objects under 20 x 20 x 20 cm):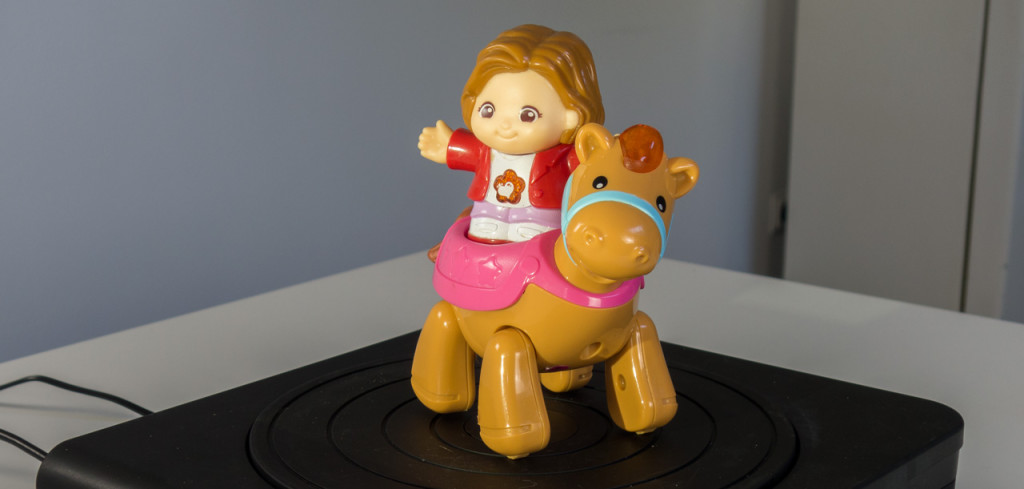
Scanning in Color
The actual maximum automatic scanning height is closer to 15 cm than the advertised 20 cm

Color-wise it’s kind of a mess.
Verdict
Color capturing is literally an afterthought
For $1199 the Shining 3D Einscan-S 3D scanner is a unique and competitive proposition
I’m hoping to find out if the Pro is worth the extra $4000+ soon. I’ve reviewed the Einscan-Pro, so now I know! Curioius how it compares to the Einscan-S?
Update June 27: Added a section with info about the Continue Scanning feature I missed during review
Update September 21: Added links to my Einscan-Pro review and a link to to the Continue Scanning section


Only using the EinScan-S with turntable scan mode is doing you and the Scanner a huge disservice. Turntable mode is handy for small simple objects, but tripod free scan is simply amazing considering the price of this scanner.
If you want some real examples of what this scanner can do, just go here:
http://www.nervindustries.com/3d-scanning.html
All the images are of full size automotive parts, not toys. This is a scanner with very real capabilities far beyond scanning small objects. I hope this helps for you and your readers.
Dave @ Nerv
We have found the Freescan capability to be less then ideal. Only 3 points is not enough when there’s no pattern matching. We find that if it misaligns and you have to align it manually with the 3 points it relies solely on the 3 points Vs using them as orientation then use the automated match… like the NextEngine does. Free scan requires ALOT of shape to match and you have to move in much smaller increments then the 30% overlap in the instructions. Additionally, the SW is way too simplistic and is missing way too much that is needed. For example when you shift and move the mouse to select unwanted areas to delete you cannot deselect and do it again. If you continue in Free scan and find a previous scan was upside down, there’s no way to go back. It works, but without the alignment of the turntable scan it does not work all that well at all!
Thanks for the input, Andy.
I think that in general the “simplistic” nature of the software needs to be improved greatly. In my opinion software is just as important as the hardware when it comes to 3D scanning.
Alternatively, you could try to make partial captures with the EinScan software, export them and use external software to do the matching. I’m currently experimenting with the auto-alignment tools in Meshlab (Free: http://meshlab.sourceforge.net/) for this. I’ll cover this in a future post!
Hello Nick. I wanted to know you if you will test in the future the Einscan-Pro?
If yes, what do you thing?
Thank you
I’ve reviewed the EinScan-Pro: http://nicklievendag.com/shining-3d-einscan-pro-3d-scanner-review/