This Review is based on the original, first generation Sense 3D Scanner.
In April 2016, 3D Systems (quietly) released the Next Generation Sense 3D Scanner—also referred to as the 2nd Generation, 2nd Gen, Sense 2—which uses the new Intel RealSense SR300 3D Camera hardware and promises better color textures, among other things.
In this post I’ll guide you through my discoveries with the Sense 3D Scanner. It is sold by 3D Printing company 3D Systems. It used to be part of their consumer-focussed Cubify line of products that also included the Cube 3D Printer, but the complete Cubify brand has been discontinued in December 2015. I’m sure they won’t be producing new ones, nor update the software, so this review is probably the final state of the product.
The Sense retails for about €400-€450 here in the Netherlands. The question of course is: is it worth that money? And what are the advantages compared to capturing objects with a free mobile app—which I found out works really well.
Hardware
The Scanner comes in a Apple-ish minimalistic flat white box. After opening there’s just a Quick Start Guide and the device itself. Let’s take a look at it:
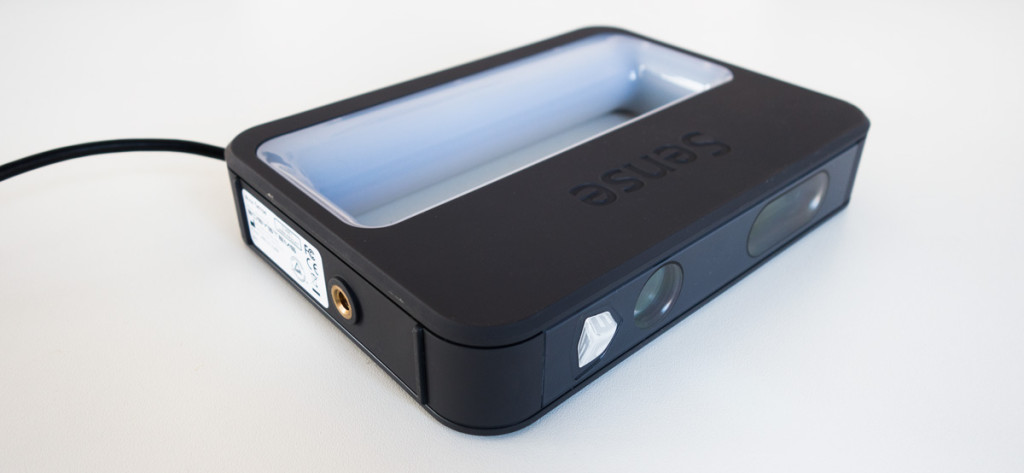
The Sense is designed to be handheld vertically using the grip, but you can also put it on a tripod because of the treaded mounting hole on the bottom. On the front you can see the 3D Systems logo, followed by a window from which an invisible infrared laser pattern is projected onto the object you want to scan. The larger windows contains an infrared camera to capture the pattern and a normal RGB camera to capture color information. I’ll get into the quality of that color information in a minute. The scanner has a two meter long USB 2.0 cable.
The depth sensor inside the Sense is made by PrimeSense — as far as I know it’s the Carmine 1.09 hardware. This company has been acquired by Apple in 2013.
Software
I’ve written before that for 3D Printing, the software is just as important as the hardware. The same is true for 3D Scanning. Maybe even more so, because the computer has to both make sense (yes, sense!) of the readings from the scanner in real time and try to connect the parts you’ve scanned seamlessly.
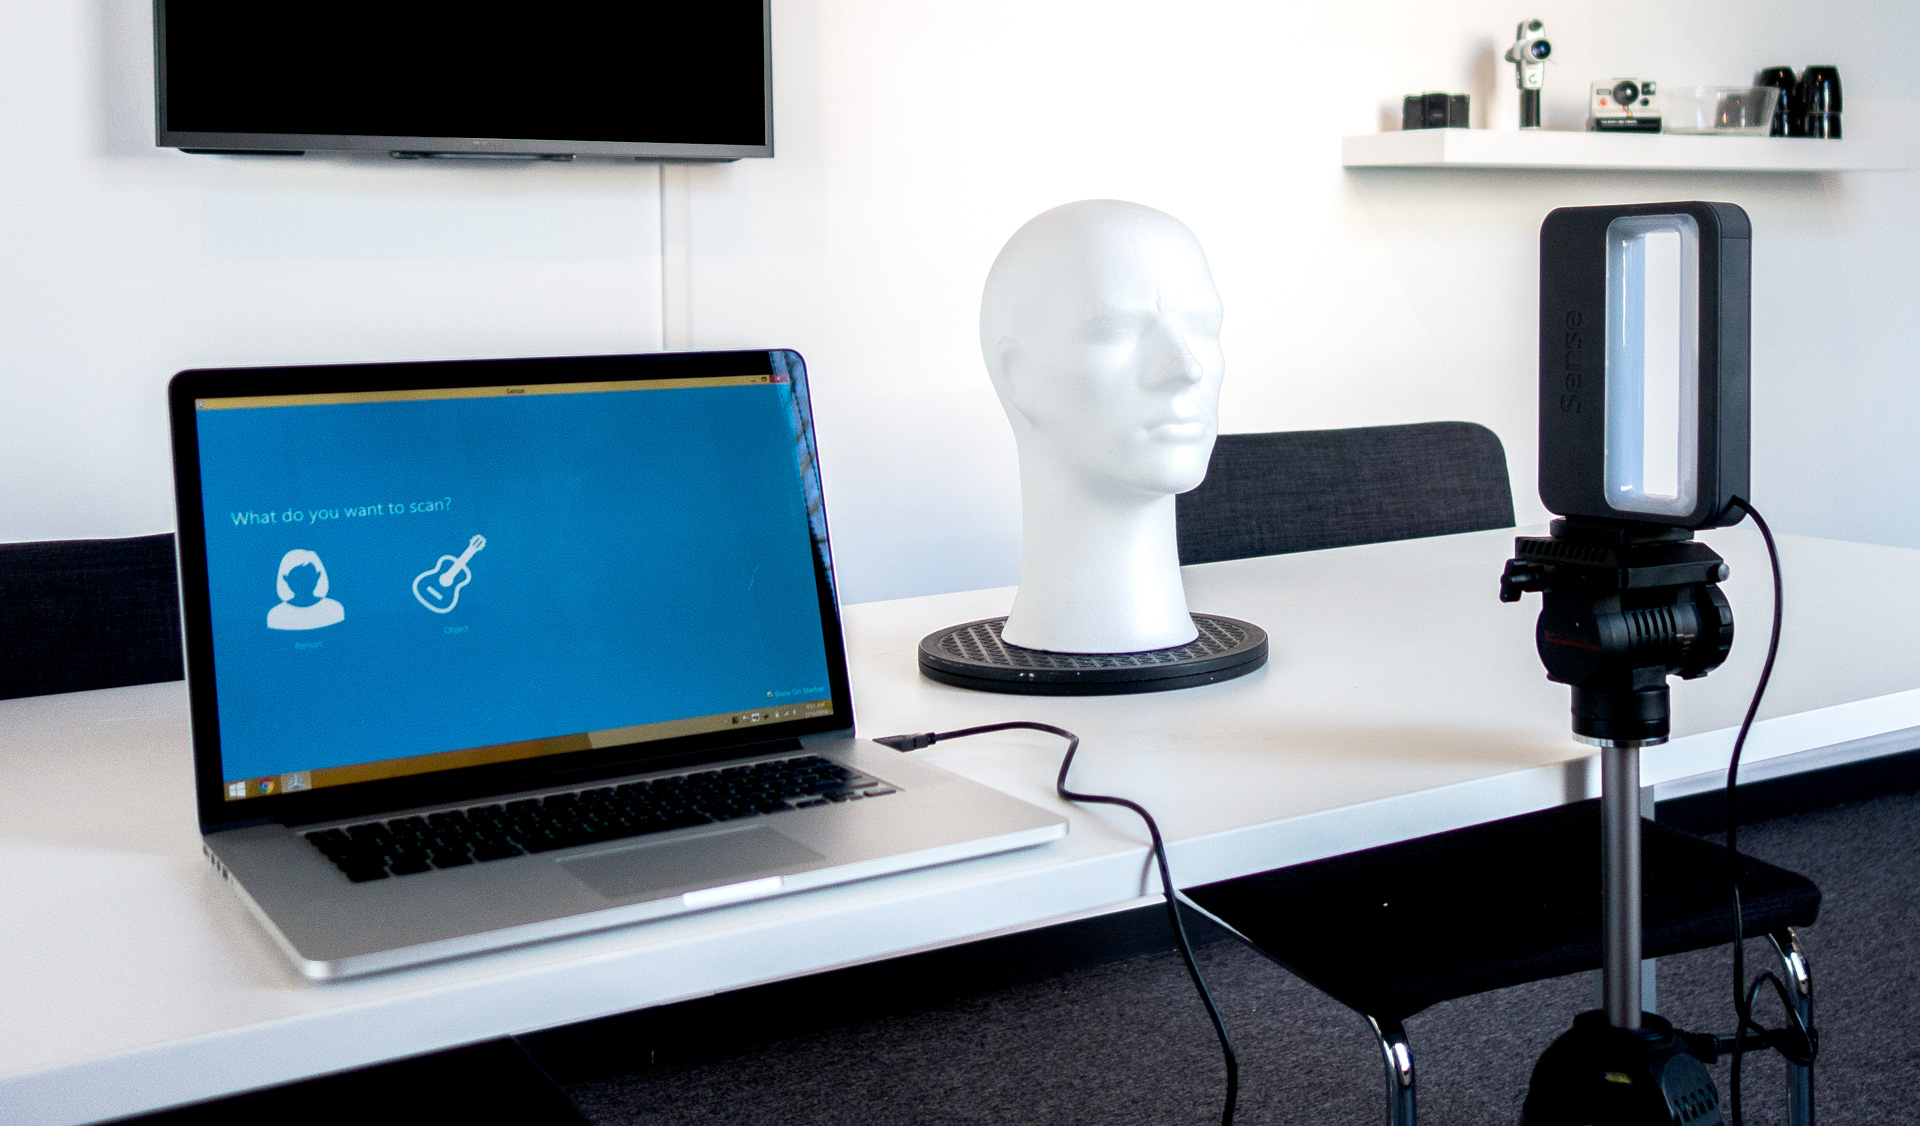
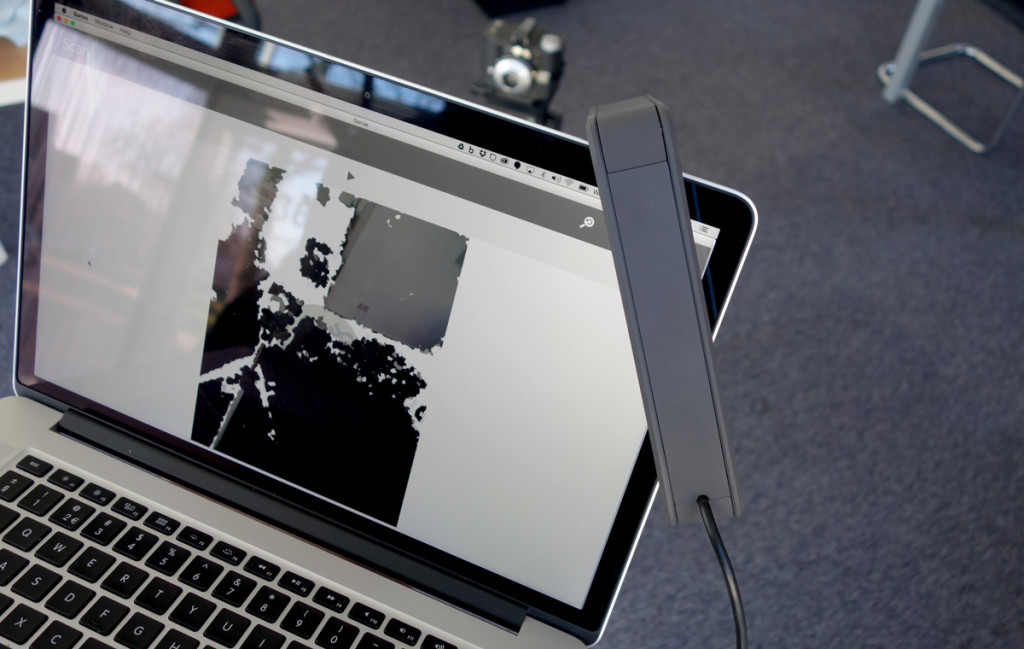
As you can see in the header image I tested it with a Macbook Pro (mid 2012) running OS X Yosemite. It also runs Windows 7 through Boot Camp. The Sense software can be downloaded for both Mac and PC from the 3D Systems website where you can also register the serial number of the device and retrieve an activation code. You’ll only need this code once when first launching the software.
I noticed a significant difference in the interface of the Mac and Windows versions. The latter seems to be developed further with a nicer interface design, more export options (more on that later) and more stability.
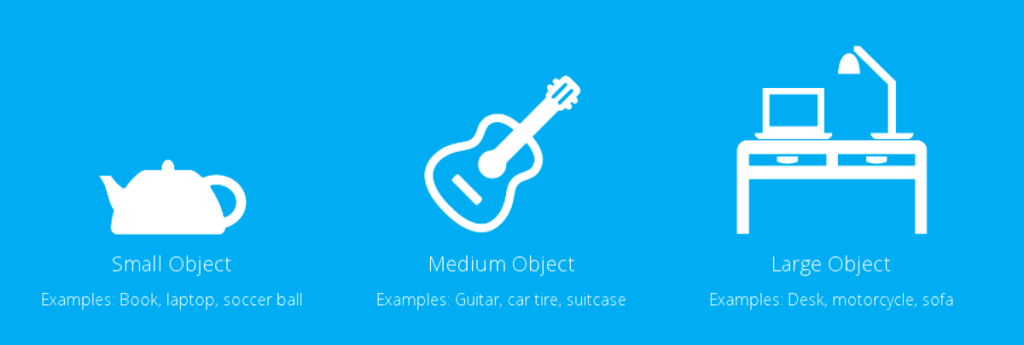
Both versions of the software are similar in function though and pretty easy to use. After launch, it will ask you if you want to scan an Person or Object, each followed by a second option screen to set the size. For Persons this is either a head or full body scan. Choosing Object gives you three options.
The presets work well in some cases, but not all. I quickly discovered that it’s a lot easier to go to the Settings menu, uncheck “Prompt on Startup” to disable the preset chooser and use the Object Size slider to set the size of the scanning area manually.
If Object Recognition is activated, you’ll notice that the object is highlighted in green. Just adjust the slider until the object is more or less fully selected.
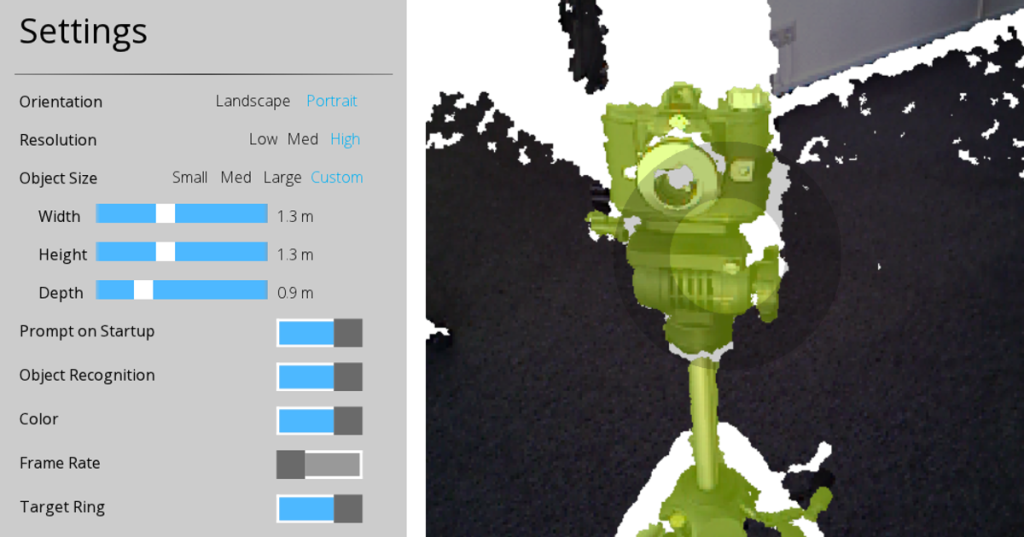
As you can see, there are a number of other Settings. The Sense can be used in landscape mode, but ergonomically it’s designed to be either held or mounted in portrait mode.
The Resolution setting relates to the density of the 3D data that is captured—not the color information. A lower setting made both the Sense and my Macbook’s life a little easier, so I could make scans faster. Maybe if you’re going to scan very large objects (the maximum object size is 3 x 3 x 3 meters or 10 x 10 x 10 feet), you won’t need an extreme dense mesh, but for the small objects in this review I used the High setting, because I figured I can always decimate the polygon mesh later.
The Frame Rate option displays the real time frame rate on which the Sense is capturing. It’s nice to have, because you know if your computer can actually handle what you’re doing. If not you can try moving slower.
Handheld Capturing
Right away I discovered that it’s nearly impossible to make a scan with the Sense while moving around an object with my Macbook stationary on the table. It’s very hard to keep an eye on the screen that way, while also focussing on pointing the scanner in the right direction.
The solution is to simply move the scanner and laptop around simultaneously. A Macbook Pro is a little heavy for that, though. A 13 inch laptop would be easier to walk around with. Even better would be using a Surface tablet, which would work since it runs Windows. I don’t have one and unfortunately you can’t connect the Sense to an Android tablet or iPad. For the latter there’s the iSense, more on that later.
Starting the capturing session is done by clicking the play button or hitting the space bar. It’s nice that the software gives a 3 second count down, though I would have liked a few more seconds to get the scanner into position after hitting space bar with the hand I’m holding it with. I really don’t get why they didn’t put a simple button on top of the device to start and pause the capture process.
I’ve made a screen recording to show both the capture process and the retouching possibilities afterwards. It’s played back at 4 times the original speed, so it only takes 35 seconds to get an idea of the process:
Mounted Capturing
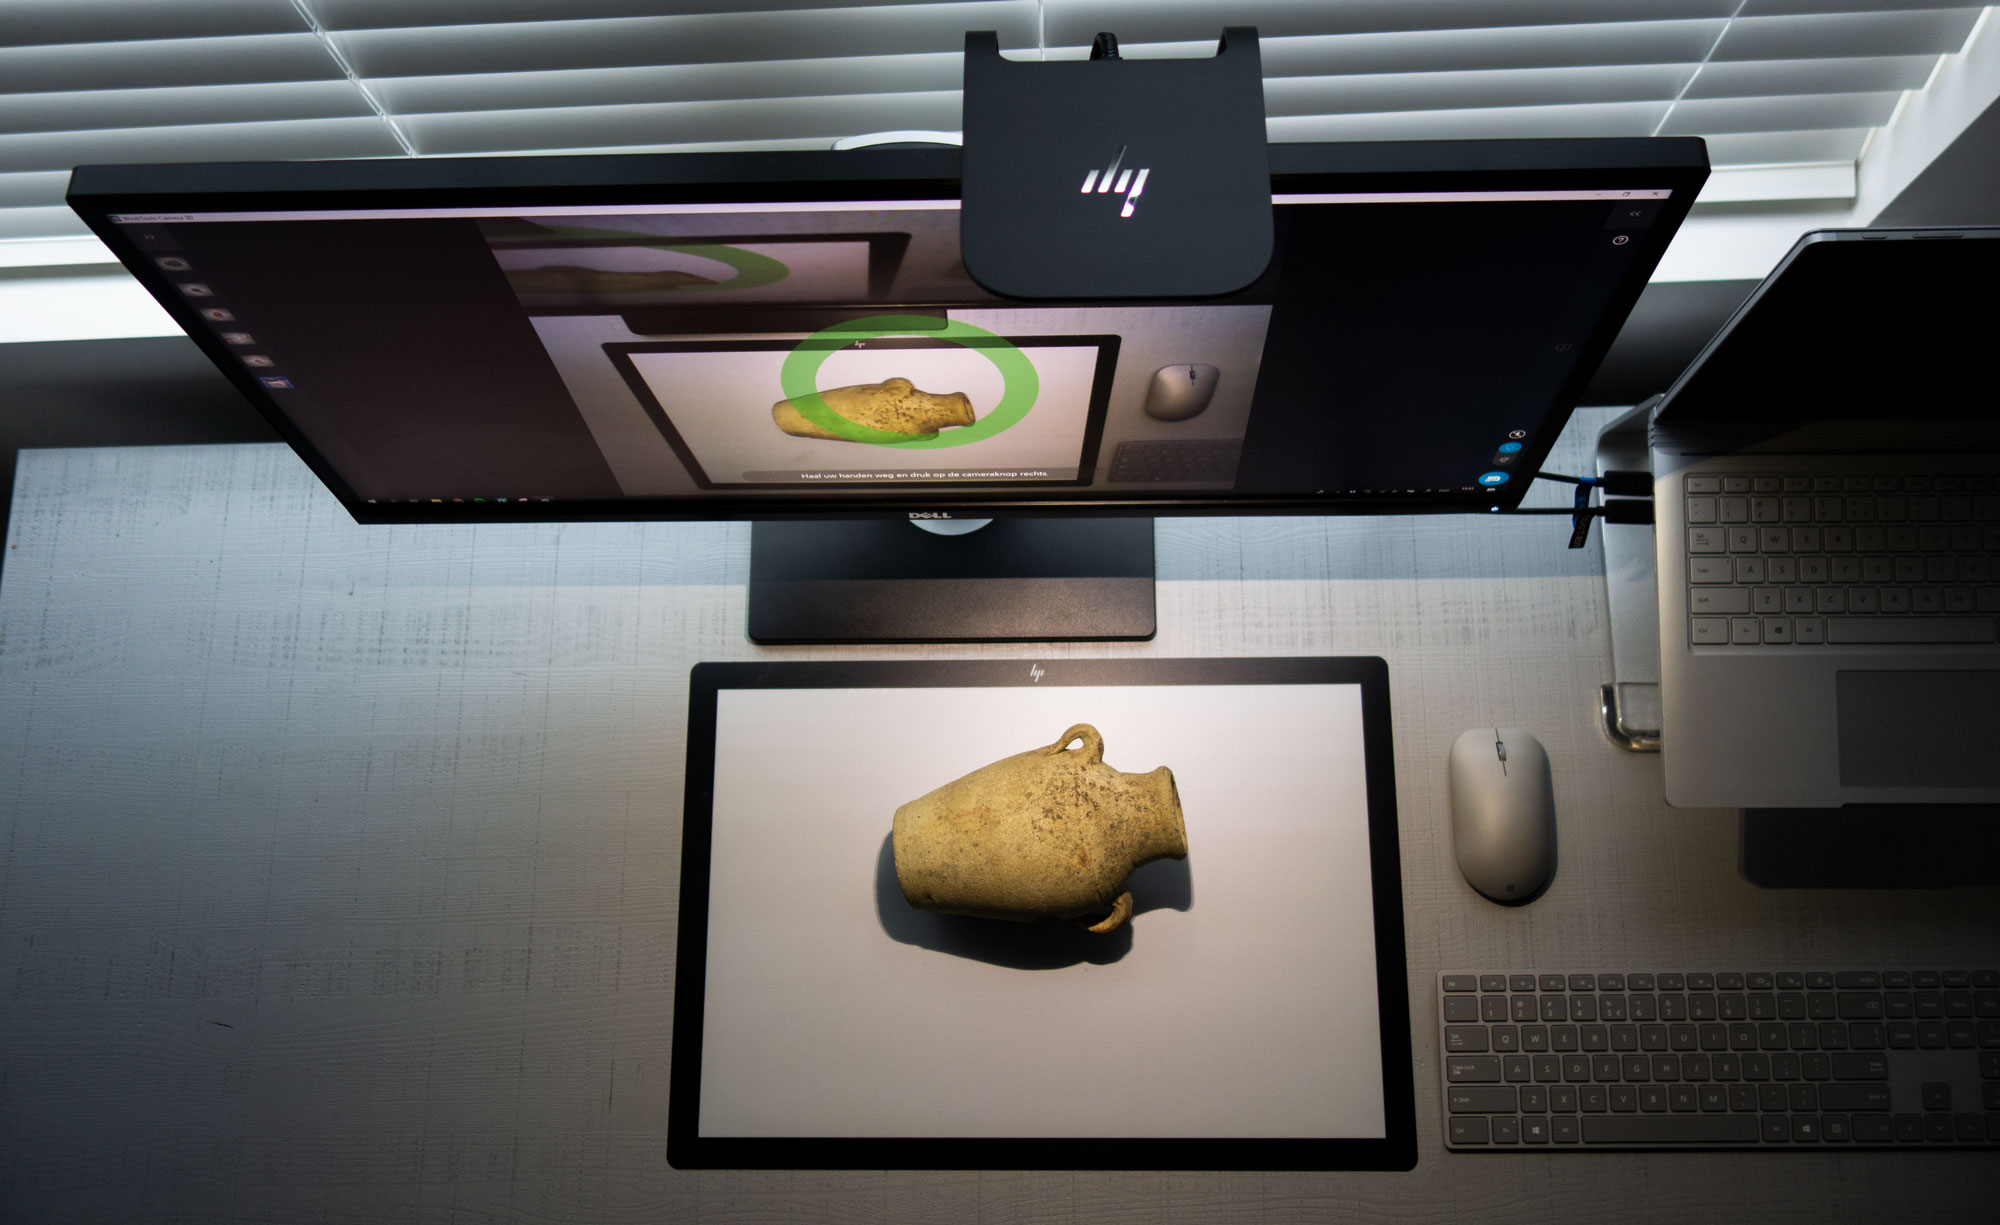
As you can see in the header image of this post, it’s also possible to make scans by mounting the Sense on a tripod and rotating the object. My co-founder Patrick discovered he ows the very turntable that’s sold as part of the Sense Accessory Pack. To thank him I’ll post a gorgeous 3D scan of him at the bottom of this post.
Because you can set the scan area of the Sense you don’t have to worry about the non-moving background, like you would with a photogrammetry approach. Scanning this way works reasonably well for some objects. Of course you have to do multiple rounds with the scanner mounted at different heights and angles. You can pause the scan in between tripod resets, but you have to be careful because too much difference can lead to lost tracking (more on that below).
In the end I found that Handheld Capturing works a lot better because of the freedom to point the scanner at difficult-to-reach areas to complete the mesh. I can totally imagine doing this with a Surface tablet (or an iPad with iSense / Structure Sensor) for even more flexibility. Handheld Capturing also resulted in nicer scans with less artifacts in both the mesh and color information.
Lost Tracking Issue
Regardless of the capturing method or the use of the Mac or Windows version, one thing that was constantly interrupting the joy of scanning was the “Lost Tracking” error. This happens when the software can’t match what you’re pointing at with the captured 3D data.
This happens on all kinds of occasions:
- When moving too fast
- When scanning larger dark/glossy/transparent/reflictive areas
- When scanning objects without much definition (like the back of the styrofoam mannequin head below)
- When scanning objects outside with too much sunlight
- Out of the blue for no apparent reason
If tracking is lost, you’re asked to align the live feed with the last-captured image, but this is incredibly difficult and if it works the pick-up point is often noticeable in the final mesh. The fastest option is simply hitting the Home button and starting over. This can get rather frustrating and since I think the software won’t be updated anymore to improve this behavior.
Retouching
Mesh Editing
As you can see scanning with the Sense is pretty straight forward: Just slowly walk around the object until the surface is complete, hope tracking doesn’t get lost, and press next. Then you can do some clean-up the mesh by removing unwanted parts by Cropping or Erasing. In the video above you can see that I removed the skewer I used to keep the teddy bear upright.
You can also automatically close all holes by hitting the Solidify button. That last step is especially important if you want to 3D Print the object.
Color Editing
The next step let’s you do some basic color editing. Before I dive into this, it’s a perfect moment to note that the color information captured by the Sense is completely and utterly useless for most—if not any—purposes. The RGB camera has a resolution of just 320 x 240 pixels—which is 0.76 megapixels! I was hoping that this wouldn’t matter too much, since the software stitches together many patches of color information as you scan, but it does. This results in a low-resolution, blurry texture—which isn’t even a texture, but more on that later.
Anyway, you can edit the “texture” if you want. The Auto Enhance is as bad as in most programs, but the Touch Up tool works as expected.
Results & Limitations
Limited export formats on Mac
Although the Sense website says the software can export .STL, .PLY and .OBJ formats, I discovered that the Mac version only exports .PLY-files. I personally favor the .OBJ format because it’s supported by more 3D editing programs. That option only seems available in the Windows version. It’s also note-worthy that the Windows version is a lot more stable than its Apple-minded counterpart. The Mac version crashed quite often, especially on export. This sometimes (but not always) lead to corrupt files, meaning I had to redo the complete scan.
No Texture File
When I opened the exported files in Cinema 4D and Memento to check out the results, I noticed that they were completely white. The .OBJ file had no .MTL file with texture information and the .PLY file had no embedded textures. At first I thought something went wrong, but I later discovered that the Sense software exports “per vertex color data”. Instead of a bitmap texture each polygon in the mesh has an RGB value.
There are only a few professional programs that support this type of color information. I discovered that the sculpting tool Zbrush does and Maya can apparently convert per vertex color data to a texture file. Surprisingly, the online 3D showcasing service Sketchfab supports per vertex color information in both .PLY and .OBJ format.
Regardless of the technical support for the color format, like I wrote earlier the actual color information captured is pretty useless for most cases. The only purpose I can think of would making a full color sandstone 3D print of a person, because on human scale the resolution might just match that of some SLS 3D Printers. I’m not an expert on that technology, but judging the results below I’m guessing you need better color information for a good full color sand stone print.
But… if you don’t need textures
Of course It could very well be that you don’t care about the color information at all. Maybe you just want to print your scans with a single-color FDM printer. The Sense 3D Scanner is/was mostly marketed as an accessory to the Cube 3D Printer, which can only output one color. And taking into account that the Cube can print objects with a maximum size of 15 x 15 x 15 cm or 6 x 6 x 6 inches with a minimum layer height of 70 microns, I think the amount of detail the Sense records on medium-to-large objects is sufficient.
Below are interactive 3D embeds of the same scan. For the white one I cleaned op some floating geometry (parts of the floor and chair) in Memento. That software doesn’t support per vertex color and after exporting this data was lost, so it’s a great example of the result that could be printed in one color:
I was surprised to see that Patrick is actually recognizable in the colorless model, as if he was actually covered in plaster. A bit of smoothing in a 3D Sculpting program is all he needs (he’s aware of that). So if your sole goal is to 3D print single-color scans of humanoids the Sense 3D Scanner might be worth a try.
Small Objects
Geometry-wise the Sense scanner works quite well on human-sized objects, from heads to busts and probably also full body scans if you can find a subject that can stand completely still for a few minutes.
However, I’m less enthusiastic about the amount of detail in scans of smaller objects. The minimal scanning distance from an object is 38 cm / 15 inches so you can’t take a “3D close-up” so to speak. In the video in the Capture section above you saw that I scanned the same 28 cm / 11 inches tall knitted teddy bear I used for my recent 123D Catch Photogrammetry Review—at the same time and location.
I’ve embedded both the Sense capture (first one) and the 123D Catch capture (second one) below. The difference in texture detail is very clear right away. If you want to compare the geometric differences, hit play and click on the cube button in the lower right corner to select the white wireframe overlay.
As you can see the 123D Catch capture has a lot more geometric detail so it beats the Sense in every aspect. Except speed of course, because the 123D Catch capture took half an hour to “render” in the cloud (double if you count my failed first attempt) and the Sense scan was literally done in 50 seconds. With a little practice you can have an object scanned, do basic retouching in the Sense software and upload it directly to Sketchfab in under 5 minutes.
For someone like me who has worked in 3D for 10 years, a production speed difference that big is really worth investigating. But in the end the scan quality of small objects made with the Sense is simply too low for me to be taken seriously.
Missing Decimation Feature
It would have been nice if the software had a way to see the wireframe and an easy-to-use decimation feature to reduce the density of the mesh before exporting. Since the product is obviously targeted towards consumers I think this would help with making the model easier to process in 3D Printing software. Of course you can also scan at a lower resolution, but a bit more control over mesh quality is useful for everyone.
Prosumers & professionals can decimate meshes in many 3D programs. Below you see the wireframes of the Handheld Capture I made of the styrofoam mannequin head at our studio. The first is the incredibly dense mesh directly from the Sense software, the second is decimated in the free Memento software (which I’ll review soon as part of my Autodesk Photogrammetry Trilogy) and the thirds is decimated using the ZRemesher function of ZBrush, which in my opinion is by far the best way to decimate 3D models.
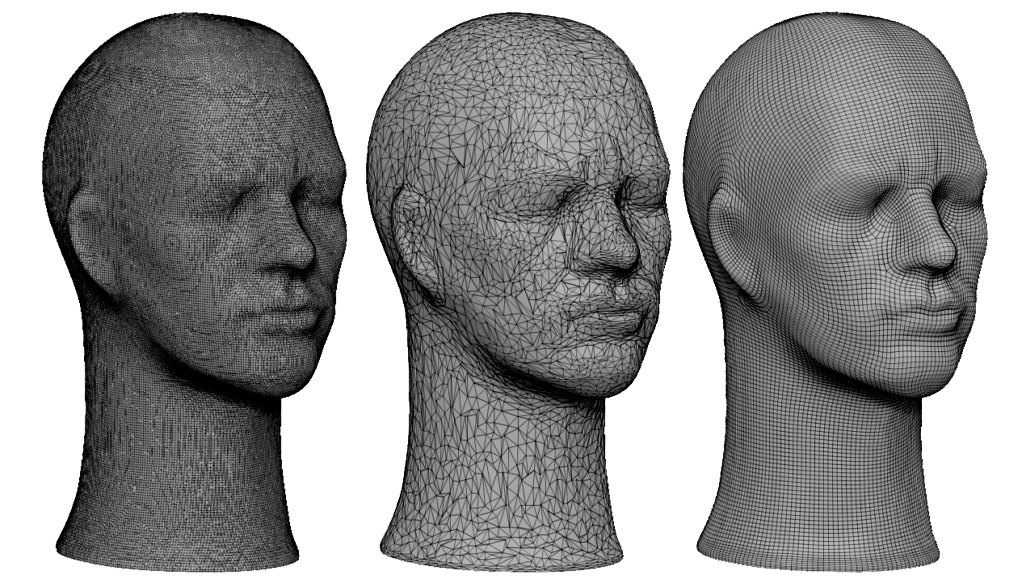
Judging the heads above and the scan of Patrick (which I did in one try), I’m confident that 3D Scans made with the Sense can serve as a good base for 3D Modeling & Sculpting, as long as you don’t need the color information. They contain enough detail to sculpt into something nice.
Verdict
3D Scanning with the Cubify Sense beats every Photogrammetry technology in terms of interactivity and production time. But the usefulness of the captured 3D models greatly depend on what you want to do with them.
If your goal is to scan people and 3D print them at relatively small sizes in a single color, it might be worth checking out. For that purpose it’s a lot faster than Photogrammetry, which is generally tricky to do right with a single camera.
If your goal is to scan people or relatively large organic objects and use the mesh as a base for digital sculpting, it’s also not a bad device.
For every other goal where color resolution is important or scanning small or very large objects, the Sense is not the scanner you’re looking for—you’ll need a more sophisticated scanner, for a more civilized age. If you need a bit more proof for it’s incapability to scan small objects here is the Sense’s scan of my vintage Agfa Clack camera, followed by the result of 123D Catch.
It must be said though that this is a < €450 device, which probably makes it the lowest-priced handheld 3D scanner you can find. Even small turntable-style scanners are more expensive with examples like the MakerBot Digitizer (€949) or the Shining 3D EinScan-S (€1449). And a professional-grade handheld 3D Scanner like the Artec EVE Lite starts at € 12.590—28 times the price of the Sense (hoping to find out if it also scans 28 times better down the road).
What’s Next?
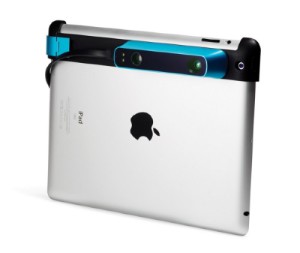
There’s one other 3D Scanner I know of in the same price range as the Sense: The iPad version, known as either Cubify iSense or Structure Sensor. I think it uses the same 3D capture technology as the Sense, but I’m hoping it has a better RGB camera or uses the iPad’s camera to capture color information, which would be a huge upgrade compared to the 320 x 240 camera on the Sense. That combined with more freedom of motion and—hopefully—better software could make a big difference. So I’m going to test that one soon!
I’ve tested it! Read my Structure Sensor / iSense Review.
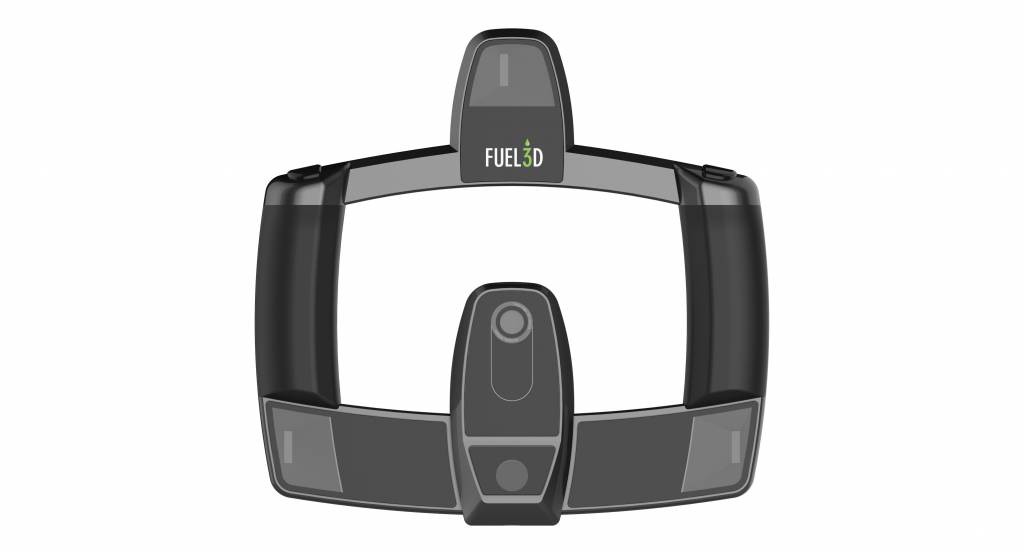
I’m also going to test I have also Reviewed the Fuel 3D Scanify. Priced at €1449 it’s also a portable handheld 3D Scanner, but it supposedly takes very high resolution 3D single snapshots, that can be stitched together afterwards.
If you want to be the first to know when future reviews are live, follow me on Twitter or Instagram!
Shares and Comments are much appreciated!


thanks for this information.you can also see this type of information on following link.
more: http://vexmatech.com/blog.html
here is 3d scanner http://www.3dmaxprinter.com/shop/3d-scanner/3d-scanner-diy-kit-for-scanning-3d-printer-objects/
Hi! I’m Tanya; I am the Service Manager at TOPDON. We specialize in professional car OBD diagnose tools. I am reaching out to you on the possibility of getting either an editorial or a video review for our featured OBD2/EOBD ArtiLink 201 Auto Code Scanner.
This product checks engine error codes with O2 Sensor Test, Views Freeze Frame Data, Reads and Clears DTC. It has extensive coverage (works on all 1996 and newer OBD II and CAN compliant vehicles) and simple manipulation (One click I/M readiness for a quick check). Besides, it has exclusive OBD II diagnostics, efficient monitoring and supports multiple languages. Please find more details of the product here: https://www.amazon.com/dp/B074M6KHDH.
If you are interested in reviewing our latest OBD2/EOBD Auto Code Scanner, please let me know and I will send out a free sample for you to review.
Thank you for your time and I look forward to hearing back from you.
Best Regards,
Tanya
i bought this scanner (sense 1st) 2 years ago and doesnt works fine, I would like to know if i can use this with another software or use components for making another thing…
Thanks for this review
If I’m not mistaken that device has a Primesense Carmine sensor built-in. If that’s indeed true it might work with Skanect. You can try it with the free version: http://skanect.occipital.com/download/
hi dear
good man
I have sense 1, can I have joined it with Skanect?
how to join sense scanner 1 with skanect software?
please help me.
ID yahoo: de_mojtaba92@yahoo.com
thank you.
Skanect doesn’t support the Sense 1 (or Sense 2)
of course they do, I have them and they work well with sense gen1, also there are many other programs that are compatible with this scanner, like “RECONSTRUCT” “SKANECT” “REC FUSION PRO” and the SENSE 1.0 setup program.
3D printers also need calibrating to make sure that the machine uses the correct amount of material for each product. Calibration options are available on most printers to do this for you. Select the appropriate materials for various applications. There are several materials you can use when 3D printing: plastic, metal, and ceramic. However, there is no such thing as the “best” material because certain three-dimensional objects are compatible with various substances. Polylactic acid, for example, is ideal for 3D printed toys because it’s cheap to source and biodegradable. Metal powder would be better suited to 3D printed jewelry where the items need to be more durable and sturdy.