
With 2016 coming to an end, it’s time to look back at another year. For me it was the year I decided to put my blogging and R&D focus entirely on 3D capturing technologies. Without any regrets! It’s a great journey so far and I’ve tested a lot of great hardware and software in a market that’s changing faster than many people realize.
The very first 3D scanning hardware I reviewed was 3D Systems’ first generation Sense scanner in February. Because that device was part of the consumer-focused Cubify brand that was discontinued in 2015, I didn’t expect the Sense to get a successor. But I was wrong and today I’m writing about my experience with the Sense 2 — or as 3D Systems calls it, the “Next Generation Sense”. It’s now targeted more towards professionals, but still has the consumer-friendly price tag of $399.
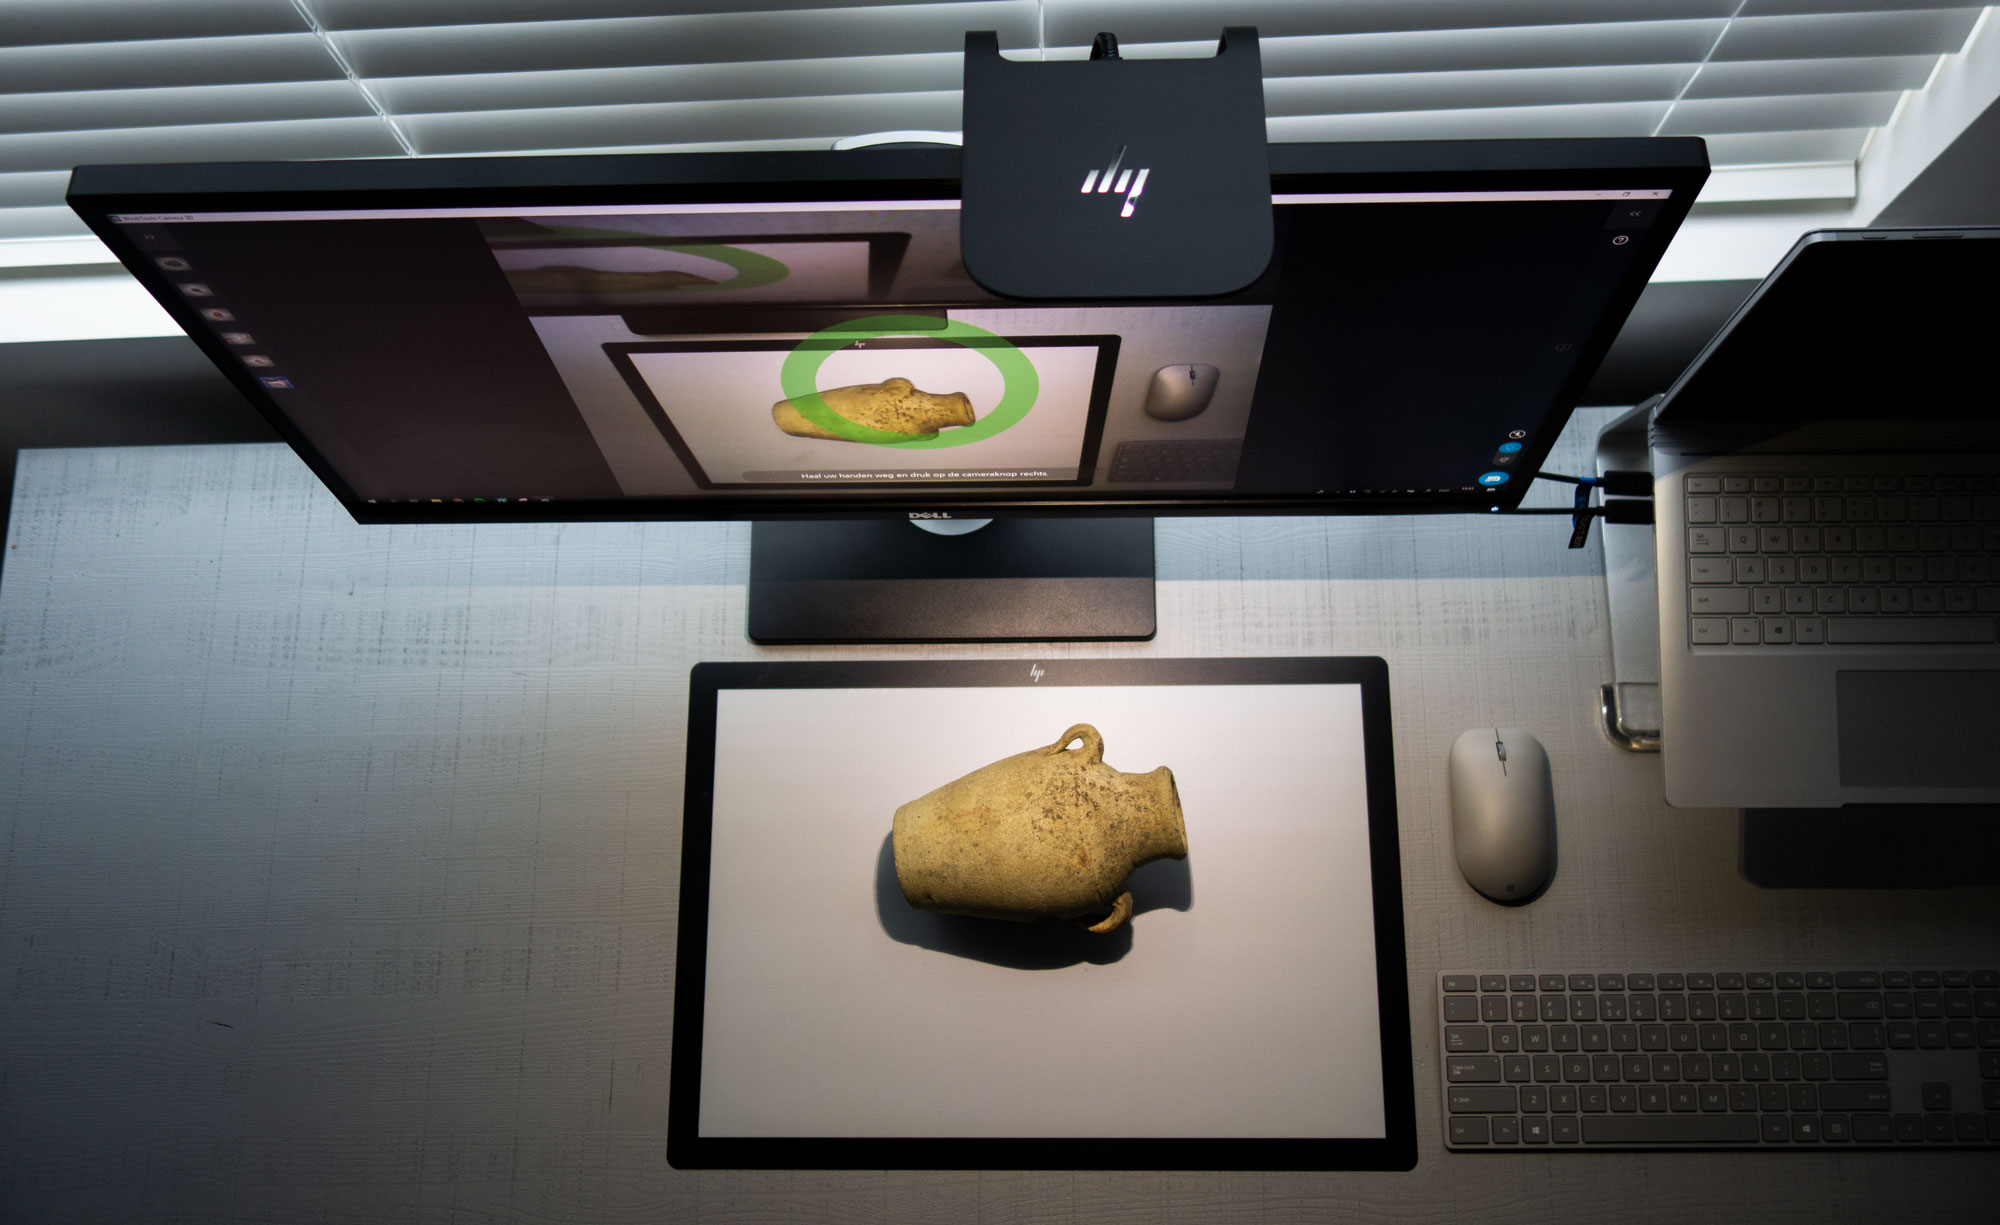
My review model has been kindly provided by 3D Printer and 3D Scanner store Machines 3D!
In this Review, I’ll compare the 3D Systems Sense 2 to
- It’s predecessor, the original 3D Systems Sense 3D Scanner (which I’ll refer to as Sense 1)
- The XYZ 3D Scanner, because that features the Intel RealSense F200 sensor which has been succeeded by the SR300 sensor in the Sense 2.
- The Structure Sensor, which 3D Systems also used to sell under the name iSense. This rebranded device has recently been discontinued. (I’ll refer to it as Structure Sensor)
Differences with Sense 1
The Sense 2 has the exact same form factor as the original. It’s actually the same plastic housing, except that the inside of the handle is now made of transparent plastic instead of the original’s milky white color.
It still has a tripod thread on the bottom, which is nice. But it still hasn’t got a button to start and stop the scanning process. I still think this is a huge design flaw — even the $199 XYZ 3D Scanner (review) has a button! The housing has a perfect place for it…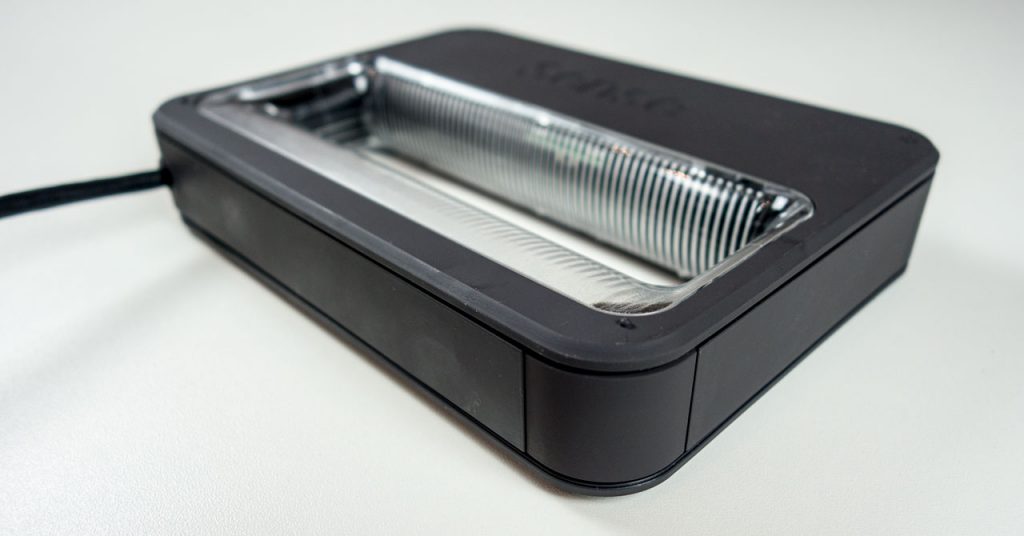
Technically, the Sense 1 & 2 both use infrared depth-sensing technology. The difference is that the original version contained a PrimeSense Carmine 1.09, while the new one features Intel’s latest SR300 depth sensor.
It still hasn’t got a button to start and stop the scanning process
On paper this means the depth camera resolution has gone up from 320 x 240 to 640 x 480 pixels. The color camera resolution has made an even bigger jump, from 320 x 240 to Full HD 1920 x 1080 pixels. Both specs state a depth resolution of 1mm at a distance of 0.5 meters.
But the Sense 2 is not better in every way. While the minimum scan distance is the same at 0.2 meters, the maximum distance of Intel’s SR300 hardware limits the Sense 2 to 1.6 meters (Intel says it’s 0.75 meters for 3D scanning, by the way) while its predecessor could scan at 3 meters — almost twice af far! Because of this, the maximum scan size also dropped from 3 x 3 x 3 to 2 x 2 x 2 meters. Realistically though, I can hardly think of objects bigger than 2 meters that one would like to capture with a handheld scanner like this.
It’s also worth knowing that with the Sense 2, there’s no longer Mac support, so Apple users like me have to use Windows 8 or 10 through Boot Camp. This is true for many 3D scanners by the way, and I personally don’t mind rebooting to Windows very much to make scans. Honestly, the Mac version of the original Sense wasn’t as good as the Windows version.
And as a plus, the new Sense for RealSense software from 3D Systems offers a great experience for the Sense 2 or any other RealSense-based scanners — and it’s free and unlimited. I reviewed this software separately when I tested the XYZ 3D Scanner (which contains the older RealSense F200 which is succeeded by the SR300 used in the Sense 2) because it gave better result’s than XYZ’s own app.
Anyway, let’s start scanning!
Geometry Quality
The first thing I was curious about was the geometric quality of the scans from the Sense 2. I still have the foam mannequin head at the office, so I decided to do a direct comparison with the 3D model from the Sense 1. For this I set the Geometry Resolution to the highest setting.
While the scan from the Sense 2 (right) has almost twice as much polygons — 348k vs. 180k — this doesn’t bring out more detail. The Sense 1 result (left) shows more geometric details, like the wrinkle above the eyes and the definition of the lips and nose. The Sense 2 scan also contains more geometric noise at the highest resolution setting. More about that later.
The Sense 2 scan has almost twice as much polygons than that of the Sense 1, but this doesn’t bring out more geometric detail.
So far, not so good. The Sense 2 FAQ also honestly states that “the new Sense does not scan uneven textures like hair quite as well as the old one did”. But if you have read my Sense 1 Review, you know that I was actually surprised by its geometry capture. The problem, however, was the fact that the color capturing capabilities were below any level — they simply sucked and made the scans unusable for any purpose other than single-colored 3D prints.
Texture Quality
For many upcoming purposes, such as online viewing, games and Virtual Reality, texture quality is getting increasingly important. I dare to say that for many of these cases, good texture capture — and mapping — can compensate for lower geometric detail. So let’s take a look at the textures the Sense 2 captures with its HD RGB camera.
For comparison, here’s Teddy Bear (18cm tall) scanned with the Sense 1:
As you can see texture quality is poor: blurry and not very bright. If you’re curious about the geometry, you can set the Rendering style of the Sketchfab embed above to MatCap through the gear icon in the bottom right corner — it has a polycount of 207.5k.
And here’s Teddy captured with the Sense 2:
A clear improvement in texture quality! Not museum-quality, but it’s certainly usable for many purposes. Keep in mind though that I used a small studio light set with softboxes for almost all my Sense 2 scans. The scan above was done with the Geometry Resolution slider at 3/4 which I call “medium-high”. At this setting the polygon count is 323k. A bit higher than the Sense 1, but with a comparable amount of details. Increasing the resolution to the highest setting doubles the polycount, but doesn’t add more details — just more noise.
A clear improvement in texture quality! Not museum-quality, but it’s certainly usable for many purposes.
And if you’re wondering how the Intel RealSense SR300 sensor inside this device compares to the older F200, here’s the same Teddy captured with that under similar circumstances:
With less than 100k polygons and blurrier texture, the F200 certainly delivers less quality than its successor.
Lastly here’s the same Teddy Bear scanned with the Structure Sensor on an iPad running itSeez3D 4.1(review) which has been updated recently with better object scanning. Even though it was cloud-processed, the polycount is 50k, which makes it the least-detailed scan of the above.
Flexibility & Ease of Use
At 18cm tall, Teddy is a bit small than the the minimal scan size of 20 x 20 x 20 cm, so let’s move to something bigger. This is also a good moment to demonstrate that you can scan objects in two ways. The first is by walking around the subject with the scanner in one hand and a laptop or tablet in the other.
Or you can put your object on a turntable and rotate it in front of the scanner. You can do this from a tripod, which — if you move the turntable very slowly and use a light kit — ensures minimal noise in the geometry capture and reduces the chance of motion blur in the color textures.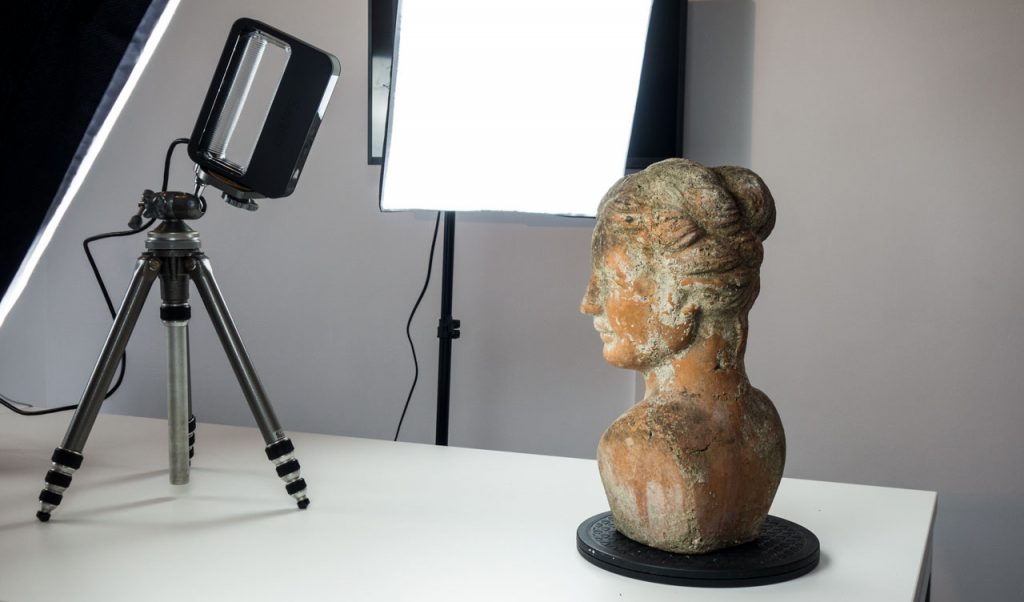
While that might work for some objects it didn’t for the bust above, because I wasn’t able to capture under the nose and chin. So I opted for best of both worlds: using the turntable, but keeping the scanner handheld. Here’s a video of the process (played back at 4x speed). It also shows how the capturing looks in the software.
I used the help of a second person to rotate the turntable to shoot a better video, but you can also do it alone with two hands. In this mode the lack of a start-stop button is not a big problem, because you can sit at a table and use one hand to operate a laptop and rotate the turntable.
Capturing is easy and I was surprised by the tracking of the Sense 2
As you can see capturing is easy and I was surprised by the tracking of the Sense 2, both with a turntable en when walking around an object or person. Below is the scan with the Geometry Detail set to the lowest setting. I also made a scan at the highest setting, but in this case the difference was minimal (172k vs 190k polygons):
In comparison, the polycount of the same bust scanned with the Structure Sensor & itSeez3D is just 48.5k and the Sense 2 scan contains more geometric detail in the hair and eyes areas.
Af far as I know, the current version of Sense for RealSense still doesn’t have RGBD tracking, which also tracks an objects RGB texture data on top of detecting patterns in the geometry. While the SR300 inside the Sense 2 has greatly improved tracking over the older RealSense F200, it had some troubles with my Old Jar’s lack of geometric features.
Honestly, I think I could have worked my way around that with a few extra tries, but for the sake of this review it’s good to know that if that doesn’t work, you can print the Tracking Assist PDF and enable the similarly named feature in the Settings.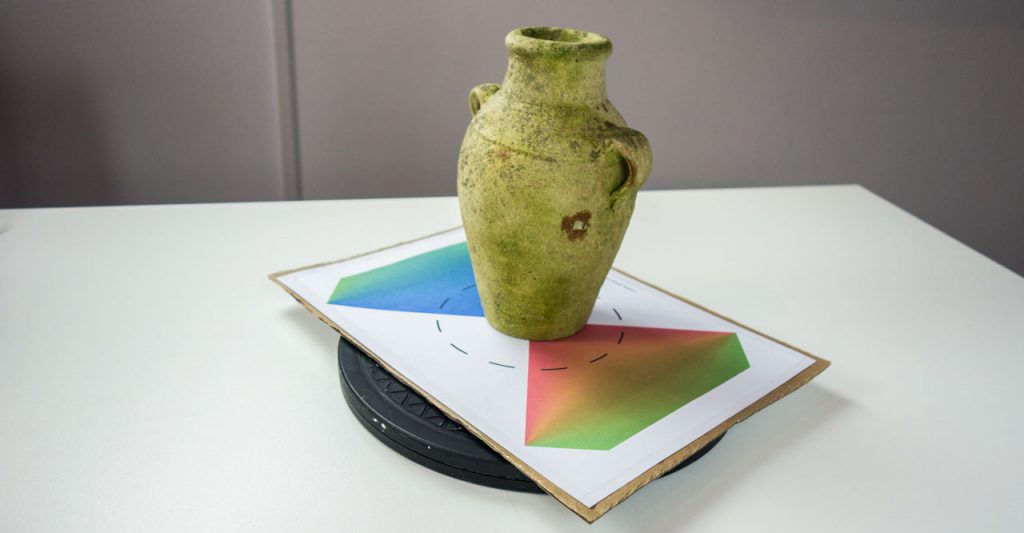
I put the print on a piece of cardboard so I could put it on the turntable without bending and it did make the scanning process for this object smoother. Here’s the result:
For the example above, I used the editing features of the Sense for RealSense software, including the hole-filling feature, which works well in most cases. It also tries to complete the texture. You can the unedited scan here.
I won’t go into the editing features of the software in detail, because I’ve already written a separate review about it. But here’s a GIF to show how the Crop, Trim, Erase and Solidify features can be used to quickly clean up a scan. After that, you can also tune the brightness and contrast and have your model ready for export to Sketchfab or a 3D file (.OBJ, .STL, .PLY or .WRL).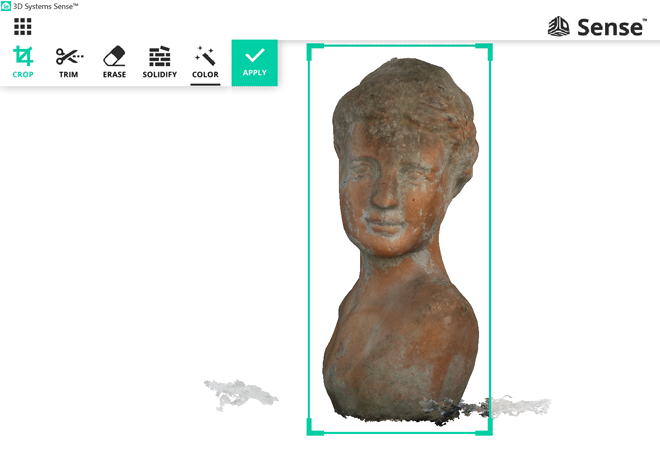
Scanning People
I get a lot of questions from readers that want to use depth sensors like this for 3D scanning people instead of (just) objects. A lot of times this is to set up an affordable mini-mi 3D printing service. So I know many of you have skipped to this part of the review. Let’s check it out.
The software offers a “Head” and “Body” mode, but the former is actually a Bust mode, which is nice. It cannot be underestimated that you need proper lighting for this, which requires a more powerful setup than objects to because of the larger scan area. I would advise to scan busts of people sitting in a solid chair, so their won’t move and you can better scan the top of their heads.
Increasing the Geometry Resolution does increase the amount of geometric detail, but makes the texture mapping worse.
Before looking at a scan from the new Sense 2, let’s revisit the scan of my business partner Patrick made with the first generation Sense 1:
That didn’t make me very happy. Mostly because of the textures, because the geometric detail is actually still usable for small-scale single-color 3D printing. Below is a scan made with the Sense 2 with the Geometry Resolution set to the lowest setting. It has a similar polycount as the Sense 1 scan (~100k polys) but has a vastly better texture:
Increasing the Geometry Resolution does increase the amount of geometric detail, but also introduces more geometric noise. And possibly because of that, the texture mapping gets worse. I encountered the very same behavior when scanning people with the XYZ / RealSense F200. Here’s an example with the Geometry Resolution set to Medium-High (420k polys):
Regardless of the Geometry Resolution, I noticed that the software has problems with texture mapping the eyes. If you rotate the embeds above, you can see that the eye texture is mapped onto the top of he eyelids.
The scans above are made with a softbox light setup. As an experiment, I wanted to test if I could make the Sense 2 more mobile for scanning people. And as a surprise, I discovered that the cheap battery powered LED I once bought on Amazon (more about that and my softbox setups here) came with an tripod thread adapter.
The surprising part is: it actually works pretty well. You do need to keep a more or less set distance from your subject to prevent too much lighting variations, but otherwise the result is similar to the softbox scan with a lot less hassle and fully portable (the Sense 2 is powered over USB and the LED has it’s own USB-chargable battery).
But altogether, to me the results are still a bit “uncanny valley” because of weird texture mapping the eyes. Below is a scan taken at the very same moment, with the very same softbox setup, with an iPad mini 2, Structure Sensor and itSeez3D 4.1:
While the polycount of the model above is less than half of that of the Sense 2 scans, the quality and the mapping of the textures compensate for this in my opinion. And this is just the photo quality of an old iPad mini 2. Imagine that of an iPad Pro. I guess Intel can never put an iPad-level RGB camera in their RealSense depth sensors at the current price point, so texture-wise the Structure Sensor wins.
Altogether, to me the results of people scans with the Sense 2 are still a bit “uncanny valley”
The eye texture mapping problem is worse if a person has very small eyes, like myself. The scans below are taken with the Sense 2 and Structure Sensor / itSeez3D right after each other. The first one looks like I used some kind of funky Snapchat filter…
What about Skanect?
This is the point where some people might ask me (and believe me, many do) if using the Structure Sensor in combination with Skanect instead of itSeez3D will improve the geometry while keeping the texture quality high. This question has become more relevant than before, since itSeez3D now has a subscription model and/or charges per scan (depending on the chosen plan), while Skanect (which costs $129 for the Pro version once) and Sense for RealSense (which is free) let’s you make — and export — as much scans as you want.
I’m still not ready to give you a solid yes or no on this. The current public version of Skanect does allow capturing more detailed geometry with the Structure Sensor, but the textures aren’t very good. I’m still testing the Beta version which promised to solve this, but you’ll have to wait a little longer before I can say if it does.
Stay tuned!
Full Body Scanning
Last but not least, I’ve tested the Full Body Scanning capabilities of the Sense 2 in combination with 3D Systems’ Sense for RealSense software. While Bust Scanning was a rather smooth operation, increasing the scan volume to body size was surprisingly hard.
The first thing I noticed was that the sensor had huge problems with Patrick’s grey denim jeans, which aren’t even that dark. It would only capture them if I went very close, like 15-20 cm distance. And only at a straight-on angle. This not only means that it was out of the focus zone of the RGB camera, but it also made it harder for the software to track the bigger picture. On top of that, scanning below-the-waist areas at this distance could be uncomfortable in many professional cases. And dark pants are very common.
The same problem was present for Patrick’s hair which… erhm… went well with his choice of jeans color. I could scan his hair, but only close-by and straight-on, which is almost impossible because he’s taller than me. This problem only got bigger when we tried scanning on an automatic turntable. The scan below was made on the turntable and it took 6 rotations to get this — still partial — result.
Again for comparison, this Structure Sensor / itSeez3D scan was made in just one rotation. It didn’t fuse the beginning and end of the 360° rotation perfectly, but is otherwise a good likeliness. And it was a smoother user experience.
By now I’ve scanned hundreds of people and objects with many scanners. So to get a better sense (pun intended) of the relative first-time user experience, I asked Patrick make a Full Body Scan of me with the Sense 2 and Structure Sensor.
The Sense 2 scan took him over 5 minutes — and 4 tries that I really didn’t feel like sharing — to make while the Structure Sensor scan was done in under 2 minutes — in one try. That is significant for body scanning, because it gets harder to stand totally still every minute.
Pricing
Usually I start with this section, but in this case I have saved it for last — for a reason.
Let’s start with the fact that for $399, the Sense 2 is affordable compared to other handheld 3D scanners. It works on most Windows machines (see hardware recommendations here), so most people don’t need to invest extra hardware (except for a light kit!). It also comes with great software that is totally free — no subscriptions, no limitations — and very user friendly. You can use this software to scan, edit, share and archive your scans.
But technically, it’s just an Intel RealSense SR300 sensor in the same simple (it looks better than it feels), plastic housing as the Sense 1. Nothing more. Not even a start/stop button, which I truly missed. Te housing puts the sensor in portrait orientation. This combined with the handheld grip makes it a bit more usable (maybe also a bit more professional-looking if that’s important for you) as a handheld 3D scanner if you use a laptop. But if you use a Windows tablet, you might prefer something that you could clip onto it so it works more like an iPad / Structure Sensor (iSense) combo.
It’s just an Intel RealSense SR300 sensor in the same simple, plastic housing as the Sense 1. Nothing more.
Actually, Gaming PC-maker Razer sells the RealSense SR300 as a 3D webcam under the name Stargazer for $149,99 — less than half of the Sense 2. And Creative sells it under the name BlasterX Senz3D for $179. Both devices should work with the free Sense for RealSense software. But, honestly, this kind of feels like ripping-off 3D Systems. They really did a great job making the software.
Update: I’ve had multiple reports that the Sense for RealSense software does not work with the Razer Stargazer. It does work with the Creative BlasterX Senz3D that I have here, but that one was originally bought as SR300 SDK so I’m not sure if it will work with the retail version of that device.
Verdict
After discontinuing the Cubify brand, I expected that 3D Systems would stop selling the Sense 3D Scanner after they sold out. But they didn’t. They recycled (okay, slightly updated) the housing and put Intel’s latest depth sensor, the SR300 inside. The Sense 2 is more expensive than other SR300-based devices — more than twice as much — that can achieve the exact same results. The form factor of the Sense 2 is a bit more 3D Scanner-like, but unfortunately 3D Systems didn’t put a start/stop button on it. Mac users are out of luck, but the Windows software is a vast improvement over that of the Sense 1.
Looking purely at geometry capture, the Sense 2 is a small step backwards. The Sense 1 was better at capturing small details and dark colors and could be used from a farther distance to scan larger objects. In practice though, I don’t think these difference are significant for the target audience of infrared 3D Scanners. If you’re thinking about upgrading from a RealSense F200-based device, there is a jump in geometry resolution.
Texture quality has made a giant leap compared to both the Sense 1 and the RealSense F200. The RGB camera of the SR300 is Full HD. It’s still not as good as a dedicated iPad camera RGB camera, so it will probably never win from a Structure Sensor when it comes to texture quality.
If you plan to use the Sense 2 to capture medium-sized (20 – 40 cm tall) objects on a manual turntable with a simple studio light setup, you can get good results with little effort. In some cases, you can try to get a bit more geometric detail out of the sensor by increasing the Geometry Resolution in the settings panel. In most cases though, this mostly introduces more geometric noise and makes the texture mapping worse.
If you plan to use the Sense 2 to capture medium-sized objects you can get good results with little effort.
While object scanning is fool proof, capturing people requires a lot more practice — and patience. Even for experienced users, it’s not predictable enough to make a good capture of a human bust scan every time. For this to work better, the software needs a few more smart features and better texture mapping.
Full Body Scanning is technically possible, but requires even more practice and patience than Bust Scanning. Dark fabrics like jeans are a challenge for the sensor and may force you to scan from close distances that are neither practical nor comfortable for scanning people.
So the Sense 2 is at its best when scanning objects. But if that’s what you plan to do, it’s currently good to ask yourself why you want to do that with an infrared depth sensor. You can achieve similar or better results through Photogrammetry — a technology that required just a digital camera or a smartphone.
As always, I hope you liked this post. If you think it’s also useful for your friends and followers, please share it! And if you want to be the first to know when new posts are live you can follow me on your favorite social network:


Hey Nick,
Great post, thanks for the clarity.
I have one question:
I have a seperate SR300 and I downloaded the Sense software on my MacBook Pro (OSX 10.11.1 Bootcamp, Windows 10, 2,2 GHz Intel Core i7, 16 GB 1600 MHz DDR3, Videokaart: Intel Iris Pro 1536 MB)
But the total system is slow as hell. Do you think it is my hardware or is the OSX-Bootcamp-Windows setup that makes it slow?
I think I have the exact same laptop and setup. The mid-2012 Retina MacBook Pro. Windows 10 actually runs pretty well. What does help is installing the latest nvida graphics card drivers. Also, make sure the Boot Camp partition is not too small. Having a few GB of free space is always good.
I bought a sense 1 and its total crap. Cant scan a single thing. Always looses focus. I hate it. I will never buy anything from these guys again. Period!
I use a gen I Sense for geometry capture for reverse engineering (auto aftermarket), it works extremely well for my purposes, and of course the devil is in the mesh to solid re-work which is human dependent (deciding exactly where a hole center actually is, averaging surfaces by eye to redraw them etc), but it saves huge time over manual measurement of everything with great results, I was surprised by the accuracy. I’ve used David Laser(SL) and the Next Engine, and Sense beats them both for actual usability/speed/result for my purposes.
To Brian, the Sense scanners require a lot of power, my scanner is worthless on my laptop without a discrete GPU, but on the one with it, it’s a breeze. My bet is you don’t have enough graphics card power to handle it.
Hi Nick, thanks for the post. I have the sense 2 and is easy to scan medium size objects. Im not an experienced person but reading your post, i guess Structure sensor is better for full body scans?
For me and other people that I let test both devices, the Structure Sensor was fool proof for scanning people. But both sensors need a good light setup to make nice full body scans.
Yes, you’re right, so what kind of scans do you suggest for sense 2?
Hello Nick,
sorry for bad english.
I am the owner of CNC foam cutting and milling company in Croatia.
I’m looking to buy simple, usable, light but good priced 3D scanner to scan objects from wood, stone and simmilar materials so I could save it in .obj and .stl, import it in ArtCam, do some editing and carve it from EPS foam with my StyroMill machine in desire dimension.
I don’t need to have super fine scaned surface and 100% details, but as much as I can get is better.
It need to be light and portable. Handheld.
I looked at 3D Sense 2 scanner and found yor review here.
Question:
– Would that scanner fit my need?
– Can I create good .stl for Artcam import?
– Price of 399$ is ok price for me, but is there any other scanner thac coud fit my needs better?
Tnx for reply.
Bojan
bojan.sokol@gmail.com
What is the size range of the objects you want to scan? If you want, I can send you an OBJ of one of my scans so you can test with that.
The size is mostly in the range of 0.5×0.5×0.5 m.
I need to scan items to replicate in bigger scale or the same scale.
I create replica of stone and cement materials, concreet posts, cartoon caracters and animal figures to create it in bigger scale, and put it under my foam mill.
If you can send me some .obj and .stl so i can import it to Artcam and see what i can get from there.
Tnx.
Thanks Nick for the review, it has been really helpful.
Im thinking about buying this scanner for a small auto workshop business where we do a lot of design work in CAD.
I have used one of the 3d systems scanner, the one that hooks into the iPad mini and it was incredibly useful. It was a game changer to be able to digitize a physical part that would have not made sense to model due to complexity.
Do you think this specific scanner might be our best choice?
I would place simplicity, ease of use, geometrical fidelity and cost higher on my requirement list.
You probably have the iSense then (https://3dmag.com/reviews/3d-systems-isense-review/)
I don’t think the Sense 2 is a huge improvement over that. You might be able to get a bit more geometric detail of it when pushing the resolution setting to the max but that also gives more noise.
The best choice really depends on your budget and the size of the objects you’re scanning.
Thanks for the reply Nick, I actually think I used a structure scanner mounted on an iPad Air. I had it for a couple days and really enjoyed it.
I have been doing some research and found the discounted iSense sensors on Amazon and then found the “not being able to calibrate” issue, and I understand how these will only be showing more and more issues as time goes on until they are completely useless.
If I were to buy the “Sense (2nd gen)” directly from the 3D Systems website ($399.00), I should completely steer away from these issues and have a reliable, calibratable, future-proof scanner, right?
Regarding the iSense and whether or not not being able to calibrate it is actually an issue: you’re merely calibrating the sensor to the iPad’s RGB camera. So it could be less “future proof” if you plan to switch iPads, but otherwise there aren’t significant problems. At least not for everyone. I wrote a detailed post about that subject: https://3dmag.com/reviews/reviews/structure-sensor-vs-isense-3d-scanning/
So in my opinion choosing between a Structure Sensor/iSense and the Sense 2 isn’t really about reliability or being future proof. The main differences are with the workflow.
If you’re planning to do a lot of “free scanning” (walking around), the former are iPad-based devices that make it very portable. The latter is strictly a Windows device so you’ll also need to carry a laptop or tablet in the other hand. The Sense 2 is also a bit more prone to tracking issues because the software doesn’t use RGB data for tracking.
But if you want to do “fixed scanning” with a turntable, the fact that the Sense 2 has a tripod mount is nice. And here you can use the printable tracking assistant for difficult-to-track objects.
I don’t know what objects you want to scan but I do know that a lot of automotive parts can be difficult to scan without RGB tracking or using markers because of their even shapes and surfaces.
Hi Nick,
thanks for your fantastic website and the knowledge you are sharing.
Since I do not own any Apple products and I found a new Sense 2 on ebay for just 250€ (liquidation of bankrupt company) I bought it right away, hoping that the device without any warranty would work. And finally I got it working, and I would like to share these short description, in case anyone else has similar problems.
Well, my PC was an older AMD Bulldozer with Win7 und Linux, that did not even recognize the USB connection, so I also bought a cheap i5-6500 system with Win 10 afterwards hoping for the best. The system requirements listed are no joke, AMD CPUs and anything below 4th Gen Core-i (Intel recommends 6th) are not guaranteed to work.
I could see then the 3 SR-300 device drivers in the Device Manager and my device worked with the Sense software, until I was wondering, why my scanned objects were showing no color. Also Skype or the RS SDK programs always got stuck when viewing the RGB stream. Nothing helped until I downloaded the Intel RS DCM. During the installation of the DCM you are asked, if the device firmware should be updated. The only option is YES, otherwise the installation aborts. So I went All-In, risking that the Sense software would not recognize my Sense anymore. But the best part was that the firmware update failed! Was my device bricked now? I unplugged it, opened the Device Manager and all SR-300 devices were present. I started the Sense software, it recognized the device and finally: Colour! I don’t know why, if the partial firmware upgrade succeded for the RGB part or if the Intel DCM replaced an older driver before aborting, but in the end and a lot of cold sweat everything works now.
Anybody who rather wants to go without these kind of problems and expects a device to work out-of-the-box should really buy the Occipital devices and skip Windows based scanners. But eh, … this is something we all knew before, right?
Hi Nick,
Is it possible to receive a scan sample from the Sense 2 and/or Blasterx Senz 3D ?
We want to take look at the point cloud in our design tool (Inventor) before we decide to buy them.
With regards,
Hi
Can you send a high quality model as STL and OBJ(color mode) to me?
I want this model for test and buy this scanner.
thank you.
Hello Nick, thanks for the great review!
I plan to buy the iSense 3D Scanner for iPhone 6 Kit, Black from Amazon:
https://www.amazon.com/iSense-3D-Scanner-iPhone-Black/dp/B016PU2YBQ/ref=lp_8301294011_1_6?srs=8301294011&ie=UTF8&qid=1502952248&sr=8-6
and read this in the comment section:
Cannot access suggested calibration app via iSense app. How to calibrate?
– You can’t. For some reason I was never able to calibrate this thing.
– You can’t, iSense & Structure, are exactly same products from Occipital company but, Structure company’s buy every All rights and benefits, at 2015 they no more supported for iSense products
Any thoughts about this? I appreciate your opinion.
Does the scanner give .obj output as well as a texture file, or is it just a color-per-vertex deal as with the previous version?
The obj comes with a texture file
Excellent article – have you had any experience using the Xbox Kinect scanners with Skanect?
Hello, Nick
I just bought an Intel RealSense SR300. It’s being difficult to start using it without the SDK because, as i think you should know, the SDK is no more available.
I wonder if I could use the SKANECT to process the data get from the RealSense, and if there’s any way to use it without a platform, like, just a sensor that is receiveng data through, Python, for example.
Thank you.
I have spent days reading reviews and watching videos on the Sense 2, the xyz and the isense and structure. I’m really confused and just need a simple answer on which one would be best for me. I just bought a sense 2 on amazon but I can cancel it if needed.
All I plan to do is make and sell bust scans of people, primarily children and print them on my 3D printer I don’t really care about color and stuff, I just want a scanner that will give me the a good scan with as much detail as possible to print a single color
Which one of these will work the best for what i’m doing. I wish I could find a used sense 1 for that purpose but I have searched and cannot find one. I almost bought a XYZ scanner but many bad reviews on amazon and people having a hard time making it work on their computer even if they have the appropriate specs
Thanks in advance for any advice. I’m going nuts trying to make sure I get the right stuff LOL
Hello, I would like to ask if there is a chance to buy an older version of scanner Sense2,
becouse I find out that for catching geometry is better older scanner with
“Intel RealSense F200”. I dont mind colours Thank very much.
As far as I know the 1st gen Sense contains a Primesense Carmine 1.09 depth sensor, not a RealSense F200. It might be hard to find a new but they’re also on eBay: https://ebay.to/2GGrRzt
Hi,I’m using your programm 3d system sense,and my divice is RS300.I have problem of scanning when I’m rotating in 180°,goes well,but when it goes to back,the things go wrong,it can’t be scanned,is there some methods to resolve this problem?Thanks~
What are you trying to scan? It could be that the front part of your subject has enough information but the sides and/or back don’t or is very symmetrical.
oh,it’s a model of ceramic sculpture,it’s not symmetrical the back side.Do you think it could be the problem of illumination o angle of camera?And the other thing is can we adjust the camera during scanning?Thanks~~~
Ceramics can be hard in general if they are very reflective. You can try using the tracking assist print. Otherwise it’s just experimentation.
Ok,thanks a lot,but for the scanning of arm?It’s possible with this application?We need to rotate the arm or the camera?
Dear Nick, thank you for your super precious article, we just bought the real sense 300 and we are following your posts, we have one issue which I don’t understand how to deal with:
is it possibile to use it also with mac?! I tried to search for it but I couldn’t find any advice fort this topic?
The answer is in the review. Mac is not supported.
Hey there, at this point in 2018 is it still reasonable to buy this scanner?? My use for it will be for scanning objects and people and touching up the scan models through Zbrush and other 3D Softwares. Do you recommend this scanner for that purpose?
Nick hello thanks for this great work on analyzing the different scanning options.
I am very interested in scanning people for 3D color printing figurines.
I know that the best option is to have a scanning booth with photogrametry, but im looking to make the scanning more practical and cheaper than a booth.
I currently scan with kinect, and didnt have problems with the size of a full body scanning, i use skanect, but i want to have a better option for scanning full body at a reasonable price.
What would you recommend me to do? Or should i stop looking for hand held scanners and go for scanning booth for a full body scanning?
Will the geometry and texture resolution of a han held scanner like sense 2 be enough to print a small figurine of around 150 to 200 millimeters tall?
THanks your your support!
David.
I’m a product designer and model/printer. I’ll like to start adding 3d scanning to my workflow and get started with a basic 3D scanner. I cannot find a comparazione between the Sense 2 and the XYZ 2.0. I cas see that both use SR300 realsense with similar resolution….and I’m wondering if it worth saving money (especially if easy enough to install and use) to go for the cheaper XYZ 2.0 scanner to start with.
I would ask if we can change the position of the object as up-side down to scan the base of the object as for example the jar of the bust above
I mean the Jar or the bust above
Thanks for the useful review of these mid priced scanners. I am interested in buying a scanner for larger items up to and including people and similar complex detailed shapes, as well as small objects for engineering and design purposes. It appears the accepted method of getting precise detail is through the use of a turntable calibrated with the scanner. You mention using a turntable manually, but is it possible to integrate the Sense with a turntable under digitized control for scanning machined and other exact dimension objects in order to achieve more accurate and consistent results?
I am sure the EinScan SE is precise and easy to use, but it costs over twice the amount and does not appear to do handheld scans, that being reserved for their $10,000 pro series which is unaffordable on my budget.
How difficult is it to integrate Sense with a digitized turntable for best precision results?
Hi nick,
You said now 3d sense software can’t work with xyz scanner but your software can. May i know what version is your software or maybe would you mind to share .exe file ?
Many thanks
Hi,
Thanks for all your information, its a real help.
For me geometry is most important because I want my scans to be as near to reality of people as possible. I am scanning people as Bust or full body, and then 3D printing, moulding and casting them as artworks so the texture side of things are irrelevant to my needs.
My question is have you posted any of your scans of people just a s geometry without the texture for me to get a comparison?
sense scanner.. total garbage.. software does not work .. been fiddling with this thing
for years..
G>A>R>B>A>>G>E
necesito codigo de activacion para sense 3d como lo adquiero?
谁有EORA3D安卓版或者别的版本软件可以分享下吗?谢谢只要能用的就行,谢谢! cherylibaosheng@163.com