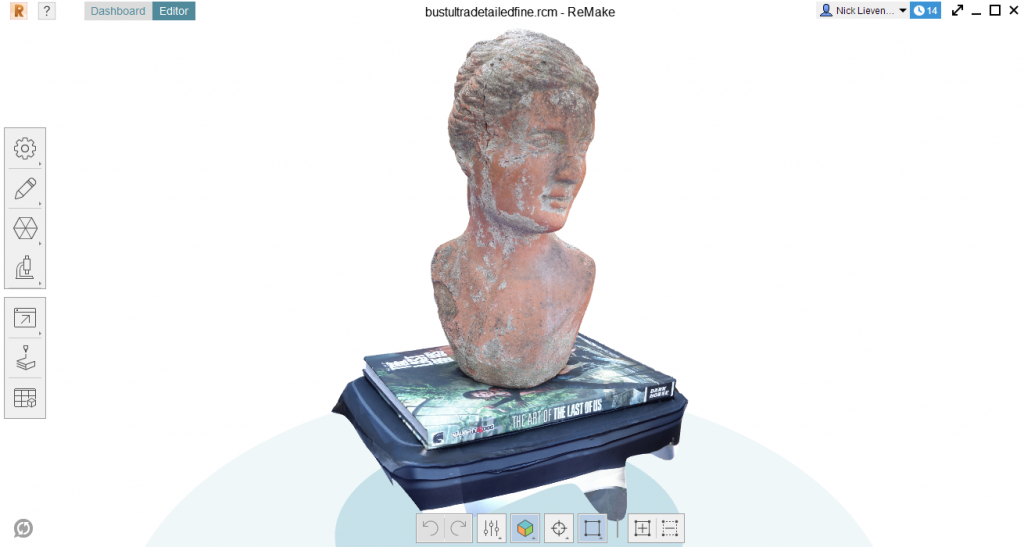
Part of my plan for 2017 was covering more Photogrammetry software. After Autodesk ReCap (Review) and ReMake (Review) it’s now time for Agisoft PhotoScan. It’s developed by the Russian Agisoft LLC, founded in 2006.
The software very popular with photogrammetry professionals in all kinds of industries and is commonly used to 3D capture digital assets for Film VFX and Game Development. For example, it was the main photogrammetry software for capturing environmental assets for Star Wars: Battlefront which I wrote about a while ago. It’s s also used a lot in Archaeology and Cultural Heritage.
PhotoScan is also used a lot for drone-based aerial surveying, but that’s not a purpose I’ll be covering in this post.
This comprehensive review focuses on using PhotoScan for capturing objects of all sizes, using various single-camera setups.
Expert Tips
I realize that my reviews are being read by beginners and advanced users alike. That’s why I’m trying something new with this post: I’m covering the basic workflow in the regular text and go into more advanced featured of PhotoScan in panels like this. Hope you like!
Versions and Pricing
Other than Autodesk’s subscription-based offerings, PhotoScan is sold as a life-time license. You can buy a license for the Standard version $179 or Pro for $3499. You can check the complete list of differences between the two here. For me (and the current purpose and target audience of this very blog) the main difference is scalability, namely network processing. The other difference that interests me is the ability to generate and auto-detect markers, which I will cover later. The other Pro-features are mainly geared towards orthographic purposes and drone-based 3D reconstruction, which I’m not covering at this time. I’ll do another round of reviews if that day comes.
Short version: if you want to capture objects that have enough details so they don’t need dedicated markers, the Standard version is probably good enough. And you can always upgrade to Pro later for the price difference. There’s also a 30-day trial, that’s fully operational (so with export features and everything).
If you want to capture objects […] the Standard version is probably good enough
PhotoScan is available for Windows but also for Mac and Linux, while the Mac version of ReMake has been discontinued. PhotoScan doesn’t have a cloud-processing feature like ReMake, so you really need a decent computer (or multiple) with a fast graphics card (or multiple).
Test Setup

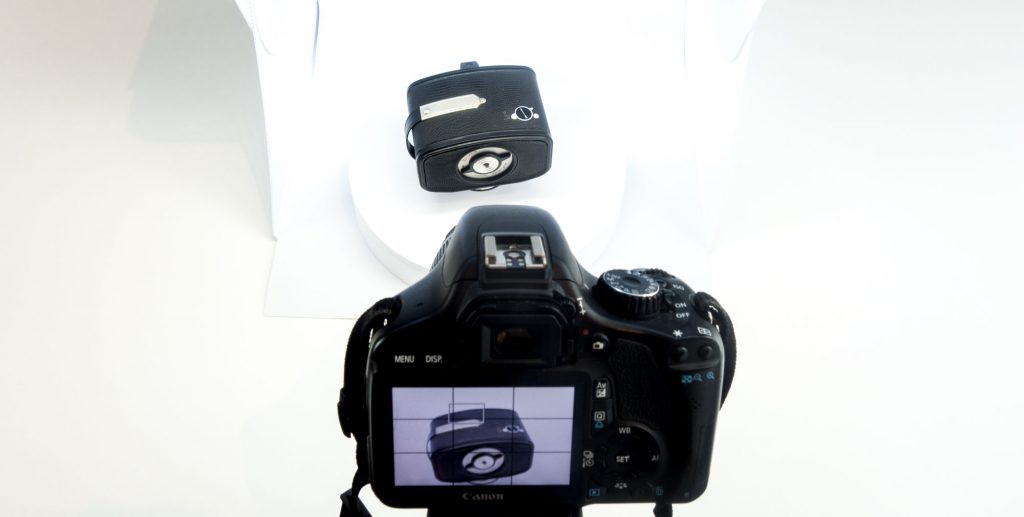
Because I just reviewed the surprisingly handy $139 Foldio360 app-controlled turntable (pictured above) for photogrammetry, I’ll use the results from that shoot. I designed the printable pattern for the Foldio360 (or any other turntable, just scale it) with PhotoScans 12-bit markers. You can Download it as a PDF for Free. Using the markers is totally optional and only works with the Pro version of PhotoScan.
I used a 7 year old entry-level 18-megapixel Canon EOS 550D (Rebel T2i in the US) with kit lens, but you can use any camera (for the Foldio360, you do need one that can be triggered with an infrared remote). A brand new EOS 1300D (Rebel T6) is just $449 with kit lens. Of course, a better camera with more megapixels and (especially) a sharp (50mm) prime lens will result in better 3D models.
I used two simple, umbrella-style 85W studio lights ($75.99 for the set) and a simple black photography background ($14.99). You can also go for white or any other color but I wanted to prevent having to color-correct the photos and use the JPGs straight from the camera for efficiency. It’s easier to get a completely even background with black and a bit of under exposure.
Other than with ReMake, PhotoScan also supports non-Nvidia GPUs
My system is an Alienware Aurora R5 gaming PC with an i5 dual core processor, 32GB of RAM and an Nvidia GTX 1070 card. All specs add up but it’s good to know that PhotoScan can use the graphics card (GPU) to accelerate the most time-consuming tasks like generating the Dense Cloud. And other than with ReMake, PhotoScan also supports non-Nvidia GPUs. This meant that I could simultaneously leverage the power of both the Nvidia card and the integrated GPU from Intel (for what that’s worth).

The amount of RAM in the system is the main bottleneck for the amount and resolution of photos PhotoScan can process, at least in a single chunk. RAM is cheap so 32GB is a good thing to have and enough for the small-to-medium objects I’m testing with. But if you’re planning on upgrading your system for photogrammetry and have the budget: just go for 64 gigs!
I hope this proves that you can actually get great results from photogrammetry on a reasonable budget.
Processing Times
You might notice that I make no mention of processing times in this review. I’ve chosen not to do this at this point, because local photogrammetry efficiency really depends on computer specs. I’m also constantly working on the computer while it’s processing photos which would make timing accurate.
Generally though, my experience is that local processing with Autodesk Remake is faster than with Agisoft PhotoScan. Generating the dense cloud is a time consuming task with PhotoScan, especially at Ultra High quality. At this setting, my system (with 32GB of RAM) could handle up to 100 18MP photos relatively well. Adding more photos resulted in a decrease in system responsiveness up to the point where it would lock up completely. So for single-chunk processing (more about chunks later) my system is best suited for small to medium objects. That’s why use those as an example for this review.
I plan to create a separate post about the exact differences in processing speed between PhotoScan and other photogrammetry software like ReMake and RealityCapture in the near future. I’ll make a more scientific test setup for that.
Interface & Workflow
Whether you’re using PhotoScan, the user interface is a bit “Windowsy” — especially compared to ReMake which on the other hand might be a bit over-designed for some professionals. It takes some time to get around the interface, but everything is well-organized.
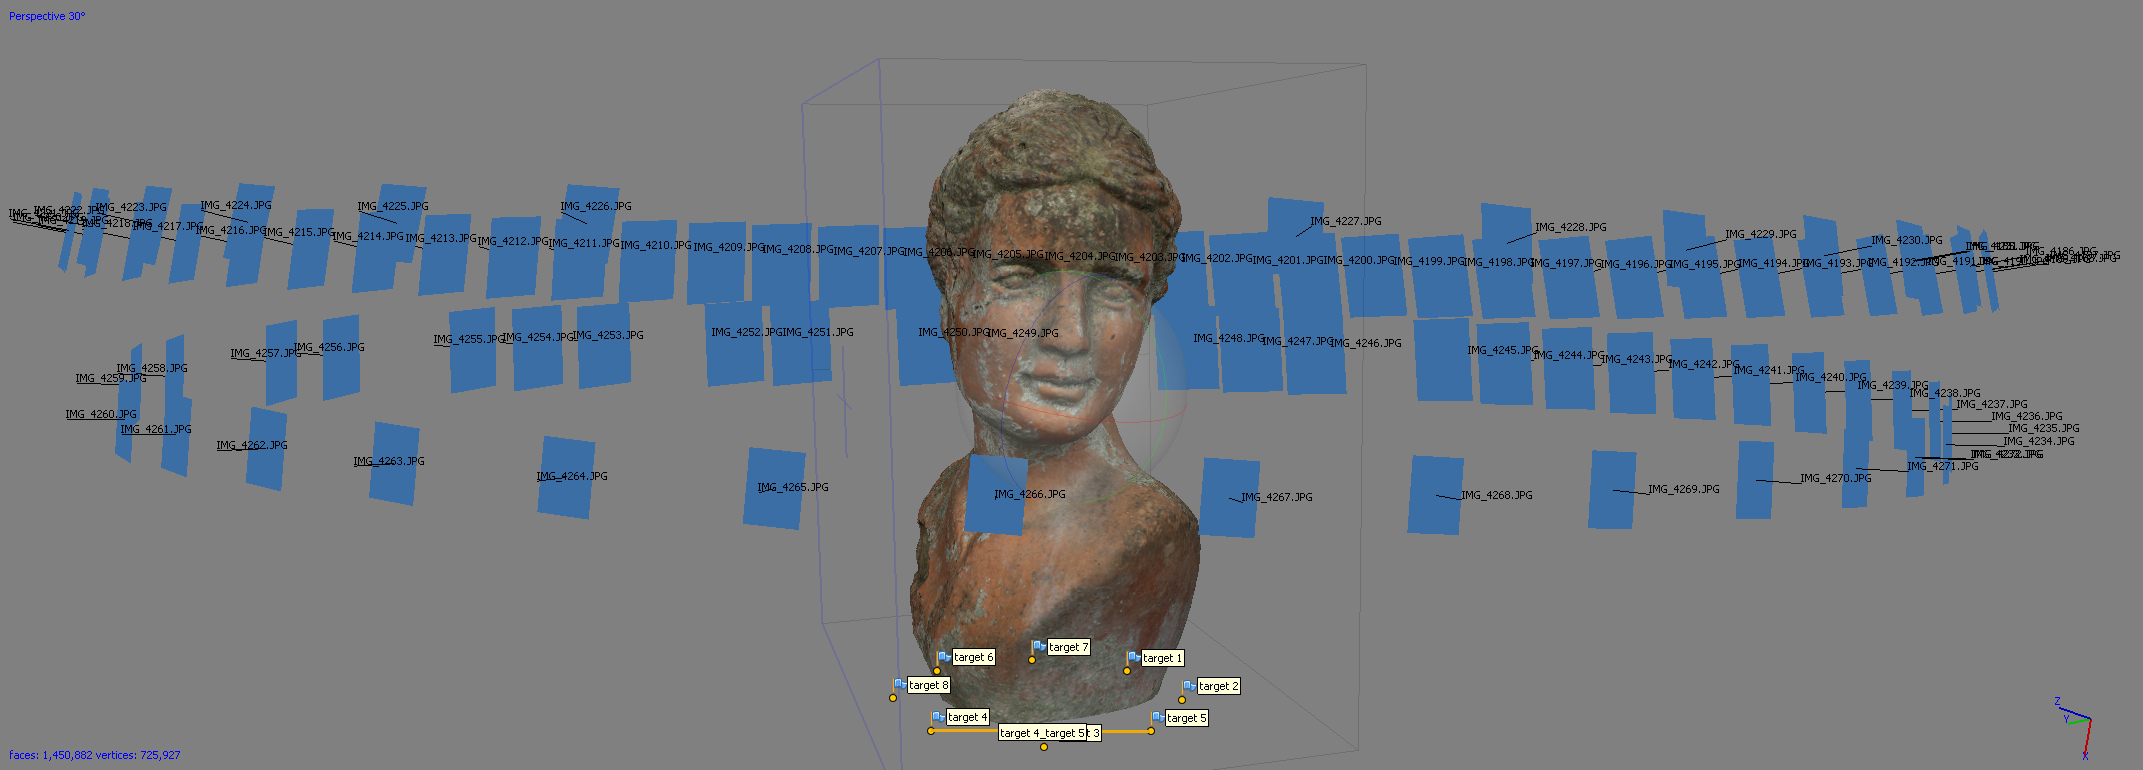
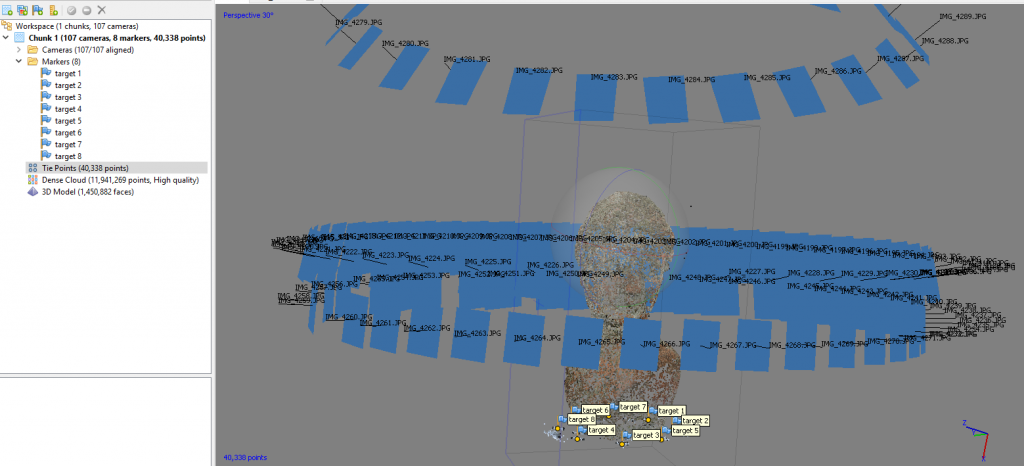
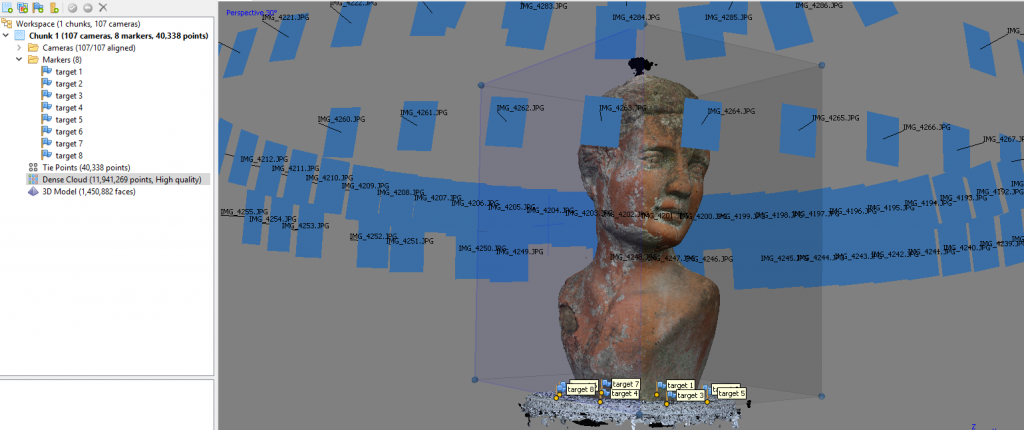
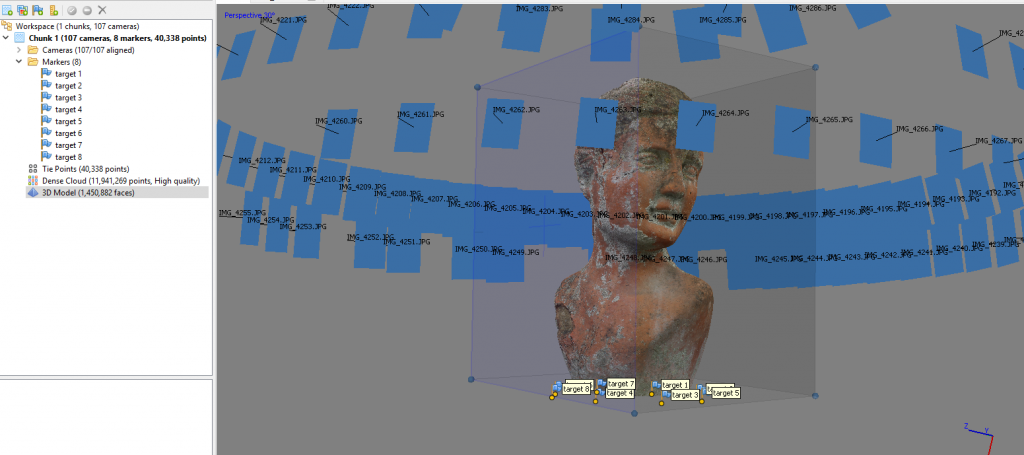
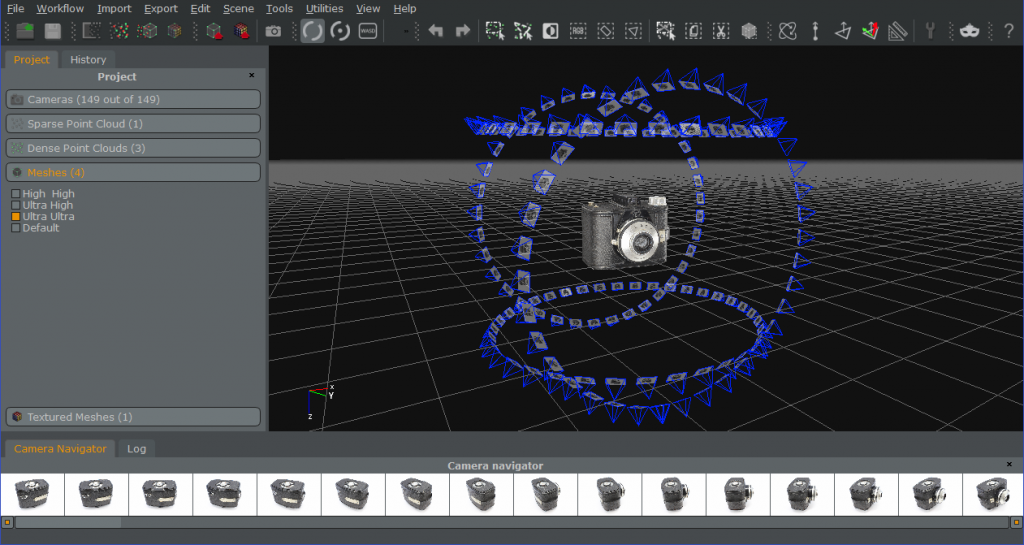
The first step in the PhotoScan workflow is loading the Photos (also referred to as Cameras) into the software. It wil automatically create a new “Chunk” for this. I’ll cover the benefits of using multiple chunks later because that’s totally unnecessary for this example.
Expert Tip: Masking
If you’re background isn’t completely even you might still be able to use the photos. The first thing you can try is tuning the brightness of the photos (individually or the entire chunk) to remove shadows.
If that isn’t enough, you can also draw mask selections on each photo. Or import mask images created in an external program like Photoshop. You can either create a general mask (a.k.a. garbage matte) and apply it onto the entire work space or a selection of photos, or you can import a dedicated mask for each photo.
The latter can be a sequence of black-and-white mask images to pair with each photo, the alpha channel stored within the photos themselves or a photo of only the background. If that last option works depends on the combination of the background and the object.
By using markers (see next paragraph) PhotoScan is far less likely to be confused by details in the background.
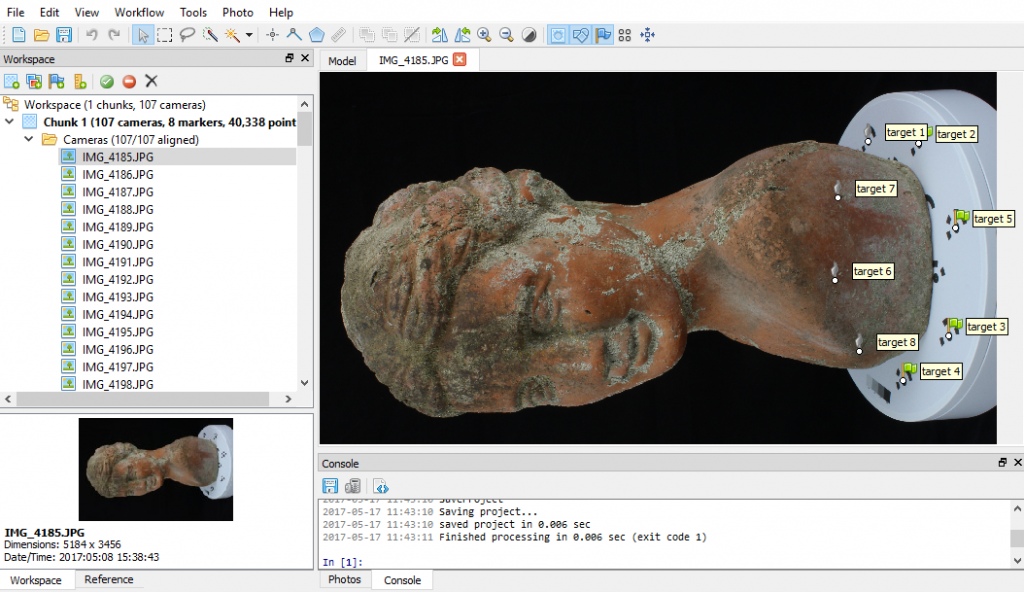
If you’re using markers — which, again, is totally optional and only works with the Pro version — you can run Detect Markers from the Tools menu first like I did in the screenshot above.
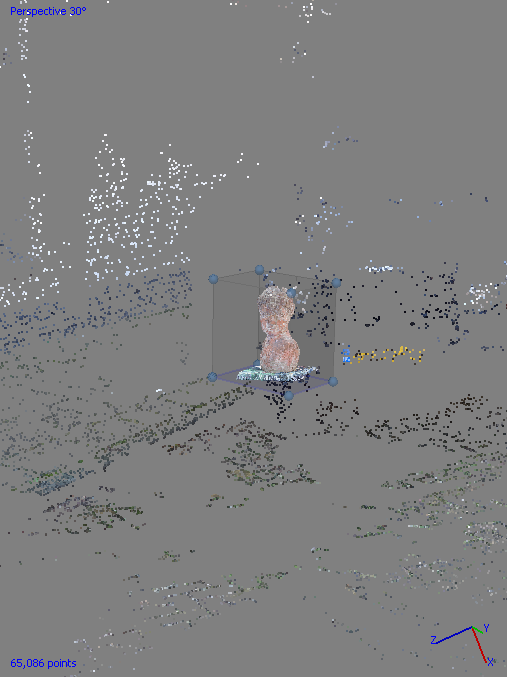
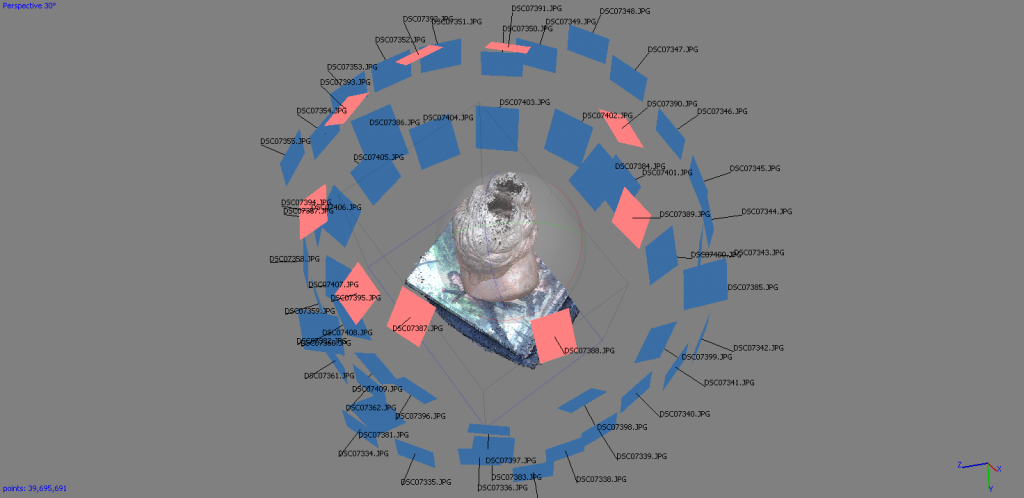
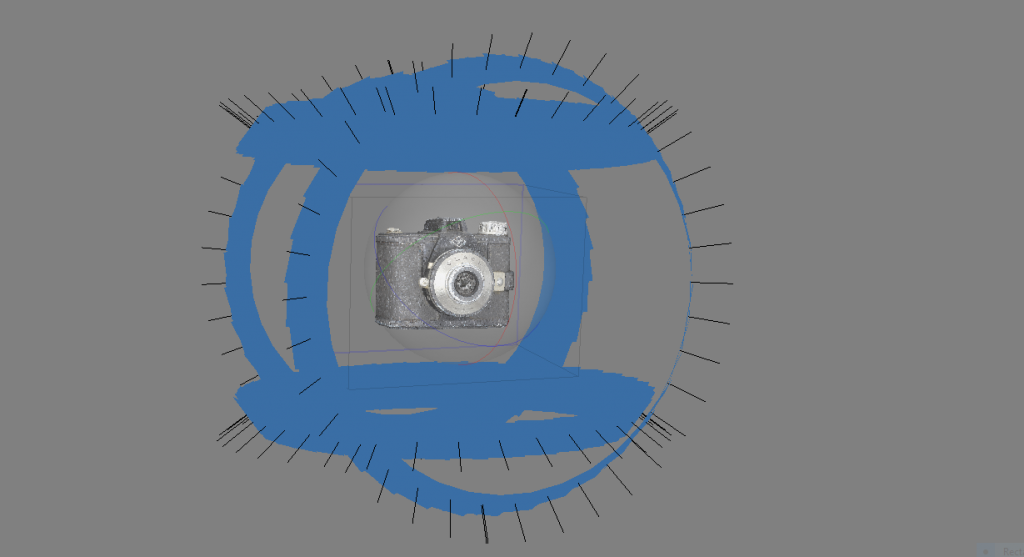
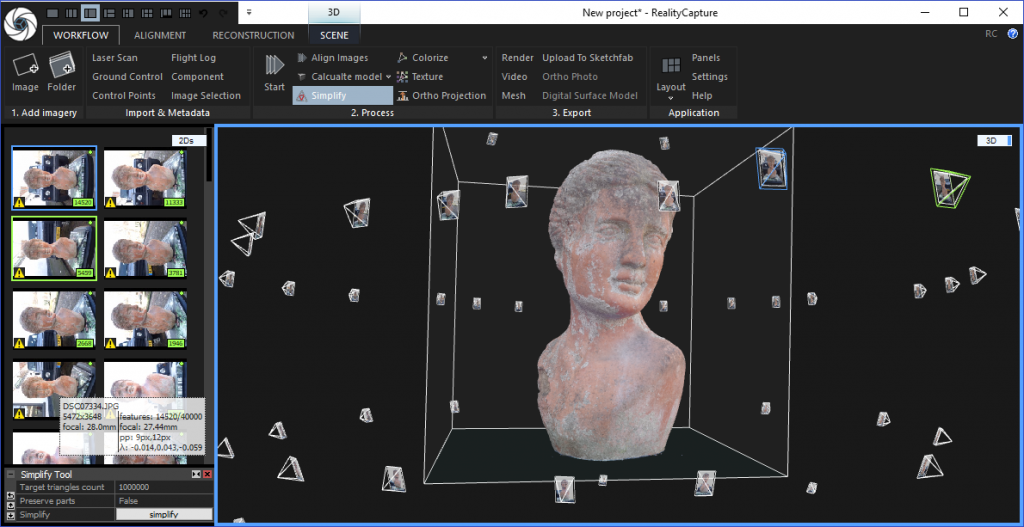
The other steps can be found in the Workflow menu and they’re ordered logically from top to bottom. The first step here is aligning the photos and generate a sparse point cloud.
All 107 cameras were successfully aligned. All camera positions and markers are shown.
Expert Tip: Manual Photo Alignment (Pro version only)
One thing I missed in Autodesk ReMake (which surpisingly is available in ReCap) is being able to guide the software in aligning photos that weren’t automatically aligned (correctly). PhotoScan has a feature that let’s you manually place four or more reference points on both an aligned and non-aligned or misaligned photos. This could be a life-saver for complex projects.
While shooting in front of an even background generates very clean Tie Points (Sparse Cloud), it’s also possible to shoot manually (it’s best to use a tripod) with any non-moving background. This is especially great to do outdoors with natural light (but avoid direct sunlight). When doing that, the Sparse Cloud will contain parts you don’t want in the final model, you can resize the automatically generated Region cube-shaped bounding box. I’ve illustrated this below.
I find resizing the Region bounding box to be a very tricky task — especially with outdoors shoots that have a lot of background information. In some occasions, PhotoScan did automatically size the Region to fit around the object in front of the cameras, but more often this was not the case. It would be nice to be able to force this behavior to remove everything that’s behind the cameras, like ReMake’s Smart Crop feature.
Expert Tip: Scale Bars (Pro version only)
If accurate scale is important for you, it’s good to know that you can select any two markers from the list on the left, right-click and select Create Scale Bar. A new Scale Bar will appear in the Reference pane on bottom left of the interface where you can set the distance between the two markers. After clicking the Update button, the model is scaled correctly.
The next step is generating a Dense Point Cloud. The quality setting you choose for this greatly impacts the processing time and final quality of the result. The default is High, which is very good. There’s also Ultra High, which gives the very best results but processing times increased threefold on my entry-level system.
If the Dense Cloud contains parts you don’t want in the final model, you can either resize the the Region box or use the manual selection tools to remove any points you don’t want.
I find resizing the Region bounding box to be a very tricky task.
Converting the Dense Cloud to a polygonal mesh can also be done with various quality settings and PhotoScan neatly estimates the resulting polycount. Alternatively, you can set a custom target polycount. Even with the highest setting I was surprised by how fast the meshing is performed.
Texturing
The resulting mesh has color information but at this stage this is stored as per-vertex color information within the 3D surface. Depending on the polycount the level of detail can already be quite good but if you want to get the best color quality you can generate a separate UV texture map. PhotoScan let’s you choose the resolution and the amount of maps it should generate.
I really like that PhotoScan generates big UV islands
In this case I chose to generate two 4K textures. You can click the images below for the full-res textures.
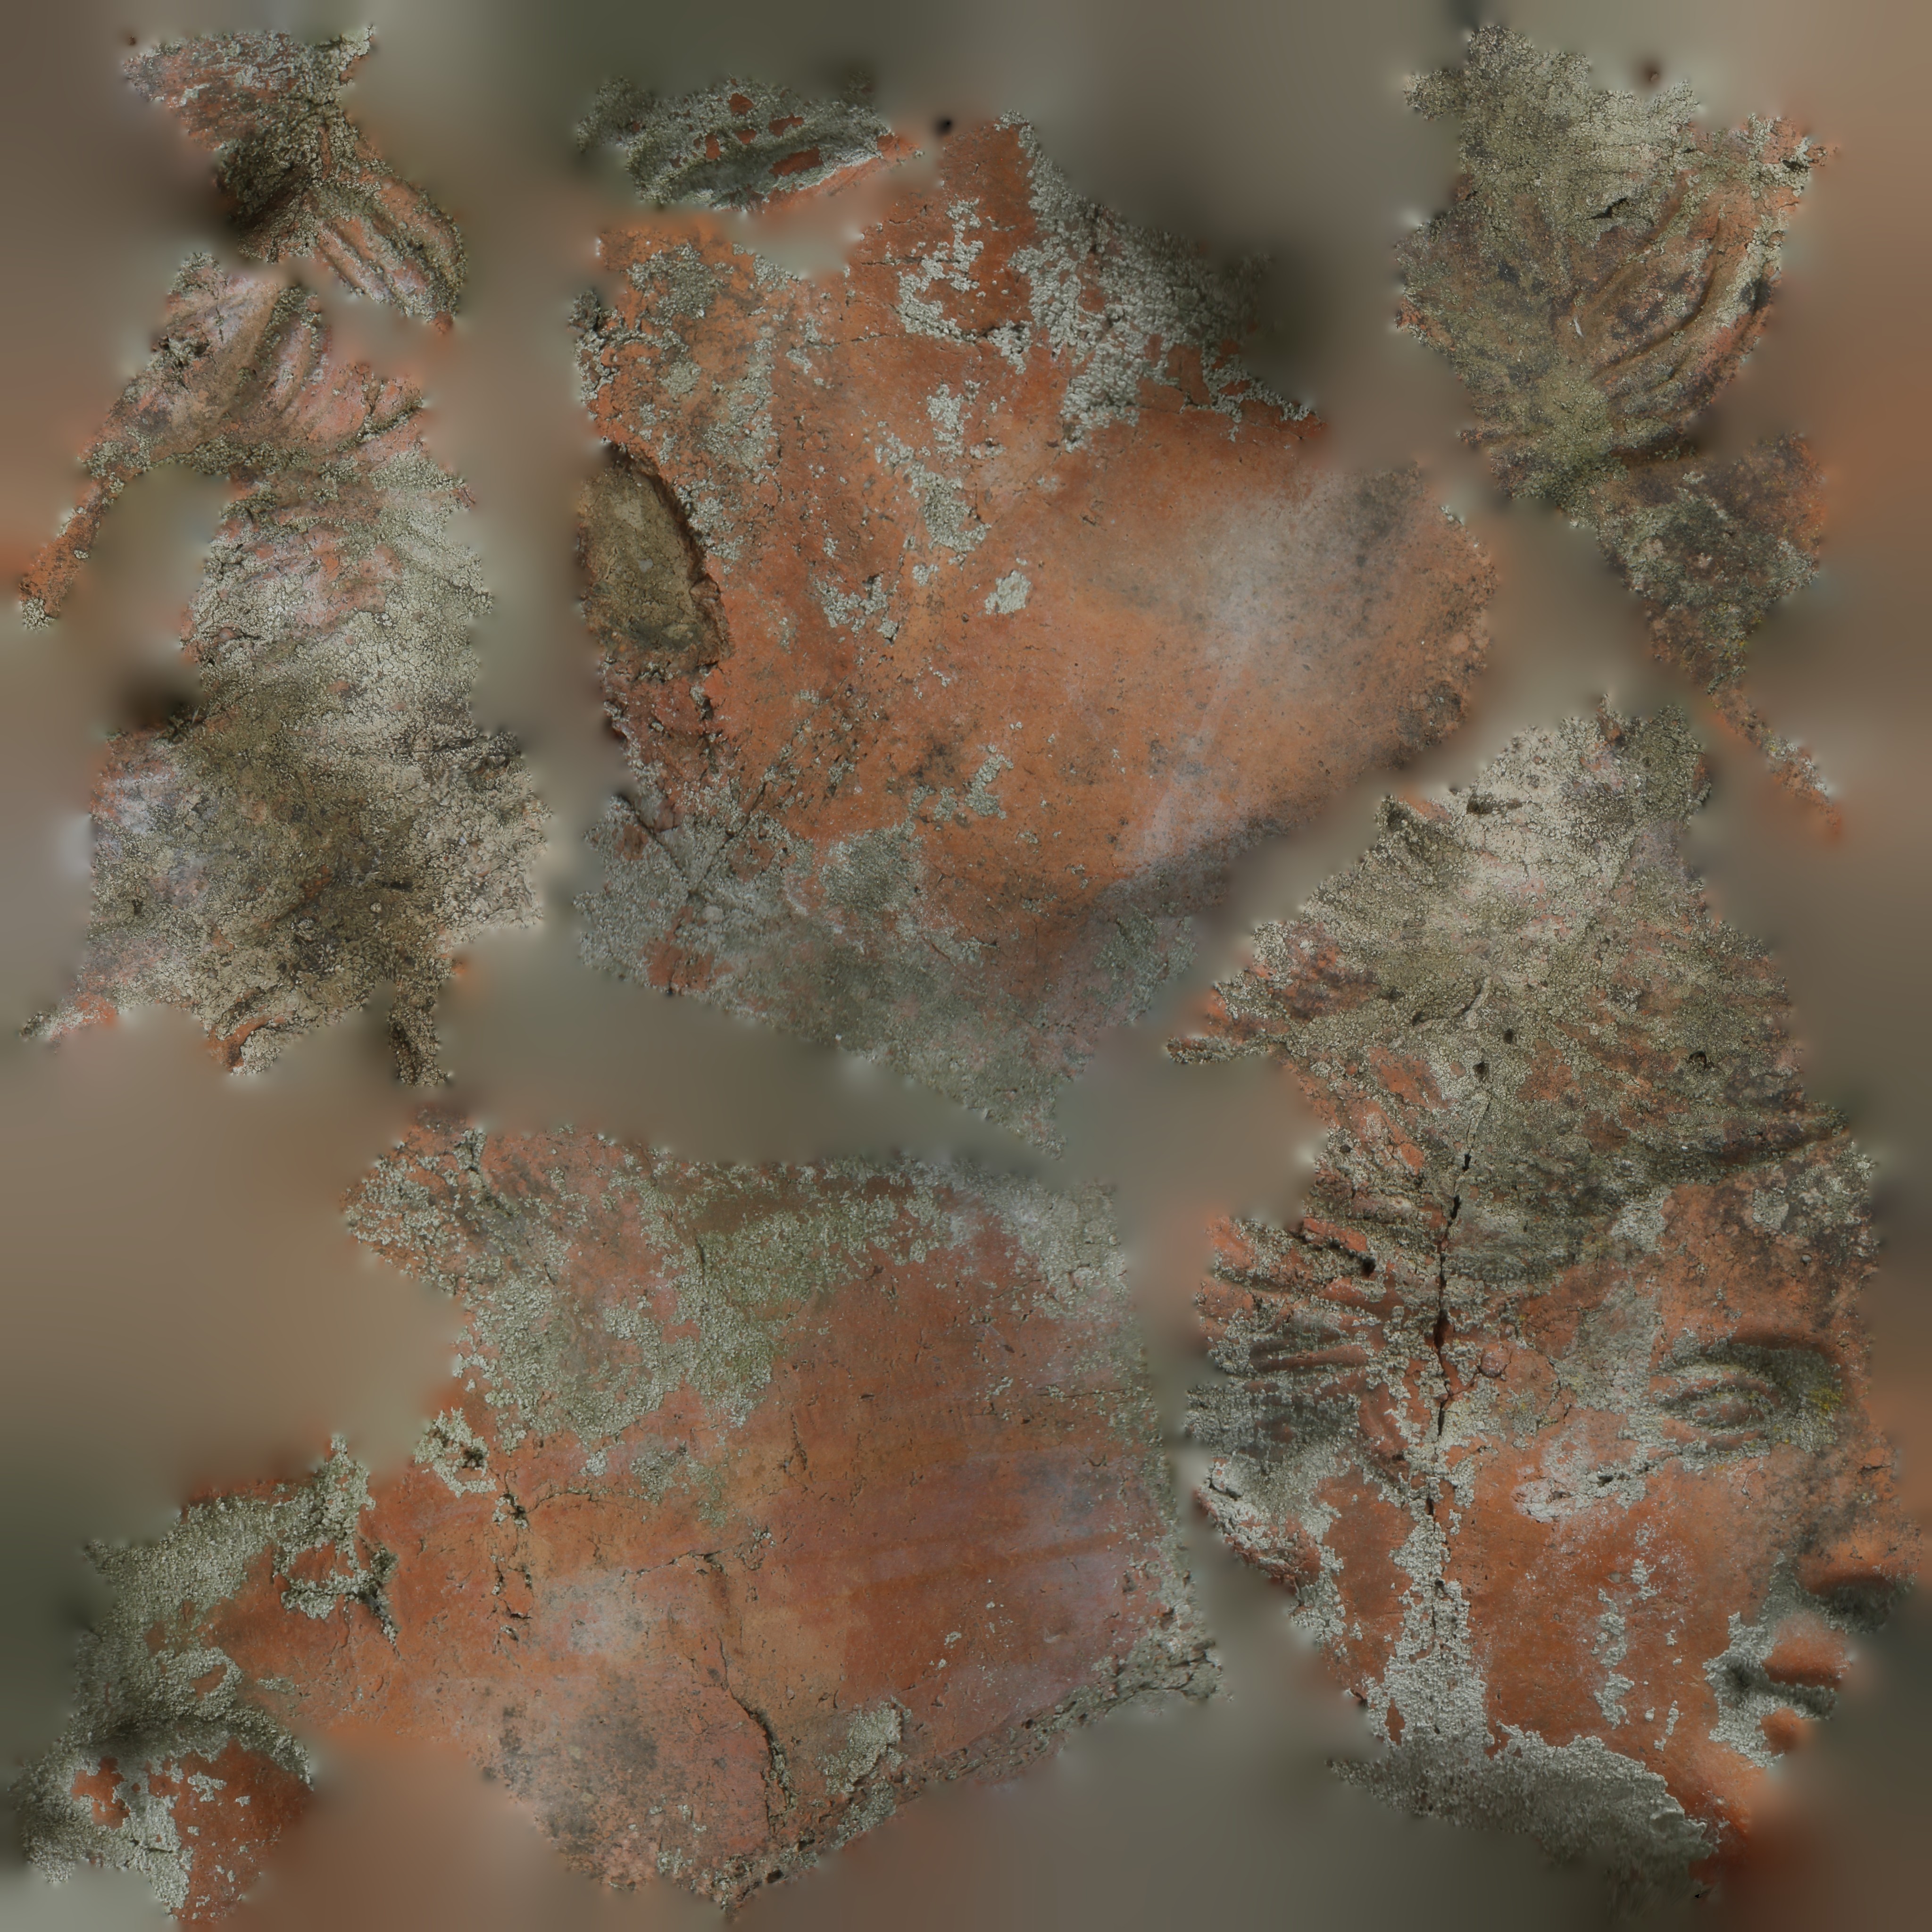
As with other 3D capture programs the UV layout isn’t logical for humans. But I really like that PhotoScan generates big UV islands instead of a gazillion of small ones that some other programs come up with. If you put your mind to it, you can simply edit these in Photoshop.
Advanced Mesh and Texture Editing
After mesh generation, PhotoScan has a build-in tool for decimation as wel as a Gradual Selection Tool to quickly select and delete small meshed parts that are not connected to the main object.
Unlike ReMake, PhotoScan cannot decimate a mesh and generate normal or displacement maps from the high-poly version. Photoscan also has no sculpt tool like ReMake. So you’ll have to do that in an external program. However, the upside is that unlike ReMake, PhotoScan allows you to export the mesh, edit it externally, and re-import it. This way you can control the retopology in a program of choice (like zBrush) but still use PhotoScan to generate a high-resolution texture. When doing this, PhotoScan can preserve the UV layout generated by the external program. I’ll write a tutorial about this in the future.
PhotoScan cannot decimate a mesh and generate normal or displacement maps from the high-poly version.
Batching
Globally, the difference between ReMake and PhotoScan is control. Where the former is a one-click approach with very few settings, the latter offers fine control over every step in the photogrammetry process.
But if you start every step in the workflow above manually, you will lose a lot of time when process has finished and you need to start the next one yourself. By creating a Batch, you can pre-define all steps you want PhotoScan to take and the settings it need to use for each step.
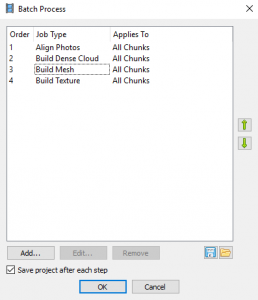
This can be a real workflow benefit if you’re capturing a lot of similar objects. The only problem I found with creating a Batch is that I had to estimate the optimal polycount myself since there’s no existing Dense Point Cloud to base this on yet. Guess that takes some experience to do educated guesses.
Expert Tip: Chunks
Photogrammetry, and 3D reconstruction in general, is a very computer intensive task. For instance, the amount of photos you can process depends largely on the amount of RAM in your machine. I didn’t run into any issues, because I’m processing relatively small amounts of photos — all sets are below 250. If you go beyond that, there’s a chance your computer won’t have the resources to process everything.
To solve this, PhotoScan let’s you device large projects into multiple “Chunks”. Basically, you make logical groups of photos that cover a certain continuous area of the object or environment. Then you process that part like I did in this review. And when all Chunks are meshed, you can align them and fuse everything into one single object that you can export.
Results
Warning: heavy files ahead
It might be needless to say but the Sketchfab embeds below contain models with millions of polygons and very large texture maps. They will probably not be the favorite thing to display on light systems and are certainly not optimized for tablets and smartphones. And we’re talking hundreds of MBs for some models, so please mind that if you’ve limited data.
Medium-sized object, on Turntable
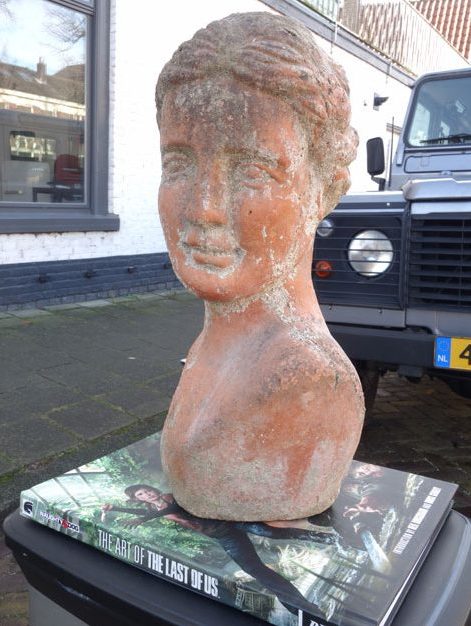
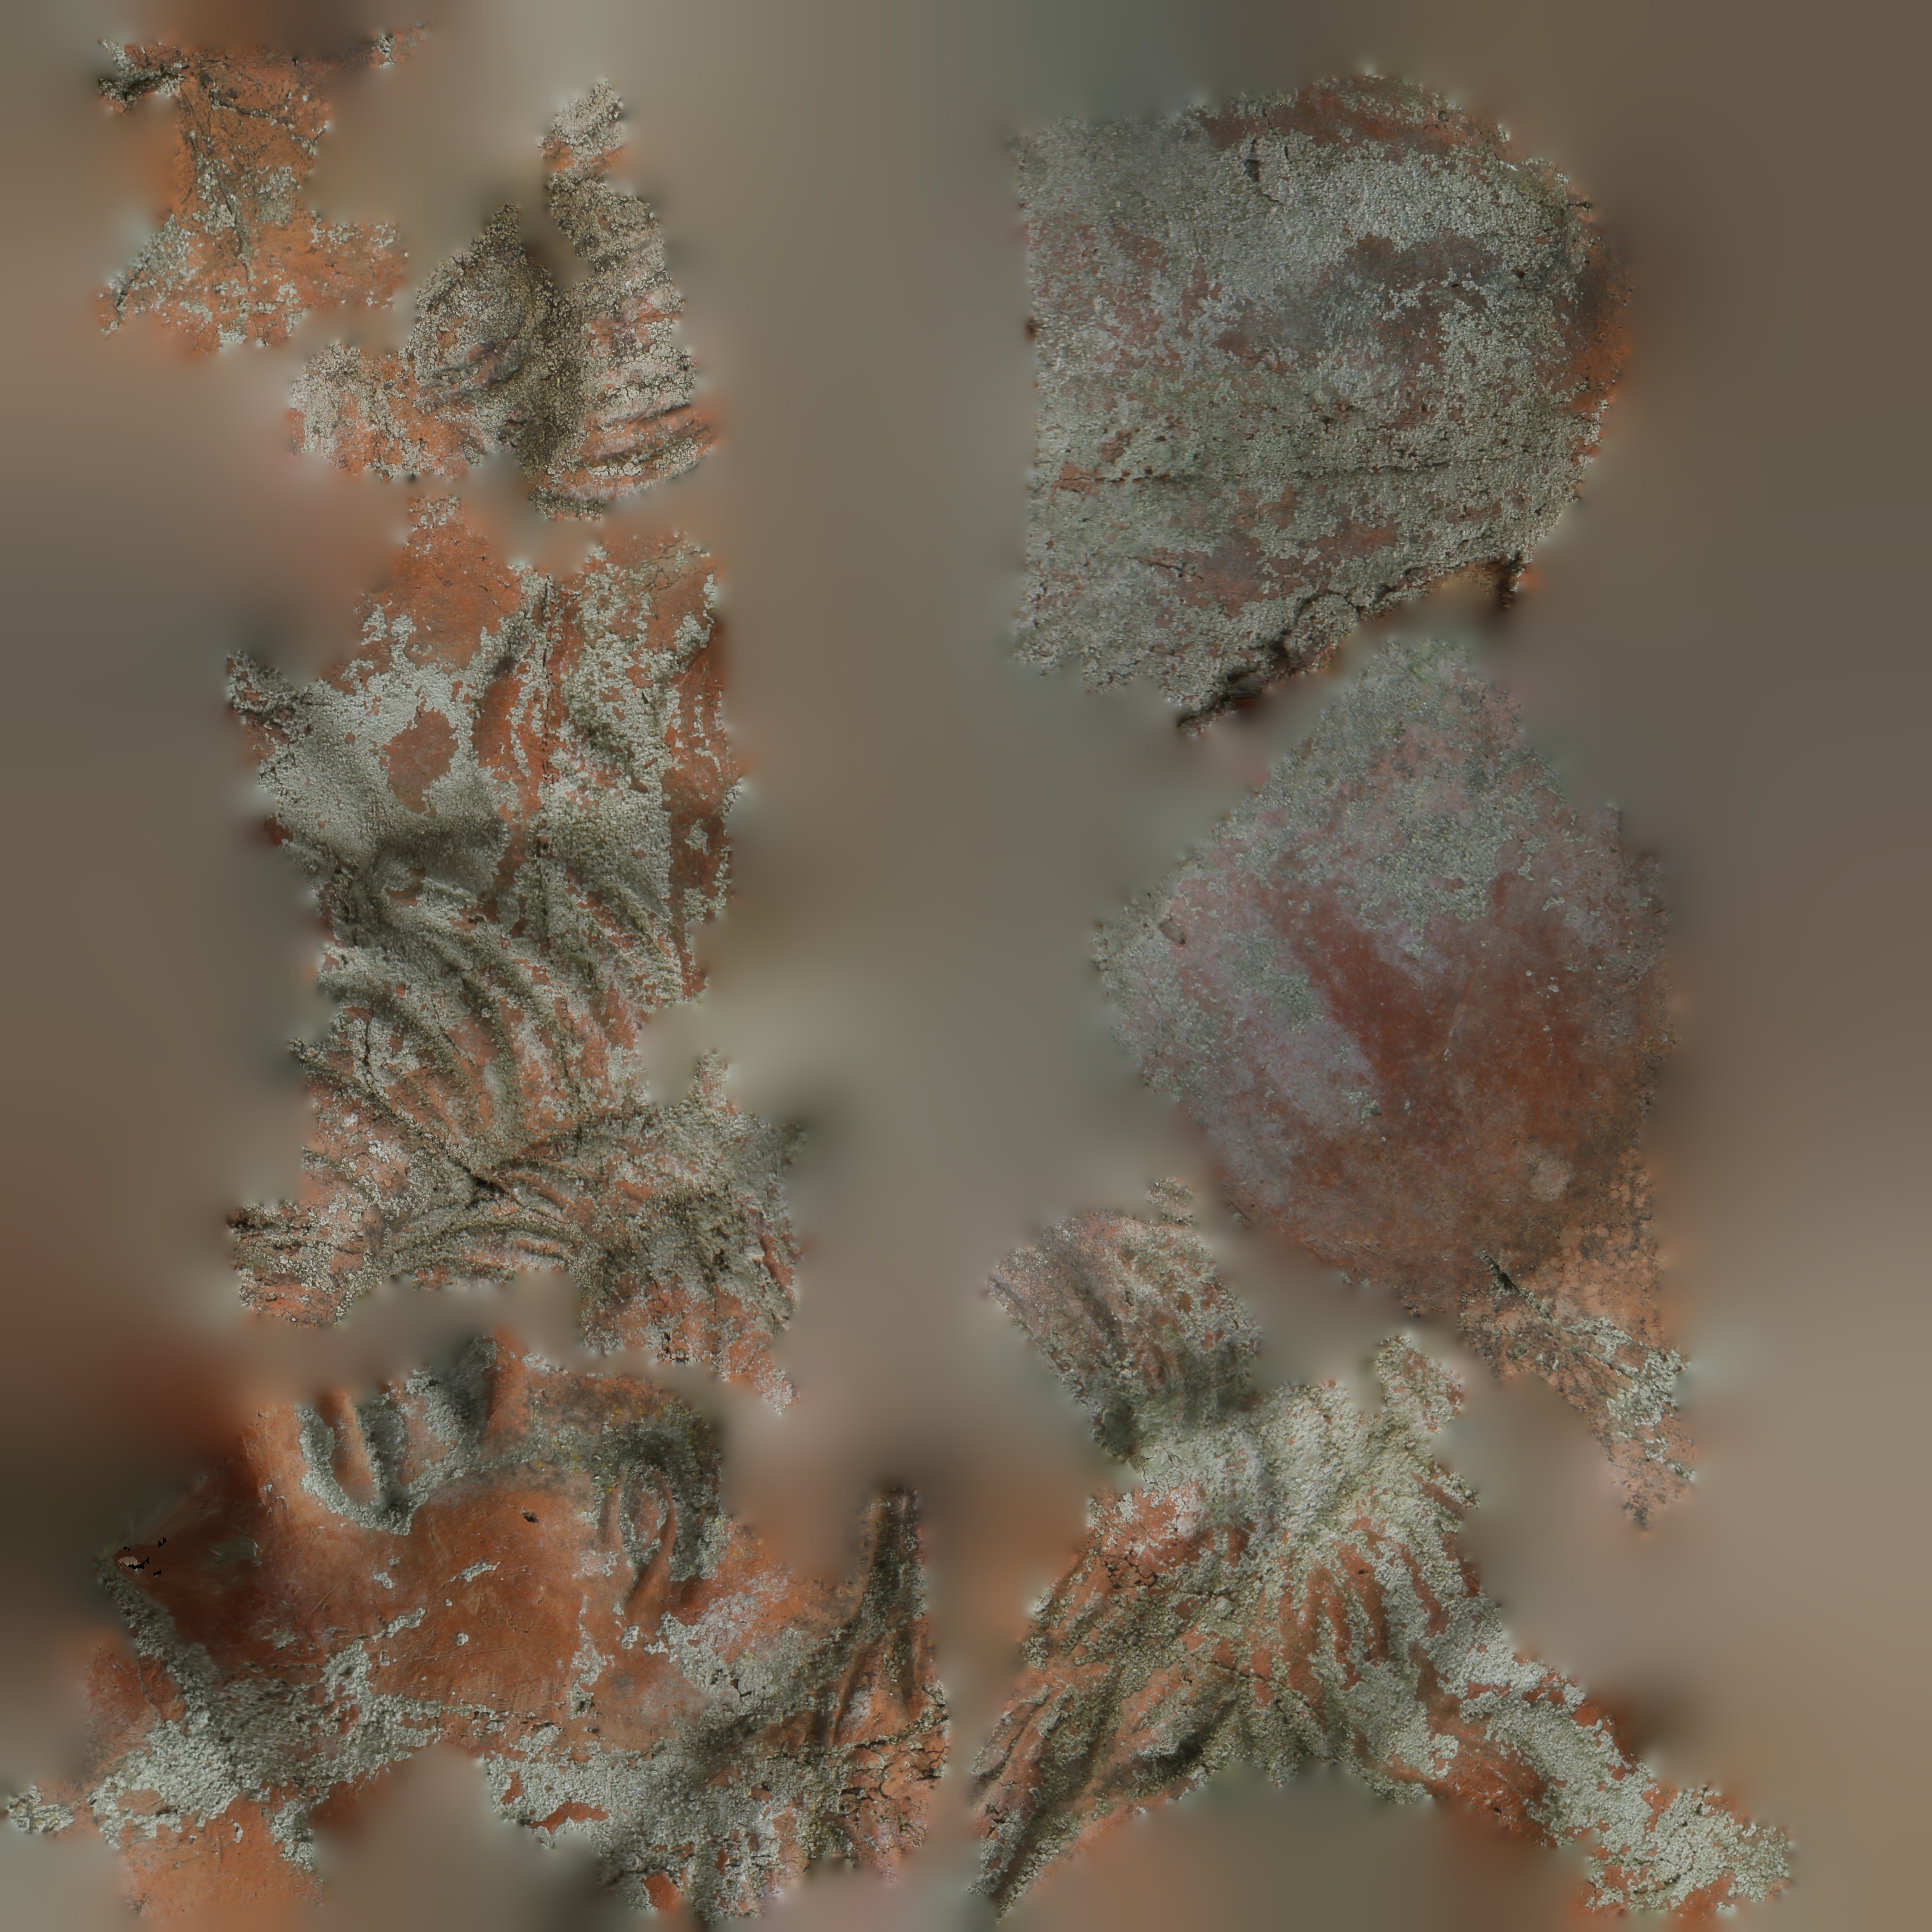
Let’s start with the bust I captured on the Foldio360 turntable in front of the black background, processed at High quality (the default setting) with 2x 4K texture. There were no issues with processing the photos from this setup.
With the High Quality setting for generating the Dense Cloud, the meshed model has a polycount 1.5M, which is not crazy high but actually still manageable for web-based real time 3D previews like Sketchfab on modern computers. If you set the render mode to MatCap you’ll see that the geometry contains a lot of detail, but the individual pieces of gravel and cement on the bust are a bit soft and undefined. I did an Ultra High version in the next section.
Medium-sized Object, Outdoors
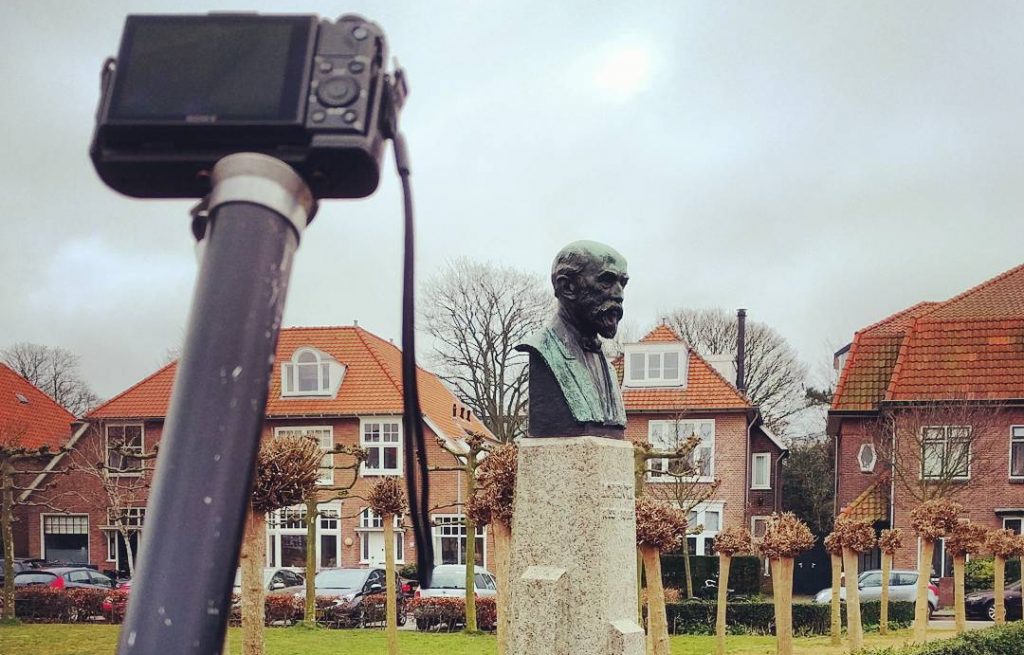
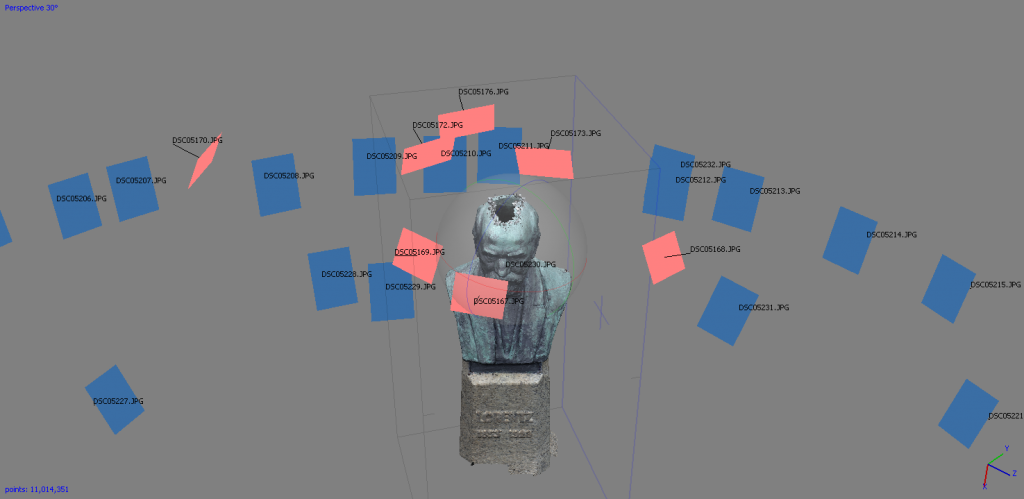
For better comparison with Autodesk ReMake, I also let PhotoScan process the photos of the bust I made outdoors with my 21.2MP Sony RX100M2 (from the photo you saw earlier). Interestingly, PhotoScan was unable to distill the details on the very top of the head of the bust, even with all modes set to their highest accuracy.
I highlighted the photos I took at a down-facing angle that isn’t that different than the shoot on on the turntable. But the amount of photos is 9 instead of 16 with the turntable. Apparently this isn’t enough for Photoscan’s algorithm to solve the topmost area. Here’s the result:
The model has a polycount of a whopping 9.2M but if you compare it to the geometry result from ReMake with the exact same photos below — which was also processed locally with maxed out setting and has “just” 2.3M polygons — you will notice that the extra polygons in PhotoScan didn’t actually create extra details.
Also, ReMake had no problem with the top of the head with this amount of photos.
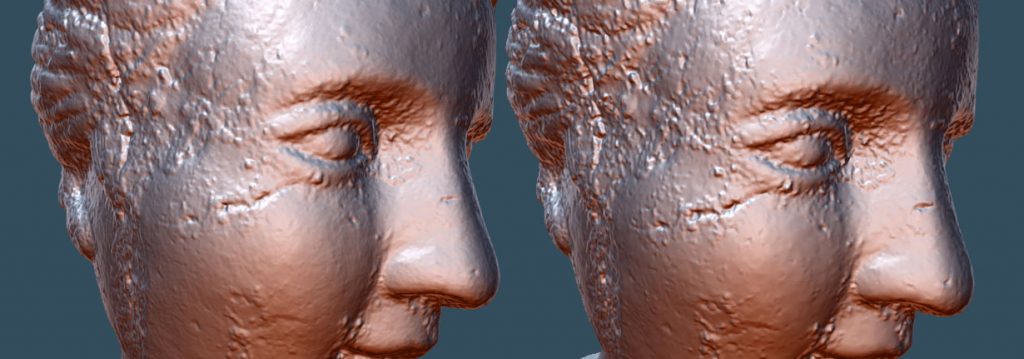
In fact, if you zoom into the face (which I’ve done for you below to save you time) I’d say that the lower-poly model from ReMake (right) contains a bit more detail than than the model from PhotoScan (left) which appears to be a bit softer overall. I’m not sure if that’s actual detail or a result of sharpening algorithms in ReMake but I’m showing the comparison because many of you will ask for it otherwise.
Small Object on Turntable with Markers
The next object is a small 10 cm wide Dog Figure that was also shot on the Foldio360 in two cycles at different heights of 48 photos each. I made no additional down-facing photos.
I didn’t decimate it, so 3.9 million polygons may be a bit much for a small puppy. But as you can see all sculpted hairs are rendered nicely so this could be a great model to use for distilling a normal and/or displacement map in external software like Zbrush. That can than be used to make a shader for a low-poly version.
If you want to compare it to the same photos processed with ReMake, I’ve included that in the Foldio360 Review.
Small object on Turntable without Markers, all angles
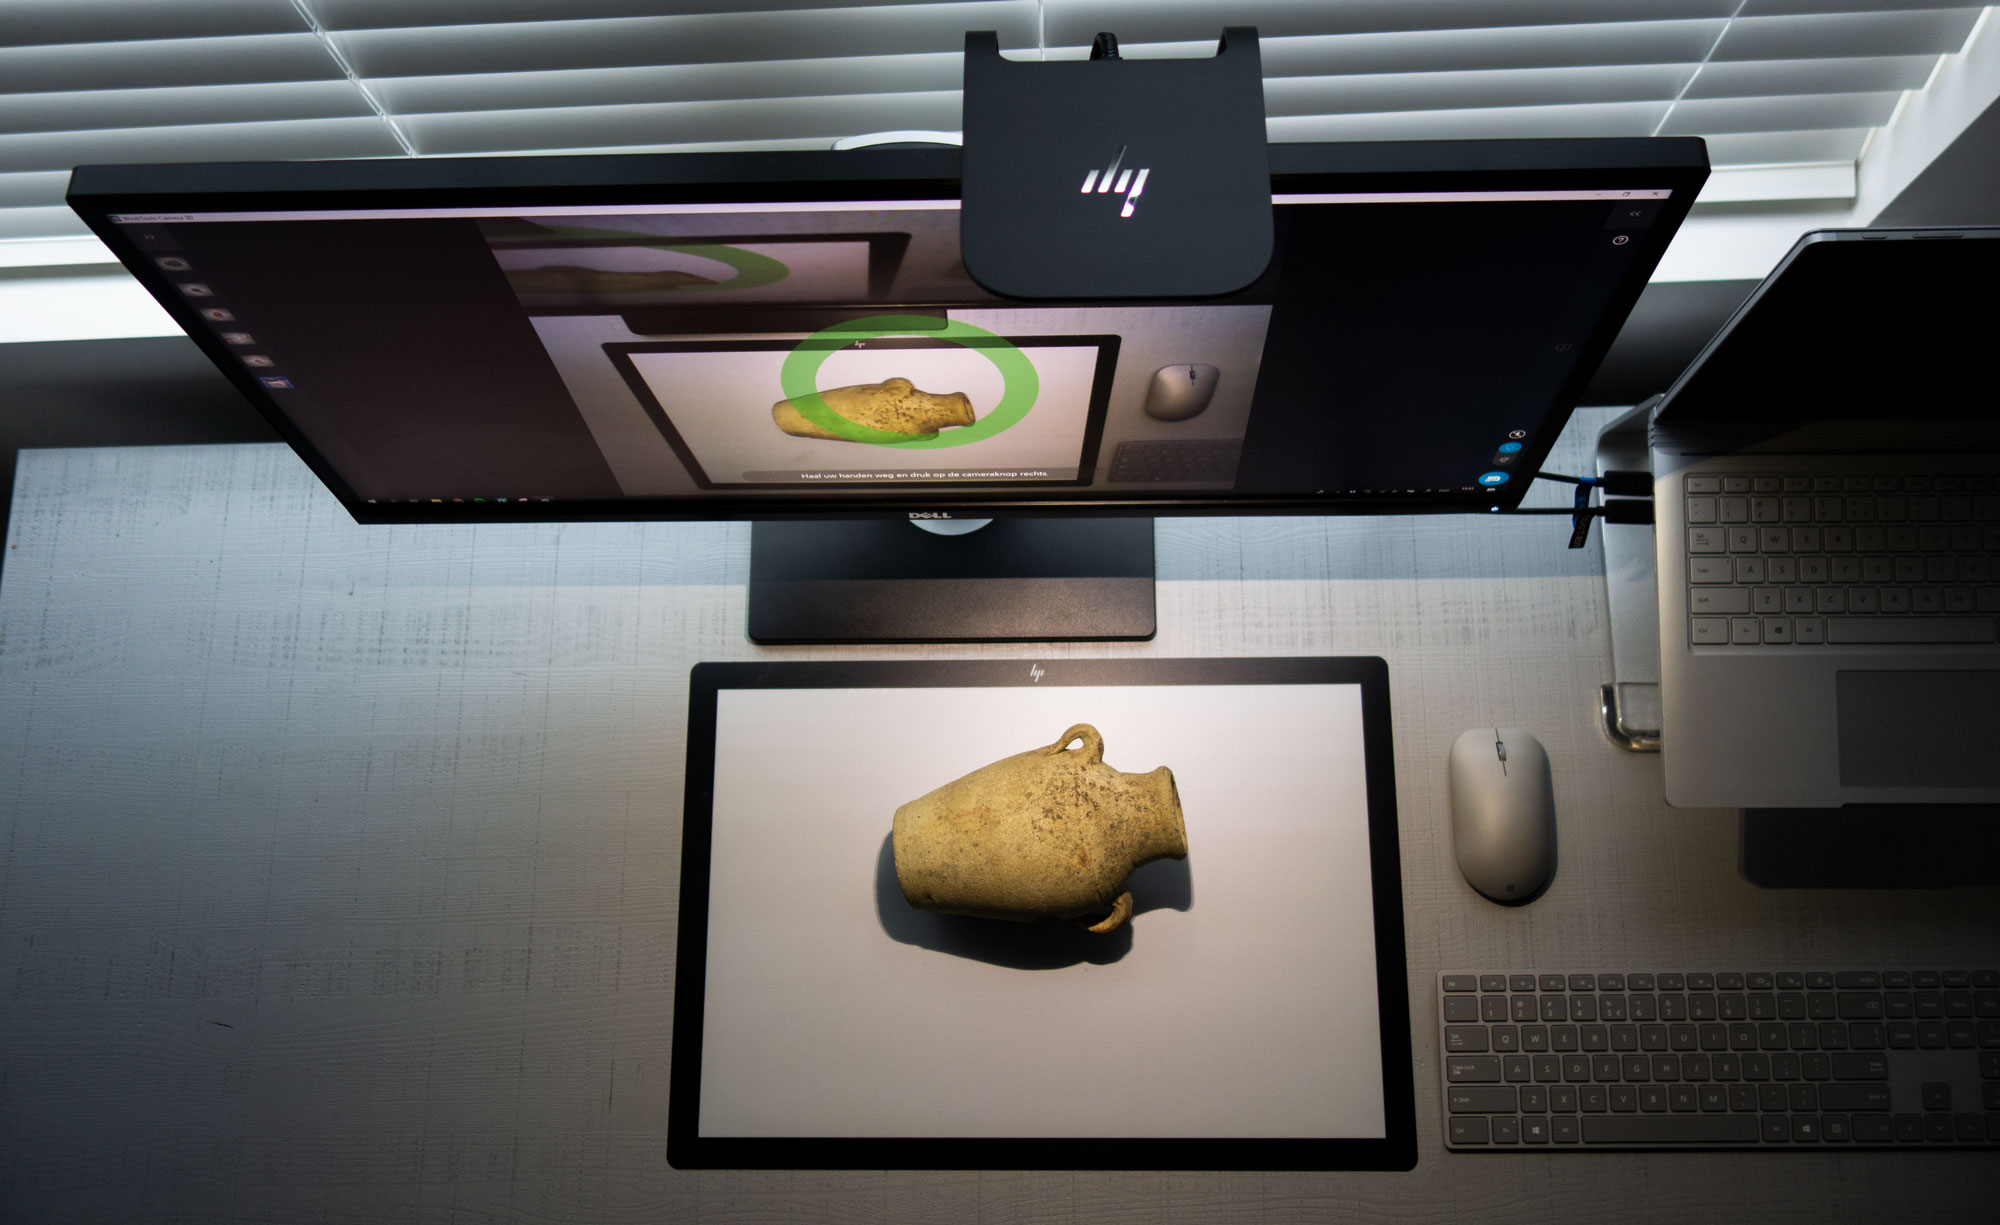
I also wanted to do what I call a “360×360” which means the result can be seen from all angles, also the bottom that’s usually open or a simple fill. The vintage camera below actually has an interesting bottom plate. I shots 4 cycles of 36 photos with the Foldio360 in the Foldio 2 portable studio with LED light (just $204.95 as a bundle wit the turntable).
I did this tuning the lights and camera exposure until the background was totally white. This way I could keep the camera in the same location and rotate the object between cycles.
With that technique, I was hoping I could simply use the JPGs from the camera for efficiency. And it worked! All photos were aligned nicely:
And here’s the result. The only editing I did was adjust the exposure levels of the texture (in Photoshop) to compensate for the over-exposed photos.
I’m really impressed by this result (2.1M polygons), especially because it’s a black object. The viewfinder on top is even glossy black and apart from some geometric noise that did come out very well. Also nice it that the levers on the lens, which are really tiny, rendered beautifully. Texture wise I chose to generate a single 4K JPG and I’m impressed by the fact that the prints on the lens are totally readable.
Large Object, Outdoors
In contrast to these small objects, let’s go for something big like this statue that about 3 meters tall from the ground up.
I took just 52 photos in total, which admittedly isn’t a lot. And while ReMake had no problems with that, PhotoScan again had issues with the (very) low amount of photos from the top (highlighted) which resulted in a hole in the model. So that’s a good thing to remember with this software.
The Hole Filling algorithm did close the hole but with very few polys. And unlike ReMake, PhotoScan has no option of subdividing selected polygons to create a polygon density that better matches the rest of the model.
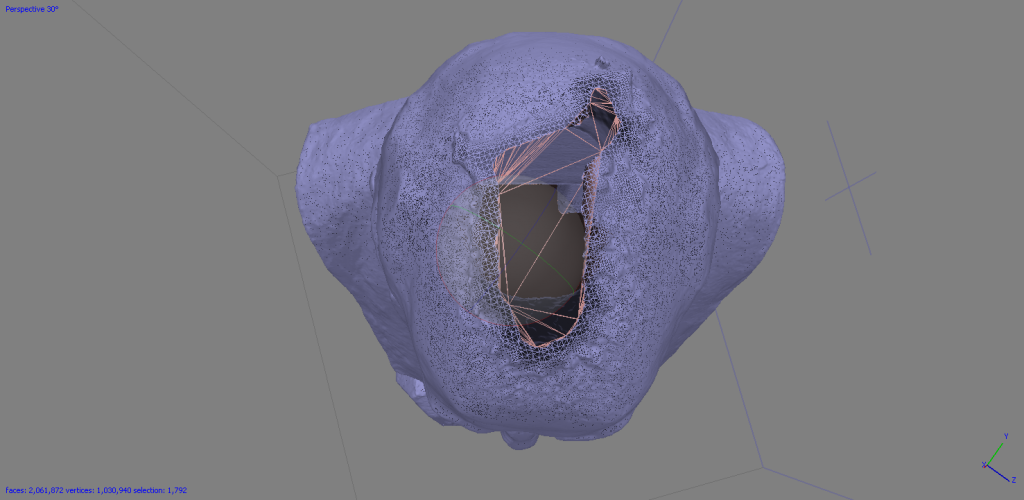
The patch is less visible after texturing but it’s still a “flat fill” would require some good 3D sculpting to fix this. Below I’ve embedded the unfilled version for pureness sake, processed at Ultra High quality (8.4M polygons).
Considering the shooting conditions for this bust (handheld on an overcast day, so I had to up the ISO a bit) it’s a bit hard to judge which geometric details are really there in reality and which come from amplified camera noise but nevertheless it’s a great result and a perfect base for a professional 3D project.
Update 29 May 2017: Teddy
Forgot to include Teddy when I published this review. Thanks to everyone that reminded me of this! In fact, it was a perfect test of the permanent Photogrammetry setup I made in my office.
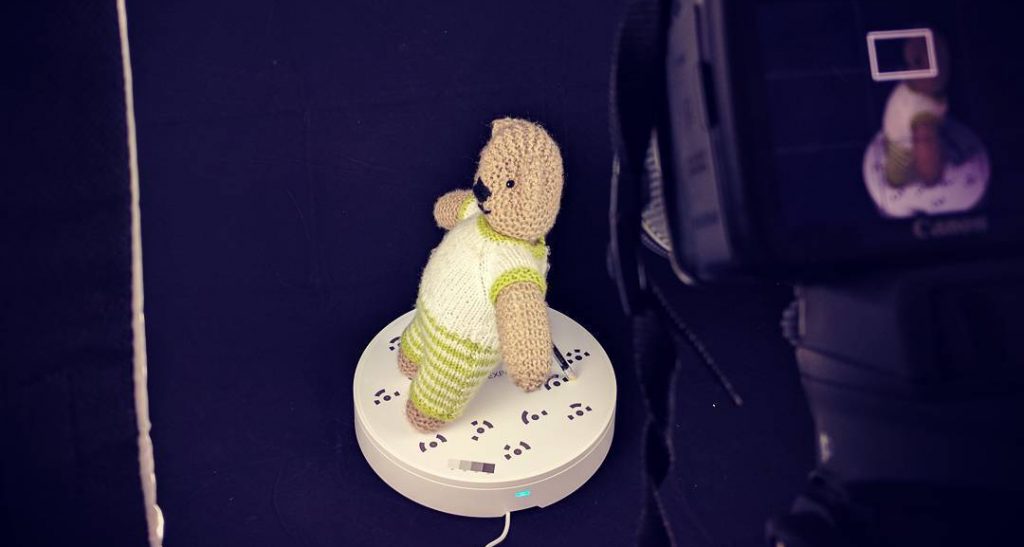
I shot 3 x 36 photos with the Canon EOS 18MP DSLR and the Foldio360, processed the data at High Quality and generated a single 4K texture:
For a final comparison between High and Ultra High quality — an honest comparison with ReMake and future software I’ll test — I also processed the same set of 80 photos I took by with Teddy static and moving around him with a tripod and my Sony RX100M2 20MP mirror-less camera.
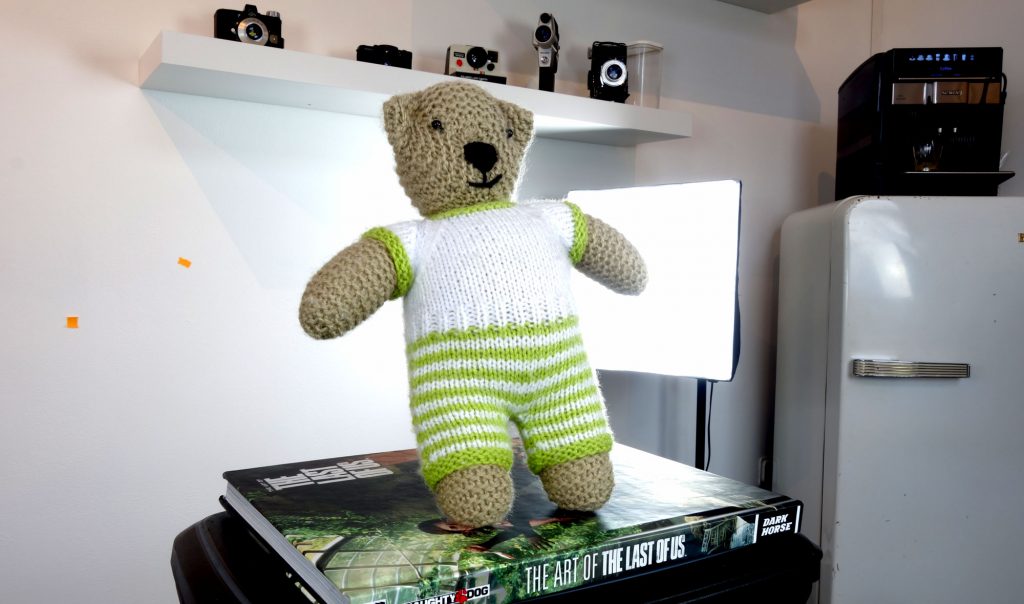
The first embed is the result from PhotoScan (Ultra High) and the second from ReMake (Ultra, Detailed, Fine).
At 4.1M polygons, the PhotoScan result again has the highest mesh density compared to the ReMake result with 1.6M polygons. Comparing both the textured and MatCap renders, it’s clear that PhotoScan did distill a bit more detail from the photos, but at the cost of more noise that’s most visible on the top of Teddy’s head and under his arms.
Maybe Ultra High is a bit too much for a knitted bear (which has a lot of tiny wool hairs sticking out everywhere), but generally my tests indicate that PhotoScan’s algorithms have a bit more problems with rim lighting in photos where the edge of an object is overexposed from certain angles. Looking at my setup in the photograph above the 3D embeds, any photography professional would tell me that it’s a bad idea to shoot directly into a soft box anyway — and they’re right. That’s why I used both an ideal situation with the turntable as well as the less perfect one above. PhotoScan performs best with a more professional studio setup and more ideal shooting circumstances.
I’ve added both results to my ever-growing Sketchfab collection of Teddy Captures.
Verdict
Using PhotoScan for single-camera object digitization.
Agisoft PhotoScan is a great piece of software for professionals that want to have full control over the entire photogrammetry process. It’s certainly a good idea to read the manual to know what every setting does, because there are a lot. If you’re like me and you’re just interested in capturing objects and maybe some interiors, the Standard version is probably good enough and for $179 it’s affordable for almost everyone. And you can always upgrade to Pro if you do need marker support and Network Processing (or the full set of orthographic features Pro offers).
I can only judge the performance based on my i5 system with 32GB RAM and a GTX 1070 GPU, but for the objects I tested I think processing times are realistic for professional use up to High quality. Ultra High would be too much waiting for me. If I had to do that frequently, I’d certainly consider Network Processing, or a multi-GPU system. For the latter it’s convenient that that PhotoScan supports many types of graphics processors.
If you want one-click processing like Autodesk ReMake, you can create a Batch action that can be saved and loaded. But this requires quite a lot of knowledge and experience to set-up correctly. The upside is that you can always see what PhotoScan is doing under the hood and learn from that, while ReMake gives no feedback about the process at all.
The mesh editing features of PhotoScan are a bit scarce and it’s clear that this software is supposed to be used as part of a production pipeline. You can export and import meshes mid-process to do editing in an application of your choice. That’s great for seasoned professionals, but will surely be threshold for newcomers with less software experience or people that don’t need (or want to learn) a completely new application while they just want to do simple adjustments.
Algorithm-wise Agisoft PhotoScan can deliver outstanding results, even from older or entry-level cameras. But it needs more photos than ReMake to create a complete result — especially from top-facing surfaces shot outdoors — and delivered meshes with a slightly unbalanced polycount-to-actual-detail ratio in my tests.
Bottom line: PhotoScan is great (and stable — it didn’t crash once here) professional photogrammetry software that offers a lot of control and is very scalable. On the business-side, it doesn’t require you to buy into a subscription-based business model like ReMake or RealityCapture (which I will review next). And of the three, it’s the only solution that’s also available for Mac and Linux.
This post has been updated after publishing to correct some typos, add the Teddy examples and the information panel about processing times.
Other Photogrammetry Software Reviews
3DF Zephyr Review
Windows-only. Perpetual & Free version
Autodesk ReMake Review
Windows. Subscription & Free version.
RealityCapture Review
Windows-only. Subscription license.


Dear Nick,
Thank you for this great tutorial. I have a couple of questions for you.
1) In which step do you define the scale? Is it possible to create the scale bar after the meshing? I want to run the batch process from camera alignment through the texturing and then apply a scale bar to the model.
2) Regarding the chunk alignment is this possible even if the different chunks are not referenced to a common reference system?
Thanks in advance!!!!
hi , thanks for this tutorial.
I want images of this tutorial . how can I download .
Your reviews and tutorials are excellent. With the current flux in software, I wonder what you would currently recommend for capturing large objects. My need is to capture 3D, low-relief wall sculptures I make, in order to be able to present them in a way they can be properly viewed, ideally with a plugin on the web for walk-around viewing, but also for VR. So it needs to work with handheld cameras walking around the object. Obviously if there’s a free or cheap option that’s best, but I’m interested in your recommendations. Thanks for all your work and explanations.
Hi, congratulations for the tutorials! after carefully following the tutorial (Small object on turntables without markers, all angles)I shots 4 cycles of 36 photos on Foldio 360, the alignment of the cameras is in one point, ask what procedure to use to view the other cameras as in the image attached to the tutorial.
[…] Agisoft PhotoScan Review 22 May 2017 Nick Lievendag […]
Hi,
If the half of my object is white (let’s say it a dish), is there trick to make it count in the 3D reconstruction?
Thanks.