Update January 2018
Autodesk ReCap 360, including the web-based interface, has been discontinued on December 1, 2017. The photogrammetry functionality will be moved into Autodesk ReCap Pro as a feature called ReCap Photo. I have reviewed this software separately.
In this Review I’m testing Autodesk’s cloud-based “Photo to 3D”—or Photogrammetry—offerings: ReCap 360. Whereas 123D Catch is targeted at consumers, ReCap 360 is targeted at professionals. It has a few extra bells and whistles. Read on to find out if that means better results.
The Product
Autodesk ReCap 360 is both a Web Service and a Windows application. The latter is meant for 3D Laser Scanning. I’ll be using the web version for this review because that one is meant for Photogrammetry.
Whereas 123D Catch is 100% free, ReCap 360 is not. The ReCap product website is far from clear about the rather complex business model that uses a combination of a subscription and pay-as-you-go credits. But the good news is that the web version is free to some extend and this free mode is very useful for many purposes.
Limitations for “Free” Version
It’s not advertised as such, but you don’t need a subscription to use ReCap 360 for an unlimited amount of projects. However, when you do these limitations apply:
- Upload Maximum of 50 Photos (20 less than 123D Catch)
- Photos are uploaded in full resolution, but downscaled before processing.
I’m assuming this based on the texture size of the final output and the product landing page that mentions “Photo to 3D in full resolution” as a subscription benefit. - Only “Preview” quality meshes.
- 5 GB of A360 cloud storage
Benefits of a Subscription
With a monthly subscription that costs €70 / $65—with discounts for longer periods—you’ll get:
- Upload Maximum of 250 Photos
- Full Resolution photo processing
- 10 “Ultra” Quality meshes a year included.
This option costs 5 “Cloud Credits” each time you select it and 50 are included each year. More can be purchased separately. - 25 GB of A360 cloud storage
Other Photogrammetry Software Reviews
Autodesk ReMake Review
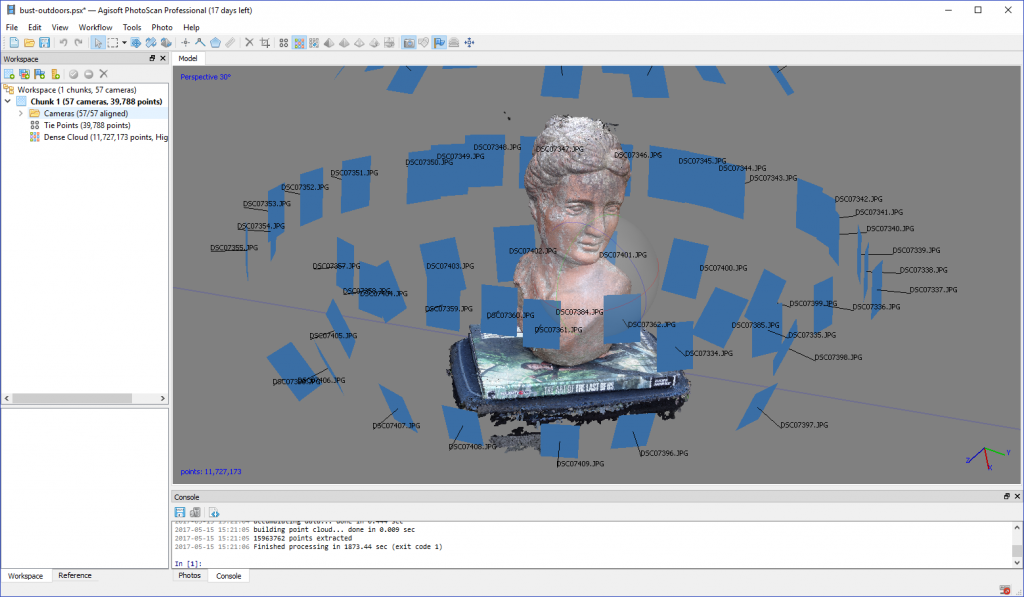
Agisoft PhotoScan Review
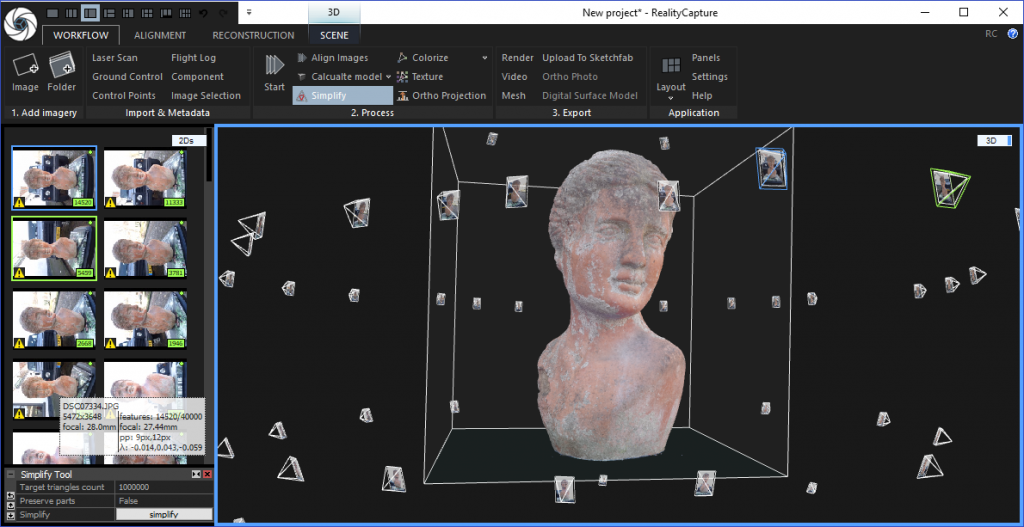
RealityCapture Review
Capturing Photos
I took the photos for this test with my Sony RX100M2 camera. Most tests I did with the smallest aperture of f/11 and lowest ISO of 100 to prevent out-of-focus areas and noise. Naturally, when you want to do this indoors, you need to use a tripod. Some tests I did on full-auto, which gave shallow depth of field to some photos. I discovered that the algorithm has no real problems with background blur, as long as the subject itself is completely in focus.
I shot both RAW and JPGs, but used only the JPGs for my tests because I didn’t have time to process the RAW files and convert them to JPG.
The Web Service (in Free mode)
Uploading Photos
Loggin into recap360.autodesk.com requires an Autodesk account. I wrote my previous post I discovered that signing up for an Autodesk 123D account was a one-click procedure thanks to the social sign-in options. Here the only option is signing up by email.
The web app itself is nicely designed, with large buttons that make clear this design team used a tablet-first approach. In the upper left corner a big “Photo to 3D” button awaits your click. Next you can upload photos from your computer or select photos from earlier projects that have been saved to A360 Drive.
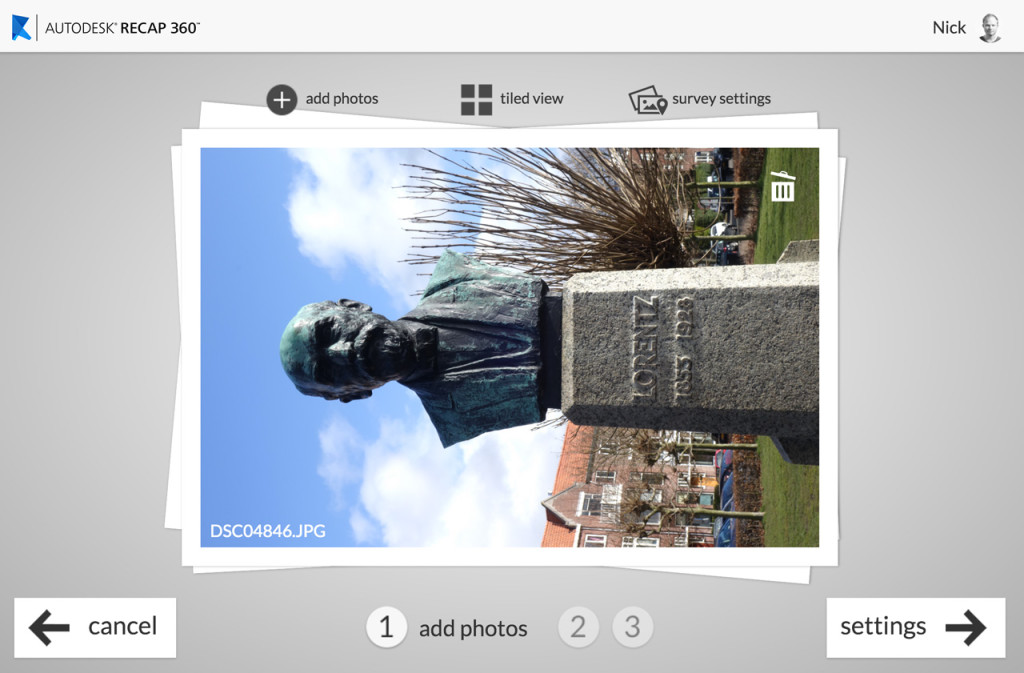
You can check your photos in tiled view so you can quickly delete photos that have clearly failed. If you have selected more than 50 photos, you’ll be notified to delete some before being able to upload them. “Survey Settings” is a paid option to aid Areal Survey Photography (which I’m not covering here).
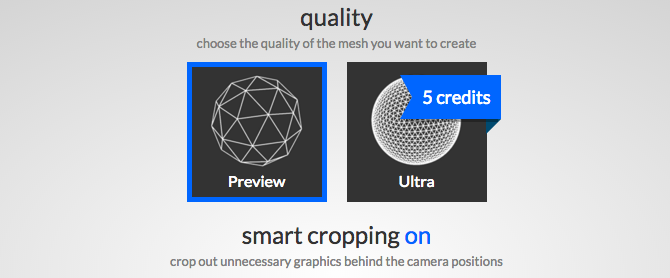
The next step is the Settings page. Here you can give your project a title and set the quality. As you can see in the screenshot, the “Preview” quality is free, but the “Ultra” version—which will output a more detailed 3D model—requires 5 “Cloud Credits”.
Cloud Credits
I’m not 100% sure how much Cloud Credits cost, because I don’t see the option to buy them in my free A360 Account. I guess you need a subscription to at least A360 ($10 month) to be able to purchase them. If the screenshots in Autodesk’s Knowledge Network are accurate it’s $100 for a pack of 100 Cloud Credits. So a high quality mesh will cost $5.
You can also enable “Smart Cropping” which was a feature I truly missed when testing 123D Catch. This feature figures out what the main subject of your capture is and deletes everything else—like random, free-floating parts of background geometry. I left it on for all of my tests and didn’t have any problems with ReCap 360 cropping away the wrong parts.
You can export in either .RCP format—which is used by the Memento application I will review in part 3—or the open and versatile .OBJ format.
Next you photos will be uploaded to the cloud and put into a queue before processing. This never took longer than a few minutes for me. As with 123D Catch, you will see an indicator to give you some idea of the cloud-solving progress, but no actual indication of how long it will take. It says it will send you an e-mail when the model is finished, but I never got any. So you still have to check the progress every once in a while.
Previewing
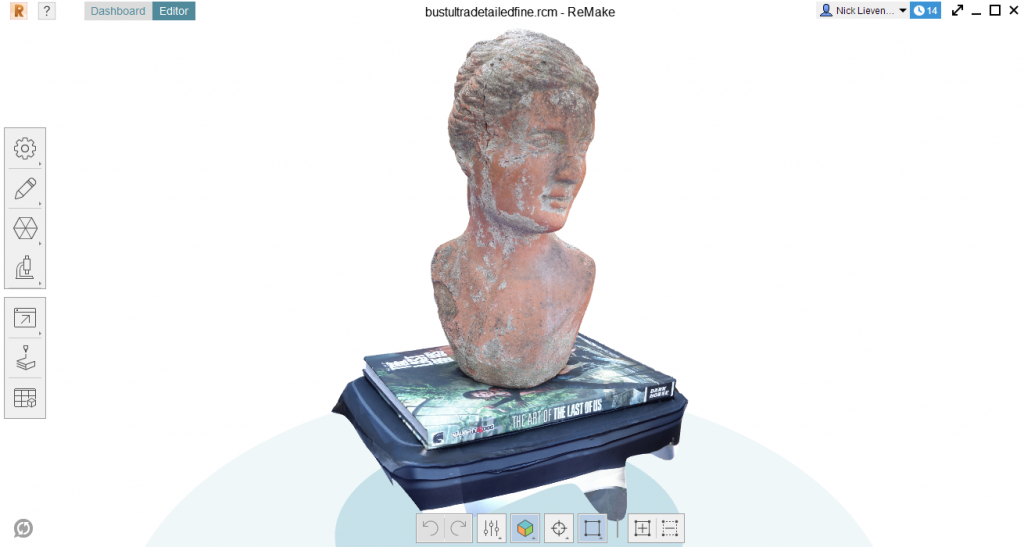
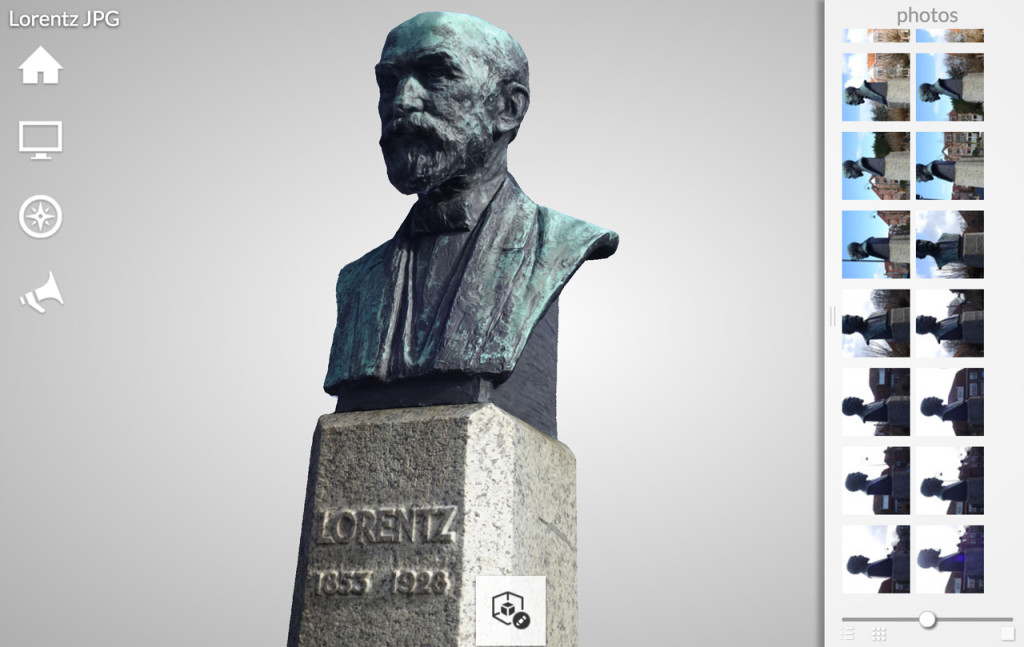
After processing you can preview the results in-browser in realtime 3D, which is nice. I found the navigation a bit tricky, because the model seems to rotate around a fixed pivot point at a random location, but it’s a great way to see if the results are any good before downloading.
Manual Stitching
(Great idea, but doesn’t work well)
In the right pane in the screenshot above you can see all the photos that were used to create the 3D model. Sometimes it will also display photos that were rejected and not “stitched” into the model.
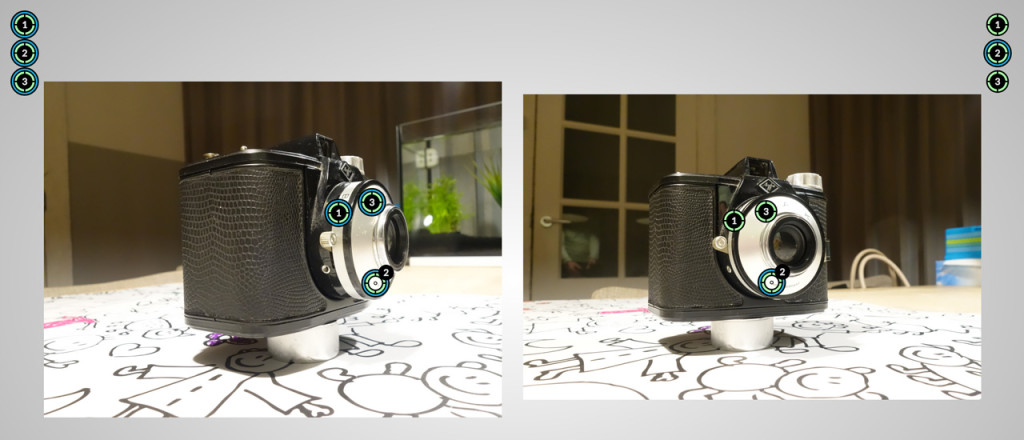
When this happens with a photo that was really necessary for a complete model, you can choose to manually aid the algorithm by selecting reference points on the unstitched photos and a few (preferably 3 or more) photos that did work automatically.
It really seems like a great feature, but unfortunately it didn’t work as expected for me. I tried this method multiple times, on multiple captures, both by selecting distinctive object edges as well as selecting high-contrast color details. In all cases it either changed nothing, or completely messed up the model.
That being said, only on a few occasions the software had rejected one or a few photos. Most of the times the model was complete and looked fine without those stitched in. And I must be honest that some of the rejected photos where a bit sloppy (or contained fish tanks in the background…).
No Post Processing Features
While the Smart Cropping feature works great, there are no manual post processing tools in ReCap 360. So if your model contains holes or artifacts, you have to correct these in an external 3D modeling or sculpting program.
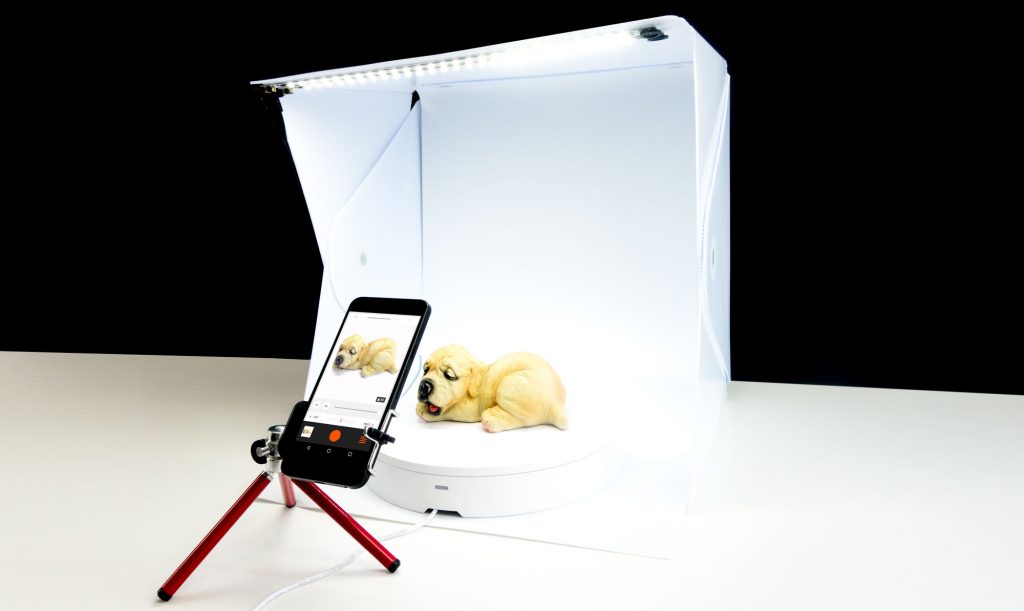
Want to Automate your Autodesk ReCap 360 Workflow?
Review of the $139 app-enabled Foldio360 Turntable
Results
Below are a few of my tests. All taken with my Sony RX100M2 and processed with the free web version of ReCap 360. I didn’t retouch any of the photos before uploading and didn’t retouch the 3D models, unless otherwise noted. All is processed in ReCap 360’s (free) preview quality.
Let’s start with the same knitted teddy bear I used in my 123D Catch Review. I’ve embedded both the ReCap 360 (top) and 123D Catch (bottom) versions for comparison.
It’s a bit difficult to compare the examples above because of the different lighting (the 123D version is lit by daylight through a window and the ReCap version by the lights above my dining table). There seems to be more texture detail in the ReCap 360 version, but that’s simply because it has more contrast. Fact is that all textures of the ReCap version are contained in a single 4096 x 4096 texture map and the 123D Catch texture is spread over 3 of them.
Geometry-wise (enable the wireframe mode to compare) the comparison is easier to make and it’s clear that 123D Catch generated a denser, more detailed mesh than ReCap 360’s preview quality—more than twice the amount!
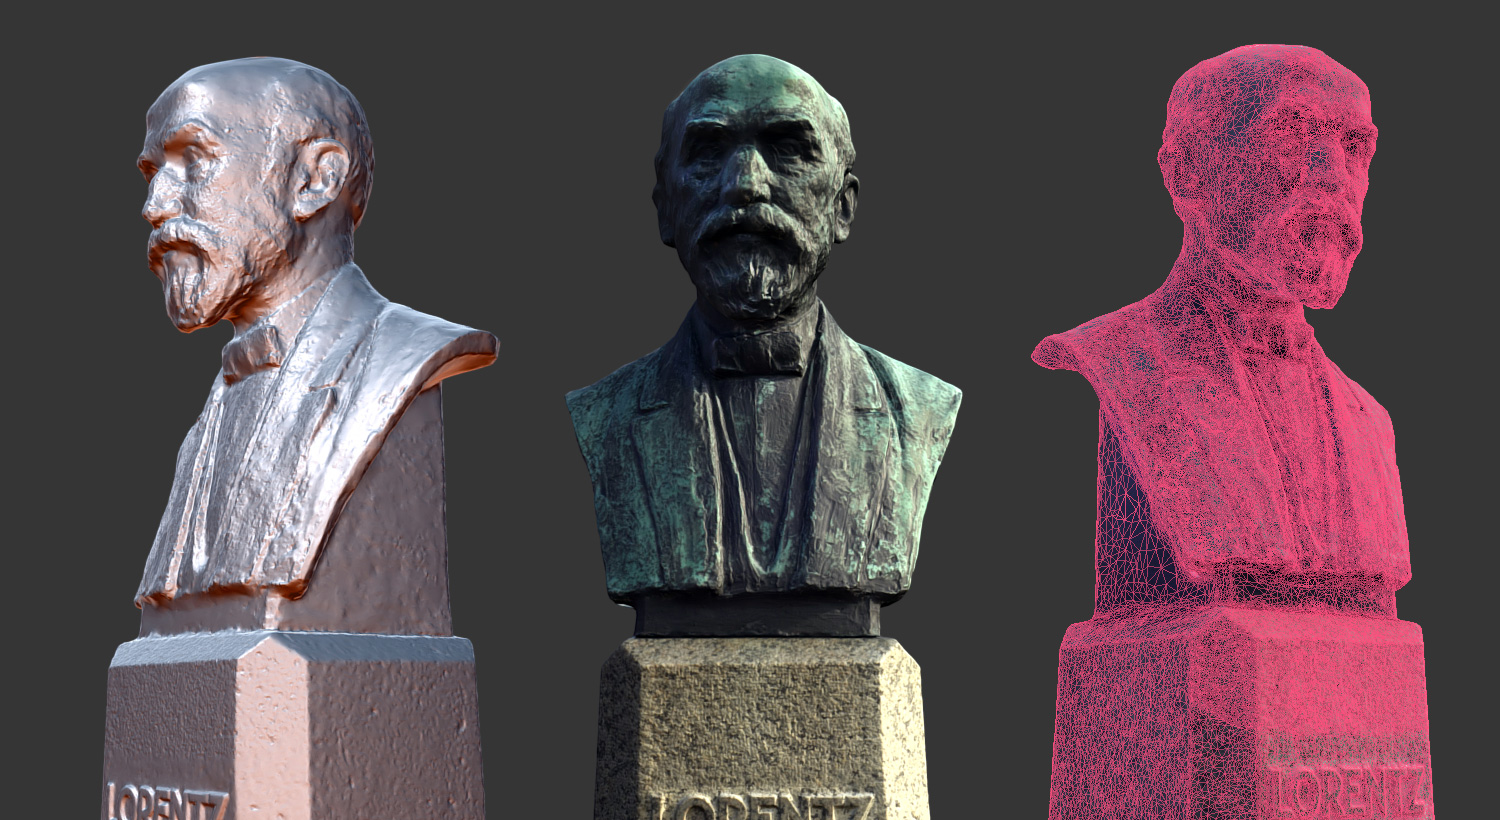
Another example is this statue of Dutch Nobel-prize-winning physicist Hendrik Antoon Lorentz, located in my hometown. Unfortunately I’m not tall enough to capture the top of his head, but I think the result is nice nonetheless. Especially because this is the direct output of ReCap 360—no post-processing applied.
While shooting the Yoda 3D Print (about 15cm tall) below, I forgot to close the aperture of the camera, which resulted in a shallow depth of field. This resulted in some blurred textures, but I chose to include it anyway because I was impressed that ReCap was able to generate this geometry even when the background—and some parts of Yoda—were out of focus.
Last, but certainly not least, I asked my co-founder Patrick to try to make a 3D Photo Scan of me.
Above is one of the results of many tries and experimenting with different approaches. As you can see my sweater looks great, but my head… not so much (I can honestly say I look slightly better in person).
The problem is that ReCap 360 gives no control over the texturing. It decides which photo will be used to build the overall texture. No matter what I tried, my face would always be made out of multiple—slightly misaligned—photos. It would be great if you could somehow tell the software which photos to prioritize for texturing. A layered texture file would be even better, of course.
Verdict
If you want to use your (professional) camera and an easy-to-use web-interface to do photogrammetry, ReCap 360 is certainly worth a try.
In my opinion, if your scope is to photo-scan relatively simple objects up to human bust size and want to post the results online on Sketchfab or use them for purposes that don’t require extremely dense meshes, the “preview” quality of the free version is good enough.
If that’s true for you, the big question is: is the free version of ReCap 360 better than the free 123D Catch app? That might not be a web version, but the mobile app does transfer gyro and location data from your smartphone to aid the photogrammetry—and you can submit 40% more (70 vs. 50) pictures with it. On top of that, 123D Catch will output comparable texture (of course depending on your smartphone’s camera) but a mesh that’s more than twice as dense.
But it’s good to also compare the workflow differences: 123D Catch doesn’t allow you to upload photos taken earlier, so you must have no problem with snapping them in-app at the moment you want to make a capture. I personally like the benefits of doing the photo session with my Sony RX100M2 camera: being able to shoot as many photos as I like and having a copy of them for later use, using a tripod, using the tilt-able screen and in way better low-light performance. And because the RX100M2 can be remote controlled over WiFi from a smartphone, I can make photos from a tripod way above my head (great for statues!).
Also, if you have no experience with 3D modeling software, the great Smart Cropping feature of ReCap 360 might win you over.
If you need do more features and quality, you can choose the paid subscription and buy additional Cloud Credits on the go. But personally, I think that the subscription service is priced too high if you want to use it for just Photogrammetry. The price is probably only justifiable if you’re (also) going to use the Windows desktop app for 3D Laser Scanning. I don’t understand why Autodesk has chosen to put the Web Service and Desktop app—which do totally different things—under one product/subscription. This is actually become more and more clear now that ReCap is being targeted towards a more technical audience (BIM, engineering, etc) and focuses more on laser scanning, while the new ReMake (see below) is purely a photogrammetry solution targeted to a wider audience.
Other Photogrammetry Software Reviews
Autodesk ReMake Review
Agisoft PhotoScan Review
RealityCapture Review
Want to Automate your Autodesk ReCap 360 or ReMake Workflow?
Review of the $139 app-enabled Foldio360 Turntable


Nick, Im very impressed with your writing! I should be working but now im reading all your blogs
Thanks Robert! Glad you like! Now back to work for both of us 🙂
Dear Nick,
I am currently trying to use the ReCap 360 software and am experiencing issues with my model. I have followed all of the AutoDesk guidelines regarding photo taking. I am trying to create a 3D model of a coffee mug and have taken about 50 photos of the mug (each one at increments of 10 degrees). However, once the photos are uploaded into Autodesk 360 and the model is created, it appears as a blob with most of the photos being layered on top of each other.
Do you have any recommendations or any insight as to why I am having these issues? Thanks for your help.
Sincerely,
Dan Kleinhenn
Is it a reflective mug?
Any kind of 3D Capturing has problems with shiny things.
What you could do is put it in an evenly lit environment (like a photography tent) or try to make it less glossy with some hairspray 🙂
Let me know how it goes!
Dear Nick,
Thanks for your quick response to my email. I found out that my main issue was attempting to photograph the mug from too close a distance. I re-took all the photos from a few feet away and the image actually turned out quite well. I think the program had issues with finding enough points of reference when I took the photos from under a foot away. The only issue I am experiencing now is when I attempt to photograph an entire room. I will increase my photo count and let you know how it goes. Once again, thanks for your help.
-Dan Kleinhenn
Great that this resolved your problem! The software indeed also uses the background for tracking!
Capturing Rooms can require a lot more photos. Depends on the room size and complexity and the result you’re after. Just make sure photos have a 50% overlap and you have a large depth of field (no blurry backgrounds). But it is still tricky with cloud magic.
Hi Nick,
Very interesting article, I was wondering you had experimented with 3d capturing a subject and then viewing the processed scan 1:1 scale in virtual reality?
Using something like Google Daydream for example to allow the viewer to see a subject in a 3-dimensional field as if they are standing in the very same room.
Do you think this could be achievable?
Thanks
Hi Tom,
I have a lot of experience with that. I have both an Oculus Rift and an HTC Vive at the office (and a lot of Google Cardboards) which I use to view 3D scans.
I even wrote a Tutorial about how to easily make 3D scans VR-compatible through Sketchfab: https://3dmag.com/reviews/3d-scan-in-vr/
It’s important to decimate the amount of polygons of 3D files (in Autodesk ReMake for example) for viewing in VR. Especially on mobile devices like GearVR, Cardboard & Daydream.
Here’s a collection of VR-optimized scans I made: https://sketchfab.com/nicklievendag/collections/vr-showcase
The female model is set-up at 1:1 scale so you should be able to look her straight in the eye in VR.
Hi Nick, Greetings from Argentina. I wanted to ask you if with this soft Recap in your online version I can make 3d images to be used in 3d printers. I’m using Tinkercad. My idea is to be able to get something with which you can digitize 3D images to make designs with those printers. Thank you very much!!
Hi Nick,
Im an artist and I am new to 3d scanning. I used Trnio after reading your review on mobile apps. the results are not convincing, although the app is very straight forward and easy to use.
My question is; can we manually find the ios app for 123d catch and install, and use it? Or, does Autodesk stop processing files coming from 123D catch?
Thanks in advance!
I don’t know the answer to any of the question. I just know that 123D Catch has been discontinued.
Hi, Nick,
Thank you for all of the wonderful reviews. I wondered if you have recommendations for software that would be easy to use for photogrammetry of buildings with the ability to import into AutoCAD and/or Revit. I’ve read your reviews of ReMake and ReCap, and you have shown fairly small objects, but we would be documenting buildings to create a usable 3D model. Autodesk seems to advertise that ReMake and ReCap can be used for this as well, but wanted to know if you had good results or recommendations. We are just getting into photogrammetry and don’t want to invest in drones, laser scanning, or expensive software or equipment. We’ve also considered PhotoScan.
Thanks in advance!
Hi Nick,
Is it posible to subtract the scand object from a “3d like material” to produce a mold?
Thanks
Hi,
Is there a cheaper solution than the Leica geometric camera to scan buildings and machines with accuracy and the possibility to convert them to meshes with the right geometrical properties?
Hello, First of all, Thank you so much for sharing this amzing information and it’s very impressive and so much helpful for me. Keep it up and once again Thanks.:)