Update January 2018
Autodesk ReMake has been discontinued as a standalone on December 1, 2017. The photogrammetry functionality of the application will be moved into Autodesk ReCap Pro as a feature called ReCap Photo.
I have reviewed ReCap Photo as a separate post that explains the differences between it and ReMake — both in in terms of functionality as in operational costs.
![]()
In 2016 I’ve mainly reviewed dedicated hardware that can be used for 3D Scanning — or Active Reality Capture, if you will — from entry-level infrared depth sensors like the Structure Sensor and Sense 2 to the professional white light scanners like the EinScan-Pro and Artec Eva. The price difference between those is huge (from less than $500 to way more than $5,000) but more expensive 3D scanners can capture a lot more detail.
But 3D scanner are not the only way to capture reality anymore. Passive Reality Capture technologies, like Photogrammetry, don’t require any special hardware. A camera and a computer will do. Even a smartphone — which is basically a camera and computer in one — can do photogrammetry when combined with Free Apps. That link brings you to one of the most-read posts on this website, because why would you pay for 3D scanning if it can be free?
Those apps, however, have their downsides. That’s why I’m starting a new series of reviews that will cover Professional Photogrammetry Software. First in line is Autodesk ReMake — previously known as Memento — which is available for Windows and Mac. As you might now, I have reviewed Autodesk ReCap 360 in the past. Or at least, the web-interface (that also works on Android) of that software. As a whole ReCap 360 is actually meant for working with laser scans — from the new (and awesome) Leica BLK360 scanner or others — and mix those with photogrammetry if needed. ReMake is purely meant for photogrammetry and offers a complete set of tools to generate, edit and export 3D scans made from photos.
Autodesk’s goal with ReMake is to make professional Reality Capture simple and affordable. Let’s find out of they have succeeded!
Pricing and Versions
There are basically two versions: Free and Pro. All differences can be seen here, but the main difference is that the Free version is limited to a maximum of 50 photos (enough for most small to medium objects, but not for larger objects and environments) and the Standard quality setting (enough for most web and basic VR/AR/gaming purposes) through cloud processing. Ultra quality is also available in the Free version, but you’ll have to pay 5 Cloud Credits (which correlates to ~$5 if I’m correct) per scan for that.
A subscription to the Pro version of ReMake costs $30 monthly or $300 annually in the US and €35 monthly or €350 annually in Europe. You can use cloud processing too, but the Ultra quality will also cost 5 Cloud Credits per scan on top of the subscription. However, the Pro version also supports local processing and here the Ultra quality is included without limitations.
Free Mac Version (for now)
There is a Mac Version of ReMake that works almost exactly like the Windows version, with one important exception: it has no local processing, so only cloud processing is available. I guess this is because local processing is handled by the graphics processor (GPU) and ReMake only works with Nvidia GPUs while the latest Mac have ATI GPUs (and maybe apart from a Mac Pro, the cards in Macs aren’t very impressive).
The good news, for now, is that the Mac version is currently completely free, including most Pro features and online Ultra quality without requiring Cloud Credits. According to the website this is a promotion for a limited time so it can end any moment but it has been this way for months.
The Mac version will be discontinued on March 31, 2017.
Other Photogrammetry Software Reviews
3DF Zephyr Review
Windows-only. Perpetual & Free version
Agisoft PhotoScan Review
Windows, Mac, Linux. Perpetual license.
RealityCapture Review
Windows-only. Subscription license.
System Requirements
You can check the full requirements at the bottom of this page but it’s good to note that if you’re a Windows user and want to use local processing, you’ll need a decent machine — especially a good graphics card. A Nvidia Geforce GFX gaming card is the minimum. Autodesk also says that 64Gb of RAM is required, although I experienced no problems with running ReMake with half of that.
I’m doing this review on a relatively affordable, off-the-shelf Alienware Aurora R5 gaming PC with a 2.7Ghz Intel i5-6400 processor, upgraded to 32Gb of DDR3 RAM and an Nvidia Geforce GTX 1070 graphics card with 4Gb of VRAM. I had no problems using ReMake for small to medium sized objects.
If you’re going to do photogrammetry on a daily base it’s good to realize that for the price of a professional active 3D scanner you can get a maxed out PC with multiple Nvidia Quadro cards that will make the average gamer or VR-enthusiast drool.
Shooting the Photos
I won’t go into too much detail here, because all basic photogrammetry tips apply:
- Shoot many photos in 360° circles at at least 2-3 different heights with 40% or more overlap.
- Use a tripod when possible.
- Use the smallest aperture (the highest f-stop number) so everything is in focus.
- Use the lowest ISO setting to prevent noise.
- Lock as many settings as possible, especially exposure.
- Don’t change the focal distance (don’t zoom) or – even better — use a prime lens.
- Shoot outside when possible, but avoiding direct sunlight (overcast days are great).
- Indoors you can use a diffuse studio light setup for better results.
- Shoot in RAW + JPEG. Use the JPEGs when time is of the essence and convert RAW to JPEG for high-profile or problematic projects.
- Put uniform objects with minimal features on a surface with a lot of details, like a newspaper.
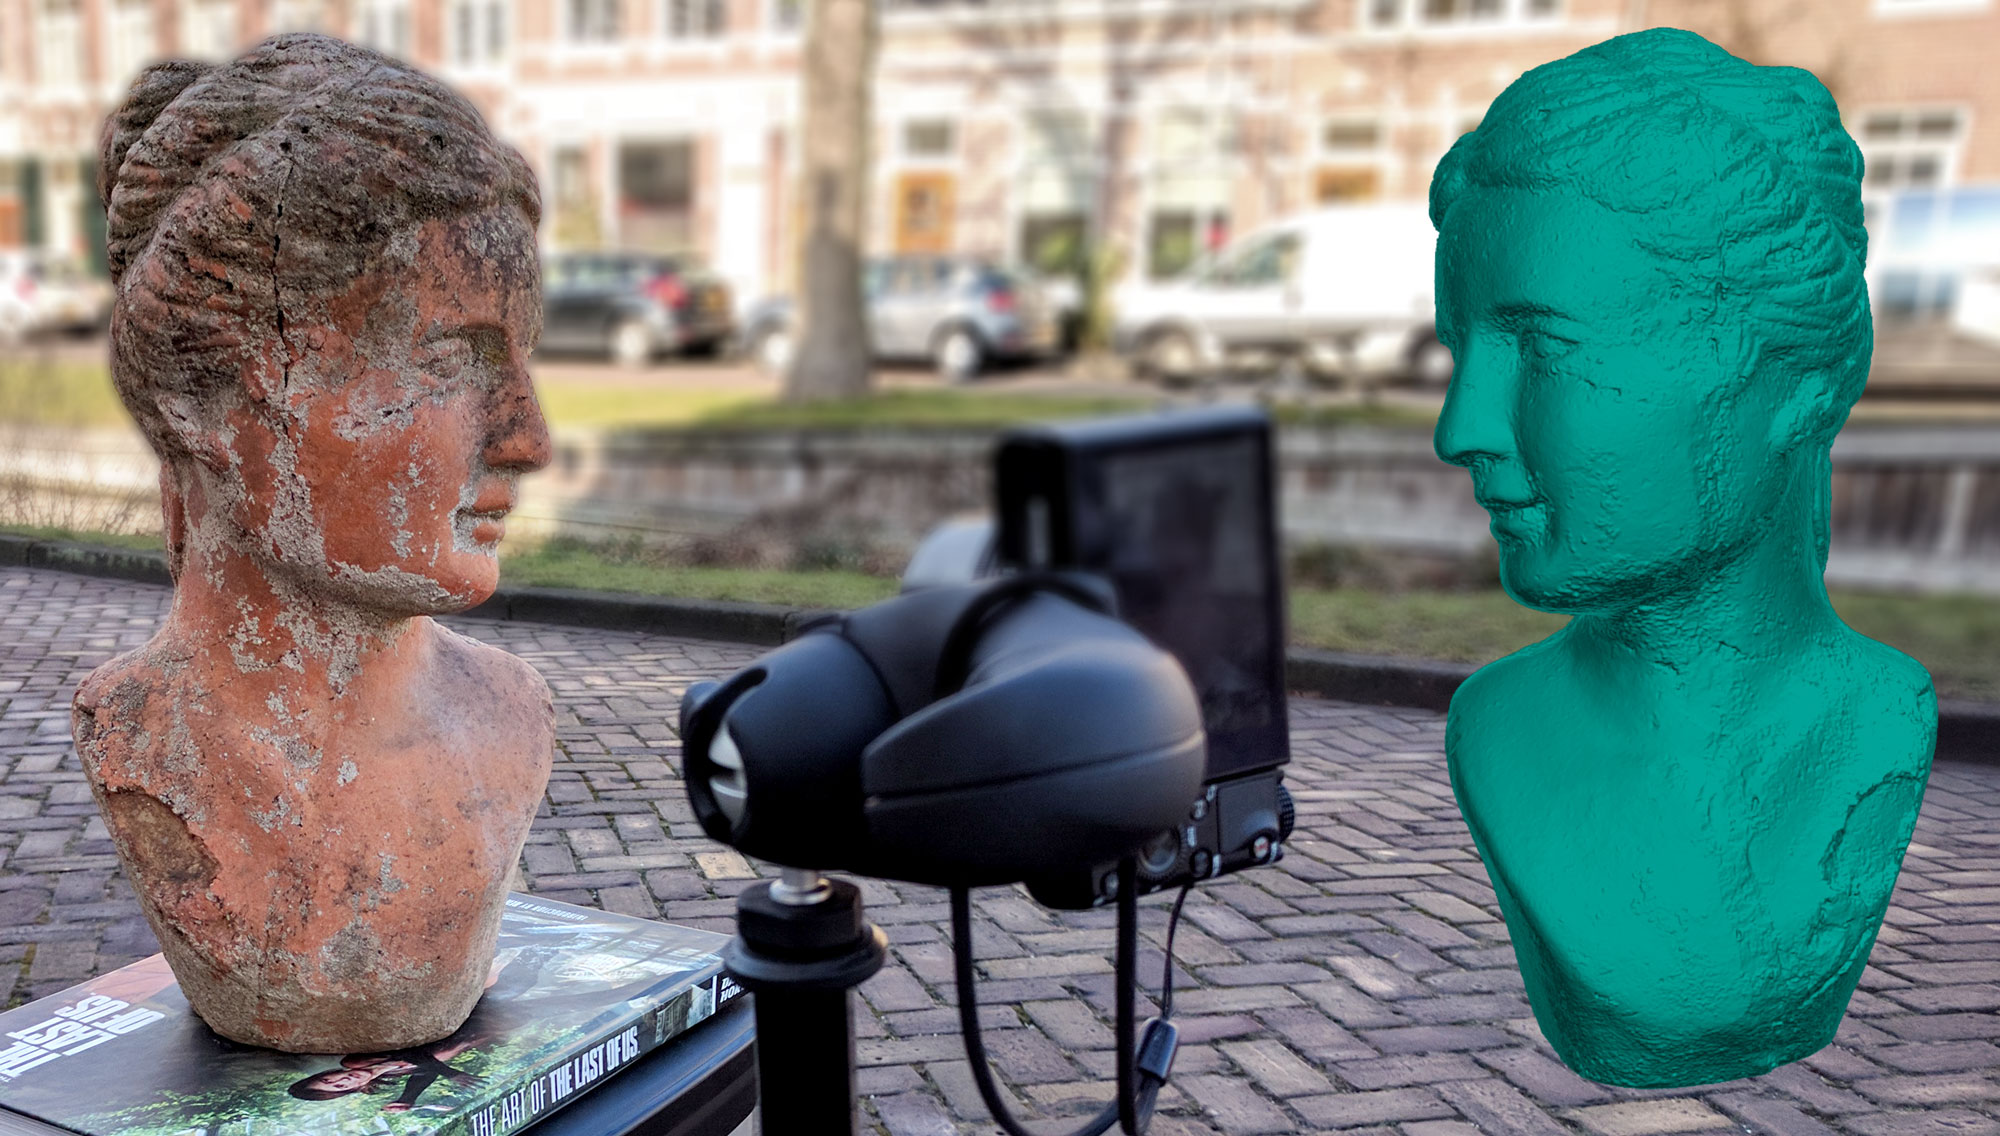
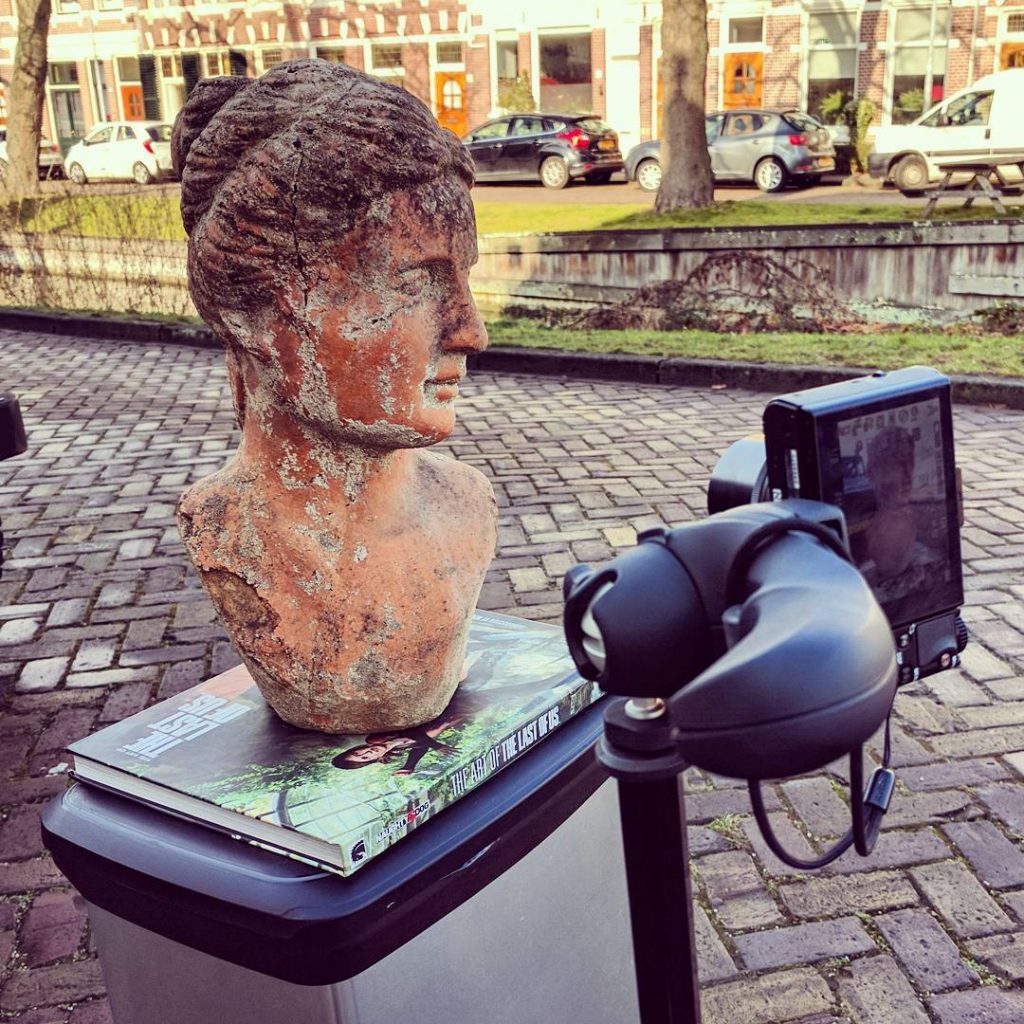
I’m using a Sony RX100 Mark II camera which has 20.2 megapixels, a minimum aperture of f/11 and a minimum ISO of 100. I like this camera for photogrammetry because it’s very compact which allows me to shoot from angles and through holes in objects that are hard or impossible with a full-size DSLR. The camera is also light enough to put on a long monopod and can be remote controlled with live preview with a smartphone app so I can take photos from up high—great for statues!
General limitations of 3D scanning and photogrammetry apply here. You can’t capture transparent and very glossy objects. Also objects with a very even surface can cause problems.
Processing
Installing ReMake is a breeze on both Windows and Mac. The Windows version offers a 15 day trial to try all Pro features, which I’m using for this review. An Autodesk account is required if you want to use Cloud Processing.
Autodesk has made a great effort on the user interface design for this product. Compared to other software — especially on Windows — it looks really polished and approachable. The manual is worth reading, but not at all required to jump in — it’s really user-friendly!
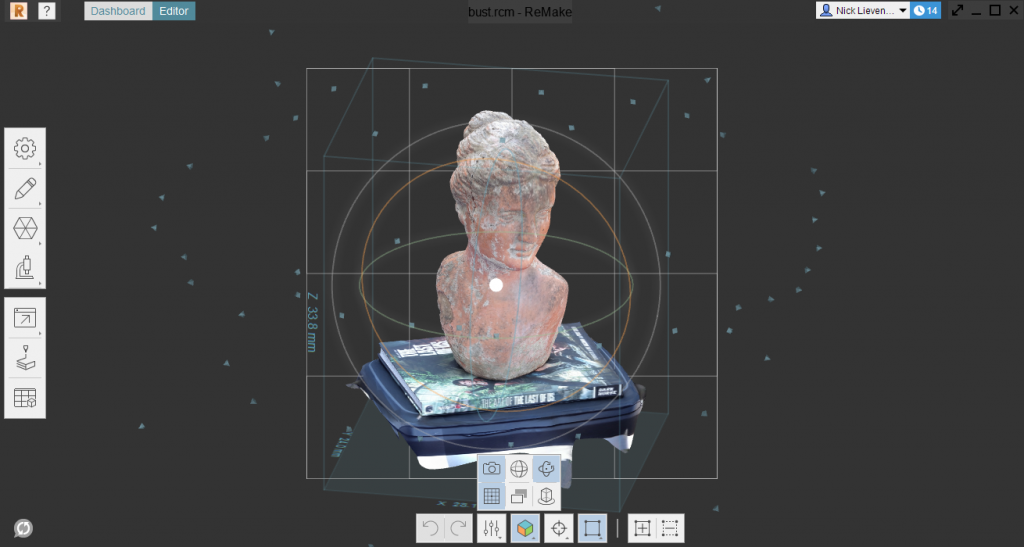
After opening you get an interface that’s divided into 3 rows: the first row is to start new projects, the second are local 3D files (it uses Autodesk’s .RCM 3D Reality Capture file format natively), and in the third row you can see the progress of cloud processing projects and download them when done.

Selecting the new project button first asks if you want use local or cloud processing (if on Windows) and let’s you select photos from either your local hard drive or Autodesk’s A360 Drive. This cloud storage is also used to save cloud-processed models. You get 5Gb for free, which will be enough for a few projects.
Autodesk has made a great effort on the user interface design for this product.
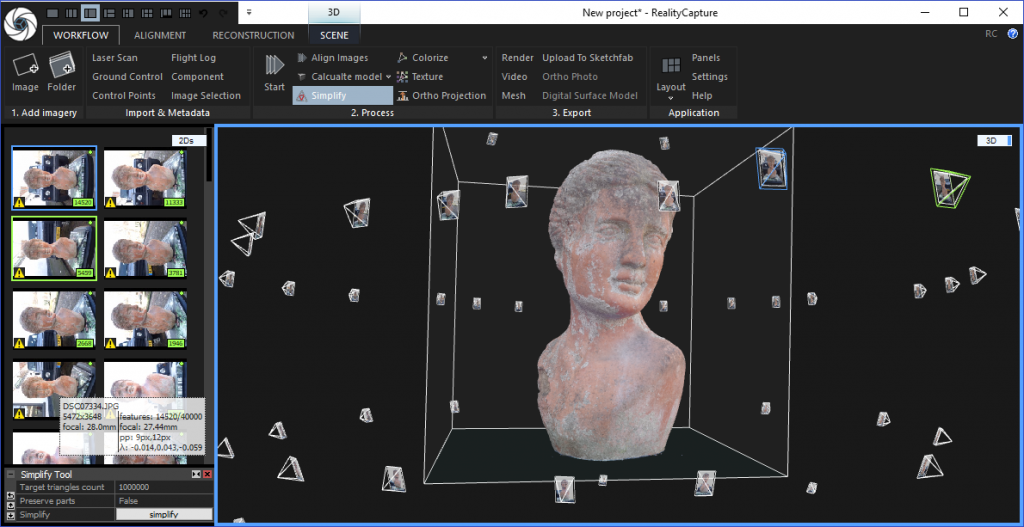
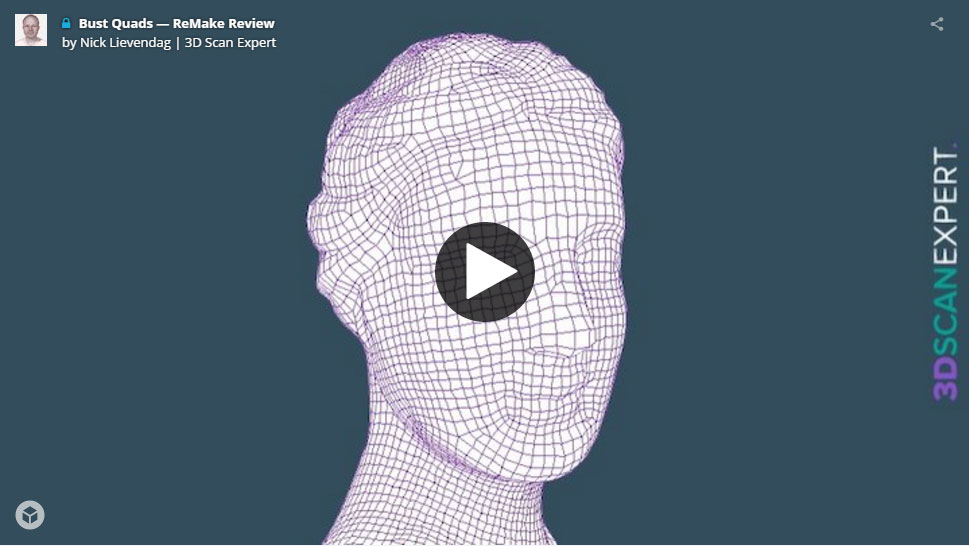
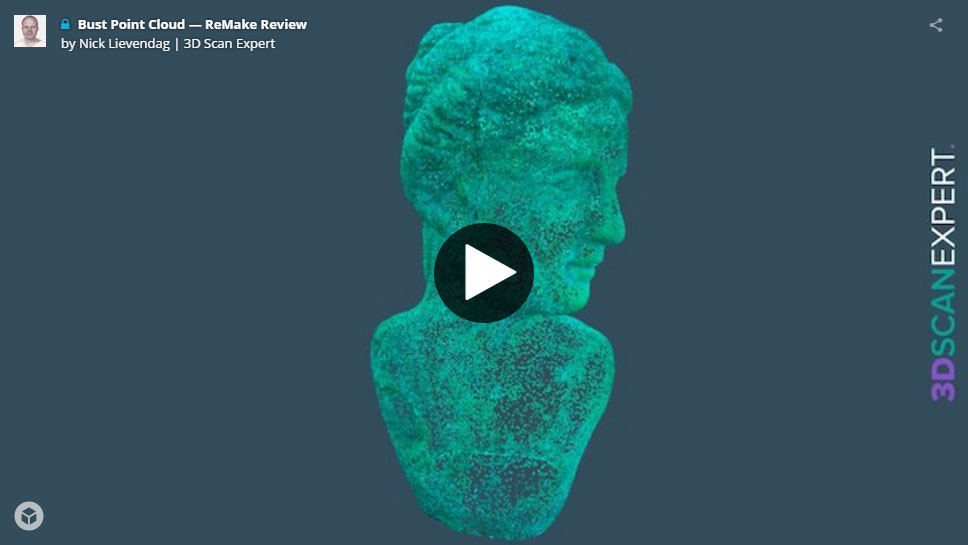
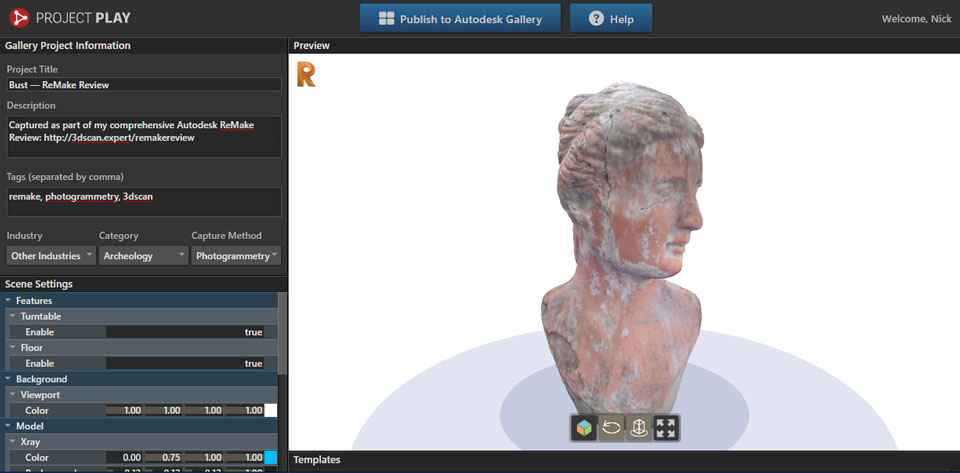
I’ll start with a locally processed project of the small bust statue you can see in one of the photos above. I shot that outside on a trash can with a book on top of it. I chose the book for increased tracking (the trash can’s lid is black) and because and to capture something of known size.
Quality Options
Next you’ll give your model a name and select if you want to use the Standard or Ultra quality. The need for Ultra really depends on your purpose. I usually do Standard first to see if it’s sufficient and if not I submit the photos again for Ultra quality.
As you can see above, Standard only gives you the Smart Crop and Smart Texture options.
Smart Crop removes everything that’s behind the camera. In most cases this gives you a clean model without any background geometry that’s not part of the object. I always have this checked for objects and never had any problems.
I had to do some digging to find out what Smart Texture is and I found the answer in a blog post by Autodesk’s Scott Sheppard:
“Smart Texture is a bit of a misleading term — it’s just a different way to calculate texture, but it’s not better or worse (as the word smart might imply) — it works better on some and worse on other captures. Again, if you don’t get good results with it, try turning it off and vice versa.”
In most cases I had good results with Smart Texture enabled, but I did have a few models where background imagery ended up in the object texture. Disabling Smart Texture solved that.
Within the Ultra setting you can also choose the Geometry Surface to be Smooth or Detailed and Resolution Coarse or Fine. Although they look like sliders, they’re actually switches, so there’s no gradual scale. I guess the choice depends on the surface of the actual object you’re working with. I’ve included examples with both settings further down this post.
It’s noteworthy that the finer settings within Ultra mode mentioned above are only available for local processing. I did some tests and the polycount and geometric details of Cloud processing with the Ultra setting are closer to the local Ultra/Smooth/Coarse setting. So the finest details can only be distilled locally. If you choose cloud processing, you do have the Smart Crop and Smart Texture options.
Apart from the Generate Texture checkbox, that’s all there is to set up. This is a big contrast with other photogrammetry software like AgiSoft PhotoScan (which I’ll review next) that let’s users enter all kinds of numeric parameters for the processing. With ReMake, Autodesk has clearly prioritized usability over control which makes this software very approachable for almost everyone. It all feels more like a creative tool than a technical one.
Below is a comparison between the quality settings. You can click the links under the image for interactive, unedited Sketchfab 3D versions with textures, but beware on mobile since the last two are over 100MB each.
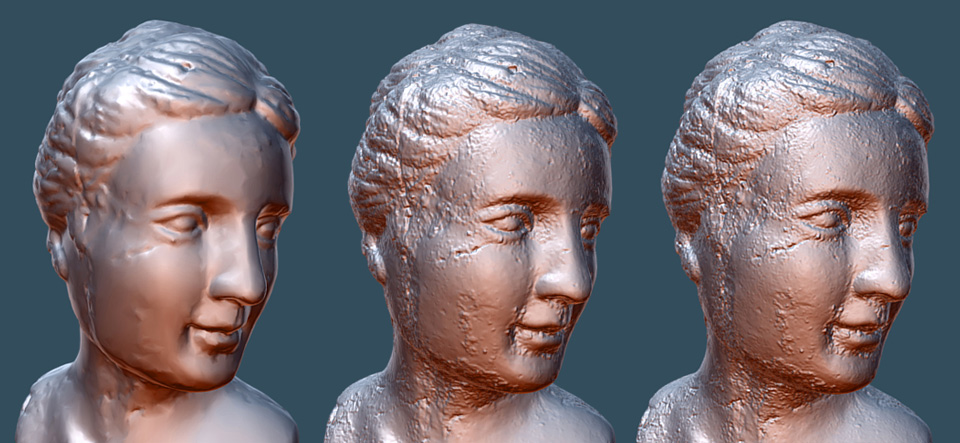
The difference between Standard and Ultra is obvious. Keep in mind that the Standard version’s polycount is still perfect for many purposes, especially those that use real time rendered 3D. I personally use Standard for large objects that are viewed from afar in reality and Ultra for small to medium objects. The settings within Ultra do make a difference, but you should really check the actual Sketchfab models and zoom in to notice that the Detailed/Fine has crisper surface details.
Autodesk has clearly prioritized usability over control which makes this software very approachable for almost everyone. It all feels more like a creative tool than a technical one.
If you open the Sketchfab versions, you can also check out the texture quality. It’s noteworthy that the Standard quality model came with a single 4K texture while the other two came with as much as five and seven 4K textures respectively. I’ve uploaded everything natively in the embeds above, but ReMake allows you to rebake textures to the resolution of your liking on export. More about that later.
Processing Time & Progress
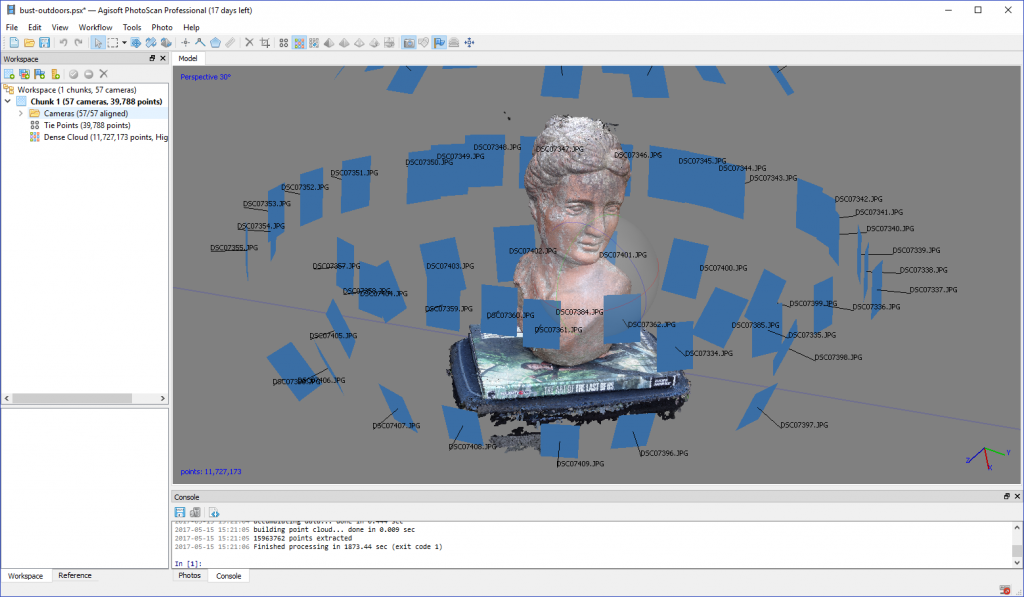
Even on my entry-level gaming system the local processing times where less than I expected. And my system was usable for light tasks while ReMake processed photos in the background. For the bust on the trash — for which I used 57 JPEGs straight from the camera — it took just under 30 minutes. Surprisingly, this is regardless of the quality settings. I’ll put the exact processing times next to the other results for reference later.
The progress indicator for local processing is nothing more than a spinning animation with a percentage indicator. That indicator works in random, large steps with no indication of the time that has passed or that is remaining. There’s also no visible log and ReMake can’t queue or batch projects locally. This means you have completely no idea when it will be done and can’t process multiple scans overnight. This is obviously inconvenient if you have to process multiple
Batching is possible with cloud processing. You can submit as much projects as your A360 Drive storage allows. I did this with 6 projects before going to sleep and they were all ready to download the next morning. That’s a huge workflow advantage!
ReMake can’t queue or batch projects locally. This means you have completely no idea when it will be done and can’t process multiple scans overnight.
It’s hard to compare the local processing times to those of the cloud, because after uploading the project is held in a queue before processing. There’s no indication of how long the queue is and it can vary throughout the day and week. I did a few cloud processing tests with this model and it took an average of [enter here] minutes including uploading, downloading and waiting in the queue. I have an internet connection with 300 Mbit/s download and 40 Mbit/s upload speed.
Viewing Results
If you have any experience with 3D software you might know that loading models with millions of polygons can be slow or impossible. Because ReMake is build from the ground up with large — as in multibillion polygon meshes — models in mind, it loads and handles large models swiftly. I haven’t gone beyond a few million polygons for this review, but those models even worked on my 2012 MacBook Pro.
As with everything in ReMake, the default viewing settings are as simple as possible. But you can choose all kinds of viewing modes from the menu in on the bottom. Below I turned on many features at the same time, like viewing the camera viewpoints, grid, sizing and the dark background that comes in handy for light-colored objects.
Correcting Errors
If you took good en enough photos you have a good chance that ReMake will generate a great results. But if it either gives an error during processing or produces an incorrect model, you’re basically out of luck.
Not knowing what went wrong or not being able to fix errors might be a red flag for professionals that rely on software like this for a living.
ReMake doesn’t have the manual stichting correction feature of Autodek’s other Photogrammetry solution, ReCap 360 (Review). That feature let’s you assist the pattern matching algorithms by selecting the same points in multiple photos. I’m not sure why that feature isn’t implemented in ReMake, but I guess it’s because of the software’s goal to make photogrammetry simple and user-friendly.
But not knowing what went wrong or not being able to fix errors might be a red flag for professionals that rely on software like this for a living. ReMake does generate an external log file, but there’s not a whole lot of useful info in there for finding out what went wrong.
That said, If you know what you’re doing when taking photos, the algorithms work fine. If it doesn’t, there’s a big chance you simply took inconsistent or to few photos. In all honesty I got zero failed models in my tests for this review. I had to deliberately load too few photos to see what the software would do. The algorithms also are surprisingly good at ignoring background noise. One of the large statues you see in a minute is located in a park where many people and even cars ware passing by in the far background. This didn’t impact the results at all.
Editing Tools
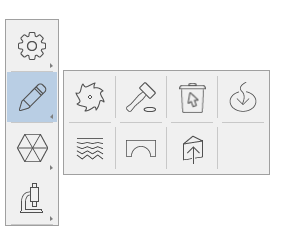
While the lack of control over the photogrammetry process is ReMake’s weak point, it shines when it comes to editing and optimizing complex meshes. All the tools you need are in the menu on the left and from top to bottom they’re in the order of the workflow you should follow. Each tool has a clear icon and settings are, again, kept to a minimum to keep the workflow easy and efficient.
Here are some of the tools to give you an idea:
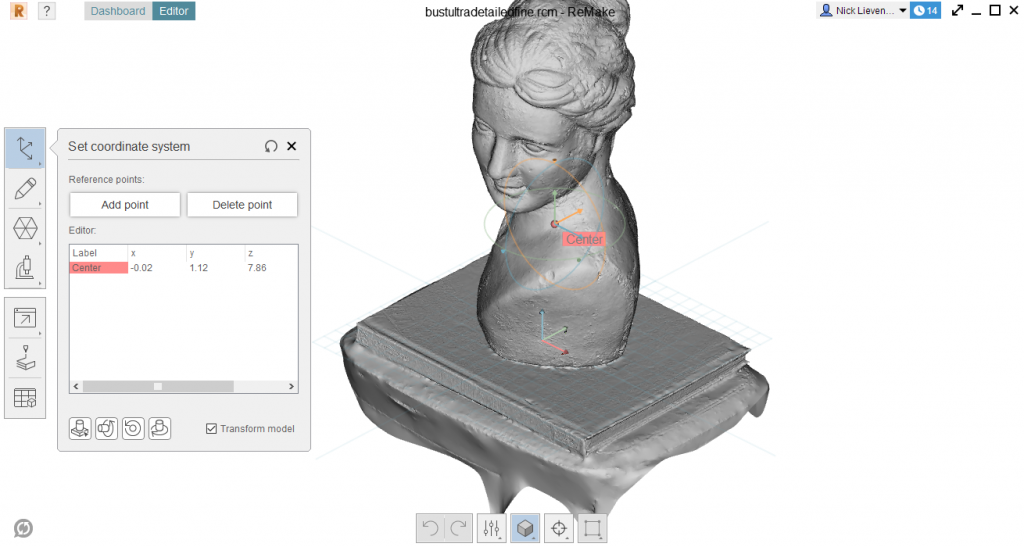
The first icon-drawer contains tools for setting the model upright, which is the very first thing you should do. What’s also handy, is beging able to scale the model correctly. ReMake’s guess based on focal length is surprisingly close, but if size is important to you it’s nice to be able to select two points that are a know distance apart. This is why a book cover is great to use.

It’s also a good idea to position your object in relation to the floor grid using the Set coordinate system feature.
ReMake shines when it comes to editing and optimizing complex meshes
The second drawer has the editing tools.
The first one, the Slice tool let’s you cut away the floor surface that’s usually still partially visible with Smart Cropping on. It has the option to fill the created hole, making most — but not all, more about that in a sec — models watertight. A must for 3D printing.
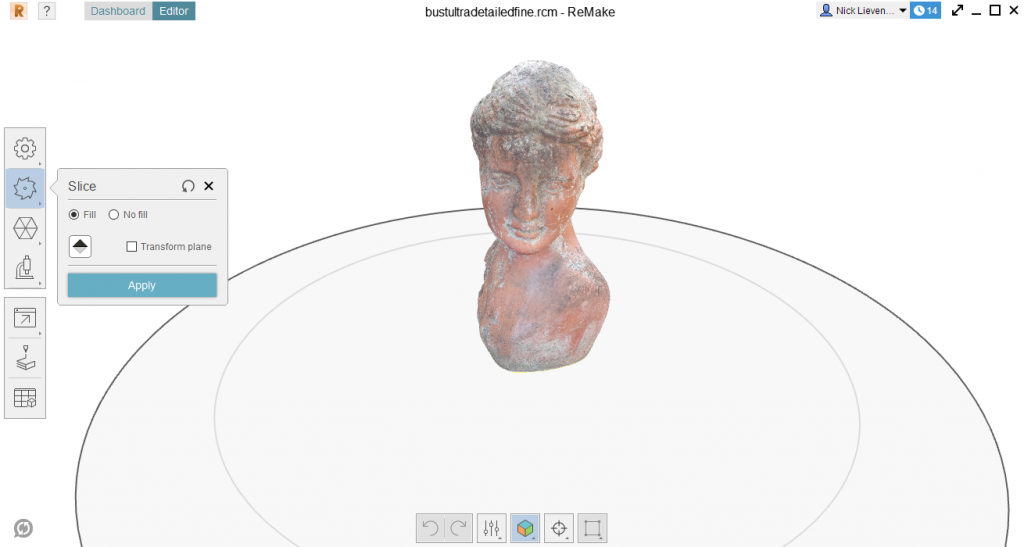
There are also features to (selectively) close holes and make bridges between selected polygons. This is handy for reconstructing holes in the mesh. And while it’s very basic, ReMake does also have a sculpt tool for retouching or smoothing geometry.

They actually give similar results to the Sculpt an Smooth brushes in Autodesk’s sculpting program Mudbox, so it’s nice for people that want to make simple adjustments and prefer a single-app workflow. Keep in mind that the topology of 3D scans is often not an ideal base for quality sculpting.
By the way, many of the tools in the menu on the left can also be applied to selections through a handy right-click pop-up at the cursor location.
The third drawer contains all tools related to mesh topology. Here you can selectively subdivide areas, which is handy for manually closed holes. But the main feature here is the decimation tool. It’s a simple slider that conveniently tells you the estimated target polycount of each decimation percentage.
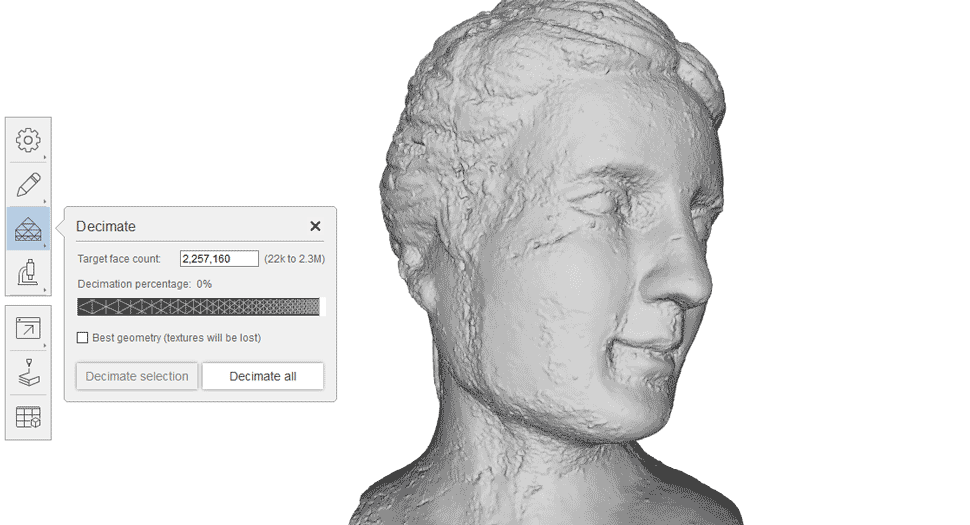
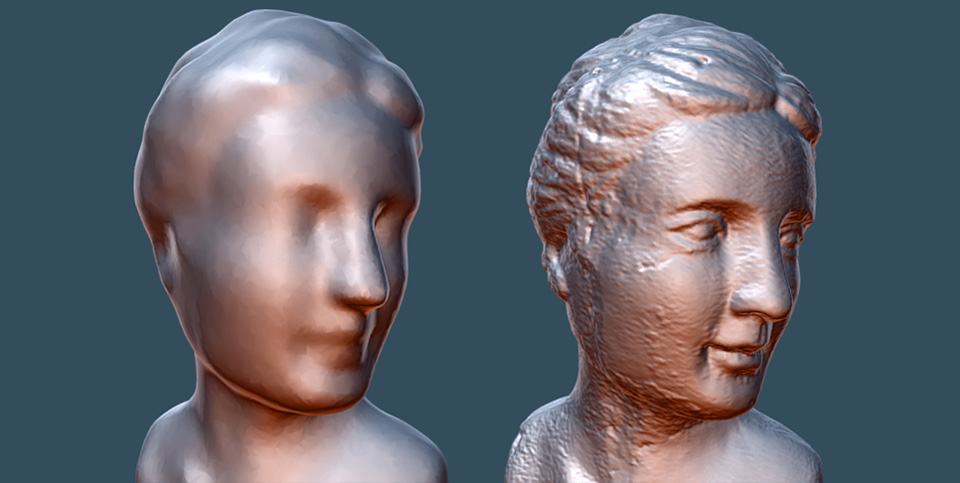
Decimation takes a while to process (the animation above is not real-time). But as you can see, I was able to reduce my 2.3M poly bust to about 500k without losing too much details. However, the results get crazy if you push the decimation to the limits. I tried to decimate the Ultra-quality model above to the 23k polycount of the Standard-quality model and this is what I got:
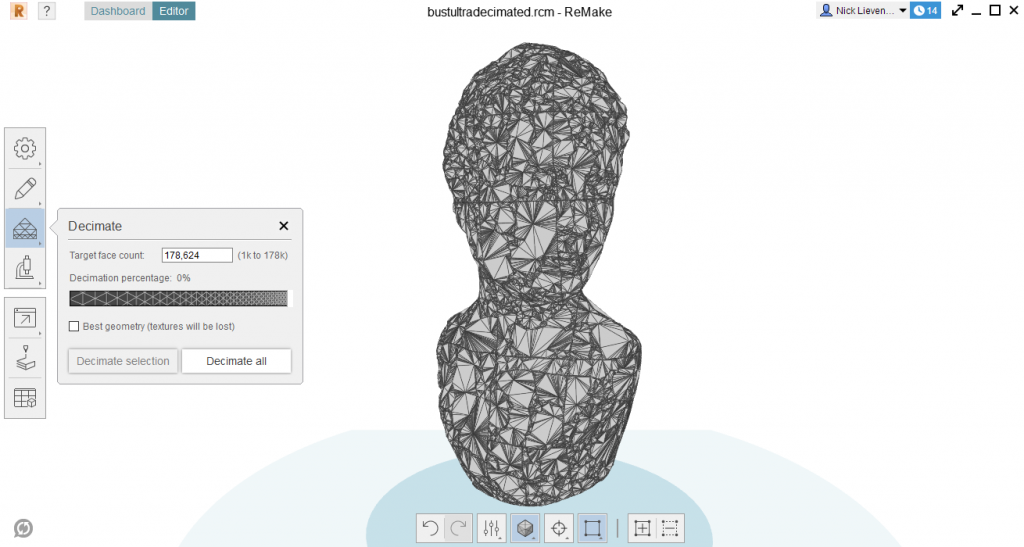
It still has 178k polys and looks totally weird. It must be said that the “Best geometry” checkbox does improve the geometry, but I need the textures. So, if you need low-poly models: just use the Standard quality — it’s free!
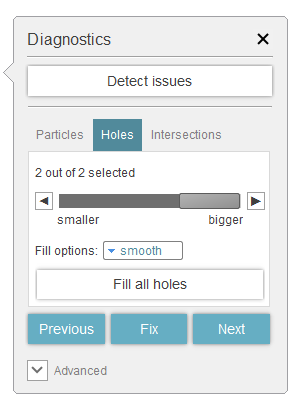
The fourth drawer has some analysis tools. The first icon will not only check and report if there are issues with your model, like holes and intersecting geometry, it can also fix them automatically. You even have some control of how that’s done and which holes are filled. Needless to say that running this tool is a must for 3D printing. But I think it’s good practice to do it for every purpose.
If you set the scale correctly in the first step, you can use the ruler to measure any distance on the model. Also handy is the comparison feature that let’s you compare two models and see the difference as a heat map. This is a great tool for cases where you’d scan the same object or location over time and see how the surface has degraded. It’s also ideal for quality assurance.
Exporting
ReMake offers a lot of export options. Firstly, there’s a way to make high-res still images from models.
Secondly, ReMake can generate videos. Either fly-throughs based on viewpoint keyframes with selectable intervalts, or turntable animations. Below I’ve combined a turntable animation of the textured and untextured bust model. Nice for non-realtime presentations.
— 3D Scan Expert (@3DScanExpert) February 26, 2017
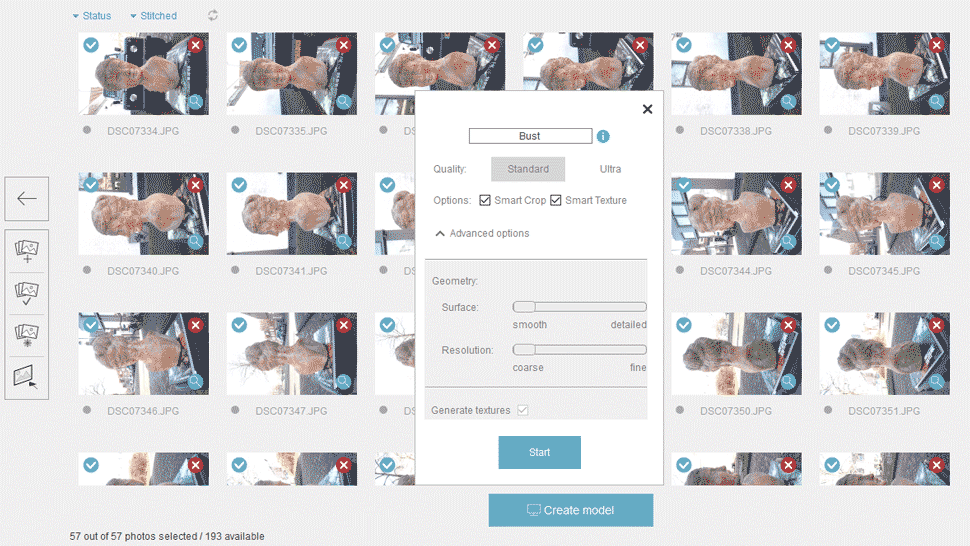
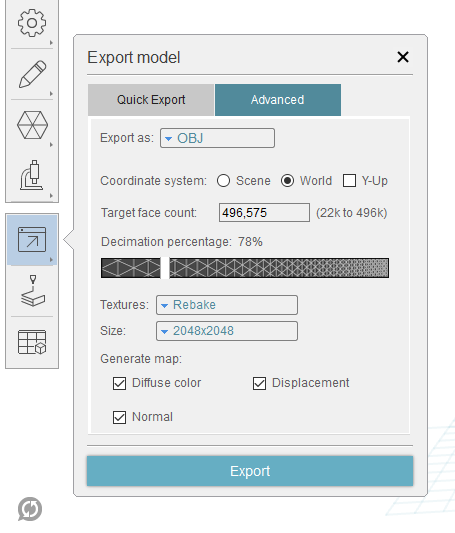
The main feature, of course, is exporting the 3D model. Here, ReMake offers a lot of functionality — at least, in the Pro version. The Free version only let’s you Quick Export models based on presets for other programs, but there are a lot to choose from. Of course Mudbox and other Autodesk apps are covered, but also many third party 3D modeling apps like Blender, and game engines like Unity and Unreal. Each preset has 3 quality settings that determine the polycount and texture size.
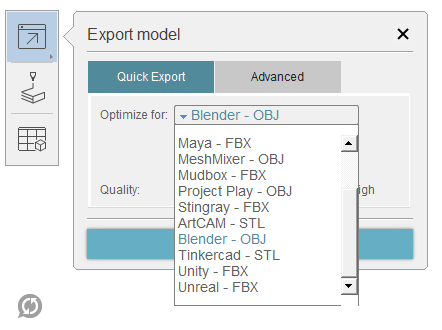
Pro users get the Advanced tab, which looks simple but has a lot of powers. You can choose the .STL, .PLY, .FBX and .OBJ formats.
Technical designers, digital sculptors and animators will also like the fact that .OBJ export can also be in Quads instead of Triangles. Unfortunately, you’ll lose the textures in that mode, but the topology is nice for a completely automatic procedure. It did leave a few triangle-shaped holes in my mesh, though.
Aside from polygonal meshes, you can also export the point cloud als .PTS. I converted that file to .ASC with the free CloudCompare tool to upload it to Sketchfab.
What’s also nice is that you can decimate the model and rebake textures on export. The system is smart enough to estimate the relation between polycount and texture resolution. So if you choose to rebake to a 2K texture, it will select a matching decimation percentage (which you can overrule).
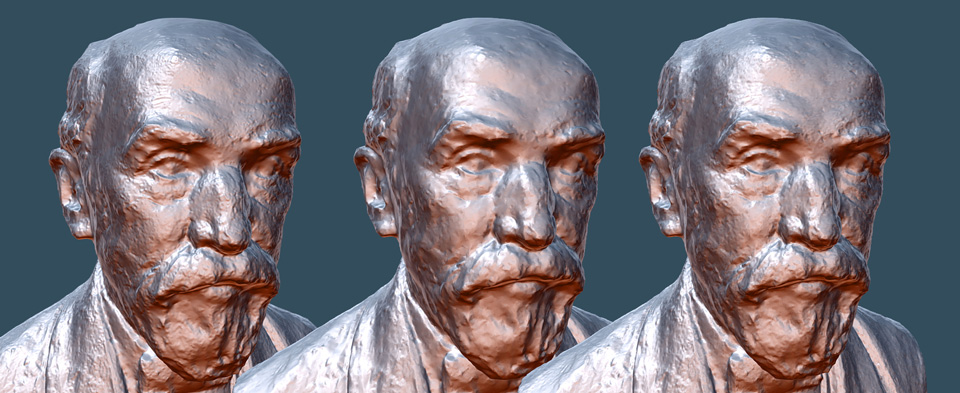
For people that are into real-time 3D graphics, like games or VR/AR applications it’s awesome that ReMake kan automatically generate Normal maps with details from the high res model that can be used to improve the details in the low res model without adding actual geometry. It can also generate a Displacement map, but for real-time 3D I guess most people will “fake” the details with a normal map. Below is an example of that. The original was generated locally with the Ultra/Detailed/Fine setting.
Online Sharing
The examples in this post where all exported as .OBJ and embedded through Sketchfab. Unfortunately, you can’t export directly to this platform from ReMake. However, you can publish your models directly to Autodesk ReMake Gallery for easy sharing. This works through Autodesk’s new Project Play online viewing experience and the models can also be embedded.
Unfortunately, large models are decimated before publishing on Autodek’s Gallery. This is not problem for most sharing purposes, but for my review I need to be able to show the unedited geometry and textures.
More Results
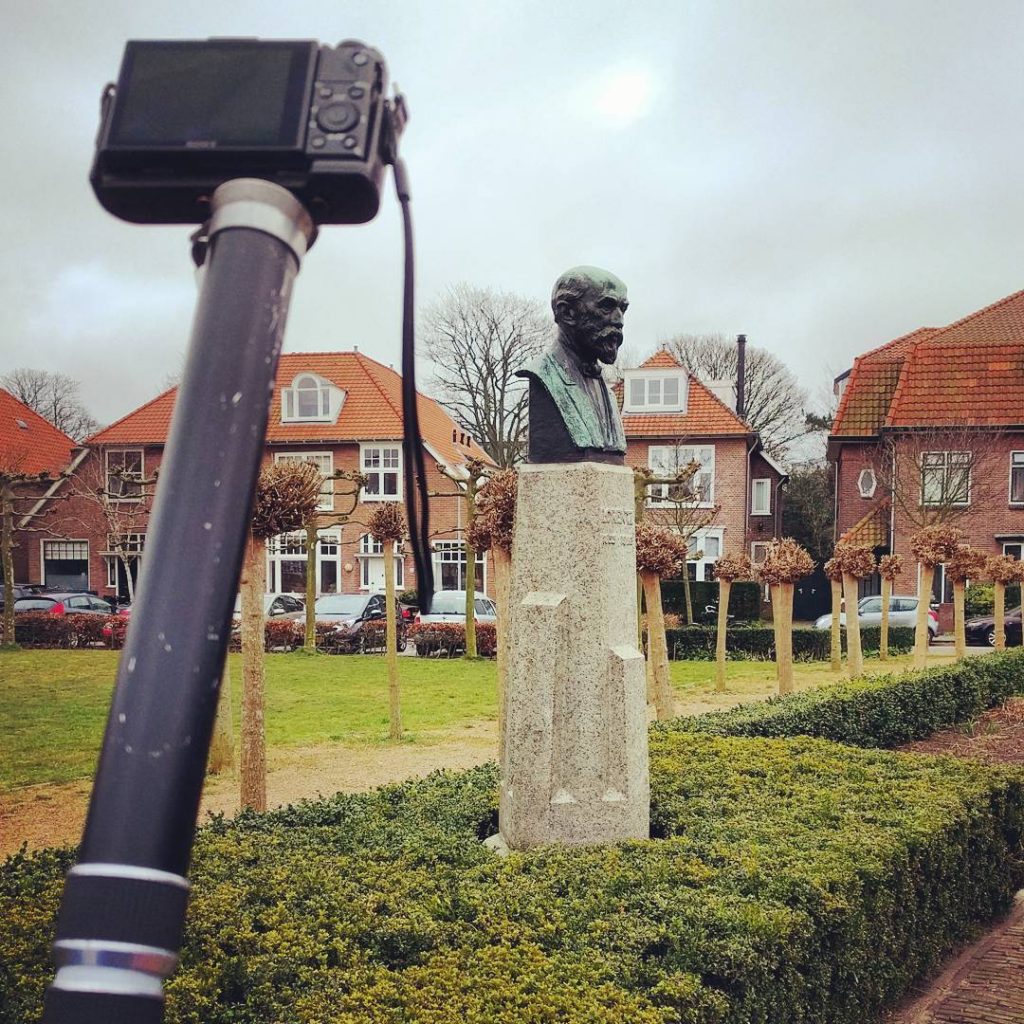
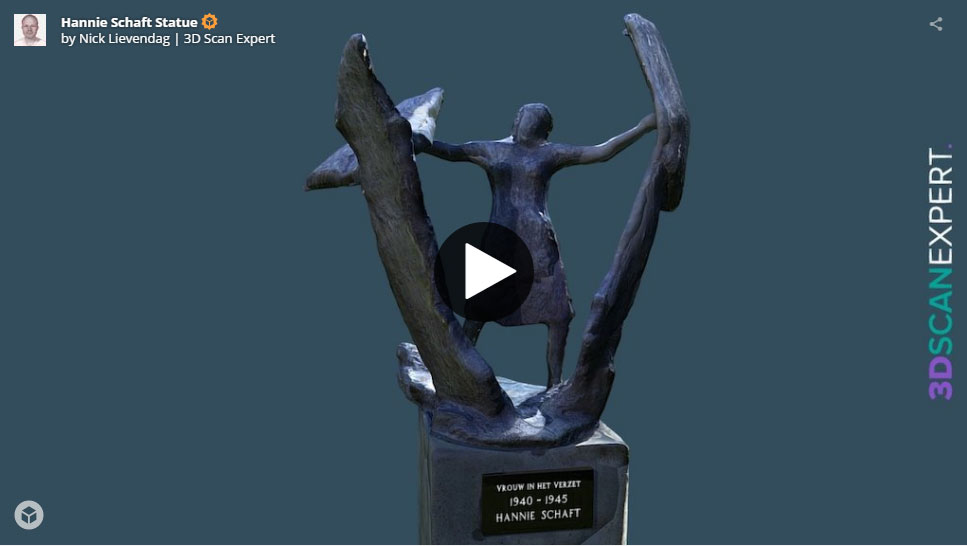
The largest object I’ve captured so far is a statue in my hometown Haarlem. I hacked together two monopods and used the WiFi remote control app of the Sony RX100M2 to do it. It was actually done in the summer of 2016, when ReMake was still Memento. It was processed in the cloud with the Standard quality setting. I did a few minor texture tweaks and made a separate object for the name plate which I re-textured from one of the high-res photos. It has been a Staff Pick on Sketchfab for a while.
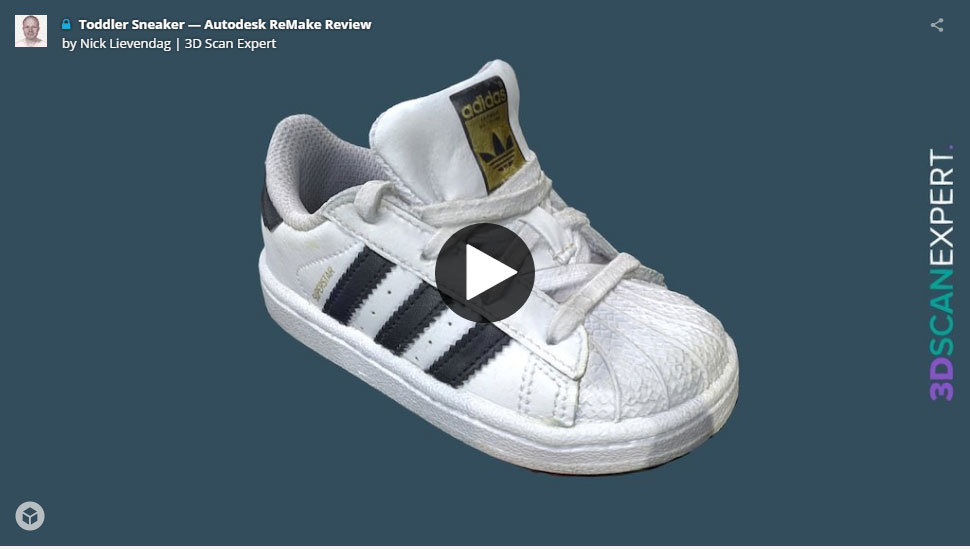
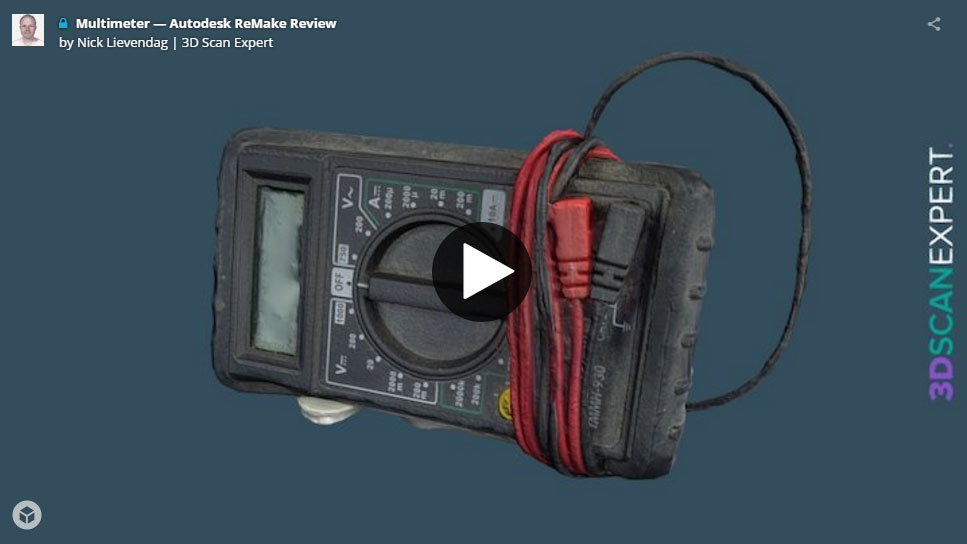
For the sake of comparison with other software — and 3D Scanners — I also captured a few objects I scanned before. I’ll be using these to create a 3D Scanning vs. Photogrammetry post which will be up soon. All processed locally with the Ultra/Detailed/Fine setting:
A Toddler Sneaker and a dusty Multimeter that I also scanned with structured light for my EinScan-S Review. Shot indoors with a small 3-point softbox setup:
And of course: Teddy! Which I have captured with almost every technology I’ve tested so far.
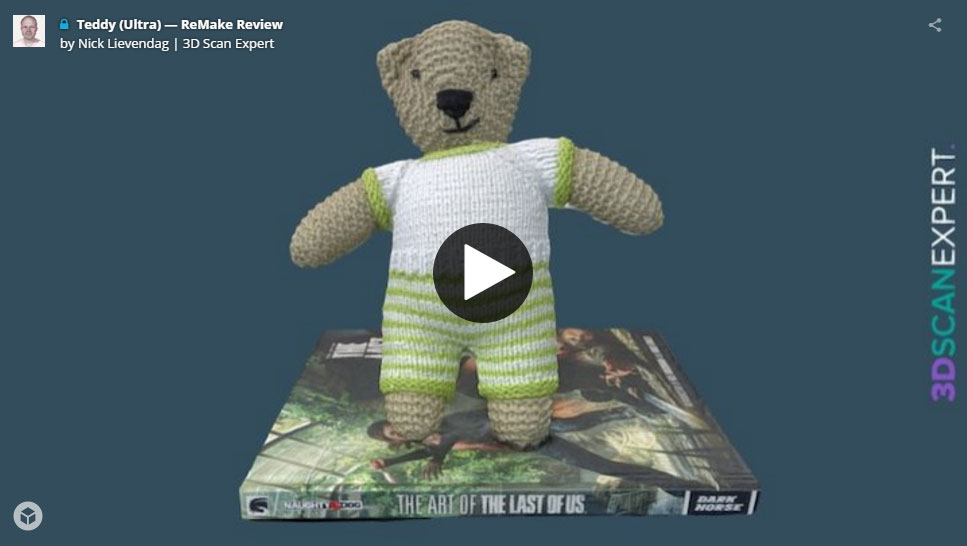
Let’s be clear: the unedited Ultra result is the best Teddy capture till date — both in terms of geometry and texture. It beats every Depth Sensor, Professional 3D scanner or Free Photogrammetry app I’ve tested so far. And I took the photos with a relatively affordable compact camera, indoors on a trash can with a cheap 3 point light setup. Local Processing took about 45 minutes. Altogether a capture like this can be done within the hour.
Capturing People
I did a few attempts of shooting people and it’s certainly possible. But it has been too stormy outside and my camera isn’t fast enough for handheld shooting indoors. To do this without a 70+ camera photogrammetry rig requires some practice. A camera with a fast lens and rapid burst mode will certainly help. Especially the face is hard to keep completely still and even the tiniest of movements hurts the algorithms.
I will update post later when I’ve done a few good single camera — or multi-camera — shoots of people.
Verdict
Autodesk ReMake has been build from the ground up for the purpose of capturing reality in 3D through photogrammetry. I really like the overal user experience. The user interface is designed nicely and clearly dictates the workflow from start to finish. Every aspect of ReMake shows that Autodesk’s goal with it is to keep things simple. They succeeded at that, although seasoned professionals will miss an Advanced Mode that offers more control.
The user interface is designed nicely and clearly dictates the workflow from start to finish.
Windows users that have a decent PC with dedicated (Nvidia) graphics card(s) can process files locally. This even works on an off-the-shelf modern gaming PC. I haven’t tested beyond 200 photos (which is enough for small to medium objects) but for that the processing times are not too extreme and my machine was still operable for light tasks. One big downside of local processing, though, is the lack of batch processing and a usable process indicator with remaining time estimate.
PC users with lighter systems or laptops and Mac users can still use ReMake because of the excellent cloud processing service. Using the cloud for Standard quality is free and is suitable for many purposes that require relatively low-poly geometry. Cloud processing at Ultra quality comes at an additional price-per-project and even then this quality isn’t as detailed as locally processed Ultra quality in detailed/fine mode.
Regardless of the processing mode and sub-settings, the Ultra quality gives very detailed results that surpass those of many professional handheld white light 3D scanners that cost the same as a small car – for a few bucks a month.
One big downside of local processing is the lack of batch processing and a usable process indicator with remaining time estimate.
ReMakes biggest weak point is the lack of control over the processing. There’s no way to tell why it has failed or to correct his. Even Autodesk’s web-based ReCap 360 offers a manual alignment wizard. Luckily, ReMake hardly ever fails if the photos are shot according to the guidelines.
The lack of control is compensated by the fact that ReMake works very fast with big meshes and offers a very complete set of retouching and editing tools. It even has a basic sculpting and smoothing tool, which I hope will also be complemented by a basic texture retouching (e.g. clone stamp) tool in the future.
It’s nice that Autodesk offers a free version but it’s good to realize that this offers only cloud processing with a maximum of 50 photos. The Pro version also offers unlimited local processing in Standard and Ultra quality with up to 250 photos. Currently you can even go beyond that (1000+) for free but this will cost extra in the future.
I recommend this product to anyone that’s want to get into photogrammetry. If you simply choose the monthly subscription, you have nothing to loose.
The local ultra processing with more images and advanced export feature with automatic decimation, texture rebaking and normal/displacement map generation are easily worth the subscription price of just $30 monthly or $300 annually in the US and €35 monthly or €350 annually in Europe. If you indeed plan to use this software professionally, it will pay for itself after one project.
I recommend this product to anyone that’s want to get into photogrammetry. If you simply choose the monthly subscription, you have nothing to loose. Just get a decent Windows PC so you can take advantage of the Ultra quality for free.


Thank You Nick for that fine write-up. I’ve been experimenting this week (March 2017) with Camera ReMake Fusion 360 to capture dimensions of automotive interiors using OBJ-Quad to T-Spline conversions insde of Fusion. Unfortunately I had only immediate access to my Nexus 6P cell phone camera, no tripod, and no attempt to keep a steady focal length, and photographed under lousy, inconsistent outdoor direct sunshine. Given all that, here was my observasions:
1) It’s clear that your recommendations on rigorous control of your photographing environment are on-spot. My poor camera setups plus large unchanging surfaces let to a lot of holes.
2) Doing inverse-3D scanning of interior spaces seems to seriously confuse the scaling tool. Setting an X length of about a meter, repeating that with the measuring tool gave me answers orders of magnatude larger. The interior volume calculations gave me ridiculous numbers with nearly 20 digits.
3) Flat plastic surfaces don’t scan well, period. Your multimeter example above demonstrates that even under near-ideal lighting & photo control. My crappy photos produced 100mm bumps & divots on the flat plastic rear deck of my CRV.
4) The produced mesh can lose landmarks needed inside Fusion for orientation and scaling. Taking 2D slices of the result gave me maybe 2-3% size variation from a smooth 2D spline that I was shooting for.
My Conclusions (YMMV):
1) For a 1-off project this is potentially an excellent free or near-free solution, provided you have time to follow all the photo guidelines you laid out.
2) This is not yet ready to be a solution for quick and accurate pointclouds for accurate 3D models, at least for interior measurement.
3) For now I’m reverting to semi-manual laser length measurements to get the data I need, with the help of stepper motors & rails.
Thanks again for your excellent write-up. It confirmed much of my speculation of why I wasn’t getting the accuracy I was trying to achieve.
Dan Doran
Boulder CO. USA
Thanks for sharing your observations as a comment, Dan. They will be helpful for other readers that are trying out Photogrammetry for similar purposes.
In general, for fine-measurement purposes, I’m not convinced that Photogrammetry is reliable enough. It’s good to measure shoe sizes, but I wouldn’t like to sit in an airplane that used it for QA 🙂
Nick Your web is amazing, we are starting to make some scans and 3d Prints for hobby and you are a truly master of it.
A have a question of Remake:
Currently I have a 16 Gb / Nvidia GTX 1060 laptop and I would like to use remake locally. Do you think is it important to upgrade the RAM to 32 Gb at least? Now it is very expensive but if you think it is important I will doit.
Allways Local remake gives me the same message: “Local reconstruction failed”.
Any other recomendation for local reconstructions? I have tried online standard reconstructions with good results.
Thanks.
Unfortunately ReMake doesn’t give very useful error messages.
I’m not sure if it’s memory related but you could check if your system runs out of memory by pressing CTRL ALT DEL, choosing Task Manager and then the Performance tab.
It could also be that the GTX 1060 doesn’t have enough VRAM. The 1070 I tested on has 8GB.
I have to improve the quality of my pictures, I will test it with the task manager open. I think GTX 1060 is 6GB RAM so I think it is enough. I will try again with a very good illumination but I am worry because online it works but offline does not.
Could you share a good gallery of images to test Remake process in my laptop and check if it is picture quality or hardware problem?. My email is bernamorillo@gmail.com
Thanks Nick
I have to improve the quality of my pictures, I will test it with the task manager open. I think GTX 1060 is 6GB RAM so I think it is enough. I will try again with a very good illumination but I am worry because online it works but offline does not.
Thanks Nick
Could you share a good gallery of images to test the laptop with a tested pictures. My email is bernamorillo@gmail.com
Thanks
I solved my problem, the problem was that:
You must ensure you are using NVIDIA graphics pushing right click in Remake Logo and selecting NVIDIA graphics controller.
My laptop is GTX 1060 (6GB VRAM) and 16 GB RAM. REMAKE works fine with less than 32 GB RAM with small models.
With this process always works fine.
The time depends of model complexity and processor because during the process the processor is 99% almost all the time
Hi, we recently took 36 megapixel images of an industrial indoor room and the 3d model produced was extremely patchy. We think it might be the reflection and shine of the surfaces of the largely metal objects in the room coupled with the strong sunlight streaming through the skylights. I wonder if I could edit the images in Adobe Photoshop in a few simple steps to produce a better quality model? There are over a 100 images so simple steps instead of repainting every object in detail is what I am looking for.
Will this product ever be reintroduced for Os10. I have a Mac and would love to use a system like this on it. Do you know of any alternatives?
Recap Pro cloud computing only option effects projected project time, cost, and time-on-task waiting on your model to complete is killing this software. They need to go back to a local processing solution. I would gladly pay a yearly software subscription. The “Ultra” feature should not cost the user as well. That feature should be limited to the local station hardware. AutoDesk is losing customers because of their greed. Also, cloud computing is not an option for those in the industry that have to abid by a NDA. Very disappointed with AutoDesk.
Never thought about NDA-sensitive projects but that’s indeed a problem with cloud computing.
[…] Download ImageMore @ 3dscanexpert.com […]
[…] Download ImageMore @ 3dscanexpert.com […]
[…] Download ImageMore @ 3dscanexpert.com […]