
The $89 Bevel is Matter and Form’s second product after their foldable desktop 3D Scanner from 2014. The Bevel promises to “turns your smartphone into a 3D Camera”. It was crowdfunded through Kickstarter in the summer of 2015. It was estimated to ship to backers in January 2016 but actually shipped in April 2017.
In on the original Kickstarter page, the manufacturer teases with this example:
This excited a lot of readers of this website. And judging the amount of readers of my 2016 preview post about 3 Affordable Smartphone 3D Scanners it still does. In that post I also wrote about the eora3D which is also a laser-based smartphone scanner that will probably come out this summer but is a fixed desktop (object) scanner while the Bevel is meant to be used hand-held.
Does the Bevel deliver on its promise?
The question of course is: does the Bevel deliver on its promise? I reached out to a reader of my blog that happens to live nearby and was a backer of the product on Kickstarter. He kindly lend me his Bevel for a few weeks so I could play with it. Thanks Victor!
What’s in the Box?
At $89 the Bevel is probably the most affordable 3D scanner in the world. It comes in a nicely designed box that obviously targeted at consumers.

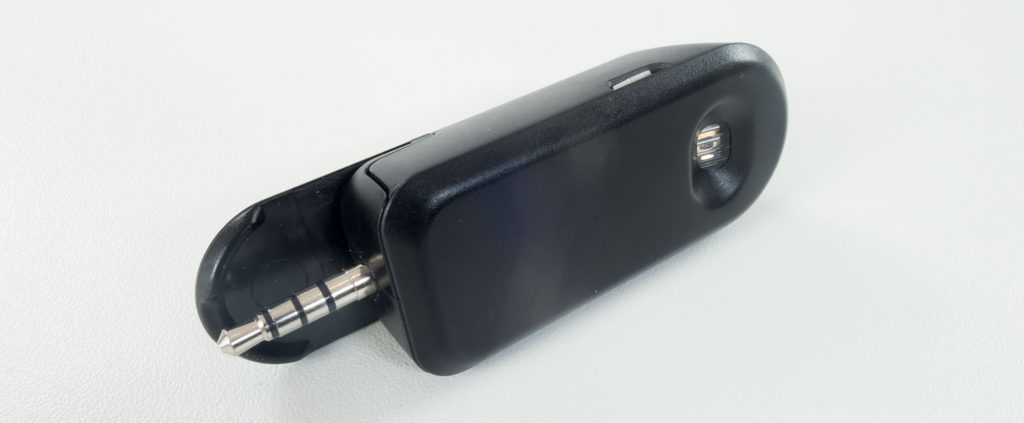
The hanger on the top of the box shows that Matter and Form hopes the Bevel will be available in retail stores. Inside the box you’ll find the device itself — which is also available in white — two extra clips for smartphones of various thicknesses, a keyring hanger that slides over the mini jack, a USB charging cable (it has its own batter) and a calibration board.
Even though it’s all made out of plastic, everything is well designed and feels durable.
Even though it’s all made out of plastic, everything is well designed and feels durable. The battery lasts long enough to capture throughout the day, maybe even longer.
The Jack Problem
 The Bevel connects to Android smartphones or iPhones through the headphone port. That idea probably sounded ingenious in 2015 — but then Apple decided to ditch that port on the iPhone 7 onwards (while it’s listed as compatible). According to a Kickstarter update from November 2016 the manufacturer has designed an Lightning port adapter but this is still not available for purchase.
A Lightning adapter makes the whole contraption unsightly and unpractical.
You can download the CAD design to 3D print one yourself but in my opinion such a life hack doesn’t fit a consumer-focused product like this — it should have been inside of the box, period. But even if it was, a Lightning adapter makes the whole contraption unsightly and unpractical.

There’s also no solution annouched for Android phones, like the Lenovo Moto Z and HTC U, that have no headphone jack either (just USB-C). It’s unclear if this is a trend that other manufacturers will follow but it does impact the future-proofness of the Bevel. It does have a micro-USB port on the side but that’s just for charging.
How does the Bevel work?
Actually, only thing the mini-jack connector really does is turn the laser on and off and gives global feedback about the battery level (like low, medium, high). So the Bevel is actually a passive device — it’s basically just a laser pointer. Other than infrared-based depth sensors like the Structure Sensor and (current implementations) of Google Tango which have both a projector and a dedicated infrared camera that captures the patterns, the Bevel only has a projector. This projects a static red laser line which is picked up by the smartphone’s regular RGB camera, which is also used to capture textures.
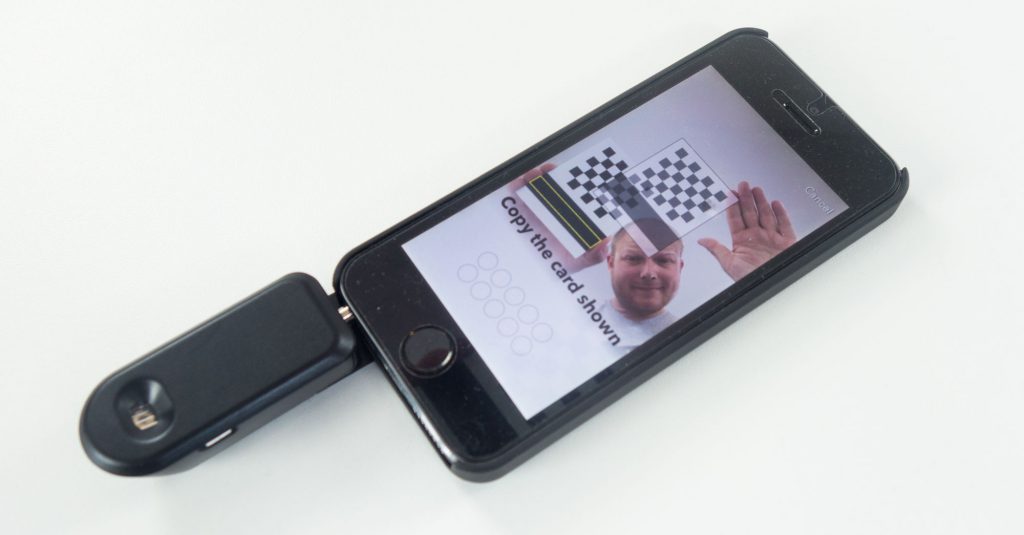
Because the location of the camera is different on every smartphone, you’ll have to calibrate Bevel before use. This has to be done for the back and front-facing camera’s separately but only once for each phone you want to use it with. The app, available for Android and iOS (I tested with a Nexus 5X and an iPhone 5S) guides this through a well-designed on-boarding procedure. Calibration is kind of a game of matching the on-screen calibration board illustration with the physical one multiple times.
After calibration you’re ready to scan. It’s clear that Matter and Form is marketing the Bevel as a 3D selfie-taking device first. The back of the box shows the potential:
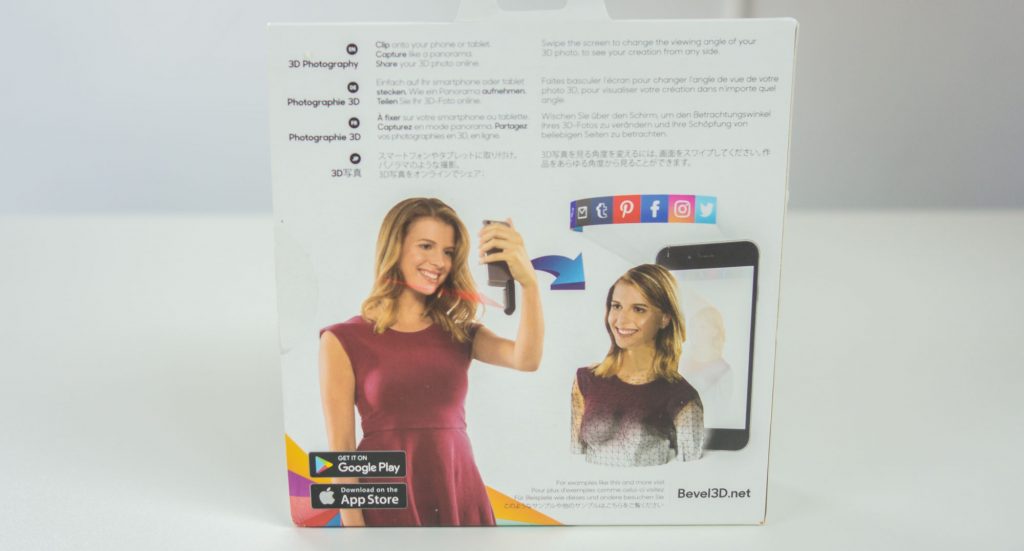
Looks promising and the lady seems very happy with it, so let’s try it out!
“Lasers”

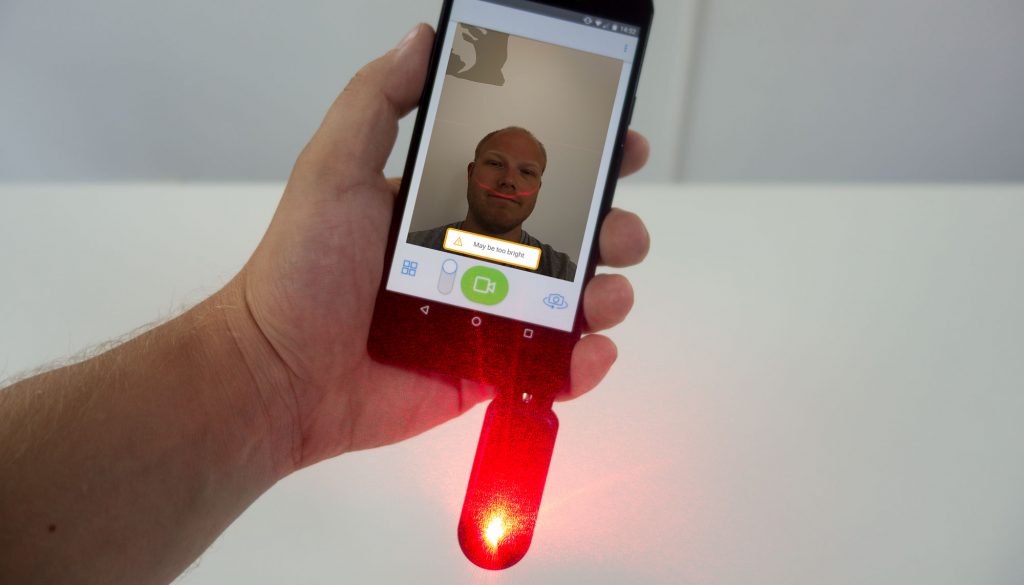
While testing the Bevel I noticed that it almost always says the scene is too bright. This is because the camera needs to be able to clearly see the red laser line on your face to capture depth information and that’s simply not possible when there’s too much other light. The downside of this that while the laser’s visibility improves in low-light conditions, the quality of the image decreases. Front-facing cameras especially have a hard time in low light conditions, adding noise and simply resulting in a darker texture (which the software can’t correct, more about that in a bit).
[The Bevel] almost always says the scene is too bright.
Scanning with a single, visible laser line also has other downsides. The biggest one is that you have to manually move it across the subject slowly, so it takes a few seconds to do. And even though Bevel uses an eye-safe Class 1 laser it’s still not comfortable when it passes your eyes. The manufacurter advices agains staring into the laser just in case.
So for a product touted as 3D photography, there are quite some downsides to good old 2D photography.
Workflow & Results
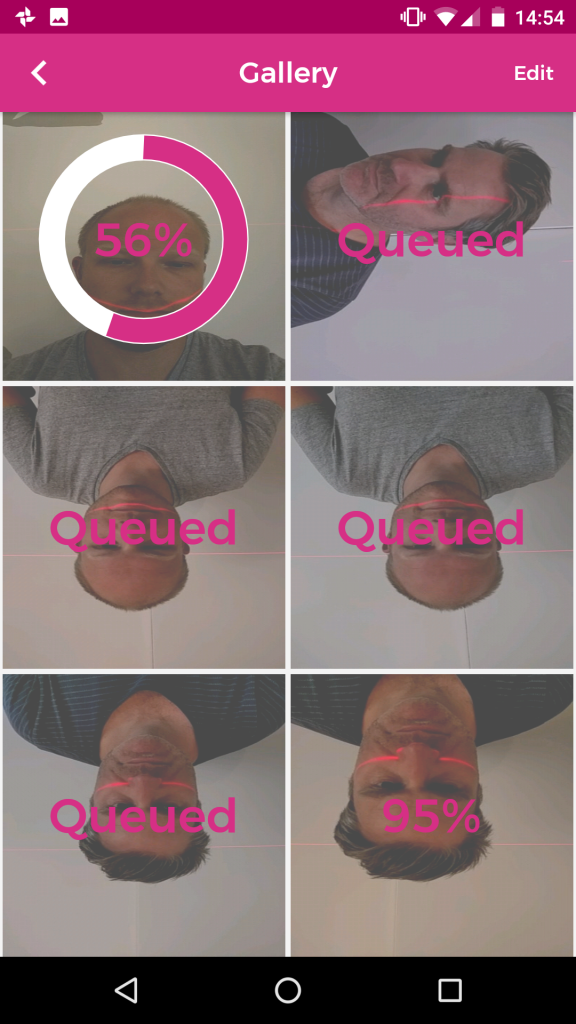
After scanning, the Bevel app has to process all raw data into a 3D model. It does all this locally on the smartphone. This has the advantage of being able to work offline and not using any data for transferring the data to a cloud-processing service. However, the downside is that processing takes a long time. On my Nexus 5X it took about 15 minutes and on the iPhone 5S a bit shorter to generate a 3D model. But during that time it uses significant resources which drains the battery. The Android app also sometimes processes multiple scans at the same time, which doesn’t seem efficient.
[column lg=”6″ md=”12″ sm=”12″ xs=”12″ ]
[column lg=”6″ md=”12″ sm=”12″ xs=”12″ ]
The problem is that you’ll only know if the results is satisfying after processing — and the results are really hit-and-miss. For this post I used the best results I could make but I assure you that for every good result I made at least 2 that where completely useless — or terrifying.
It took about 15 minutes to generate a 3D model.
Because you can only move the laser over your face from the top downwards it’s really only a face scan. If you’re happy with the result all you do in the app is upload it to the dedicated BevelPix service. This means that you cannot export the 3D file straight from the app or generate a GIF to quickly share on social media. Which is ironic, since the heavy processing is done on the phone.
Unfortunately BevelPix is the only export option. Sure, I can understand the benefits of an proprietary service but for such a nice device I think it should have been nice if it could also export directly to Sketchfab, which has become the norm in 3D sharing online.
Luckily, BevelPix does offer some useful options. You can share your 3D model as a public or private link (they’re private by default), download the 3D file as .OBJ, .DEA, .PLY or .STL, generate a rotating GIF animation or copy an embed code to integrate the 3D model into your website. I did the latter with the selfie I took with my Nexus 5X in the office, away from windows or anything bright (it still said it was too bright, though), close to a wall:
As you can see the result is very dark even though it was a brighter in the preview while scanning and I locked the exposure, which you can — and should — do by tapping and holding an area of the screen before scanning. You can then drag up and down set the exposure manually.
Also, the software put some kind of bend plane behind me filled with what looks like random bits of texture from myself. I’m not sure what the purpose of that background is and I think it makes the half-baked result look even worse. Adding to this are two flying pieces of actual background that the software doesn’t seem to filter out.
If I only I could do basic geometry editing, background removal and color-correction in the app.
If you click the eye-icon in the top left corder of the embed above, you can set the quality to Original and the Rendering to Normals to see the captured geometry. That’s actually a very recognizable profile of my face.
If I only I could do basic geometry editing, background removal and color-correction in the app (like the Sense for RealSense PC app (Review) does in a very user-friendly way) it would make a big difference. Then it could have looked like the result below which I made by manually editing the .OBJ:
Still not mind-blowing, but a lot more usable if you ask me. So I did another try on the iPhone 5S. And to my surprise this version of the app let’s you put a custom photo from your device as the background. It can also remove the background entirely, which I prefer.
Update June 22, 2015: The updated Android version of the app (0.5.90), released today, adds this functionality as well.
[column lg=”6″ md=”12″ sm=”12″ xs=”12″ ]
[column lg=”6″ md=”12″ sm=”12″ xs=”12″ ]
Here’s the unedited 3D version, embedded straight from BevelPix:
As you can see that the default iPhone result is a lot better in terms of texture quality. Although I’m not quite sure what happened to my nose. And again, there’s also some stray geometry flying around that shouldn’t have been to hard to filter out automatically.
So for 3D selfies, the Bevel kind of works. However, the purpose of this is totally unclear to me. I completely admit that I don’t really get the selfie-generation in general but I can’t imagine what the results from the Bevel would add to that lifestyle. The results aren’t remotely close to what’s promised on the box — you don’t even get ears! But I’m just showing results here, it’s up to you if you think it’s totally awesome.
For 3D selfies, the Bevel kind of works.
After the selfies, I flipped the Bevel and tried to scan things other than myself. Naturally starting with my business partner and loyal test subject Patrick. He found the laser a lot less disturbing than the flickering white lights on the EinScan-Pro (Review) and Artec Eva (Review). Not bad since the latter costs 140 times as much as the Bevel, but there are a few differences here and there. Again, the original capture contained parts of the background and was too dark from my Android phone so here’s the edited version followed by an untextured version:
The texture isn’t very sharp, the mapping is slightly off and the laser line is visible in the middle (the other scans have this issue too if you look closely) but Patrick is recognizable in both versions. The geometry has a lot of noise, probably cause by the noise of the camera in low light, but does contain details that I haven’t seen on results from infrared depth sensors.
For comparison, below is scan of Patrick made with the Structure Sensor (Review) and itSeez3D (Review), which you can also see without textures by switching the embed’s Render mode to MatCap, which is a less detailed — bot also a lot less noisy:
The biggest difference here is that this result is a full 360° 3D scan which you can view from all sides while that from the Bevel is just a face. I naturally wanted to make a 360° (or even more than a single-perspective) capture with the Bevel by holding the phone horizontally like on some of the early pictures on the original Kickstarter.
But that doesn’t really work. I was able to scan Patrick about 120° from ear to ear. After that the capturing is stopped automatically. On both devices I had about 4-5 seconds of scanning time before it stopped. I’m not sure if that’s caused by a timer or because of memory limitations (or maybe even Class 1 laser safety guidelines) but this is all I could get out of the Bevel as far as 360° scanning goes:
If you put the result (which is from the iPhone 5S) in Normals viewing mode you can see that some of the geometry of Patrick’s ears is indeed captured, but the texture mapping failed completely on the sides.
I even tried turning the Bevel into an automated object scanner using the Foldio360 Smart Turntable (Review) and a Tripod with Smartphone Mount.
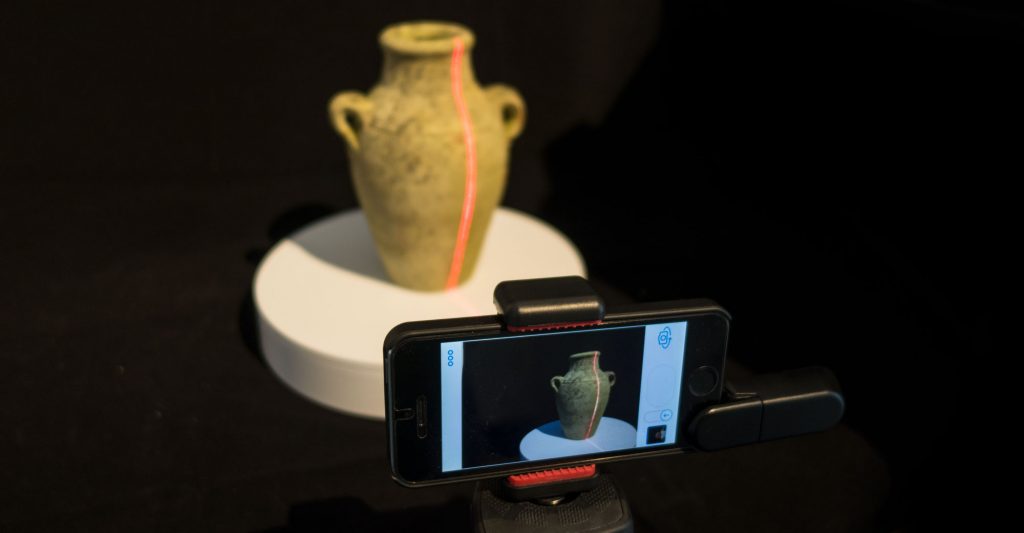
While the picture above looks awesomely promising, the app only scanned for a few seconds and couldn’t even compute a result from the data. It’s clearly not designed to be used this way.
Judging this Instagram post, the Matter and Form team is working on 360° scanning and I really hope they can get it to work. For this review, I gave up the 360° mission and instead tried to capture a few objects with the intended vertical motion.
First I tried scanning like this…
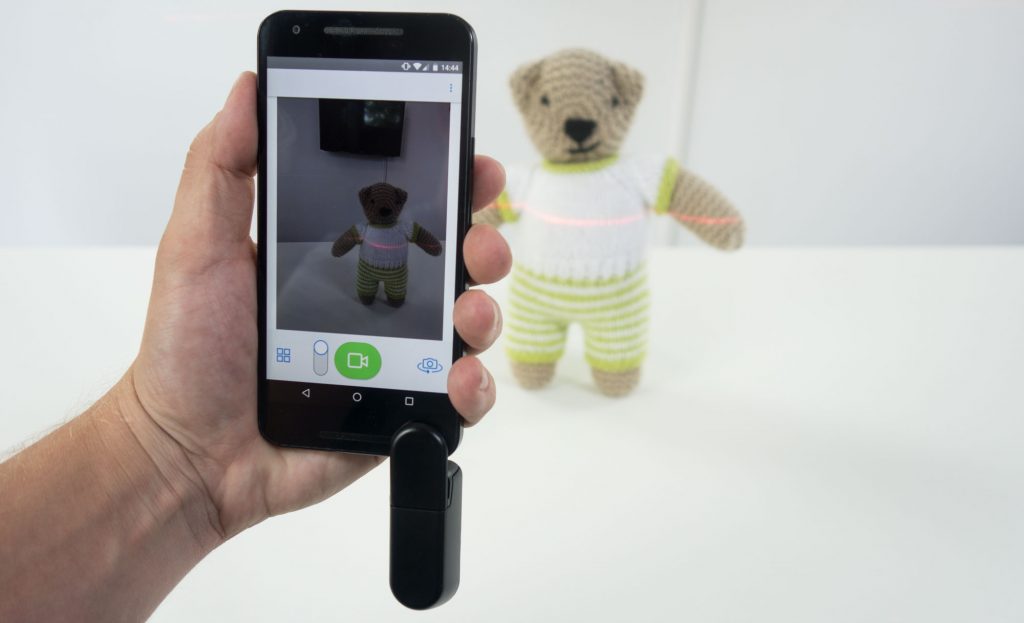
…but that didn’t really work. After diving into the do’s and don’ts of the Bevel, I discovered a Tweet that demonstrates that for best results objects need to be placed in front of a textured or patterned background — not plain black or white. There’s also a YouTube video with all the tips. Why do I discover this when writing a review? It should be the first thing in the app’s on-boarding!
So I captured Teddy the knitted bear again but this time laying down on the office floor carpet. The original result includes this very carpet. When I wanted to remove that (in Cinema 4D) I discovered that the meshes from Bevel scans consist of multiple depth layers.
It shouldn’t be to hard to build background removal into the app but here’s the result after I manually removed the background in Cinema 4D and uploaded it to Sketchfab:
This result is relatively good. The laser captures quite some details from the knitting pattern (check the MatCap render mode) and the combination with the texture makes it look like Teddy for sure.
But what are users supposed to do with this result?
BevelPix can generate a GIF to share on Social Networks…
[column lg=”6″ md=”12″ sm=”12″ xs=”12″ ]
[column lg=”6″ md=”12″ sm=”12″ xs=”12″ ]
…but what’s the point of a 360° turntable animation of only a partial object of person — with background included? Beats me!
There’s also a button on BevelPix to send the result to Shapeways for 3D printing, but since this model isn’t watertight it’s not printable at all.
I also made a capture of my famous bust while laying on the carpet. You can check the original here or the manually edited (background removal, color correction) version below:
Again, and concluding, it surprises me that a simple laser on a smartphone can capture quite some geometric detail but the fact that it’s only a partial scan and that the texture is sub-par doesn’t make this a result that I would share with anyone — I’d just make a regular photo and be done with it in a second.
[well type=””]
Opinion: The Future of Consumer 3D Scanning is Pure Software
Devices like the Bevel, and the fact that Google Tango isn’t being adopted by phone manufacturers, makes one wonder if there’s room for 3D sensing hardware on mobile phones.
I think there isn’t. They will always add extra costs for something that will not be used frequently. And it’s becoming clear that we might not need hardware for basic 3D vision in a world where software is getting smarter at a breathtaking speed.
Last year, Microsoft gave a demonstration of an upcoming multiplatform 3D capturing app that used just a regular 2D camera and can capture objects almost instantly. And an increasing amount of software developers is working on ways to make 3D scans of faces to be used as digital avatars in games and VR/AR applications. A while ago I wrote about the Avatar API by itSeez3D that uses machine vision and AI to create a 3D avatar from just a single selfie photo within minutes (through the cloud but faster than the Bevel from scan to result)
That might not be the most geometrically accurate version of my head but the Bevel scan isn’t either. In fact, this just my face and the rest isn’t me at all — I can even put all kinds of virtual hair on my head. Plus, this model is extremely low-poly and very suitable for realtime 3D applications or animation. Just put that in a space suite and I’m an astronaut!
In my opinion, if consumers want 3D selfies — and I do believe that’s just a matter of time — they want to be able to take them anywhere and have them delivered fast — preferably (near) realtime.
That’s why Snapchat acquired Seene last summer (note the source) — they believe consumers want to be able to do this:
[/well]
Verdict about the Bevel
Let’s start with the fact that the Bevel is a brave attempt to bring 3D scanning to consumers — I have enormous respect for that!
Its $89 price tag might make it the cheapest 3D scanner in the world, but it might also be the most limited one. The hardware is well designed and attractively packaged, but the idea of using a headphone connector to make this device compatible with both iOS and Android phones isn’t as practical today as it sounded back in 2015 when all smartphones still had headphone ports.
Connectivity aside, the Bevel is basically just a passive laser pointer. All the hard work has to be done by the smartphone — and it’s hard work indeed. Scanning is hit-and-miss and you’ll only discover which one it is after waiting for 15 minutes of processing, which puts quite some strain on the phone’s processor and battery.
If everything works out correctly, the result can be pretty good. Geometry-wise a laser has the potential to go beyond the detail level of infrared depth sensors but it’s also a lot slower to capture with and requires more processing afterwards. For consumers that are used to instant digital photography — and even instant Augmented Reality effects in apps like Snapchat — the result is probably not worth the wait for the target audience.
For hobbyists or prosumers, the lack of 360° capture might be the biggest problem. Without this there’s no way to create usable assets for purposes like game development, 3D printing or even basic CAD work.
But no matter what your intended purpose is, the Bevel solution is just 10% hardware and 90% software. And at its current state, the iOS and Android apps aren’t living up to the promise — and potential — that Matter and Form pitched on Kickstarter. There are so many things that can — and must — be improved for this device to be useful. Things like background removal and color correction are basic stuff that isn’t there.
But that’s software and it can be fixed. And the hardware… maybe if Matter and Form would make a Bluetooth version that works on every smartphone — and would lower the price to $49 — people might want to give it a try. But as it is now, I doubt many will.
[well type=””]
What about that other upcoming Smartphone Laser Scanner?
I’m hoping that I can also get my hands on an eora3D when that scanner is finally ready.
Although it basically uses the same concept of a laser (a green one in that case) and the smartphone’s built-in camera, it seems to do so in a more sophisticated way (the laser and turnbtable both move) that takes human error out of the equation. It’s not meant for scanning people but it can take full — and apparently high resolution — 360° scans of small objects which could actually be usable for many purposes.
The eora3D isn’t targeting (young) consumers like the Bevel. With its aluminum enclosure it looks more like a professional device and the price reflects this: The complete set with the Bluetooth turntable will cost $419 (you can still pre-order it for $100 less). That’s almost five times the price of the Bevel.
That price is slightly higher than respected depth sensor-based 3D scanners like 3D System’s Sense 2 (Review) and Structure Sensor (Review). But those are not suitable for scanning small objects so the eora3D could be filling a gap. I’m also very curious about how it performs in comparison to the EinScan-SE (Review) — a full-fledged structured light desktop 3D scanner that costs (just) $1199.
The eora3D was expected to be shipping in July but the manufacturer stated on May 8th that they “are not comfortable giving you an ETA regarding shipping”. So stay tuned!
[/well]
Follow me on your favorite social network if you want to know when new Review are up.
[tw-social icon=”twitter” url=”http://twitter.com/3dscanexpert” title=””][/tw-social] [tw-social icon=”facebook” url=”http://facebook.com/3dscanexpert” title=””][/tw-social] [tw-social icon=”instagram” url=”http://instagram.com/3dscanexpert” title=””][/tw-social] [tw-social icon=”linkedin” url=”https://www.linkedin.com/company/3d-scan-expert” title=””][/tw-social]


A slight “typo” — I received my Kickstarter Bevel in April, 2017, not 2016 as you indicate in your article.
And, like you, I was quite disappointed by its lack of usefulness. I hope that they will provide a capability to combine multiple scans to achieve a rendering of a complete object.
Typo indeed! Corrected.
And I do hope the same. The software side has a lot of potential!
to bad that DAVID 3D laserscanner was acquired by HP; they introduced back in 2007 a handheld scanner, most like that one…well, the free(!) software for it, the “scanner” was just a cheap pointer with a line-generator-lens (cost me 10 bucks). still working with their old free software; its amazing, how much detail you get out of it, if you have a camera with decent resolution.
but as a handheld device for phones to make 3d-“selfies” is just
a bad idea.
there you go, their old site via wayback (remember, this was 2007, a decade ago):
https://web.archive.org/web/20070214022506/http://www.david-laserscanner.com:80/?section=Start
would it be possible to take multiple pics with this, and use a photogrammetry software to stitch them together to get a solid object?
We love these! We turn the lights off and have a battle and my 4 year old blunto my 32 year old husband are having a blast. Got them got Christmas and they have been used often.
Where can I find an iPhone holder like the one shown in picture four?
Hi, always i used to check webpage posts here in the early hours in the daylight, because i like to
gain knowledge of more and more.
If you are going for best contents like myself, only go to see this web page everyday because it gives
feature contents, thanks
Very nice article, just what I was looking for.