With smartphone-based 3D capture becoming increasingly popular, a new generation of apps is using new concepts that are different that the first generation of apps that mainly relied on passive photogrammetry. Developers are now using a combination of AR-technology and algorithms that can convert 2D images to 3D models in near real-time.
A while ago I wrote about Qlone after my visit to MWC 2018 and now I’ve tested the latest version of the app myself. Let’s find what makes Qlone unique and if it works.
Software & Pricing
Qlone is currently available for iOS and Android but the latter currently misses the editing features and some export options that the former does have.
It’s important to know that the results greatly depend on the smartphone you’re using. It technically works from an iPhone 5S and up but for good results an iPhone 6S or equivalent is greatly recommended. I’m using an iPhone SE for this test, which has the same internals as the 6S in terms of camera and processing power. It also supports Apple’s ARkit technology, which I’ll come back to later.
On Android, as always, it’s let’s clear to define which handsets work best. At first, the app only worked on ARcore-compatible devices but this has been broadened in later versions. It works great on my Pixel 2, which I’ve also used for this post.
Since the app is basically free to use you can simply download it and give it a try to see if it works well on your device. I’m saying basically because exporting 3D model files (OBJ, STL, X3D, PLY) requires you to either but credits or a subscription.
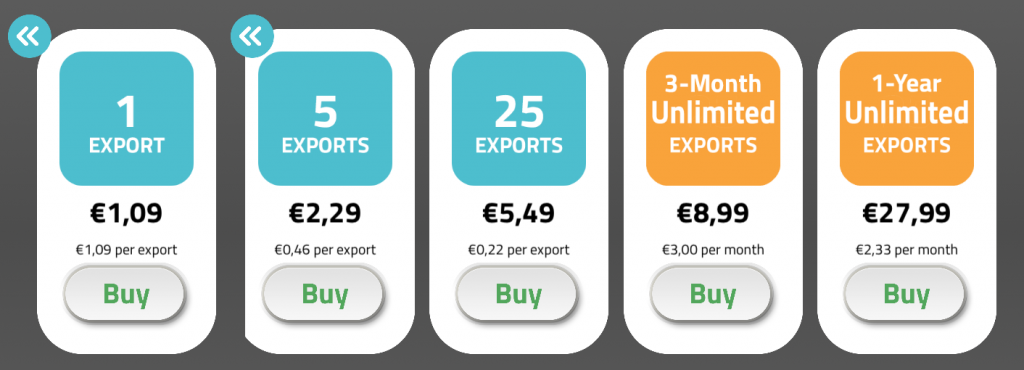
As you can see prices are reasonable and you have a choice for unlimited exports as well. But there’s enough free stuff, too. More about that later.
Scanning
Before you can do anything with Qlone, you’ll have to print the so called AR Mat. This black and white checkerboard pattern serves as a tracking marker for the software. You can print it with any printer but it’s greatly recommended to print it on thick paper to prevent the pattern from deforming.
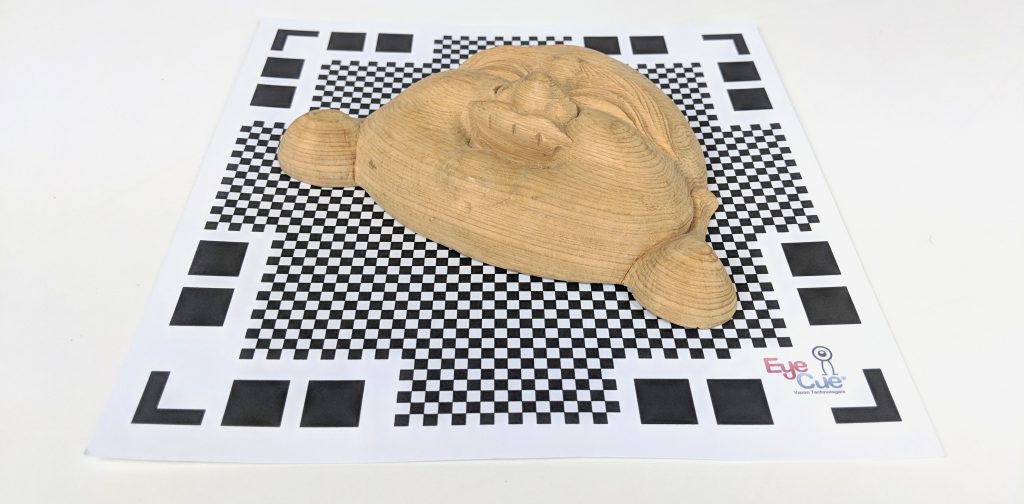
Objects need to fit into the center square of the pattern, which essentially limits their maximum footprint to 15 x 15 cm. You can place slightly longer objects, like the Buddha hanger above, diagonally. However, the biggest limitation is the height of objects. This has to do with the AR-dome the software will project.
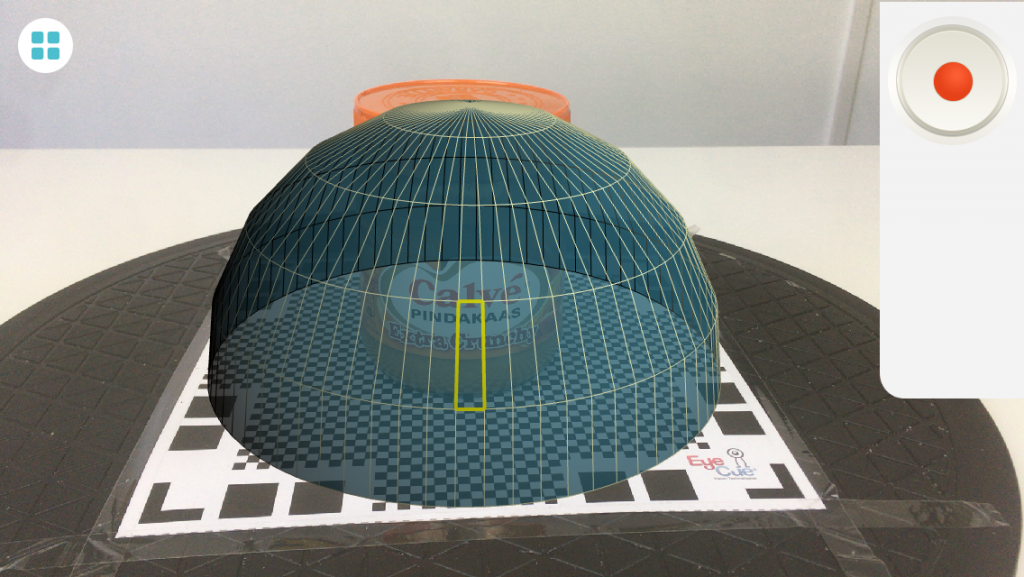
The peanut butter jar above is 10 centimeters tall and as you can see it clips the dome and can’t be captured completely. The solution is easy if you have access to a large format printer. I happen to have an A3-size printer at the office but I doubt many people have one at home.
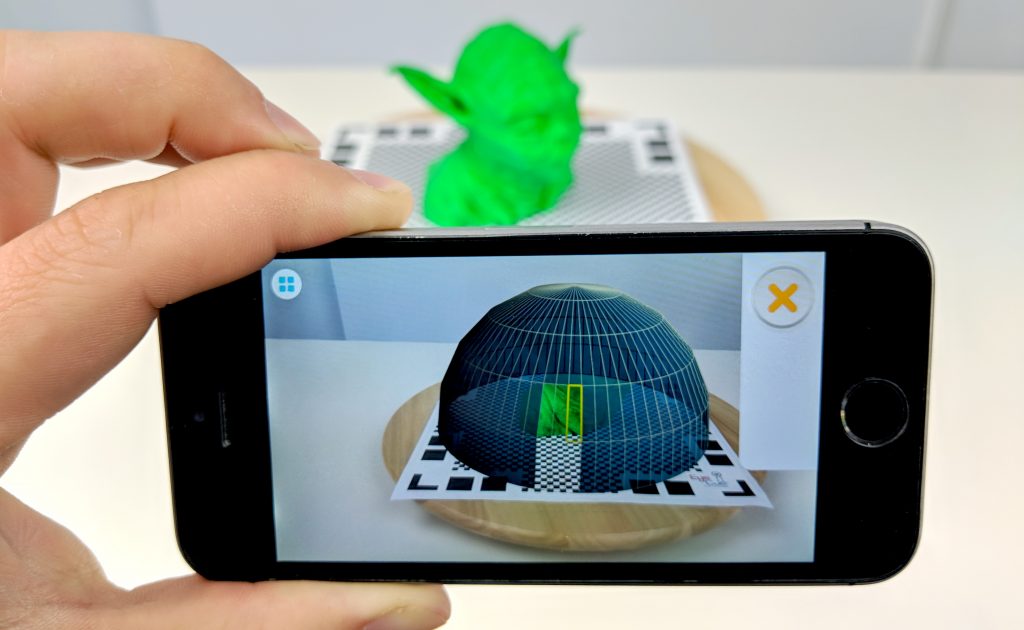
Besides printing the pattern on A3 size paper so I could capture larger objects like this Yoda bust I also fixed it onto a lazy suzan from IKEA. This way I could smoothly rotate the mat instead of having to walk around it. Both work fine but rotating the object makes for a nicer user experience. Bright, diffuse lighting is essential for good results. I used a studio light kit but that’s not necessary. Outdoors also works as long as there’s no direct sunlight or wind that makes the paper move if it’s not secured to a solid surface.
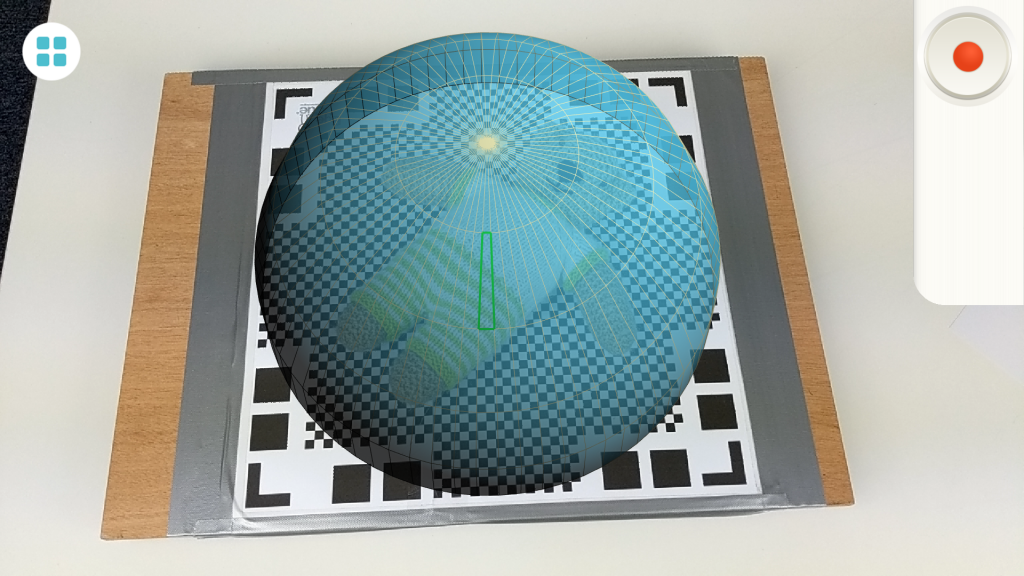
The AR dome that is projected over the object is the progress indicator of the capture process. It’s build up out of 4 layers and a lot of segments. To finish scanning you have to clear every single one of them. The latest version of the app has made a lot of improvements in terms of speed. I could rotate the turntable smoothly while clearing segments ring by ring.
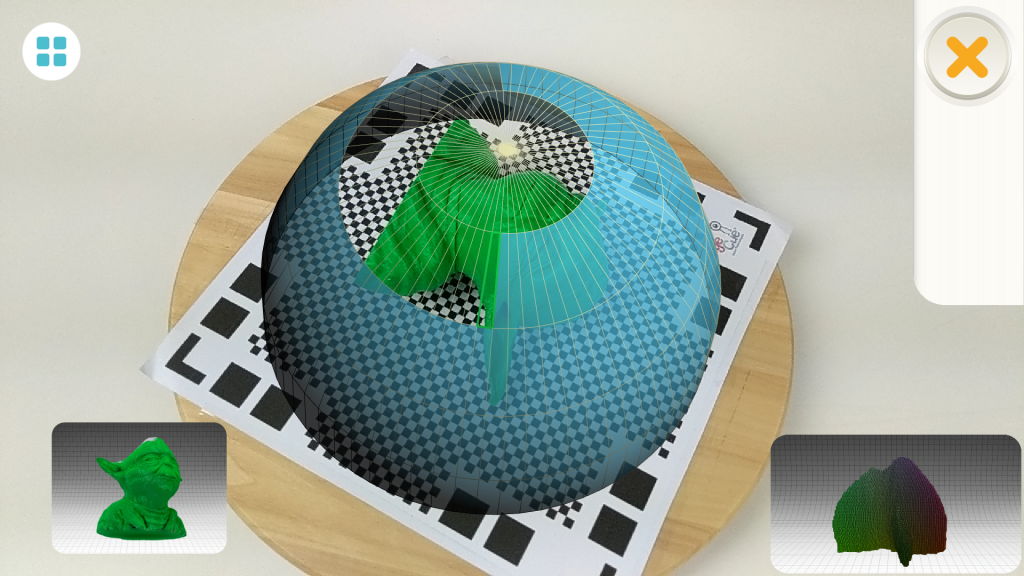
The app will show a funky preview of what it’s doing in the bottom right corner. It’s not really necessary but it’s interesting to see how the captured data is processed and will slowly form the shape of the object. Depending on the processing power of your device, you’ll see the raw, untextured data rotate for a few seconds after which the result is displayed.
Sometimes, the initial result is great. But other times, it’s terrible.
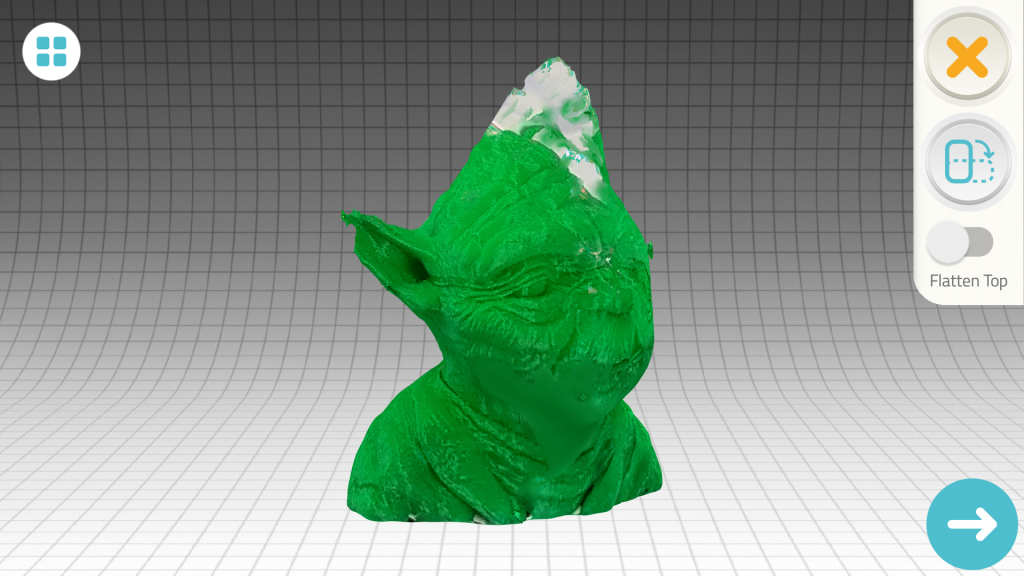
I noticed that many objects I tested that are standing tall will have tapered tops. This probably has to do with the shape of the dome and the angles at which the images are captured but it’s not pleasing. Luckily Qlone allows making a second capture with the object in another position. As the second icon on the right indicates this more or less means that you should rotate it. So I did just that.
After this, the app will try to align both models (this works best with objects with distinct features) and make corrections where needed. This process takes a bit longer than rendering the initial scan. In the case of Yoda about a minute on my Pixel 2. After this, the shape of Yoda’s head was corrected. Unfortunately, his face initially looked weird. But you can re-texture by rotating it with the most important side, in this case his face, towards you and then tapping and holding it.

This feature is crucial and that’s why it’s a pity that it’s almost a hidden one. It’s explained in the onboarding but if you’re the kind of person that skips these (like me) you’ll miss it for sure. I would very much prefer a dedicated button for this in the side bar.
A feature that is clearly marked is “Flatten top” which can can correct the tapared tops of objects that have a flat top in the real world.
Editing
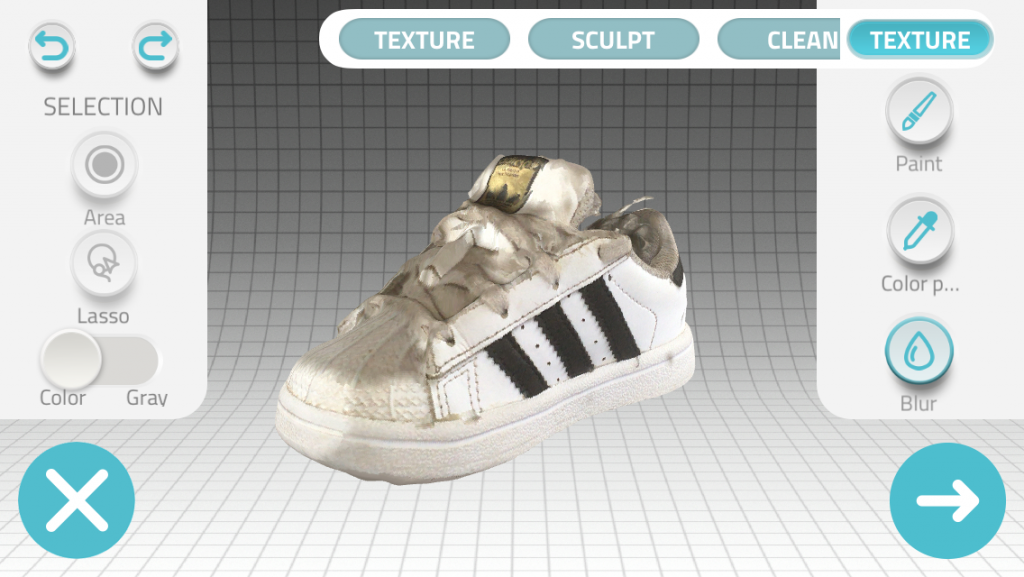
This part is currently only available in the iOS version but it will probably soon arrive on Android as well. Qlone offers a very comprehensive set of editing and retouching tools. I’m not a big fan of the user interface though. It took me quite some time to discover that the word “Texture” in the top right is actually a button that pops out more editing features, like Sculpt, Clean and Resize.
I must admit that I wasn’t able to test the features that require touch input well because my iPhone SE testing device only has a 4.5 inch screen. It’s simply too hard to do precision editing on such a small screen. Apart from that, I found the navigation quite confusing. It requires one-finger touch input for editing and two-finger input for navigation. I was able to rotate the model with two fingers and zoom using a pinch gesture but could find a way to pan the model. I expected this to work with three fingers but it doesn’t.
I’ll test the features on my larger Pixel 2 when the editing mode becomes available on Android but as you can see you can use a color picker and paint directly onto the model in that color. And you can blur certain texture details. There’s also a basic sculpting tool for editing the geometry and you can use area and lasso selections to perform edits on only a selected area.
You can also resize the model or decimate it within the app, which is great if you want to use it for 3D printing or real time 3D applications respectively.

Talking about size, when you print the AR mat at 100% scale on A4 paper, the models are also at the correct scale. So if you use a larger print you should remember the scale factor and apply this to the model. Unfortunately, the resize feature is only a slider and doesn’t allow you to enter a percentage.
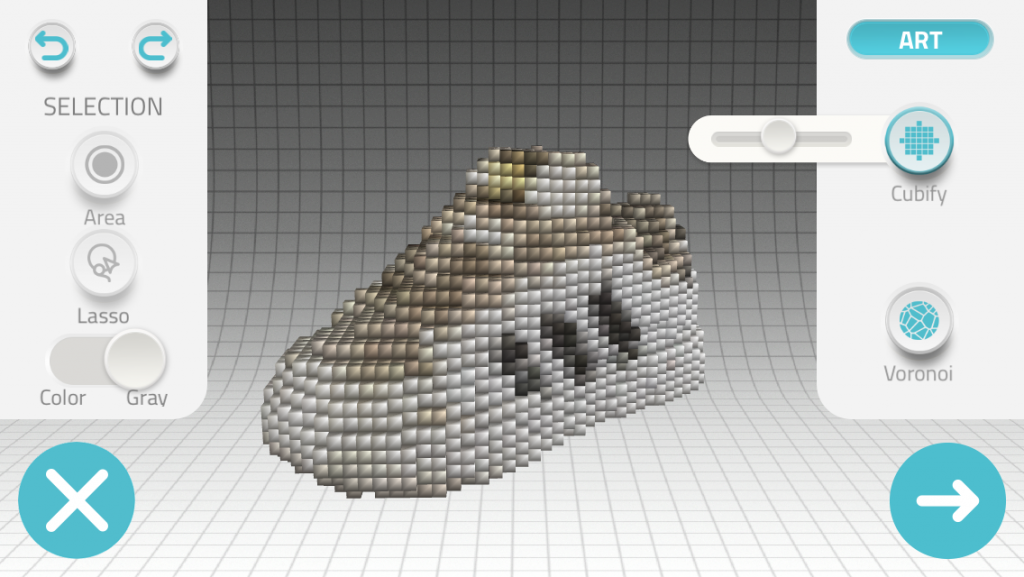
There are also some interesting art effects.
Exporting
Exporting to 3D file formats that you can import into external software requires purchasing credits. But after unlocking a model for 1 credit you can export it as often and in as many formats as you want.
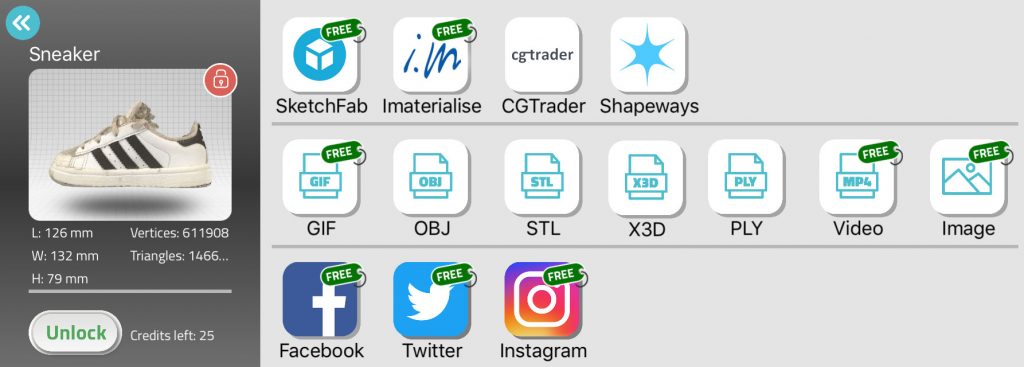
I really like that exporting to Sketchfab is free. This allows you to share the actual 3D model in a browser and VR/AR friendly manner. Or embed it into your website like I do in mine. This does disable Sketchfab’s downloading features so if you want to sell your scans on the Sketchfab Store you’ll have to export it to OBJ and upload it manually.
You can also export the 3D model to 3D printing services iMaterialize and Shapeways or CGTrader (not in the Android version yet). It’s possible to share models to social networks for free but unfortunately the Facebook export is a Video Post instead of the recently introduced 3D Post format. You can also just export a turntable-animation video of GIF.
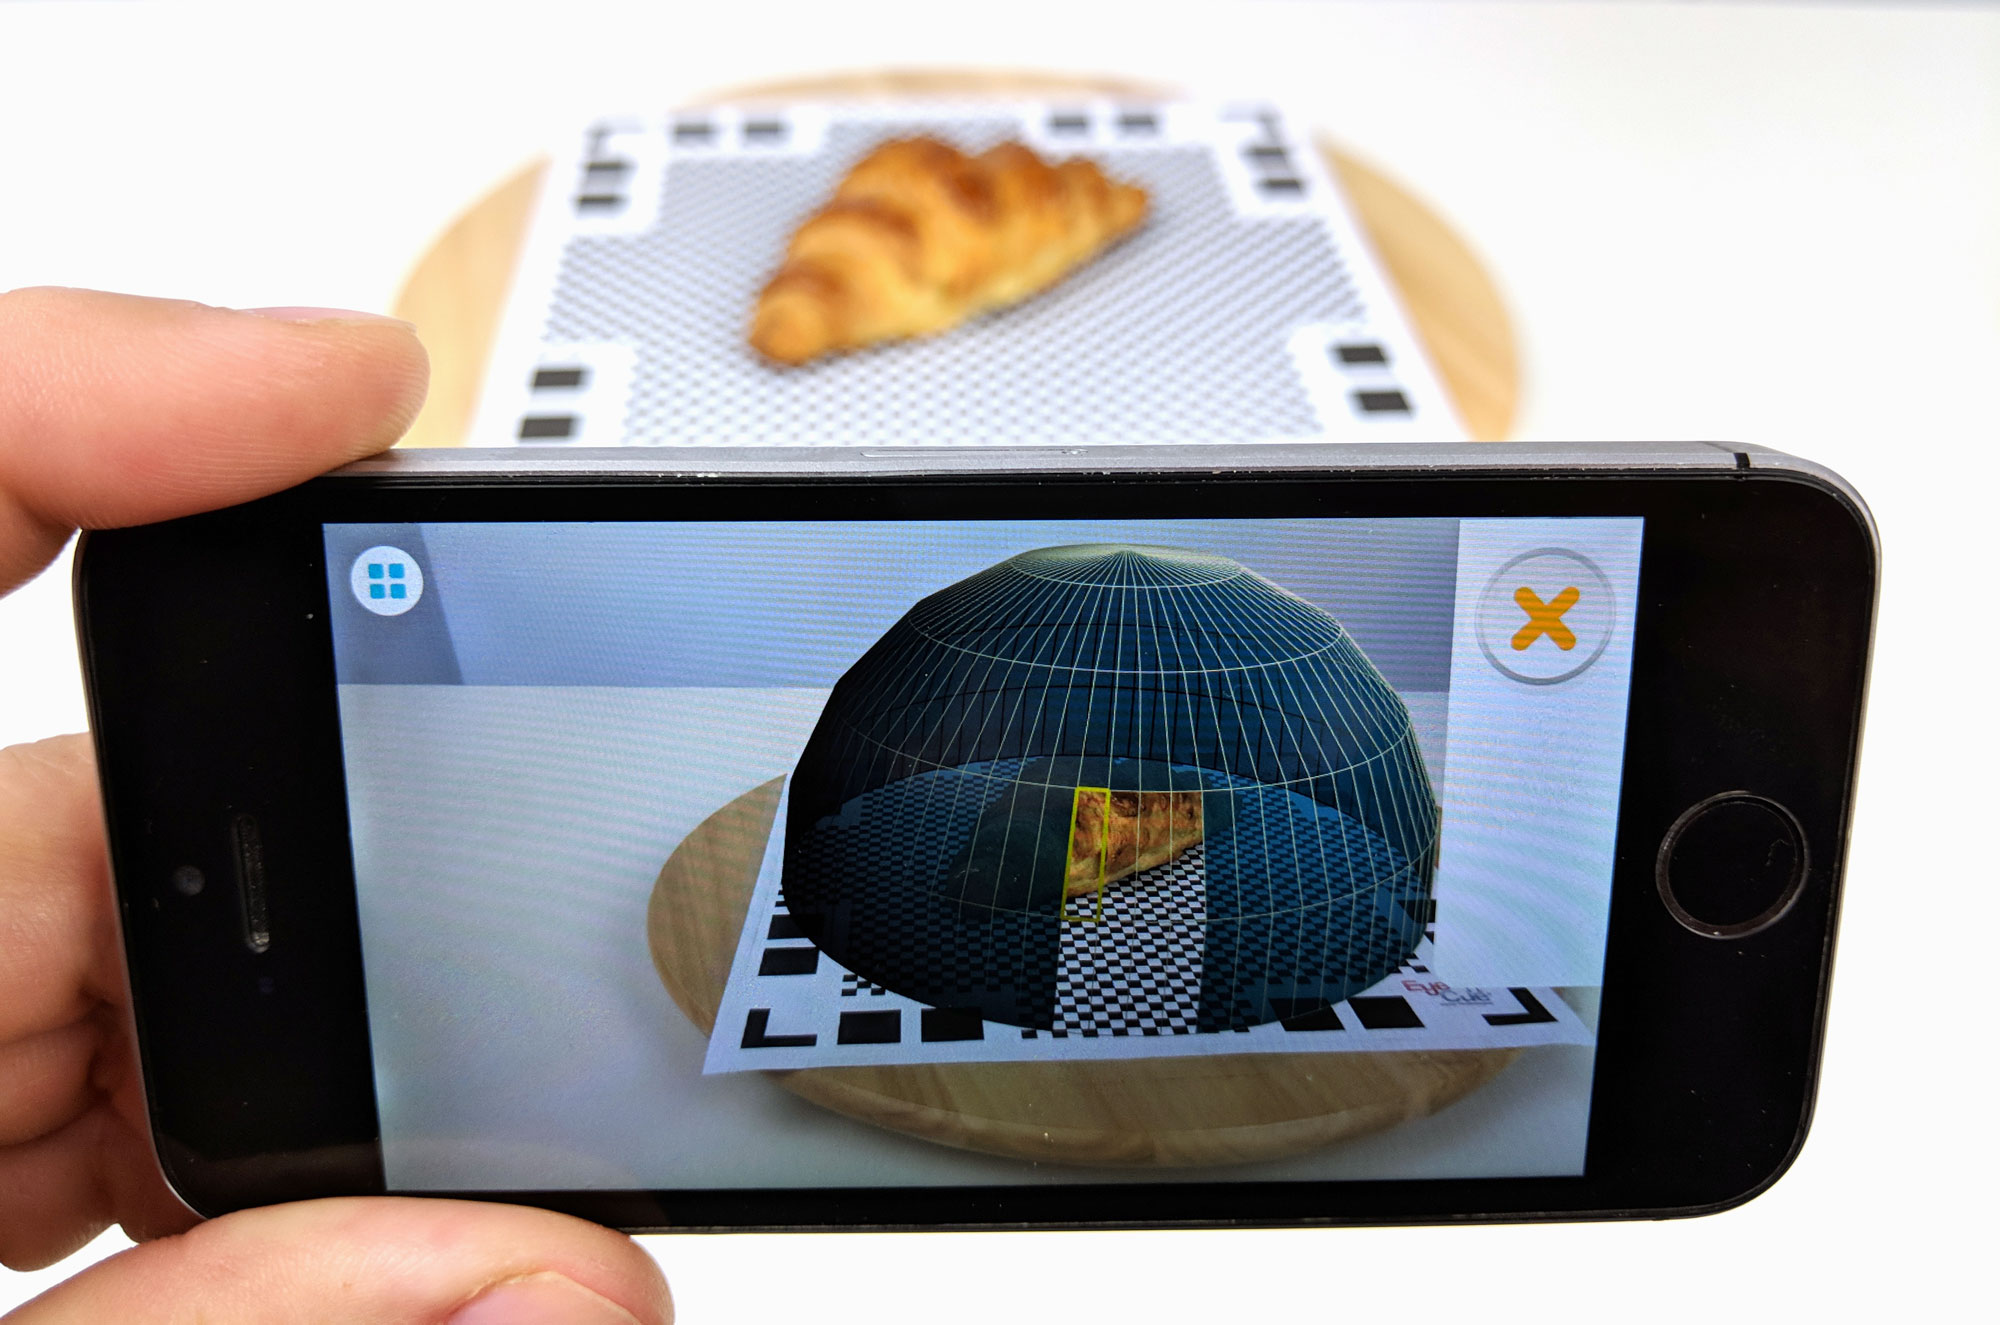
Finally, you can reproject your 3D capture into the real world using AR technology. If you have an older phone, this requires the AR Mat but if you have either an ARkit compatible iPhone or an ARcore compatible Android phone you don’t need the mat.
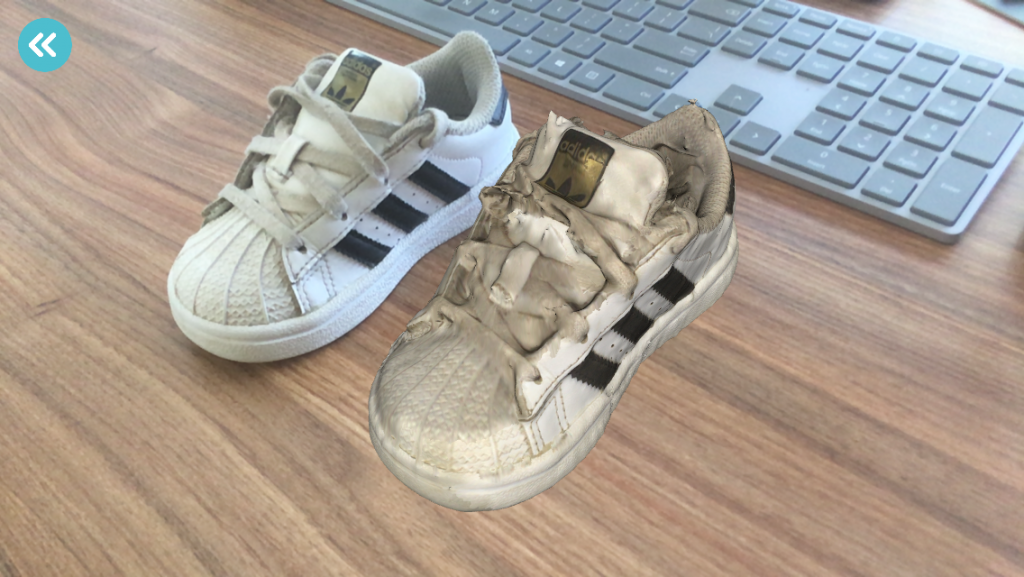
It’s fun to put a captured model next to the actual one. And because both Apple’s and Google’s AR solutions are pretty good at estimating scale the 3D version is almost the same size as the real one if you captured it on the A4-sized mat or scaled it accordingly afterwards.
Results
I expected the results from my Pixel 2 to be better than the iPhone SE since it’s newer and has a better camera but they models where surprisingly similar. That said, similarity is very hard to test with Qlone because different scans of the same object with the same phone can result in different results. That might be a problem for use cases where repeatability is important.
There is a slight decrease in quality when increasing the mat size, which is to be expected because it requires a further distance from the object. So you really have to choose a mat size that fits your object efficiently for the best results.
Below is a capture of a croissant on an A4-sized (21x21cm) and a larger A3-sized (30x30cm) mat respectively:
The first one has better details in both geometry (press 3 on your keyboard to disable the texture and 1 to enable it again) and texture although this difference might be significant for more casual use cases. In general I liked working with the larger mat better because it could simply fit more of the objects I wanted to test.
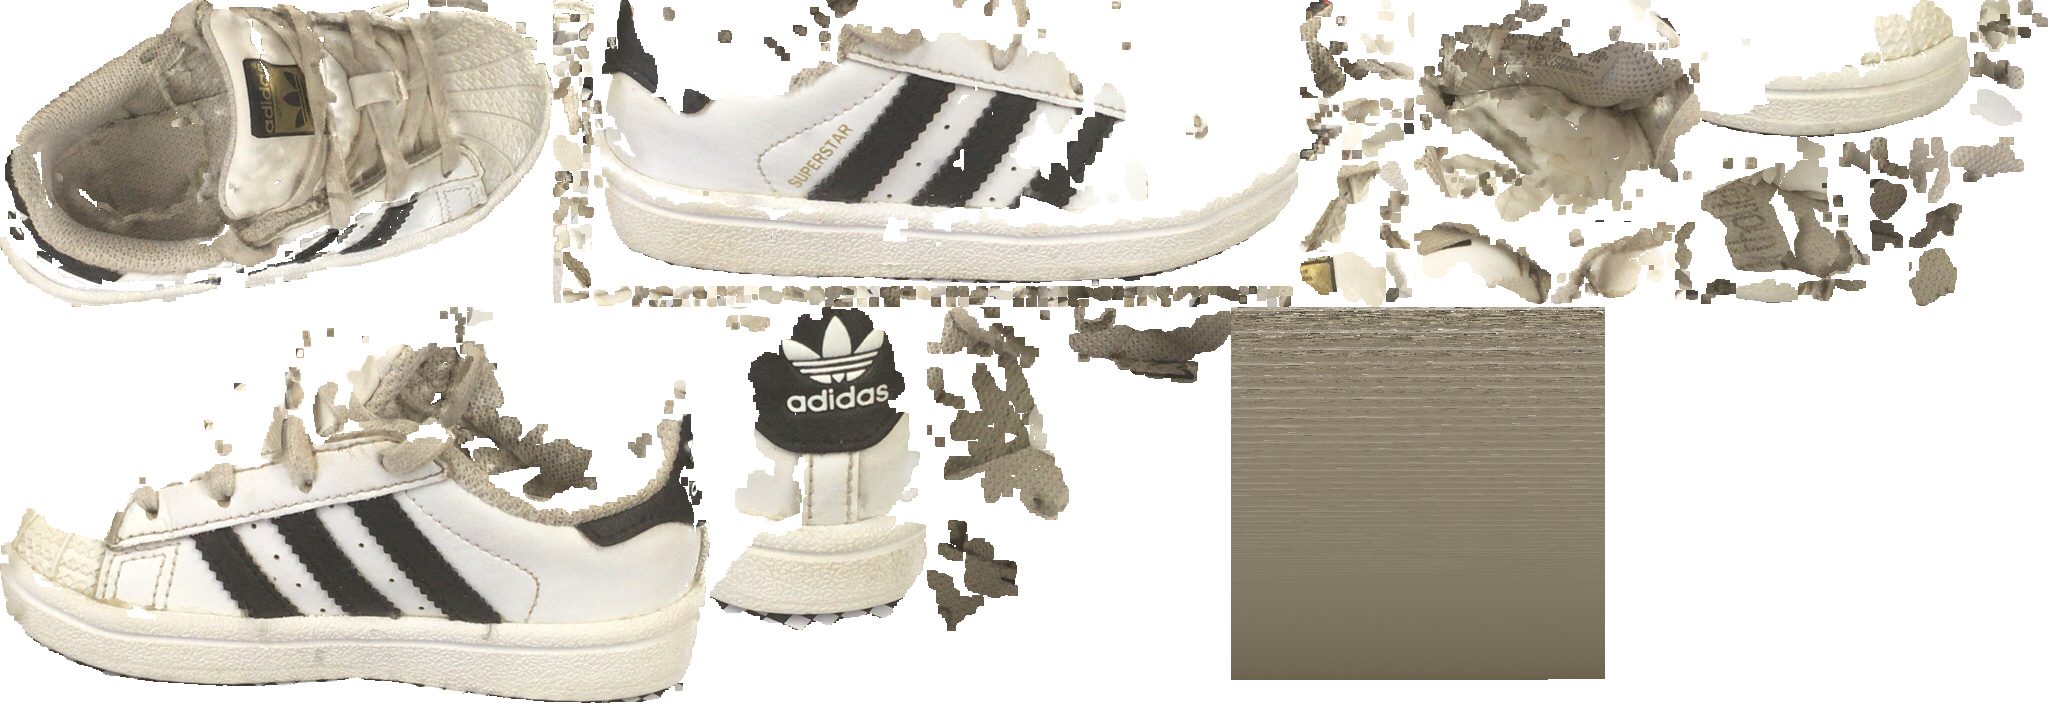
Below is a Toddler sneaker that did fit on the smaller mat diagonally.
If you look at the geometry you can see that many details of the shoe are present. There’s some noise on the surface though and the open top was apparently hard to solve for the algorithm as it contains quite a lot of random and orphan geometry.
Texture-wise it looks quite sharp put the texture map could have been a lot more efficient. As you can see below the texture is simply a collection of images that occupy less than a third of the image, which has a 2K resolution. What you see below is only the first 722 vertical pixels of the 2048 (click to enlarge).
Next I wanted to compare a capture from Qlone to one of the very first smartphone-based 3D captures I made over 2 years ago with the discontinued 123D Catch. I wanted to scan the same vintage camera Qlone couldn’t figure out how to fuse two poses (and I tried many different poses) for this object. So I was left with either a tapered top of use the flatten top option. I chose the latter because it looks less weird.
Needless to say that I’m not happy with this result at all, especially when comparing it to that of the previous-gen 3D app approach of the discontinued 123D Catch which was made on Nexus 5 Android phone with a version of the app from 2015.
That app required shooting a about 20 photos in a circle and 6 more from a top angle (you can still read my original review here) which took about as look as the Qlone approach. Big difference is that 123D Catch didn’t require anything to be printed and used cloud processing which required uploading, waiting (sometimes up to an hour) and downloading. Qlone processes locally and almost instantly. But this approach clearly has limitations in terms of quality and precision.
In that very first 3D Scan Expert Review I also tested my famous Teddy Bear so I needed to test it with this new app to. Because Teddy is 30 cm tall I had to print the AR Mat on two A3 papers to create a 42 x 42 cm mat that I have taped onto a piece of wood.
Because he still could stand upright I hoped that Qlone could fuse a scan facing upwards with a scan facing downwards. It did just that but decided to let the two parts that faced the AR mat outwards. So here’s the result from a single scan.
At this point it came very apparent that Qlone is really only usable for very small objects. The camera distance didn’t do the geometry any good since its very generic. And Teddy clearly has the problem of the tapered top. Here’s the same object scanned with TRNIO (Review), an iOS 3D capture app that, unlike 123D Catch, is available for download. It’s $0.99 but offers free exports.
Yes, I used a book for improved tracking but that could be any detailed surface — a textured table top works just as well. But I could capture this knitted bear — which I use because it’s an ideal photogrammetry object — standing upright. While TRNIO also has its issues (mainly around its cloud-processing queue and editing features) it doesn’t require a printed mat making it more flexible for scanning objects of all kinds of sizes.
Now, let’s focus on small objects, like this miniature dog figure that fitted on the 21×21 mat.
That’s a good result. The thing coming out might have been fixed by rotating him for a second position scan, but this object wouldn’t stay put that way. It can easily be removed as well. So it’s a single capture. The geometry is not extremely detailed but enough for many purposes. And the texture is sharp.
I discovered that Qlone is exceptionally good at capturing objects that have shallow depth like this Buddha hanger carved out of wood. It fitted the small mat diagonally and is only a few cm tall.
That’s a very nice model and I’m extra impressed by the fact that the metal hanger on the top is preserved with great detail.
And here’s Yoda, which is a 3D printed bust of about 10 cm tall.
Interestingly none of his facial details are transferred to the geometry so the illusion comes from the texture. Here the texture remapping I wrote about earlier really helped to focus the texture on the face.
It’s good to realize that issues like the white spots in the texture can be fixed easily with Qlone’s built-in editing tools. Tools that are not present in the other apps I mentioned above.
Finally, it’s noteworthy that while Qlone is pretty good at capturing reflective objects that can give traditional photogrammetry algorithms a hard time, you’ll have the checkerboard pattern in the texture.
Verdict
The use of a printed mat is an interesting concept because it gives the user great visual feedback over the scanning process in the form of a segmented dome. It also allows for quicker camera solving for the algorithms so results can be displayed almost directly after capture. This near real time and offline experience is a great advantage over 3D capture apps that rely on cloud processing and let the user wait minutes or an hour for the result.
But the printable mat is also Qlone’s Achille’s heel. It requires users to have access to a printer and tick paper. And you’ll have that with you if you want to scan something. But for me the main problem is that the mat greatly limits the size of objects you can scan. Even objects that I still call small, like a jar of peanut butter, are to tall to fit within the dome on the standard 21×21 printout. And large format printers are even less common, certainly in domestic environments. Scan quality also decreases with larger mats.
Overall the capture process itself is very smooth and the near-instant computation is impressive. But for me the geometric resolution of most models is too low for many objects. It works fine for very organically shaped objects like pastry and shoes but it doesn’t capture sharp details on the surface of objects well. Another problem is that by default, many scans have tapered tops. This can sometimes be solved by scanning the object in a different pose and fusing the two results but more than often this is not physically possible or the algorithms can’t figure out how the two pieces fit together.
[well type=””]
Need Tailored 3D Capture Advice?
If you want to use 3D capture in your product, business or workflow or need quality feedback for developing your 3D capture hardware or software, please consider my consulting service.
I work for individual artists, small startups, educational institutions and large international companies alike.
[tw-button size=”medium” background=”” color=”” target=”_self” link=”/contact”]Contact me for a fFee Consulting Quote[/tw-button]
[/well]
Qlone features a very comprehensive set of editing tools (currently only on iOS) but didn’t find the user interface very intuitive. The 4.5 inch display of my iPhone SE is surely to small for editing so I might update my findings when the editing tools are available for Android.
Although exporting 3D models require the purchase of credits, the app itself and scanning is totally free. You can also export models to Sketchfab, 3D printing services and social networks free of charge. This means you can fully test Qlone yourself and see if it works for your objects and on your smartphone.
If you have a use case that requires scanning small organic objects (like small sculptures or pastry) and require these to be at scale, Qlone is certainly worth experimenting with. If you plan on doing this often, you can create a nice fixed setup with studio lights and the mat mounted on a hard surface (the IKEA turntable is greatly recommended). But if you’re looking for flexibility in terms of both subject and location choice I think that you might find this app too limiting in it’s current form.


I am wondering that since now iPhoneX and many other smartphones are equipped with structure light unit for face detection, how come there’s still not yet an ios and android app that does 3d scanning using structure light? Isn’t that every iphone that have face id are now actually an iPhone with built in Structure Sensor?
I need to scan an object to serve as a design drawing so I can send exact dimensions to a factory. Does Qlone provide actual 3D dimensions for a scanned object or just the proportions of the shape?