RealityCapture has only been publicly released in 2016 (for comparison, PhotoScan has been around since 2010) but has quickly gathered attention from professionals that are integrating 3D capture into their workflows. For instance, while game developer DICE used PhotoScan as their main photogrammetry tool for Star Wars: Battlefront (I wrote a feature post about this), they also experimented with RealityCapture.
Naturally I couldn’t wait to test this software to find out why many people are getting so excited. I did find out and I’ll tell you in a bit.
(New) Versions & Pricing
New for 2018: You can now get RealityCapture PGM with a perpetual license for $2800 until April 30th. After that it’s $4000. Which means you have life time access (with one year of updates and support) to the software with no subscription fees or even an internet connection requirement. With this new pricing strategy the software is now par with an perpetual license of PhotoScan Professional ($3499) or 3DF Zephyr Professional (€2400).
Be aware that the new RealityCapture PGM version is strictly for Photogrammetry and doesn’t include laser-scan features (like Zephyr Pro). For those features you need the full version of RealityCapture, which costs $15,000. The scope of this review is strictly photogrammetry for objects and I won’t test the laser-scanning features.
There’s also a subscription-based “Promo” license. It costs $99 for 3 months. That’s comparable to Autodesk’s ReCap Photo (previously ReMake) on terms of monthly subscription but Autodesk’s solution is now strictly cloud-based and charges extra for that on a per-scan basis. RealityCapture processes locally on your computer with no restrictions in the amount of projects.
The Promo version of RealityCapture does have a few limitations, namely a maximum of 2500 photos and no technical support. It will also send anonymous statistics (purely some numbers, no scan data) of the models you export to the developer. Those limitations are no problem for my purposes and the scope of this review, which is mainly capturing small to medium sized objects.
Finally, you can also get the Promo version as a 1-month RealityCapture subscription through Steam for $39,99.
If you just want to test how RealityCapture works and if it runs well on your PC, there’s a Demo version (without export possibilities).
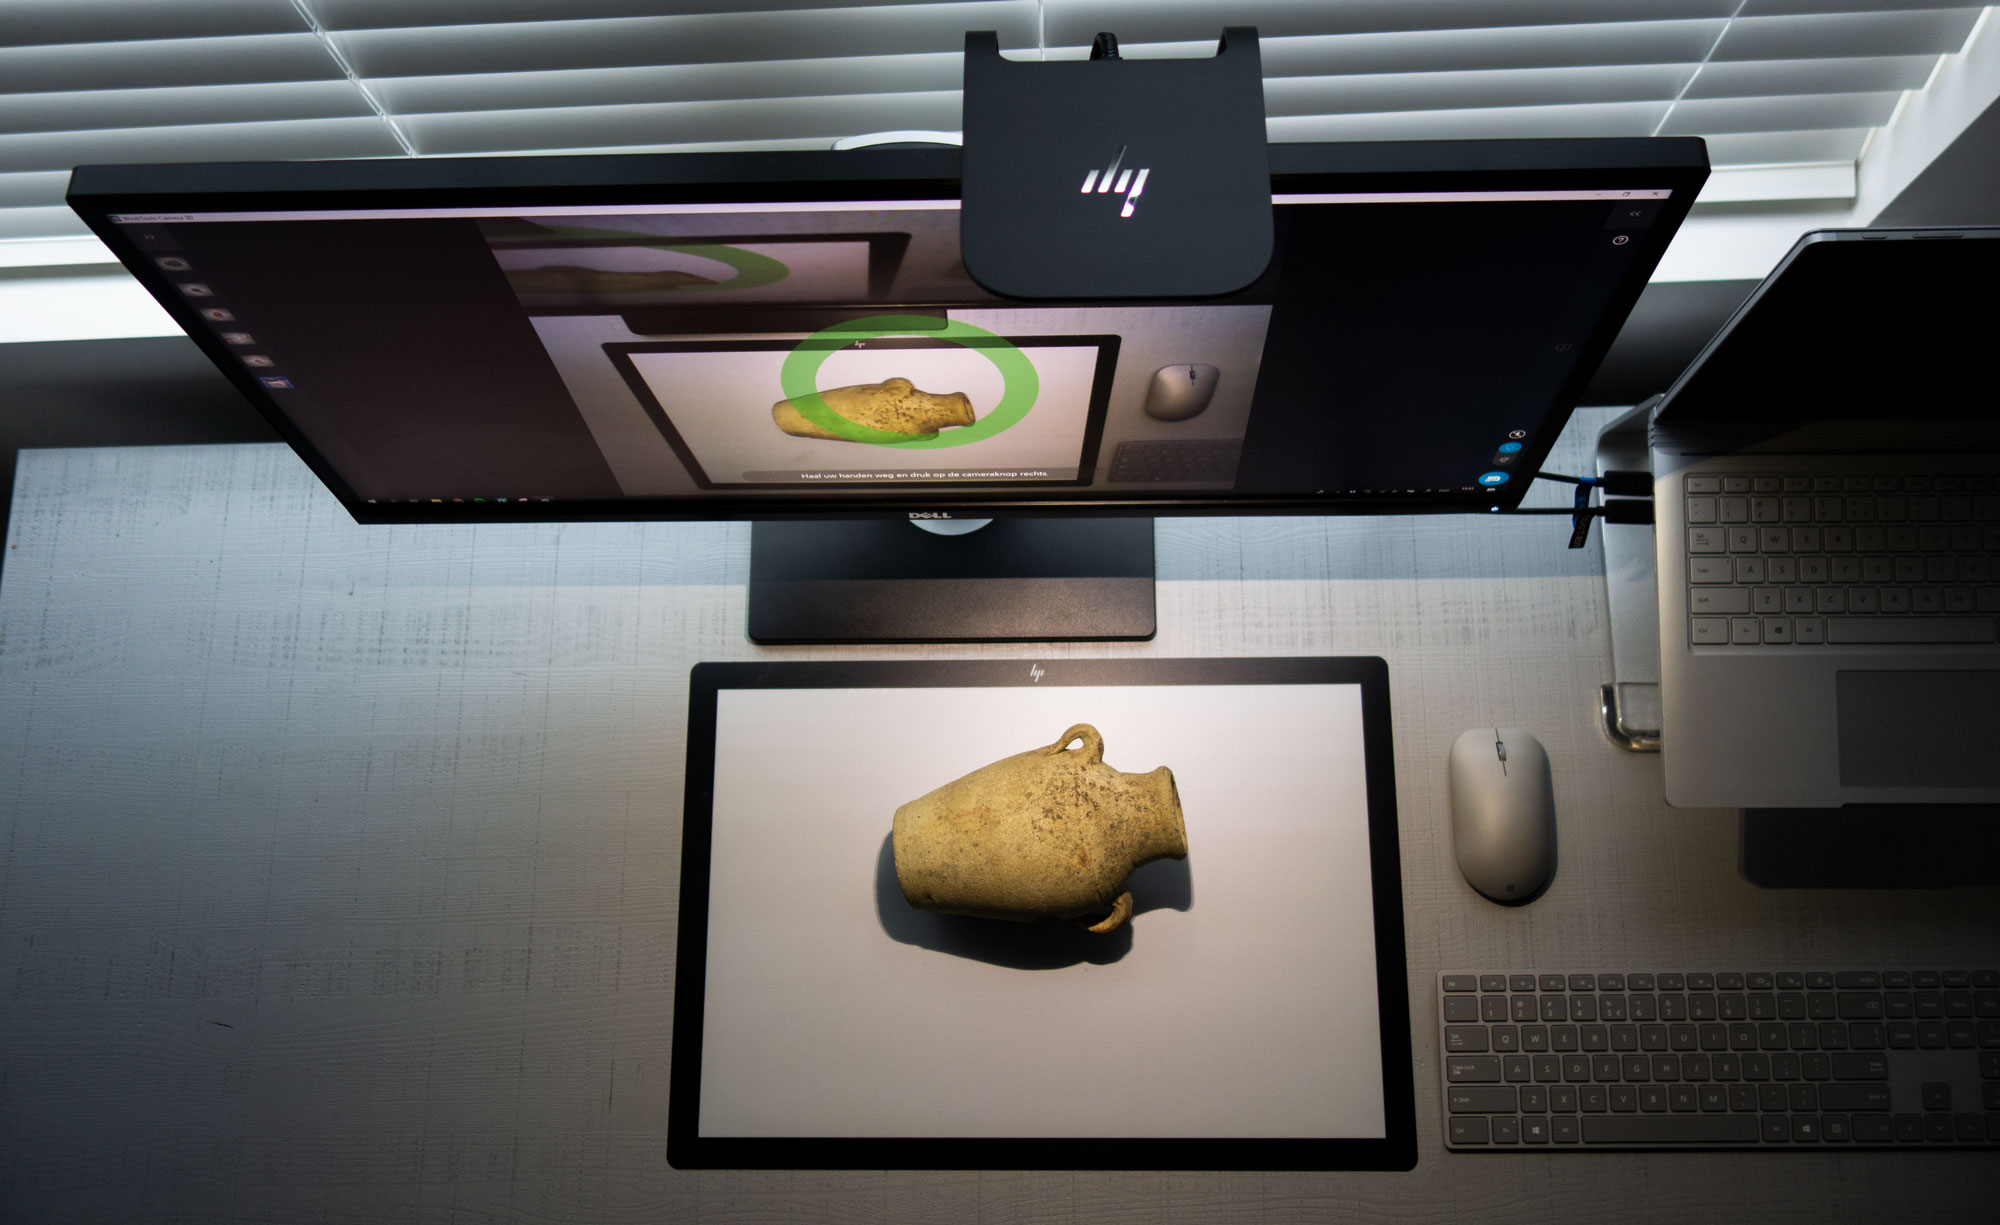
First, let’s take a look at the hardware I’m using for this Review:
Camera Setup

Because I just reviewed the surprisingly handy $139 Foldio360 app-controlled turntable (pictured above) for photogrammetry I’ll use some results from that shoot. I designed the printable pattern for the Foldio360 for use with Agisoft PhotoScan Pro. RealityCapture can’t natively recognize coded markers but in general it’s nice to have a patterned floor surface — not necessary though.
I used a 7 year old entry-level 18-megapixel Canon EOS 550D (Rebel T2i in the US) with kit lens, but you can use any camera (for the Foldio360, you do need one that can be triggered with an infrared remote). A brand new EOS 1300D (Rebel T6) is just $449 with kit lens. Of course, a better camera with more megapixels and (especially) a sharp (50mm) prime lens will result in better 3D models.
I used two simple, umbrella-style 85W studio lights ($75.99 for the set) and a simple black photography background ($14.99). You can also go for white or any other color but I wanted to prevent having to color-correct the photos and use the JPGs straight from the camera for efficiency. It’s easier to get a completely even background with black and a bit of under exposure.
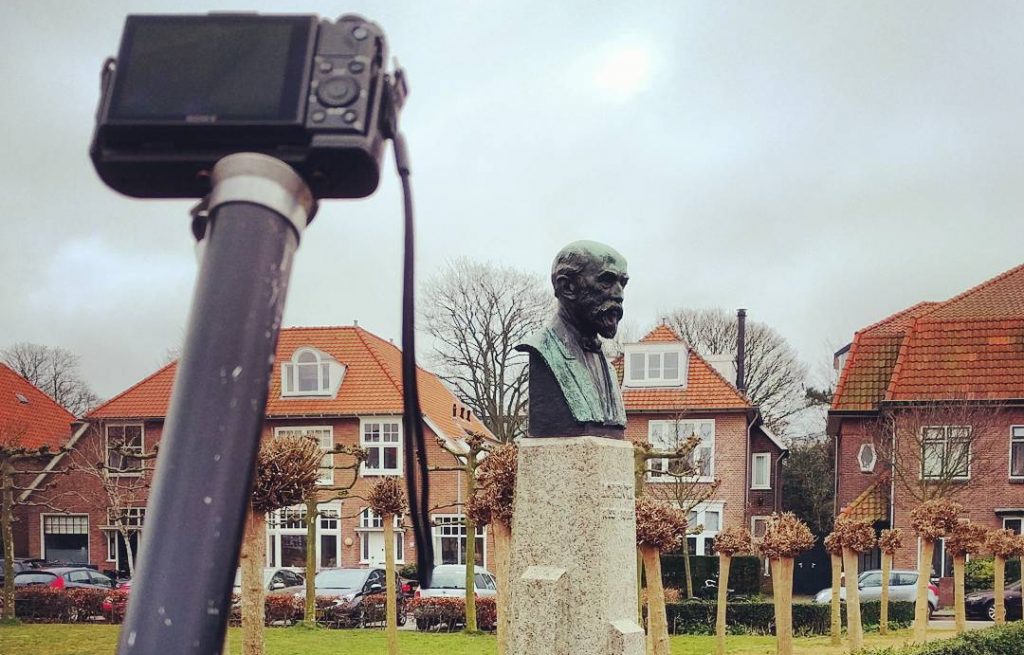
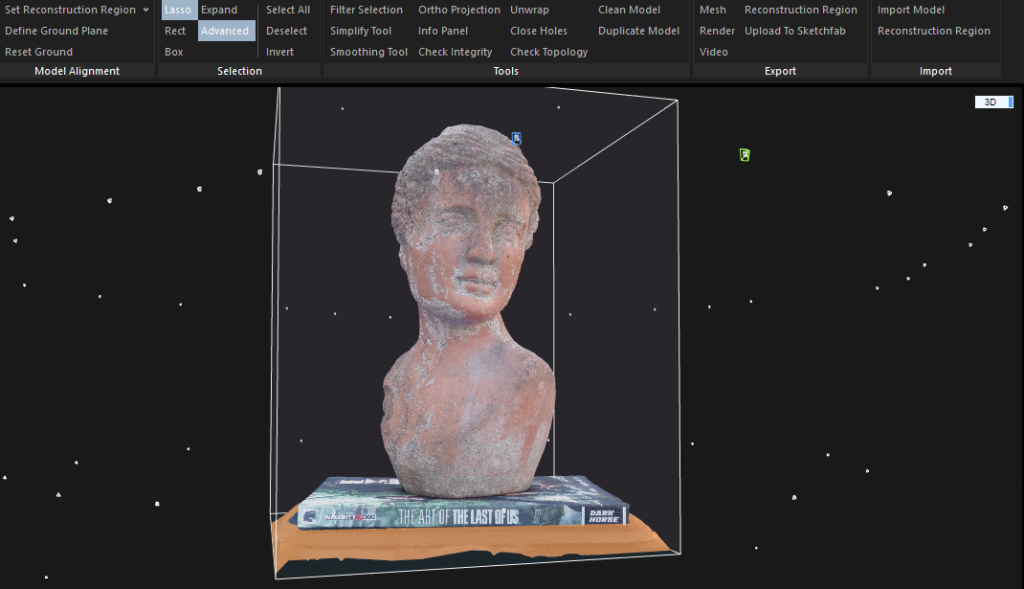
For non-turntable and outdoors shoots I used a Sony RX100M2 20.2 megapixel mirrorless camera. I like it because it’s light and can be controlled remotely with a smartphone app over WiFi. Perfect for tricky shoots of statues like the one below for which I used an extended monopod.
Computer Setup
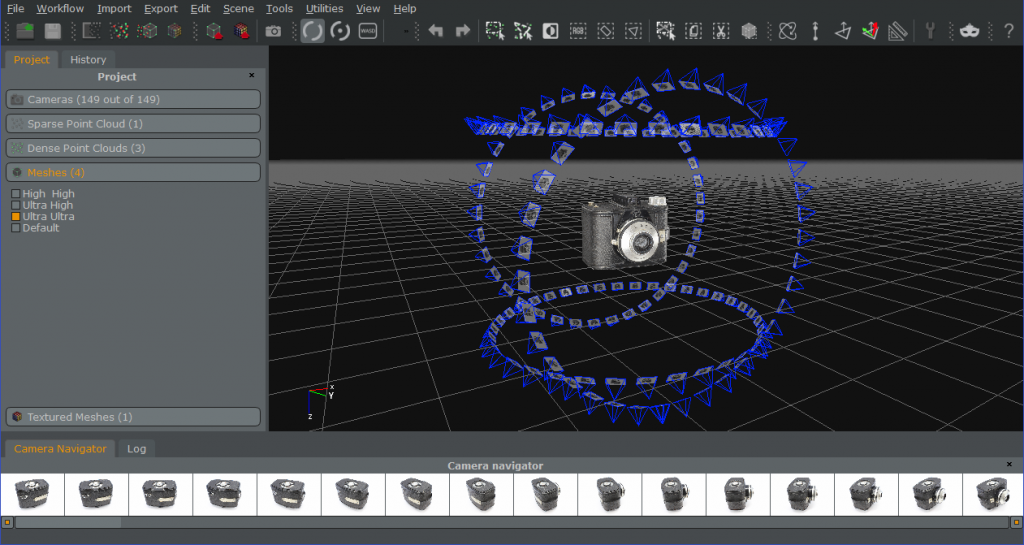
My system is an Alienware Aurora R5 gaming PC with an i5 dual core processor, 32GB of RAM and an Nvidia GTX 1070 card. Like ReMake, RealityCapture also supports just Nvidia graphics cards while PhotoScan also supports non-Nvidia GPUs.
But where PhotoScans capabilities — specifically the amount of photos it can process at once — are directly limited by the amount of RAM in the system, RealityCapture is a lot more resource-friendly. It apparently works very different internally and is a lot better suited for medium-end systems like my gaming PC. And that facts suits perfectly with the Promo license aimed at freelancers and artists that are unlikely to invest in an industrial-grade workstation — let alone network rendering.
Even modern gaming laptops with Nvidia GTX 1050 or 1060 GPUs could run this software to do photogrammetry locally — at a speed that’s even faster than Autodesk’s cloud service if you count uploading, queue-waiting, processing and downloading. And at higher quality (ReMake’s cloud processing feature is only free for Standard quality) and with more photos (2500 in the case of this Promo version, instead of 250 with ReMake Pro).
Interface & Workflow
It’s interesting to see how different all these photogrammetry software looks and works. ReMake has a very visual, almost app-like UI with big icons, fly-out panels and sliders. PhotoScan’s interface is that of a classic Windows program with lots of grey, drop-down menu’s and floating dialog boxes.
RealityCapture’s UI reminds me of professional video editing software with lots of black and panels that dock magnetically within the interface.
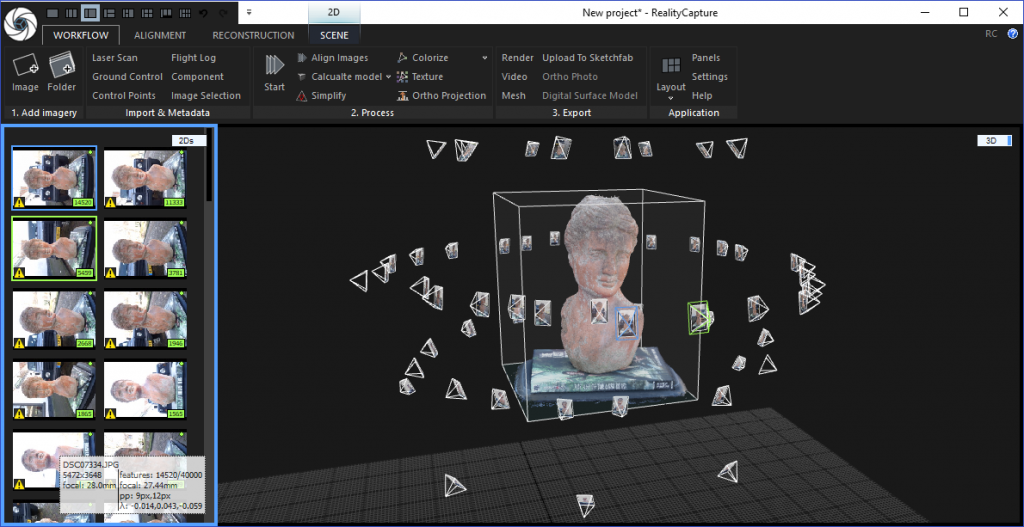
In the top left you see the RealityCapture logo. It took me a while to discover that this is also the File menu where you can start new projects and save/load existing ones.
Next to that, in the top bar, you can choose how you want to split the interface. I’ve chosen a 2-up split in the screenshot above. Each panel can then be configured to contain 1D (statistics), 2D (photos), 3D (point cloud), Con (log console) and Help (pictured above). It’s a great way to configure the interface depending on the screen real estate you have. I have an ultra wide 21:9 Dell monitor so I generally like to stack panels on the sides of the main view port. I’m used to doing this with other software I use a lot, like Adobe After Effects and Maxon Cinema 4D. The fact that RealityCapture resembles programs like that makes it more approachable for creative professionals working in VFX, Animation and Game Development.
There are basically 3 menus, deviced by tabs: Workflow, Alignment & Reconstruction. They all offer more in-depth settings but for a fully or semi-automated end-to-end process, you can simply follow the 3 steps in the Workflow tab.

1. Add imagery
Either select files or a complete folder (with subfolders). The images from my Canon EOS loaded without problems but those from my Sony RX100 had yellow exclamation marks. After searching the (excellent) support forums I discovered that this is a minor issue cause by the camera model and focal length info from the EXIF info isn’t present in RealityCaptures database. It caused no problems with my tests.
As you can see there’s also a unnumbered step in the process called Import & Metadata. Here you can import laser scan data and import external information for drone-based captures. Since they’re are beyond the scope of this website, I won’t include them in this review.
2. Process
Just hit Start and the program will automatically run all necessary processes. It uses the presets from Settings > Start button for this. There you can set the Reconstruction Mode (Quality) and whether you want the model to be per-vertex colorized, have a UV-texture, or both.
After using the Start button for the first time I thought the software only did camera alignment (Sparse Cloud generation) in the few minutes it took. But to my surprise it generated the Dense Cloud as well! And then I thought that would be because it was set to Normal quality but that setting already delivers a very detailed result. A lot more detailed than ReCap Photo’s (previously ReMake) Standard and PhotoScan’s Medium settings that have comparable processing times, as you’ll see later. I have done some speed test comparisons in a separate post.
You can also start all sub-processes one by one instead of using the Start button. This is recommended for trickier shoots like outdoors. While RealityCapture generally does a good job with automatically setting a sensible Reconstruction Region you usually want to adjust it after the — amazingly fast — alignment stage.

Resizing and rotating the Reconstruction Region (either in the sparse or dense cloud stage) is very easy due to the clever gizmos. A vast improvement over PhotoScan’s implementation of the same process. You can also easily define the ground plane by simply moving and rotating the model in relation to the floor grid. And if you’ve done that, you could also generate a new Region by drawing a rectangle on the grid and pulling it upwards to form a cube — again, clever and easy.
New in 2018 are a complete set of selection tools. Not only the standard tools like Lasso and Rectangle selection but also selection by parameters like edge length. All selections can also be expanded en you can create a Reconstruction Region from a selection. I can’t be understated how important this is for daily workflows and I’m very happy that they have arrived! You can check the full list of new features in version 1.0.3.3939 here.
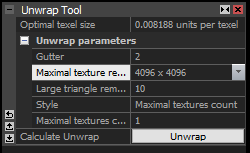
RealityCapture can colorize the model both with the per-vertex coloring method as well as generate UV-texture maps. If textures are important for your workflow, be sure to dive into the Unwrap Tool (located under the Reconstruction tab) and experiment with the settings. It won’t hurt to put the maximum resolution at 4K. As of 2018 the default is now 8K which is still a tad high for lighter systems but a lot less likely to crash your PC.
With the settings above I switched between 1 and 2 textures depending on the object size and the generated textures are usually quite good and efficient.
Updated: Earlier versions of RealityCapture could only visualize the processed results as point clouds. Recent versions generate a polygonal mesh as by default, which is great. No more need to view the actual results externally and the software is still fast.
RealityCapture still does hole-filling automatically, with no control over which holes are filled. But the algorithms for these seem to have improved since my first review. It’s still a big difference with PhotoScan and Zephyr that both offer filling option on a per-hole basis.
3. Export
You can export the results directly to a video or still image which is handy for previews and sharing with clients that don’t have 3D viewing tools.
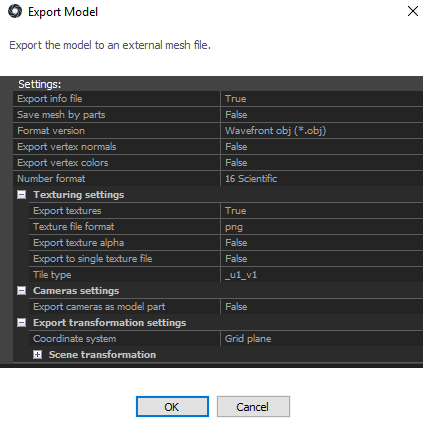
Exporting meshes can be done as .FBX, OBJ or .PLY. You can also export the point cloud data as .XYZ file but ironically that has to be done through the Mesh export button.
RealityCapture can also export to directly to the popular 3D-sharing platform Sketchfab.
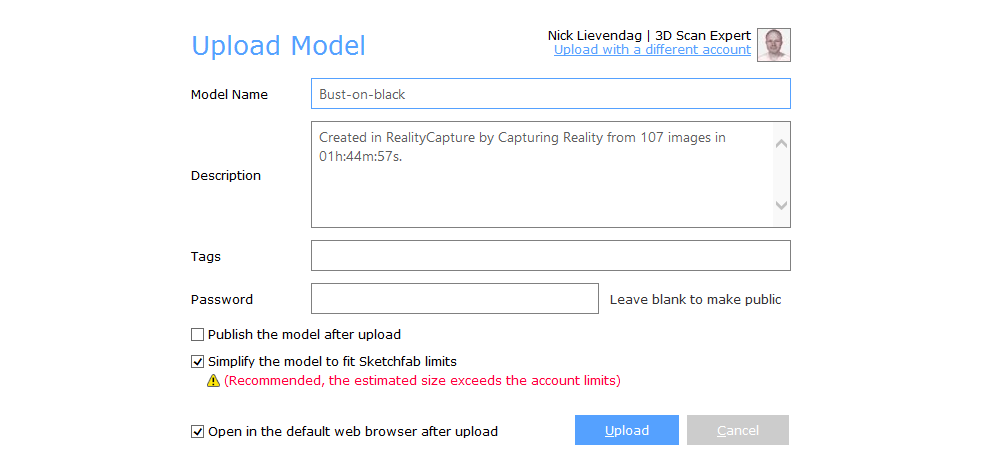
What I really like is the fact that it can automatically simplify (decimate) the model to fit within Sketchfab’s upload limits. It will even recommend when it estimates this is necessary.
Results
Note: I have not reprocessed my photo sets to generate new models for the 2018 update so all models below are made with the June 2017 version of RealityCapture.
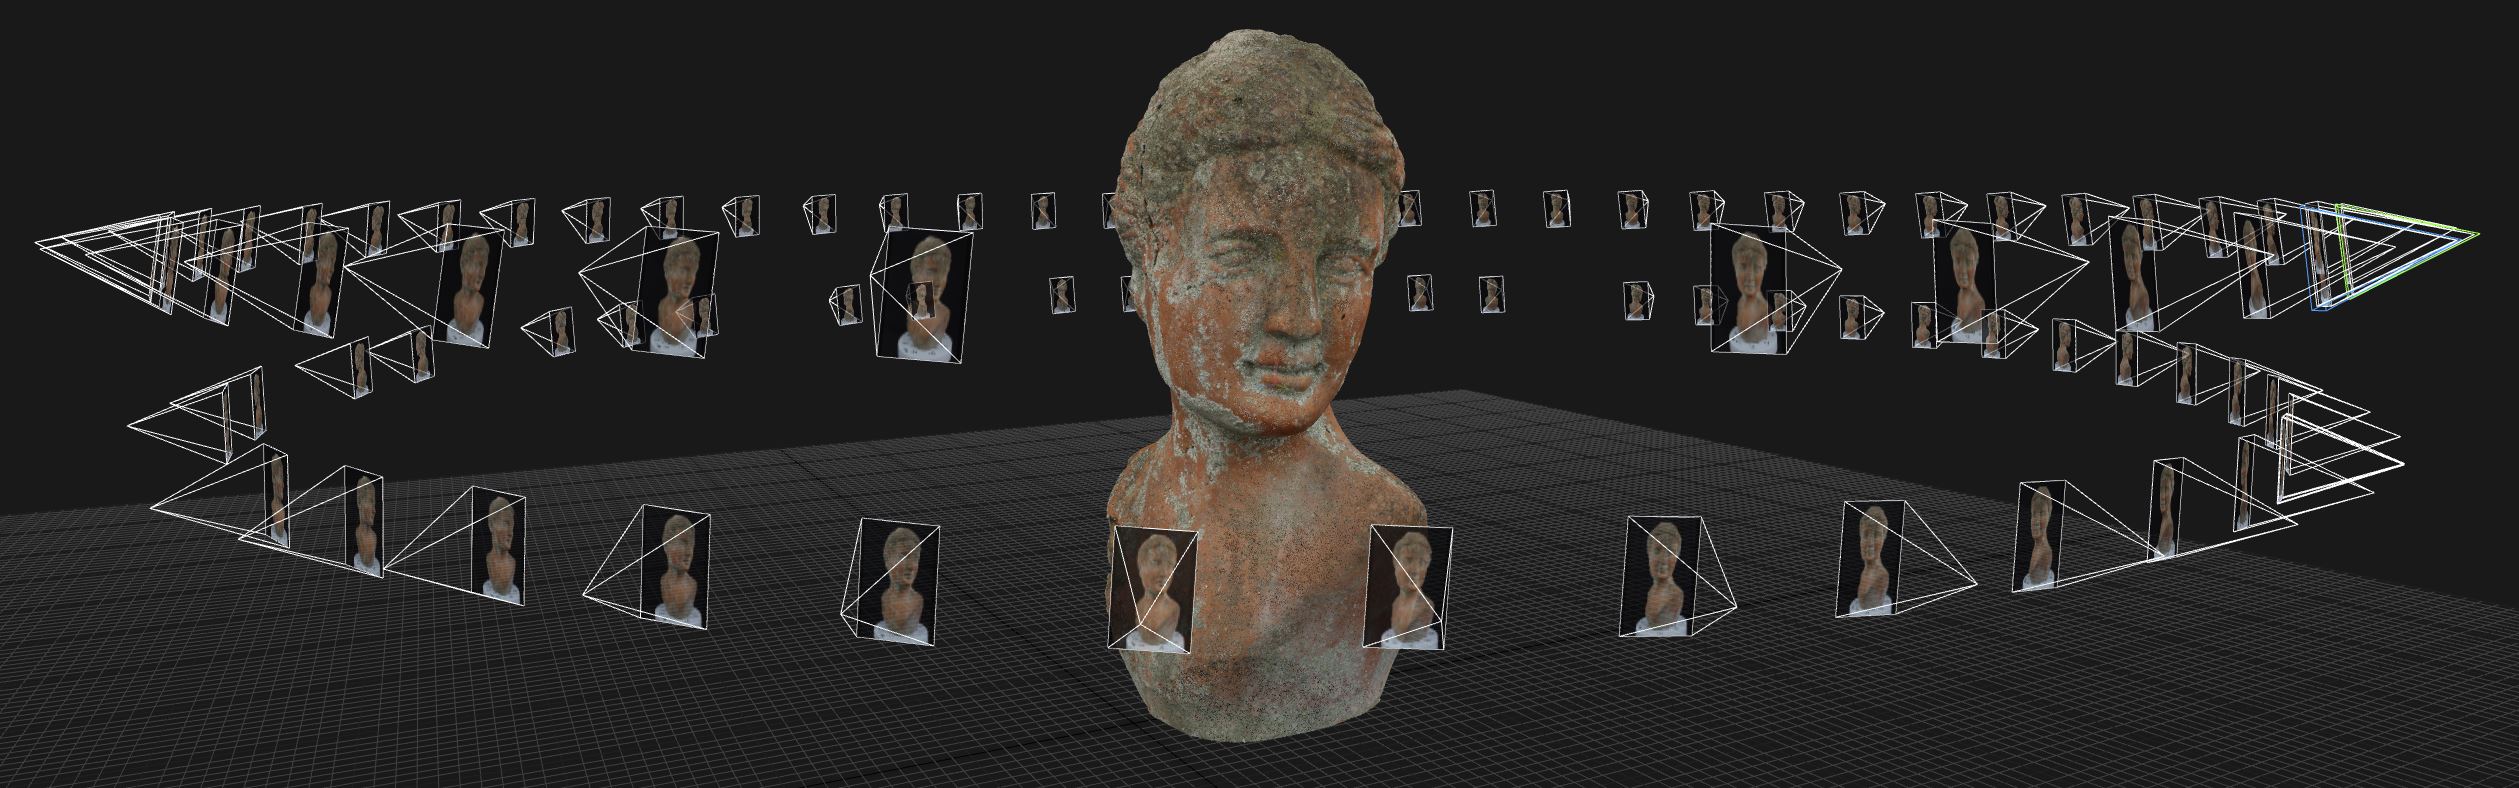
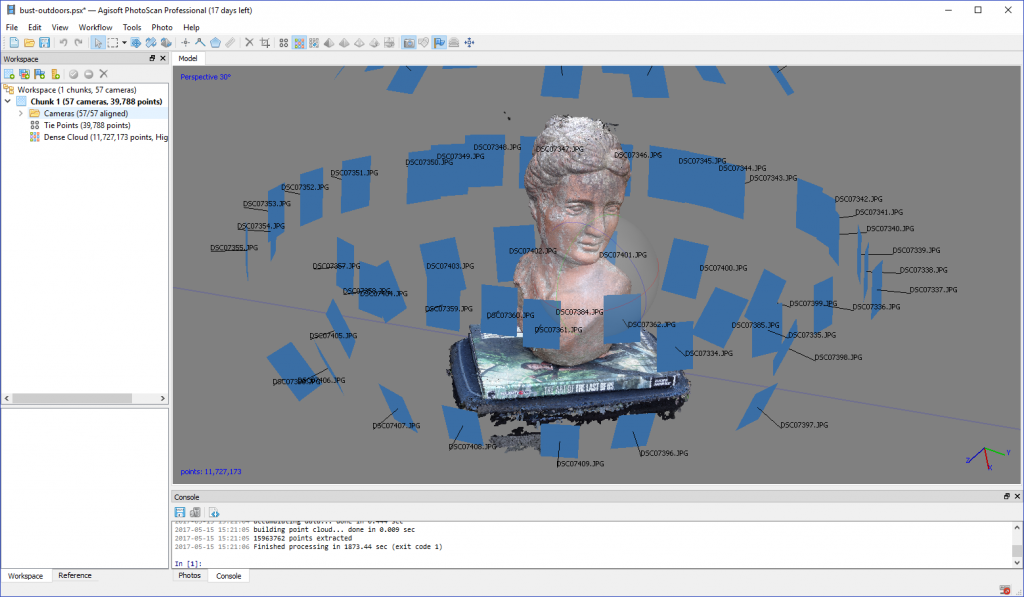
Let’s start with the bust I shot outdoors. The first result below is processed with the Reconstruction Mode set to Preview quality. If I understand correctly, that’s the only mode that uses point cloud data to generate the mesh. I think it even uses just the Sparse Cloud for this. It’s a set of 57 21MP photo’s and it was processed from loading the photos to meshing and uploading to Sketchfab in 5 minutes — five minutes!
Okay, if you set the render mode of the embed above to MatCap, you can see that the geometry isn’t very detailed. But the texture is good and compensates for this. In fact, if you’d smooth the geometry a bit (which is clearly necessary) I’d say the Preview quality of RealityCapture is comparable to the output of most Depth Sensors for medium-sized objects like this. Here’s the same bust scanned with a Structure Sensor and itSeez3D (Review) for comparison:
But I included this Preview-quality result just for the sake of it. I’m positive very few people will use that and nobody will use it for final output. Especially because the Normal quality takes just 15 minutes to compute. And look at it!
It’s really worth looking at that in MatCap mode since the geometry is very detailed and it has a polycount of 3.8 million. For comparison, PhotoScan can also process that photo set in 15 minutes, but only in Medium quality which is a lot less detailed with just over half a million polygons:
To get more details from PhotoScan, you’d have to process the photos at High quality which takes significantly more time. I’ll keep the exact number for the upcoming comparison post because I want to perform all tests on an idle system for fairness sake.
You might have noticed that like PhotoScan, RealityCapture was unable to distill enough data from the photos to fill the top of the bust’s head with geometry. Instead it filled the remaining hole with a few flat polygons. It also didn’t texture these new polygons like PhotoScan does.
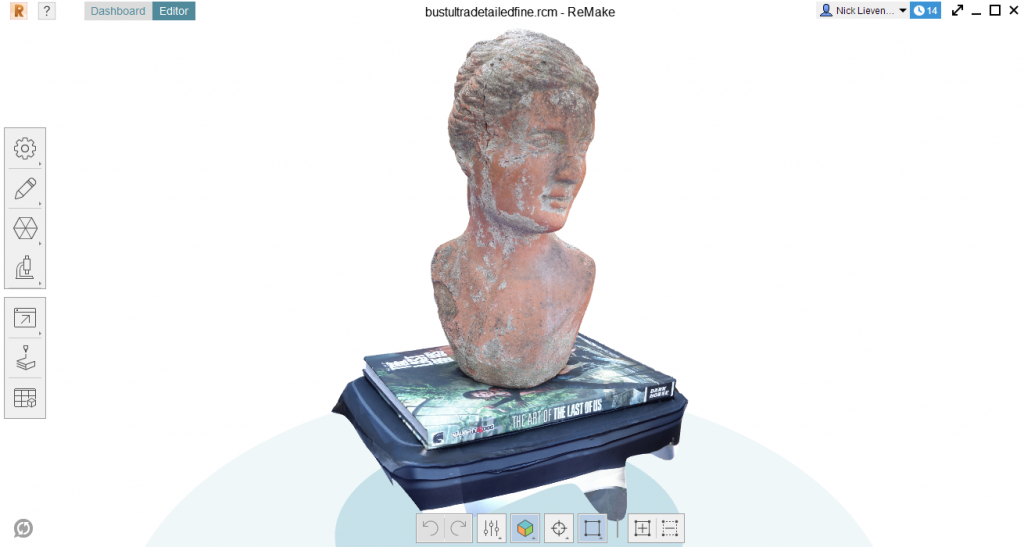
It’s noteworthy that ReMake is the only software of the 3 that has no problems with the minimal amount of photos I took from a down-facing angle. Here’s the result from ReMake in Preview quality — also processed in about 15 minutes — which would also have been also achievable in that software’s Free version if I discarded 6 photos from the set to meet the maximum amount of 50.
At 113k polygons the result ReMake can produce in 15 minutes locally (and also externally — running this project through Autodesk’s cloud service takes about the same time because of the added upload, download an queue times) is clearly the least detailed of the three.
What this basically means is that if you’re a professional and time is money, and you’re budget only allows you to invest in mid-level computer hardware (like my i5 / 32GB / GTX 1070 system) for this kind of work you can get the best results from RealityCapture. I have a background in 3D animation and VFX so I know all about the impact of render times on budgets and profit margins and fast computation is worth a lot because it takes away the hassle of planning overnight renders or invest in cloud rendering.
If you do have more time the High quality setting of RealityCapture is still very fast. Below I used the set of 107 photos I took of the bust on the Foldio360 turntable with the Canon EOS. It processed in just 1 hour and 45 minutes and because of the extra photos from the top it also resulted in a complete head.
The initial result it produced had 19 million polygons! I’m not sure how much of that is actual detail because almost none of my 3D software can handle a mesh with a file size of almost 2 GB comfortably. Ironically, ReMake was the only software that could load the mesh to view interactively. For completeness sake I made a 2D render of the unedited mesh:
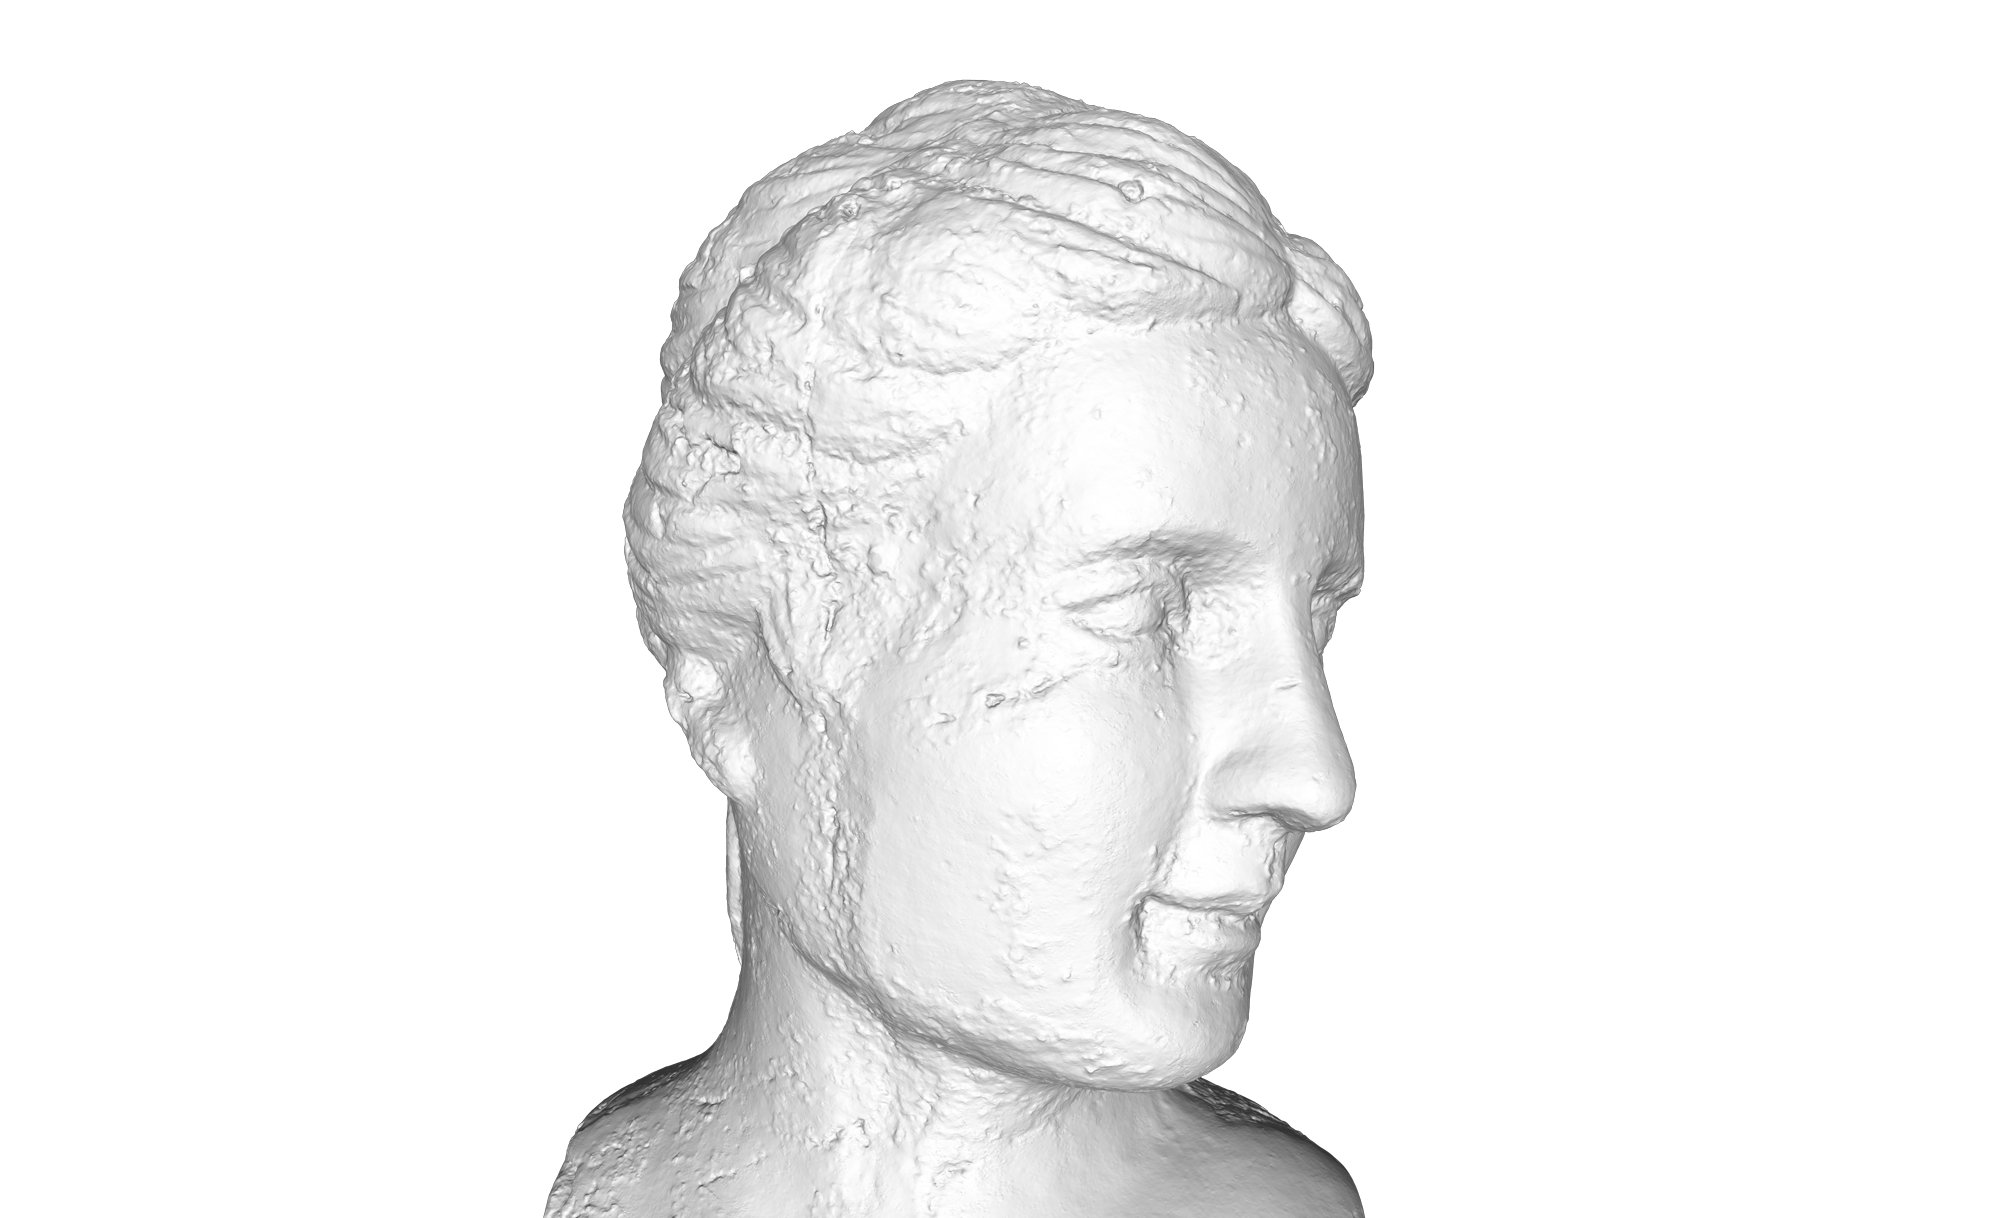
While exporting it to Sketchfab, RealityCapture automatically decimated the mesh to 1.9M polygons. That’s exactly 10% of the original polycount but surprisingly a lot less than the result computed in Normal quality mode. Even so, a simplified High quality model contains more details so it’s worth the extra time if you have it.
Next is the statue I shot with the RX100M2 on a monopod, processed in just 10 minutes. It has 5.4M polygons.
Unlike ReMake (see below) but like PhotoScan, RealityCapture also had a problem with closing the top of this model with the minimal amount of down-facing photos. But the way it filled it is rather special. Of course you can easily remove those polys in a 3D editing program but that defeats the purpose of the built-in Sketchfab exporter. I would really like to be able turn of hole-filling.
This is a good moment to emphasize the weak point of RealityCapture and the stong point of ReMake. The latter has a lot of advanced mesh editing features but can also decimate high-poly models while generating normal and displacement maps. The result below took a lot longer to compute in ReMake at Ultra quality but it was decimated to under 1M polygons and has the automatically generated Normal Map from the high-poly original. The normal map has been applied in the Sketchfab version below:
The fact that stuff like that can be done without ever leaving ReMake is surely a big USP for some professionals. On the other hand the topology and UV-map of the ReMake model is still unusable for most VFX, animation and game development purposes. This means that a 3D artist will run it through a program like zBrush anyway to retopologize and remap the texture. If that’s the pipeline you want to add a photogrammetry tool too, the fact that RealityCapture is blazing fast is probably key.
Next up is a small object — and a less organic one that’s harder to hide imperfections with. I shot 4 cycles of this vintage camera on the Foldio360 turntable with the Foldio2 light tent and camera settings matched to create a shadow-less white background. The Canon EOS DSLR was set to Manual and wasn’t moved or changed. I simply rotated the object in between cycles to create a full 360×360 degrees object from 149 photos. It was processed in High quality in 1 hour and 45 minutes (Normal took just 24 minutes) and was auto-simplified before uploading to Sketchfab:
With the texture enabled, it looks pretty good. But when you set the embed to MatCap render mode, you’ll notice that the geometry is very noisy. On the smooth parts this isn’t very surprising with photogrammetry but the leather-like texture on the black parts of the camera is also noisy and very inconsistent. There are clearly some patches that have more noise than others which gives a peak into how this algorithm works. This result in the leather texture makes it impossible to efficiently pull a normal map or displacement map from — the first thing you want to do if you want to turn this into a game asset.
For this object, I like the geometry produced by PhotoScan better:
It’s good to know that RealityCapture also has a Smoothing Tool. Below is Teddy, the knitted bear, captured on the Foldio360 (127 images) and processed at High quality with Simplification but without Smoothing:
If you zoom in on the MatCap render, you’ll see that the polygons are very twitchy. After running the result through the default smoothing settings, the geometry looks softer but a lot more organized:
Below is the same photo set processed with PhotoScan set to High Quality (which was actually a nightly render that almost locked up my PC).
Even after smoothing, the RealityCapture result has more geometric details. So for organic objects it beats PhotoScan in terms of time and quality.
But because of the less-than-perfect results on the vintage camera I decided to capture an object with straight edges to see how RealityCapture handles that. I used a 12cm tall wooden Juice Pack from my daughters toy kitchen. In Normal mode, RealityCapture came up with this result from 74 18MP photos from the turntable:
Of course this is wood so the surface isn’t 100% flat in real life but if you look at the MatCap render you’ll notice that the geometry is messy, especially on the diagonal areas at the top. I processed the same photo set with PhotoScan in High Quality. That took three times as long but resulted in a model with similar polycount with a far nicer surface.
I’ll definitely do more testing in the future but from these tests I’m concluding that capturing non-organic (so most technical) objects with flat surfaces isn’t RealityCapture’s strong point.
Verdict (updated for 2018)
RealityCapture is fast. That’s its USP and it’s very true. It’s significantly faster than the competition at aligning photos and generating dense point clouds. And it delivers detailed results as well. Recent versions also visualize the polygonal mesh in the viewport which is a big step forward compared to previous version that only showed a point cloud and relied on exporting for meshing. Now you can see the final model directly in the software. On top of that there’s a lot of added control over the editing process in the form of a great set of selections tools. The only feature on my wish list is more control over hole filling.
While RealityCapture produces very high-poly meshes, the initial poly-count-to-actual-detail ratio is quite extreme in High quality mode. It’s a good idea to simplify the dense cloud before meshing and for most objects I’d advice to run the Smoothing Tool as well to get a less-chaotic topology that’s a better basis to work from.
In general I found that RealityCapture works best with organic objects. For statues it beats PhotoScan in terms of speed and detail, so it’s perfect for Archeology and Cultural Heritage purposes. But if your objects are more technical and contain a lot of smooth, flat surfaces I’m not sure if you’ll be happy with the results of RealityCapture’s fast algorithms. For those objects, I find PhotoScan’s geometry more pleasing.
The interface takes a bit of getting used to but all features are nicely organized and the locations of the various panels can be customized to taste. The same is true for virtually all settings which can be saved. I really like the fact that RealityCapture offers both a one-click approach to photogrammetry through the Start button for first-timers and various levels of control for advanced users. Most tools are quite technical but the built-in help feature explains most of them in a clear way.
Maybe the most exciting thing about RealityCapture is that the version I first reviewed was just 1.0 and was already very good and the new version of the review update (1.0.3.3939) improved on many pain points of my original review.
It’s great that there’s now also a version that’s priced in the range of the competition. It purely for photogrammetry (so sans laser scan features) but that’s the only thing I’m interested in anyway. I’m also sure the Promo subscription of $99 for 3 months will attract a lot of artists and small businesses. For that audience it’s also nice that the software is less resource intensive than PhotoScan and can run on a lighter system with less RAM and still allow doing light work in the meantime. It does require an Nvidia graphics card, though.
The 2500 photo limit of the Promo version is enough for capturing most objects and environments. And sending a few anonymous statistics now and then is a lot less than most people do when browsing the internet in general.
Other Photogrammetry Software Reviews
3DF Zephyr Review
Windows-only. Perpetual & Free version
Autodesk ReMake Review
Windows. Subscription & Free version.
Agisoft Photoscan Review
Windows, Mac, Linux. Perpetual license.


Hello sir, I have a question about reality capture, as you said in your conclusion : “audience might be attracted to some features from competitor PhotoScan, which include the ability to re-import optimized meshes and UVs (from zBrush, for example) for texturing.”
This is my case, so what is the alternative if we cannot re-import the meshes or UVs for texturing in reality capture software ?
Thank you
Hello Thomas,
You can re-import your mesh into RealityCapture with the import model button (at the right of top menu).
Pascal Godard
Hi Pascal,
I’m a geologist and am wondering if I would be able to use this software to measure features in a rock outcrop. Do any of these programs provide tools to quantify/ measure feature geometries & spacing that would be true-to-scale?
Thanks! – Steph
Hi Stephanie,
If you objects in the scene of known scale in the scene (preferably more than one at different places) you can scale the virtual object by defining the distance between two points. The more of these control points you define, the more accurate the model becomes.
Unfortunately RealityCapture doesn’t yet have measurement features but if the model is scaled correctly you can import it into the open source program MeshLab to perform measurments.
If you want to perform distance, area, and volume measurements inside a photogrammetry tool, you can check out 3DF Zephyr Professional.
I have a special post planned about scaling photogrammetry projects in all major software packages. Keep an eye out for this!
Hello Nick
What texture size are have the last one women bust model? (Bust — RealityCapture (High)
At the moment texture look a little low quality and blurry. Does that happened because of Canon 550d and kit lenses or you just desides not to rendering too big texture size?
Thank you
Thank you for the reviews. I’m currently looking for a photogrammetry software solution and your reviews are very helpful. If I can make a request, would it be possible for you to review the PhotoModeler software?
Hi Nick,
How long do you think before most cellphone have proper depth sensor in the back?
Thanks
Website Design and Development Company in Lucknow
hey! Mr Official Online
How long do you think before most cellphone have proper depth sensor in the back?
Website Design and Development Company in Lucknow
[…] Processing photos in RealityCapture (source: 3D Scan Expert) […]