
A while a go I stumbled upon the Orangemonkie Foldio360 — a “smart turntable” that’s controlled by an app over Bluetooth. It costs €165 (ex. VAT) in the EU and $139 in the US.
Like the name implies, the Foldio360 is actually focused towards 360° product photography but I was curious if it could also be used to automate Photogrammetry. So I reached out to Dutch reseller Benèl BV who kindly supplied me a complete set containing the Foldio360, a portable light tent (with white, black and green backgrounds) and a smartphone tripod. You can buy them separately or as a set.
I think that’s within the budget of many (creative) professionals that want to experiment with 3D capture. It’s even affordable enough for hobbyists and education.
The question of course is: does it work for photogrammetry? Let’s find out!
Why am I testing this?
When it comes to making 3D captures of small to medium objects there are quite a few desktop 3D scanners on the market today. Most of them can be used with an electric turntable, making it a lot easier to automate the process of making full 360° scans. Desktop 3D scanners like this are getting better, easier to use and more affordable each day. An all-in-one structured light scanner like the EinScan-SE (Review) starts at $1199.
Another way of capturing reality in 3D is Photogrammetry — the technology that can turn a set of regular 2D photographs into a 3D model. Popular applications for this are Agisoft Phototoscan (Review), RealityCapture (Review) and 3DF Zephyr (Review). The latter has a free version but you can also get a discount on the Lite version (up to 500 photos) on my Deals Page.
These sophisticated programs can all produce impressively detailed models but unless you have the funds to build a rig with 100 cameras, single-camera photogrammetry is very time consuming. That can become a problem if you need to scan a lot of objects or want to experiment with volumetric 3D stop-motion animation.
I’m hoping the Foldio360 can be used to create a setup similar to a desktop 3D scanner, but using photogrammetry.
Hardware & Software
At first glance the Foldio360 is just another electric turntable. It’s 25cm in diameter, white, and weights almost nothing. Nothing special there but this one as a few very interesting features under the hood that make it ideal for this purpose.
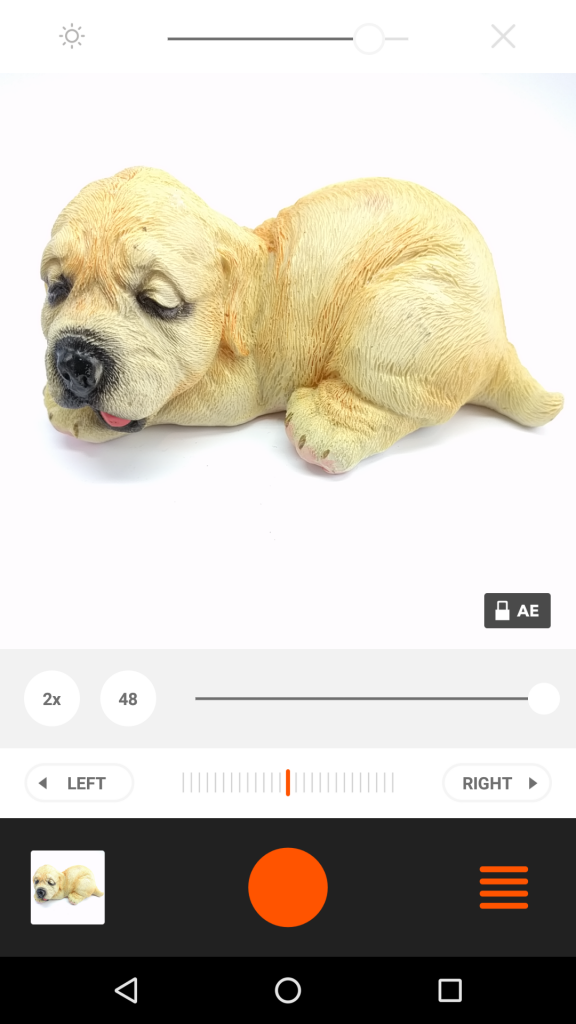
Firstly, it can be controlled over Bluetooth with a nicely designed and easy to use Android or iOS app. Here you can set the amount of stops the turntable should make when doing a 360 degrees rotation: 24, 36 or 48. There’s also control over the speed.
Next to the rotation options, there’s a slider for the HALO EDGE light system. The what? Yes, it is as sci-fi as it sounds! On the back of the turntable there’s a transparent strip that can light up like the Millennium Falcon. When the turntable is put on a limbo (a crease-less photography background) the HALO EDGE can light up the background.
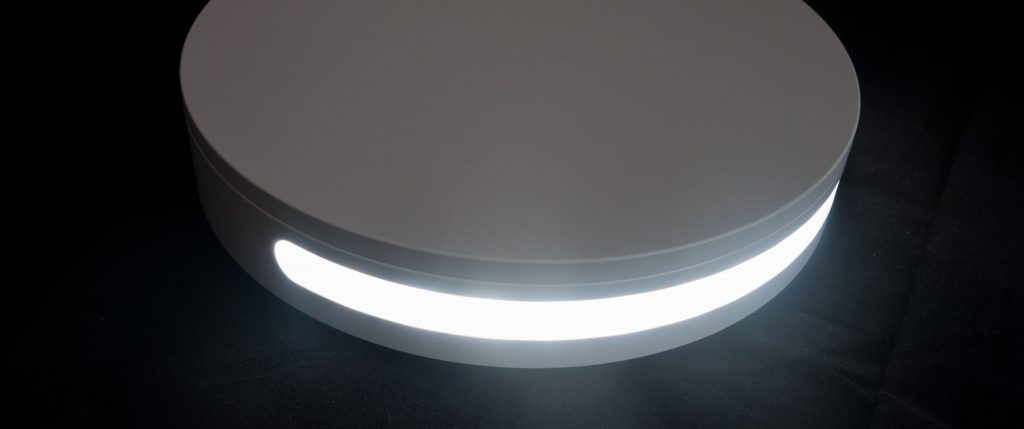
Combine the back light with the two dimmable LED light strips that are built into the supplied light tent (or any front-facing continuous studio lights) and you can create an effect where the object seems to sit in a completely white environment. This effect can be improved with the brightness slider in the app. Altogether this is a very intuitive way of getting this effect, even for beginners.
Smartphone mode & 360° Product Photography
Creating a 360° photo sequence of a product can be done within the app by just pressing the record button. After that you can upload the result directly to Orangemonkie’s Spinzam service — for free. From there you can share the result on social networks or embed it in a website like I did in the second image below.
Click and Drag the image below to rotate
This is surely a quick and easy way to create basic interactive 360s but they are basic indeed. For instance, the app doesn’t allow you to combine cycles from multiple height angles for a more “three-dimensional” presentation.
This is all nice of course, but I’m not really interested in 360 photography, or at least not to use it directly. My plan with the Foldio360 was to export the photos and load them into photogrammetry software to create volumetric 3D presentations.
Unfortunately, the exported photos aren’t full resolution — they’re just 1080 x 1080 pixels. Not completely useless for some cases but I’ll go into that in a moment. First, I want to highlight the Foldio360’s killer feature for photogrammetry: remote DSLR control.
DSLR Mode & Photogrammetry
It’s a pity that it’s not possible for the smartphone app to save full-res photos but if you want to get the most out of photogrammetry it’s generally a better idea to use better camera anyway. That’s why it’s great that the Foldio360 also has a DSLR mode.
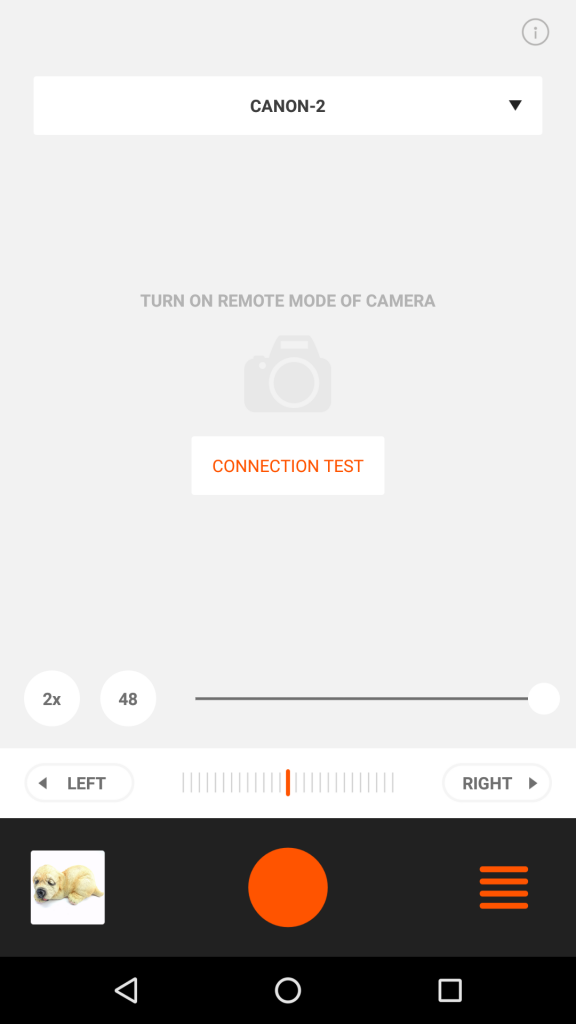
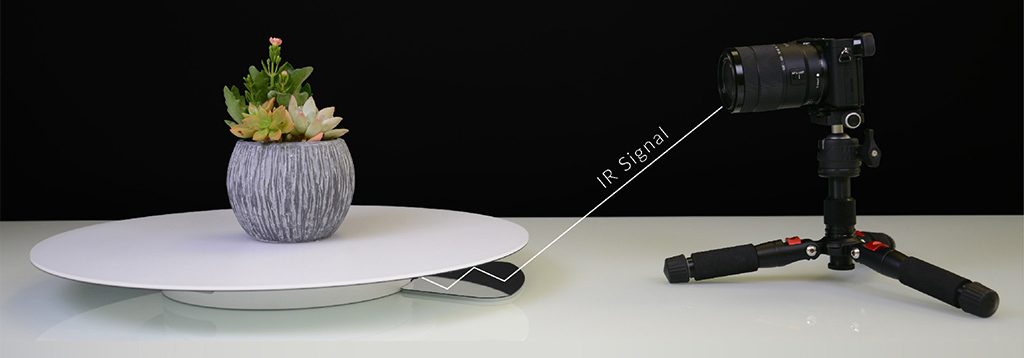
In this mode you still operate the turntable settings with the app over Bluetooth but the LED on the front of the front of the device will send a trigger command to an external camera every time the turntable pauses. This allows you to take full resolution photos with all the settings you desire.
Naturally, the photos are not saved to the app in DSLR mode so you will have to get them from the SD card yourself. Modern DSLR cameras, like the Canon Rebel T6i, have WiFi capabilities to transfer the photos to your computer. If yours doesn’t you can also opt to use a WiFi-enabled SD card.
The remote control uses infrared. The Sony RX100M2 I usually use doesn’t have that, so I had to use my old entry-level Canon EOS 550D (Rebel T2i) with kit lens. The app has control schemes for all the mayor DSLR brands but I had to tap the “refresh list” option and use the “Canon-2” to make it work. And I had to do this every time I started the app — it doesn’t remember your preference. It does work reliably, although some camera angles and positions seem to break the line of sight between the IR transmitter on the Foldio360 and the receiver on the EOS.
Update October 2018: Extension Kit
To allow bigger objects on the turntable, Orangemonkie has announced the Extension Kit. It features a larger disc (49cm / 19″ diameter) that you can put over the existing turntable. Using the included mirror and the mirrored surface under the plate, the IR signal can pass beyond the edge. Included is also a large white backdrop. This is great news for people that want to use it for photogrammetry.
The Extension kit will be $89 but is now available for pre-order for $59 for a limited time.
The DSLR feature of the Foldio360 is ideal for automating photogrammetry in three ways:
- You can take full-res photos with the finely controllable settings of a DSLR
- You can shoot RAW photos to more easily remove any remaining shadows from the images (in Photoshop and then saving them as JPGs for most photogrammetry software)
- You can shoot from multiple angles at once if you have two or three DSLRs. Infrared control is passive so all cameras will react to the singles simultaneously.
So that’s a very interesting feature for the small price. But before I go into the results I want to cover the rest of the hardware setup.
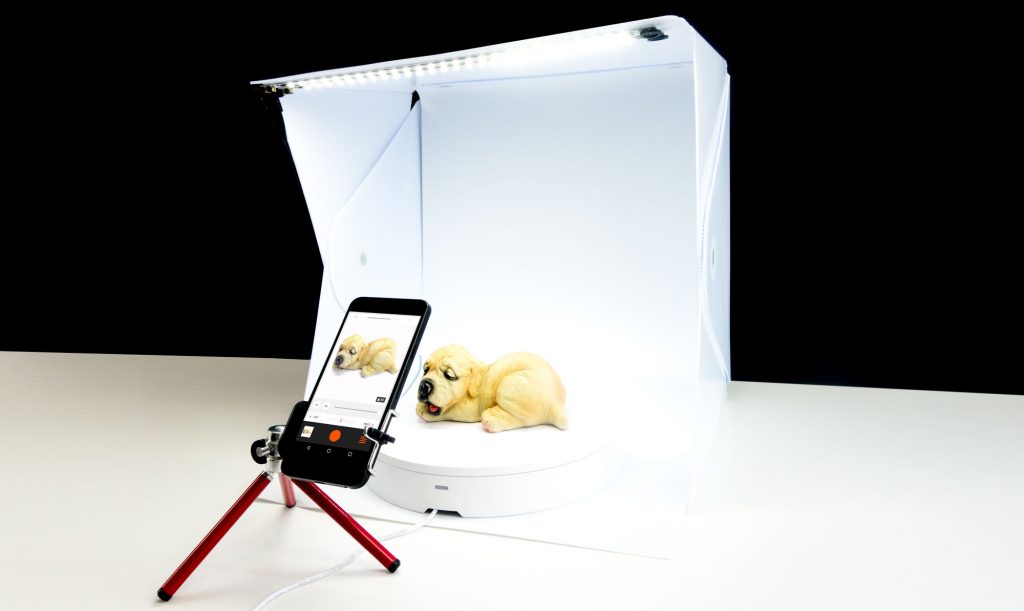
The Light Tent
The Foldio ligt tent now comes is multiple sizes
- Foldio 2 — 15″ for $69
- Foldio 3 — 25″ for $139 or $159 with extra LED stand-alone Halo Bars
I’ve used the smaller one for my tests an it’s indeed quite small. I’d greatly advice the 25″ Foldio 3 since it will prevent the edges of the background from showing up in the background.
There are, of course, many options for product photography. There are foldable light tents made out for fabric that have built-in lights, like this 25″ one from AmazonBasics for $135,99. Or you can can use a set of tripod-mounted continuous studio light combined with a photography backdrop. You can get a set with fluorescent lamps as cheap as $57 or a set of LED-panels for $150.
Using Makers
None of the applications I’m using here require markers and for most objects they work perfectly fine with just the white Foldio360 plate. But if you’re going to crop the floor plane anyway, it’s good practice for photogrammetry to use a floor plane with recognizable patterns. This can be anything but since the turntable is circular I thought it would be nice to make something special for it.
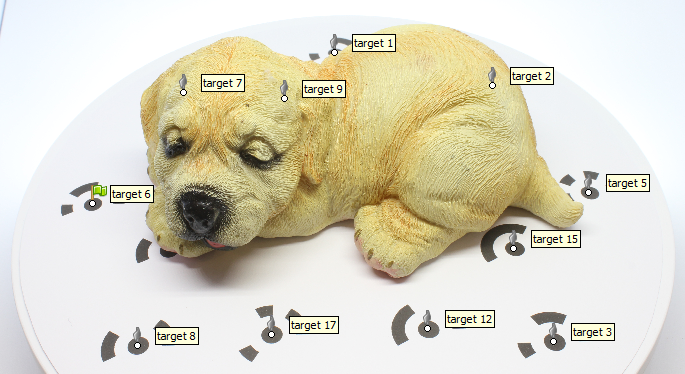
I made the PDF below by generating 12-bit targets. Agisoft PhotoScan Pro and the full version of RealityCapture have their own ways of natively detecting these markers.
Download Printable Markers as PDF
Results
Now the moment you’ve probably been waiting for. Does it work? Yes it does! Here are examples of the dog figurine capture (48 photos with the DSLR) in three popular software solutions. Note that below is not necessarily a quality comparison between these applications, since they all have different quality settings that affect the level of detail in the geometry and processing times.
3DF Zephyr
3DF Zephyr (Review) is the only commercial photogrammetry software that provides a Free Version (max 50 photos). Since it doesn’t require a Nvdia graphics card (like RealityCapture) you can basically any modern computer, albeit not very fast depending on the GPU. If you need more than 50 photos (for larger objects of full “360×360” captures I’ll show you later in this post), you can choose Zephyr Lite which has a limit of 500.

Get Discount on 3DF Zephyr Lite
If you use the button below you can order the Lite version with $10/€10 discount!
Agisoft PhotoScan
You can buy Agisoft PhotoScan (Review) Standard for $179 or Pro for $3499. It’s good to know that only the Pro version supports native (pre-processing) marker detection. As I wrote in the panel earlier, markers are not necessary for most objects — certainly not this richly-detailed dog figure — but can add reliability to the workflow, especially for capturing less-detailed objects.
RealityCapture
RealityCapture (Review) is probably the fastest photogrammetry tool out there. You can get the Promo version for $39.99 a month or $109.00 for 3 months on Steam. This version is capped at 2500 photo but that’s more than enough for using it with the Foldio360 (or capturing small to medium objects in general).
The model above is processed at Normal quality and took just 24 minutes (yes, RealityCapture is fast).
Capturing something bigger
Here are some more captures of objects of different shapes and sizes. And captured with the Foldio360 in different ways. All photos are processed with Agisoft PhotoScan Pro (at High quality), since I’m review that now and I like efficiency.
So with the printed markers on the plate you’re kind of breaking the “infinite white background” effect. Photogrammetry on a turntable with a fixed camera simply needs a completely even background. Depending on the color of your object, it might even be better to choose one of the other supplied background colors. In fact, it’s even easier to setup a DSLR to make a black background totally black. This only needs a little bit of under exposure which is easier to correct once the texture is generated.
But with a black background the white sides of the light tent can come into frame. And in general the tent from this set is a bit small compared to the turntable — it only works for objects up to the size of the dog figure (10cm wide).
So to scan something bigger I discarded the light tent completely and just used a black photography background and two continuous studio lights.

As you can see the outer ring of markers are still visible because of the small footprint of the bust. But as most objects won’t need trackers it’s not really a problem if they aren’t visible. One thing to keep track of though is that objects cannot extend over the edge of the turntable if you have the DSLR on a down-facing angle. This is because the object can then obscure the infrared transmitter preventing the camera from being triggered. I’m not sure if the Foldio360 could handle very large and heavy objects anyway, since it’s very light-weight itself.
Of the bust above, I shot two 48-photo cycles at different angles. After that, I wanted to take a few shots from the top down but that angle didn’t allow the IR trigger to function. To work around this, I used the third option in the Foldio app that allows you to rotate the turntable manually with a set amount of degrees. So I set it to 60 and took 6 photos manually with a timer to prevent any camera movement.
I loaded all unedited JPGs into PhotoScan and as you can see below it actually worked pretty well — and in a fraction of the shooting time compared to shooting the same bust by moving around it.
Capturing a “360×360”
If you want to capture small objects, the big advantage of the combination of the Foldio360 and the light tent is the infinite white background effect I mentioned earlier. If you setup the camera correctly this allows you to keep that in the same position and shoot multiple cycles with the object in different orientations. This can be very useful if you also want to capture the bottom of an object.
For efficiency and speed (because that’s what this post is actually about) I wanted to do everything “in camera” to prevent having to edit the photos. This approach only works with dark objects, because over-exposing light objects will result in lost details in the JPGs. For those objects, post-processing the RAW files is the only option.
Keep in mind though that with a single camera position, you can also create a single mask for all photos directly in Agisoft Photoscan.
I chose the vintage Agfa Clack camera below because it has an interesting bottom (erhm… yeah whatever). And because it has a combination of light and dark parts, and also glossy areas. I shot 4 cycles of 36 photos (48 seemed a bit overkill) positioning the camera on its bottom, top, back and front respectively:
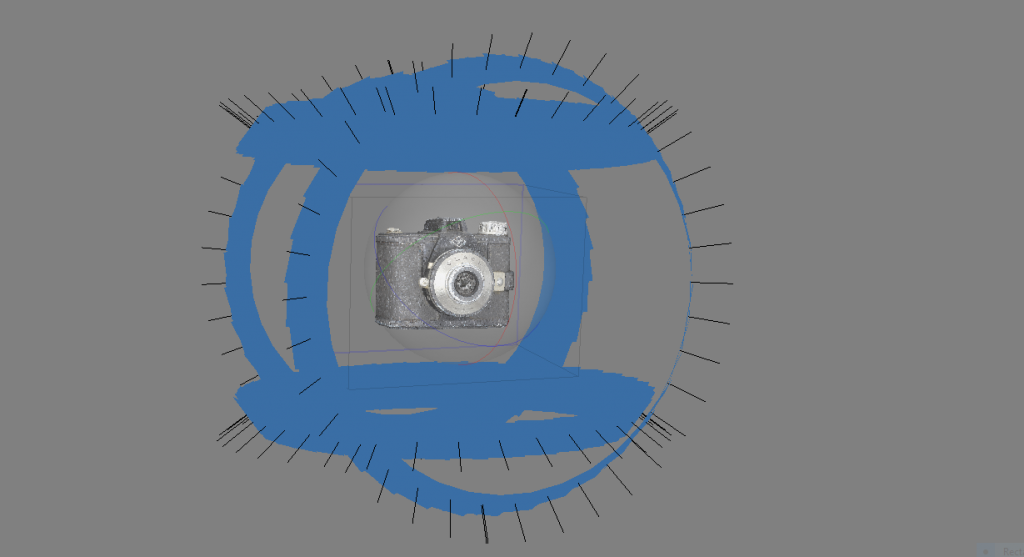
I processed the dense cloud with the High Quality setting and didn’t do any mesh editing. The only edit I did was adjust the levels of the texture to compensate for the over-exposure of the original photos. Here’s the result:
I’m very pleased with the result — surprised even! The fact that the small handles on the lens have been rendered correctly is simply awesome! Sure, the flat parts like the viewfinder and the area around the lens are a bit noisy but that’s a general problem with photogrammetry and structure-less surfaces. But the details are all there — both geometry and texture!
Verdict
I’m very excited about using the Foldio360 for photogrammetry, especially considering how affordable it is. The app has a few small bugs, but otherwise works great. The big downside is the fact that the Smartphone Mode doesn’t store the full resolution photos. So no matter how good your smartphone’s camera is, you won’t be able to create a full-mobile workflow.
For anything serious, you will probably use a more professional camera anyway and the DSLR mode is this device’s killer feature. The infrared transmitter has its limits in terms of range (especially at top-down angles) but it works reliably otherwise. 48 shots per cycle is nice to have but even 36 will do for most objects, saving processing time.
The Halo Edge back light effect is great in combination with a small light tent. If you know your way around setting up a DSLR manually (which is an absolute necessity for photogrammetry, by the way) you can create an infinite white background effects in-camera and use just the JPG output to efficiently capture objects in full 360 x 360 degrees.
I really like that Orangemonkie is constantly expanding the possibilities of the Foldio360 by offering all kinds of add-ons, like a larger tent, halo bars and the newly announced Extension Kit.
For bigger objects, the Foldio360 will still work in front of an even photographic background. For wider objects, it’s nice that the new Extension Kit expands the range of the IR transmitter. But even without automatic triggering, being able to rotate the turntable by a number of degrees and manually triggering the shutter can be a time-saver.
My personal feature request would be to also support WiFi-controllable cameras like my Sony RX100M2. That would make the whole set more compact and camera placement even more flexible.
Bottom line, the affordable price there are very few reasons why you shouldn’t buy the Foldio360 to automate photogrammetry of small-to-medium sized objects. It’s a fun and easy-to-use product that can be used in many ways.
Follow me on your favorite social network if you want to be the first to know when new posts about Photogrammetry are live!


Great overview! This makes me want to add the Foldio turntable to my setup, but we also use a Sony rx100 (m5). Do you know of any other similar products out there that might work? Even something that just turns based on phone controls? All of the other auto turntables I’ve seen are continuous spin.
Hi Kristy,
Thanks!
I’ve been in contact with Orangemonkie to ask if they have plans for adding support for WiFi-controllable camera’s like the Sony RX100 series. They don’t have plans for that in the near future.
If you have an Android phone, a workaround could be using the DSLR mode and then use this Time Lapse app to control the RX100M2: https://play.google.com/store/apps/details?id=com.thibaudperso.sonycamera&hl=en
I was planning to test if I could figure out a way to get it working (since my RX100M2 has more megapixels than the EOS I used) but haven’t found the time yet. If I do, I’ll share it here!
Have you tried to use adobe photoshop to create the 360 view of a product?
Hi,
Thanks so much for this 🙂
Been searching for the app Specs for Foldio
Can it run on iPad air?
Can it run on older iPhones?
thanks for the information. what do you use to raise the camera higher upon changing angles?
Thanks for this breakdown of the foldio360 Nick! I’m a student at California State University, Chico and I’ve been taking a photogrammetry class using Agisoft PhotoScan. I was looking into building a 360 turntable along with using my portable photostudio from amazon basics. However, the foldio360 caught my attention and it seems like a great product at a low price.
Just as a pushback to what’s possible with this turntable (which is sulking next to me as I type): we bought it following this review and were initially generally pleased. We’re hitting a roadblock with the precision of its rotations now, because we’re trying to incorporate focus stacking into the scans. Basically, the amount the system rotates when going around “360” degrees is not always that, but with an error of plus or minus 1 degrees. This error pops up when your trying to focus stack multiple runs, with subtle but killer alignment problems. It seems Foldio360 should be called Foldio360 -1
Photography is always a game of compromises. It really makes sense to grab the focus stack in one go at each angle.
Extra work but it’s possible! If you’ve got a Canon EOS hunt down “Magic Lantern” which enables focus stacks.
I don’t know of a turntable with the precision you’re after… but if you find one, please do share =)
I have a Canon Rebel T1i (Crop factor: 1.61) and am shooting small dioramas and products on my foldio360 turntable. Between these two budget lenses, which would you choose (35mm vs 50mm):
https://yongnuousa.net/products/yn-35mm-f2-lens-for-canon-ef-cameras
https://yongnuousa.net/products/yn-50mm-f18
I realize that if I spend more, I’ll get much better results, but feel that just by stepping up to DSLR my results will be worlds better than the cellphone capture.
Thank you for this write up and sharing your knowledge!
Sorry for the rapid fire… but also looking at these moderate lenses from Canon (22mm vs 24mm):
https://shop.usa.canon.com/shop/en/catalog/ef-m-22mm-f-2-stm?cm_mmc=GA-_-EOS-_-150903Brand Paid Search-_-canon lens 22mm&Ap=Camera Lenses&gclid=EAIaIQobChMIhoerlquN2AIVk9dkCh0AGgnKEAAYASAAEgK_ZfD_BwE
https://www.usa.canon.com/internet/portal/us/home/products/details/lenses/ef/wide-angle/ef-s-24mm-f-2-8-stm
Best!
I don’t have enough knowledge about those lenses to say anything specific about it. But it’s good to keep in mind that you’ll not use lenses at their widest aperture for photogrammetry. You’d rather make the aperture as narrow as possible to prevent any foreground or background blur in the images. Keep in mind that if you want to use every pixel of your photos you’d have to set the photogrammetry software to the highest settings, which can take a very long time to compute depending on your graphics card.
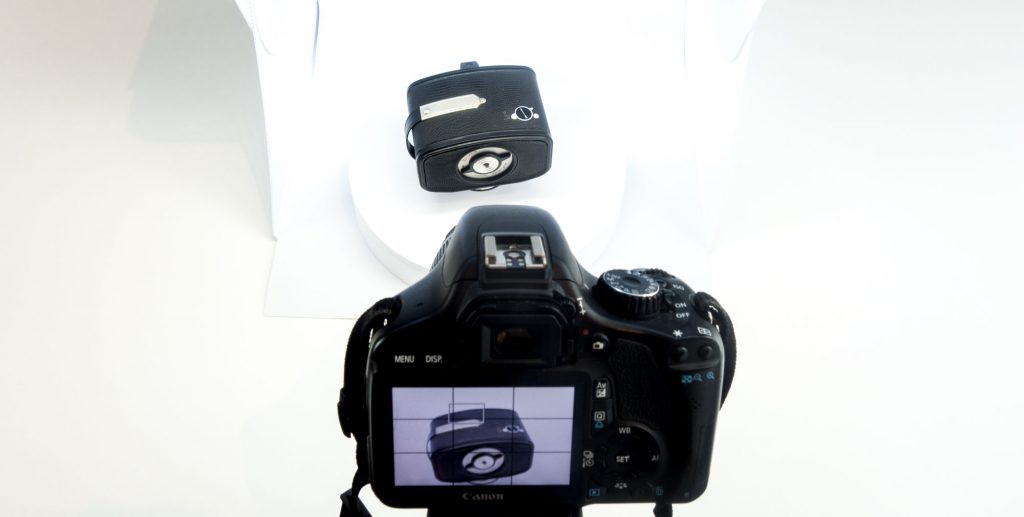
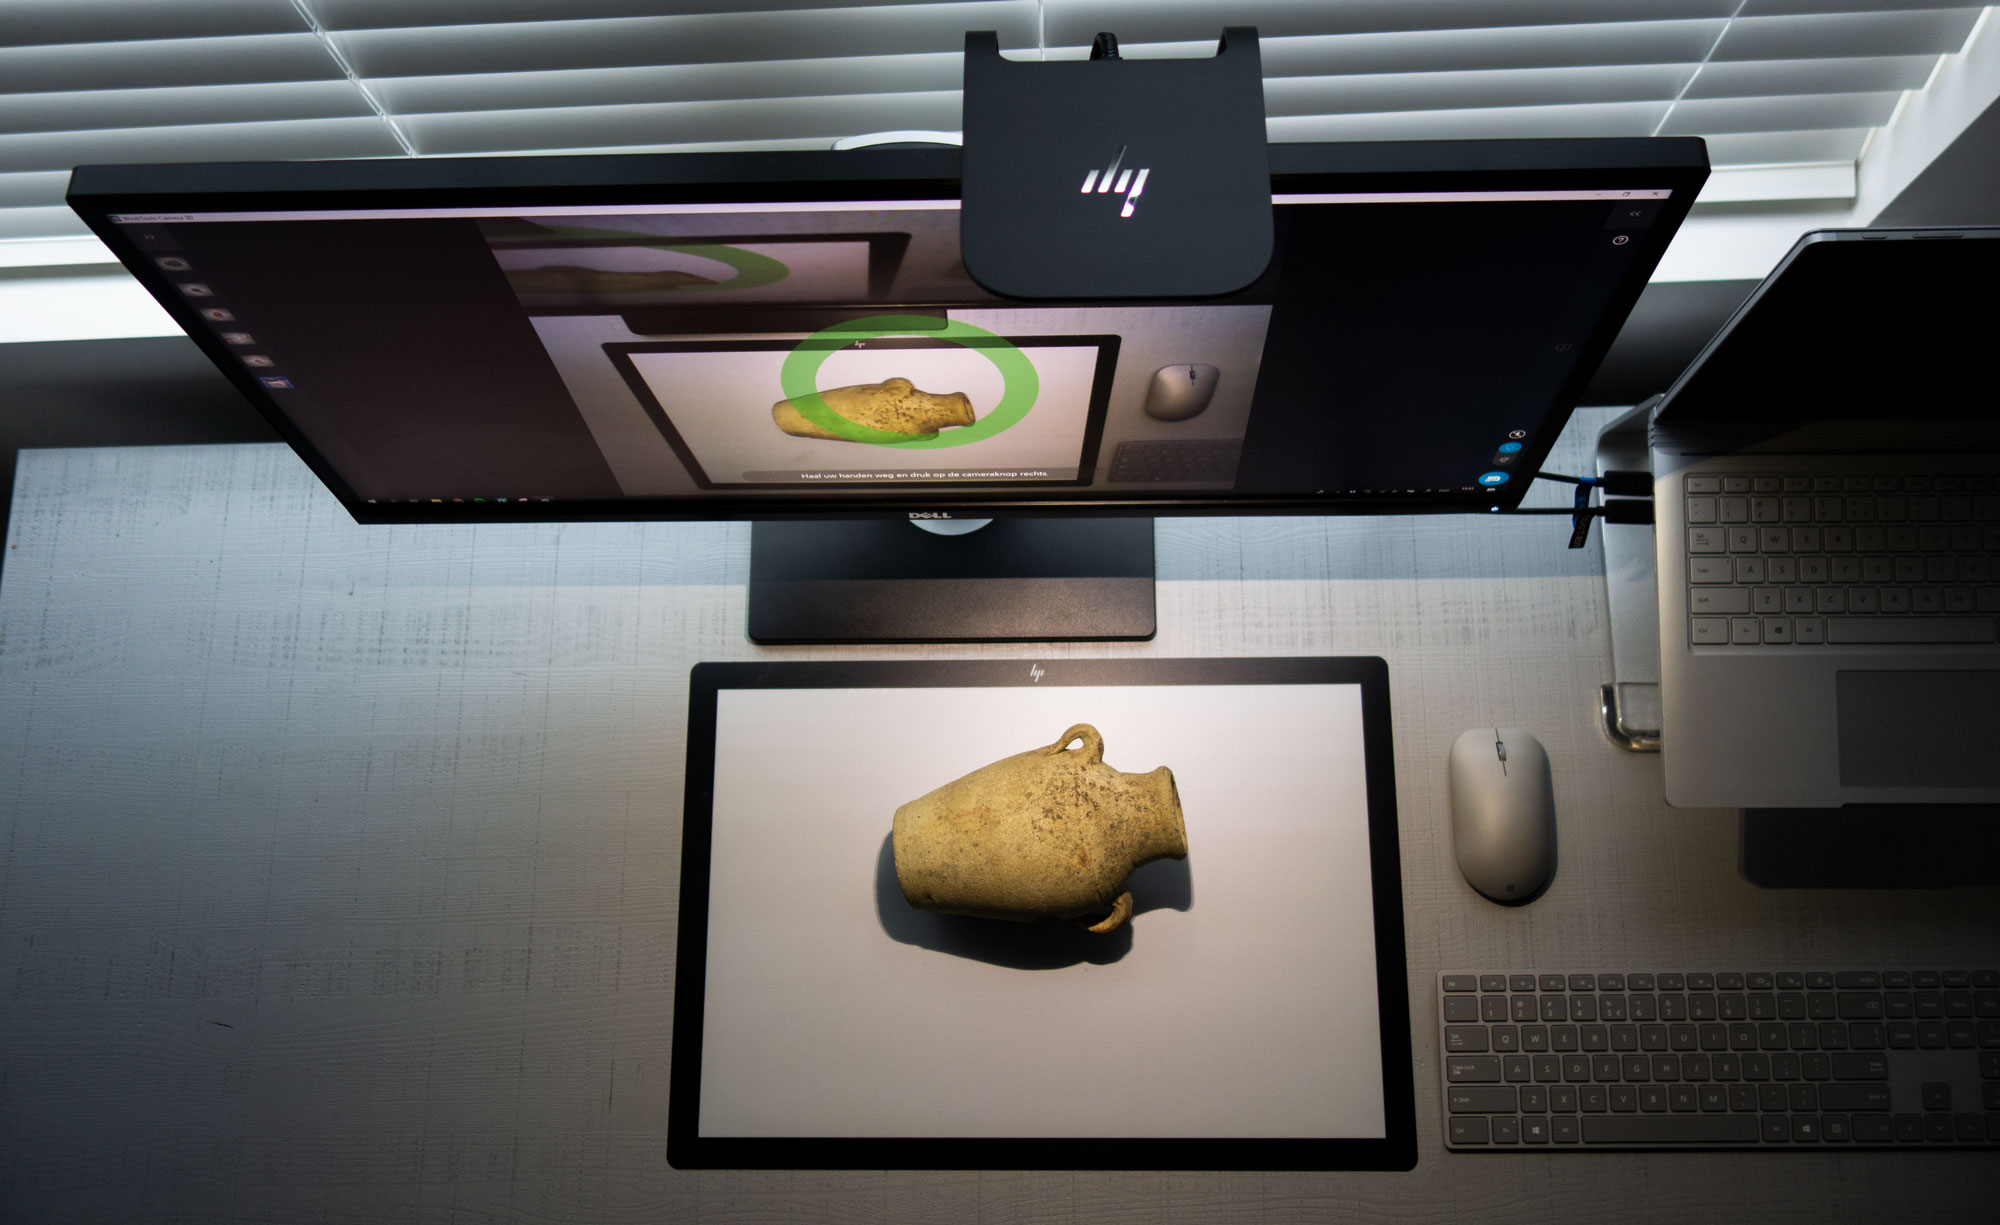
Regarding your setup picture at the start of the article… Are you zoomed in for focusing there? I’ve got an 18mm lens on a T1i and I can’t get the object to fill nearly as much of the frame as you’ve got going on. How much of the frame did you typically fill with the object on the turntable?
With the default foldio360 tent were you able to get the frame cropped so that everything was white besides the model? I’m struggling with physics trying to get 12″ of turntable all in focus while maximizing the size of the subject in frame. At 18mm it’s not quite tack sharp but the images still get good ratings in Zephyr, but I also still get some tent edges (well, the magnets of the tent) in frame which I’m afraid may confuse the algorithms.
Calculators tell me getting a Canon 10mm-18mm lens at 16/17mm should give me the best results but I’m wondering if it’s really worth the upgrade from kit lens or if I should just invest in a better tent/lights.
If you still have the original photos you shoved at Zephyr for these examples it would be great to have them for reference up on https://shared.3dflow.net/index.php/s/uLEdTEj2XBv4Dmb?path=/
Hi Nick,
I am looking into food-photogrammetry. The foldio360 caught my attention, because of the size (I think normal sized dishes won’t be too big for it, right?).
Are there any other requirements/things to pay attention to when working with food?
Thanks in advance!
If a dish would go over the edge it would block the infrared transmitter so then it won’t with a DSLR camera. You’d have to somehow extend the IR-LED. Shouldn’t be impossible. I would keep in mind that not all food will stay in place on a rotating turntable. Otherwise food capture through photogrammetry works pretty well in most cases.
Hi There,
Fascinating reading such a well written and helpful review.
Ima pro photographer but have brought the turn table and cannot for the life of me work out how to make the table link, speak, tell the camera to take the photo… on my canon 5d marklll.
Do i need a infa red receiver adapter for the camera.
Real shame there is no why folio360 has a app for the laptop as I often shoot feathered.
I meet the designers of this product at NEC photography show earlier int he year, really lovely team.
Appreciate any help. Im not very etc…
David Lund
David, our stop motion turntables control the Canon 5D Mark III.
https://pamco-imaging.com/products/
Mark McLean, owner.
Hello
Very good article!
Thank you!
Do you know if it is possible to use the foldio 360 with cobra flash?
Still working?
Have you ever test it with flash?
Thank you
I THINKS THATS A GREAT IDEA FOR AUTOMATE PHOTOGRAMMETRY WITH THIS SMART TURNTABLE
This technology is progressing so fast. We’ll all be doing photogrammerty with our smartphones in a couple years.
[…] method, I yearned for an option that offered more precision. That was when I came across this post by 3D Scan Expert, in which the author, Nick Lievendag, discusses his attempt at making a 3D model using the […]
[…] method, I yearned for an option that offered more precision. That was when I came across this post by 3D Scan Expert, in which the author, Nick Lievendag, discusses his attempt at making a 3D model using the […]
Great article!! I’m going to build my own lightbox and motorize a turntable. I use the intervalometer function in Magic Lantern software I installed on my Canon DSLR. Printed out the markers you provided and the very first time I took a set of photos it turned out fantastic compared to what I was getting without markers. Too bad Agisoft doesn’t include that capability in the 179.00 version. Maybe they will realize not including that keeps people like me from buying the software.
Thanks for the tips!! I put them to use immediately.
Have a great day!
[…] the object being photographed while it is rotated, eliminating the need to move the lights. Most photogrammetry turntables, on the other hand, require the user to manually rotate […]