
The most affordable 3D Scanner that works best with Software from its competitor
The 3D Scanner I’m reviewing here is made by Taiwanese 3D Printer manufacturer XYZprinting. It’s simply called the XYZprinting 3D Scanner, although the supplied software refers to it as the XYZscan Handy.
At €199 / $199 it’s probably the most affordable 3D Scanner on the market today and it’s widely available through resellers such as the Dutch 3D Printer and Scanner store 3DNINJA that kindly provided me with the review model.
It costs half as much as the first generation 3D Systems Sense I reviewed earlier. And while that device captured the geometric shape of objects in a surprisingly good way, its color capturing was completely useless due to the RGB camera with a resolution just 320 x 240 pixels.
The question of course is: can a 3D Scanner for less than $200 be any good? Let’s find out!
Hardware
The XYZ 3D Scanner comes in a clearly consumer-targeted retail box with a photo of a baby wearing sunglasses that’s being scanned (if you have children, you know is is completely impossible as they can’t keep still).
The device is basically an Intel RealSense F200 depth sensor in a strikingly designed, glossy red body that also features a blue-lit button. It’s organic shape is apparently designed to hang it onto a laptop screen like in the header image of this post, but there’s a problem with that that I’ll cover later.
At 238 grams (0.52 lbs) and 15.7 cm (6.2 inch) long it’s feather light, small and easy to hold. As you can see on the photo above, only the RGB camera is visible through a hole. The infrared laser projector and infrared camera are hidden behind a one-way mirror.
The XYZ 3D Scanner plugs into your computer with a permanently attached USB 3.0 cable. This also powers the device, so you can take it anywhere when using a laptop or tablet. A Windows laptop or tablet, to be more specific, because there’s no Mac OSX support.
On paper it requires a PC with an 4th generation Intel Core i5 processor and 4GB of RAM, but I used my MacBook Pro Retina with 3rd generation Intel (Quad)Core i7 (2,6 GHz), 16 gigs of RAM and Windows 10 through Boot Camp and experienced no performance problems.
Both the infrared camera that captures depth and the RGB camera that captures color information have a resolution of 640 x 480 pixels—4 times more than the original 3D Systems Sense I tested. It’s minimum scan volume is 5 x 5 x 5 cm (compared to 20 x 20 x 20 cm of the Sense) and the maximum scan volume of the XYZ is 60 x 60 x 30 cm (compared to 300 x 300 x 300 cm).
So the XYZ is suitable for smaller objects, ranging from a small toy to a human head. Nothing bigger, but that’s because the Intel RealSense F200 is actually a Front or User-Facing 3D Camera, usually build into the screens of laptops as a 3D webcam replacement—it’s the thing that powers Windows 10’s Hello login-by-facial-recognition feature.
3D Scanning with the XYZscan Software
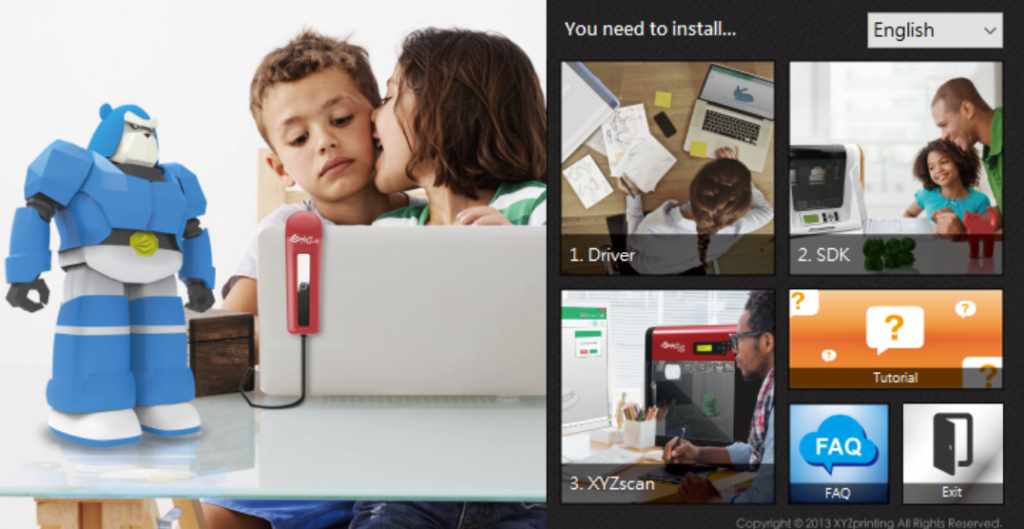
Supplied within the box is an SD Card with the Installer you see above. It’s clear that the XYZscan software is a user interface designed on top of the Intel RealSense SDK that needs to be installed first. It’s nicely designed though. Again clearly towards a consumer audience with friendly colors and illustrations. The splash screen serves as a Quick Guide (which is also supplied on paper).
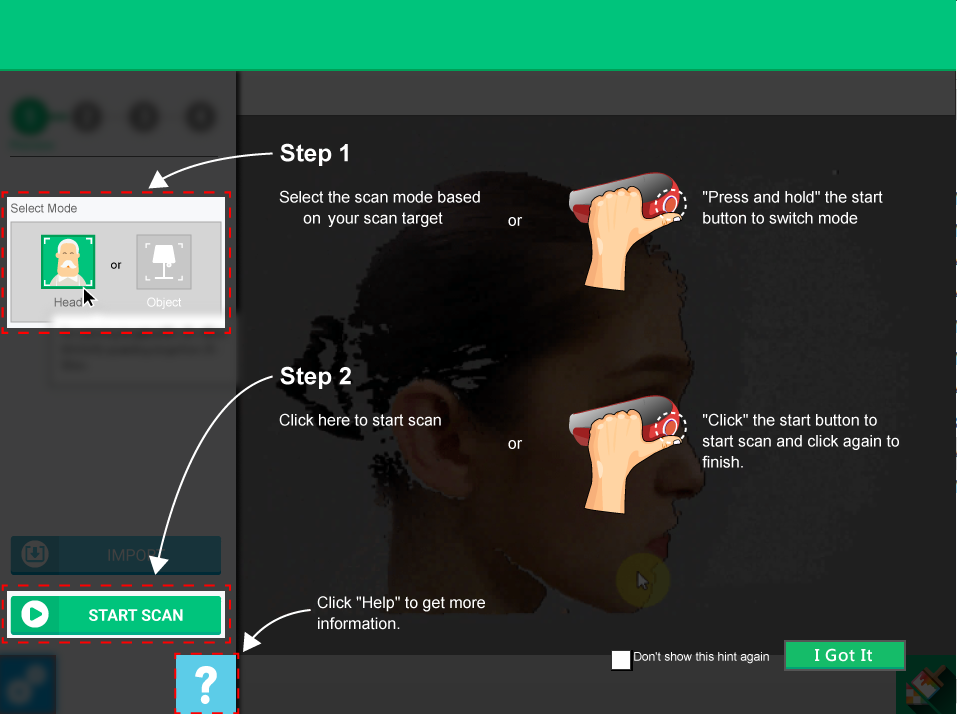
So the function of the button is very clear: hold it to switch between Head and Object mode and click it to start and stop scanning. In the next screen there isn’t much to talk about in terms of complexity: the only settings are language and turning of the sound effects of the software.
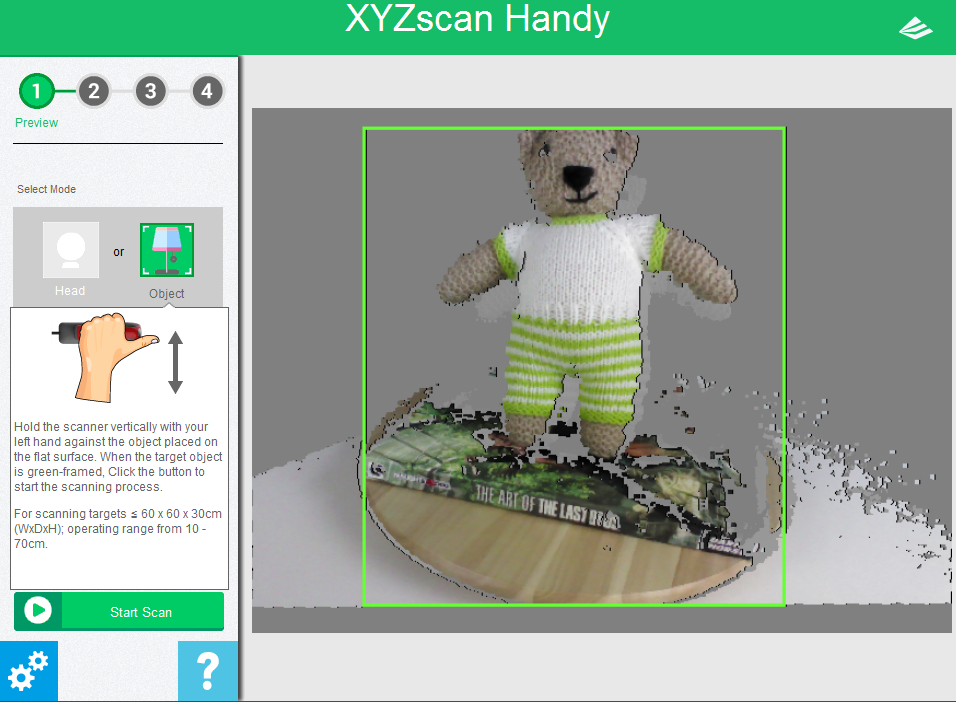
What’s interesting though is the tooltip: I was quite surprised that I had to hold the scanner sideways—horizontally (note it says vertically)—with my left hand (I’m right handed like 90% of all people) while it seems to be designed to be held upright. What’s the point of being able to hang it onto a laptop screen if it can’t be used this way? You would hang it there in when idle, because it blocks a rather large part of your screen.
I expected to be able to just hang it and move my laptop around an object or point it at a turntable like above, but this is not possible—the software doesn’t even recognize objects (successful recognition is highlighter with a green box like) in portrait mode. You can only start scanning if an object is recognized.
Unlike the Sense, the XYZ 3D Scanner has no tripod thread (more about this later) so you have to hold it while scanning. I noticed I’m using the very same IKEA SNUDDA turntable as XYZ uses in their tutorial videos (8-bit background music, really?) so I was good to go. And I must say it totally works fool-proof. Here’s the result of my first try:
The model has 285k faces, which isn’t bad in terms of numbers, but if you set the Rendering in the Sketchfab embed above to MatCap (through the gear icon in the bottom right corner) you can see that there’s no hint of the knitting pattern visible in the geometry whatsoever. This is a big difference with the first gen 3D Systems Sense (embedded below for reference), that has a similar polycount (205 for just the bear) but a lot more details in the geometry (from a 320 x 240 infrared sensor!). Color-wise the result from the XYZ (captured with two small softboxes) is a bit better than that of the Sense (captured with just daylight through a window), but both have fuzzy textures.
In regard to textures, it’s also good to know that while the XYZscan software can export color information in .OBJ files (one of the two formats besides .STL), it does so with per-vertex coloring. So the color quality depends on that of the geometry.
As you can see, the Teddy Bear scan contains a lot of stray geometry on the sides, which are my hand and arm coming into the frame to rotate the turntable. Unfortunately, the XYZ scan software has no editing tools of any kind. You can only export the scan and start over again.
Next up was a test of the Head Mode, activated by pressing and holding the button on the scanner. For this I naturally asked my infamous test subject Patrick (and he’s happy as always)
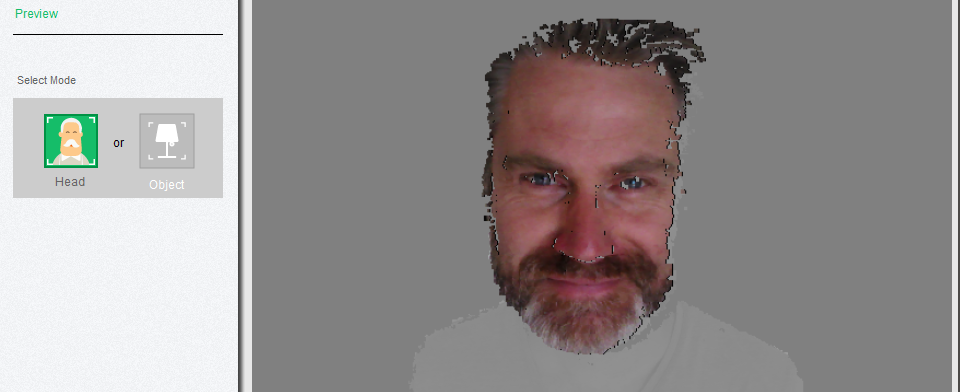
I tried a couple of times, but head scanning proved to be a lot more difficult than object scanning. Somehow the volume box kept clipping into the z-axis of Patrick’s head so all I could get was a face scan:
Nothing special there. The preview image looked a lot better than the resulting texture and the geometric detail is also no big deal.
But not all hope is lost, because the guys at 3DNINJA told me in advance that instead of using the supplied software, I should install the latest Intel RealSense SDK which includes a 3D Scanning application.
3D Scanning with the Intel RealSense SDK
I downloaded and installed the latest (2016 R2) Software Development Kit, which also includes a 3D Scanning sample app. After this, the XYZscan app stopped working, probably because it uses an older version of the SDK that was overwritten.
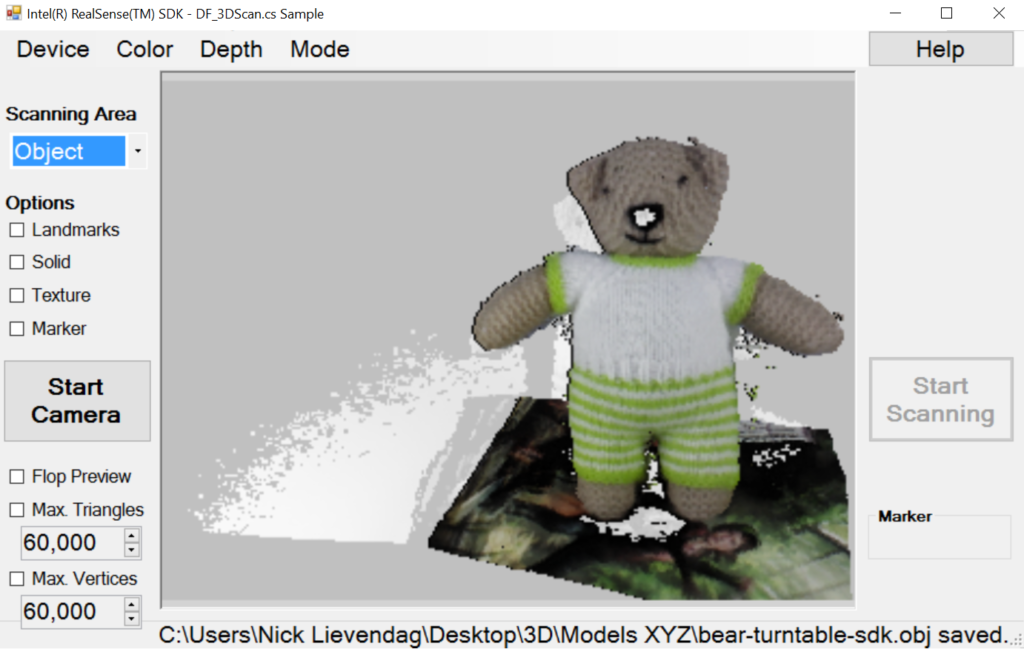
As can be expected, the user interfce looks very SDK-ish. It does offer a few extra features compared to the XYZscan application, but not all of them work with the F200 model. The Landmark, Solid and Marker options didn’t work but the Texture option did. And that’s great because that enables saving an .OBJ file with separate texture map as a .PNG file. The Flop Preview option is also nice, because it allows you to flip between scanning away from yourself without having a mirrored viewport.
Let’s see the result:
That’s a big difference, right? The geometry is about the same (262k faces), but the difference in texture quality is huge! It nowhere near perfect, but I would call this result usable for many cases and not bad at all for a $199 device.
The application didn’t allow me to set the Scanning Area to Head (or Body) so I chose the Full option to capture Patrick’s head again:
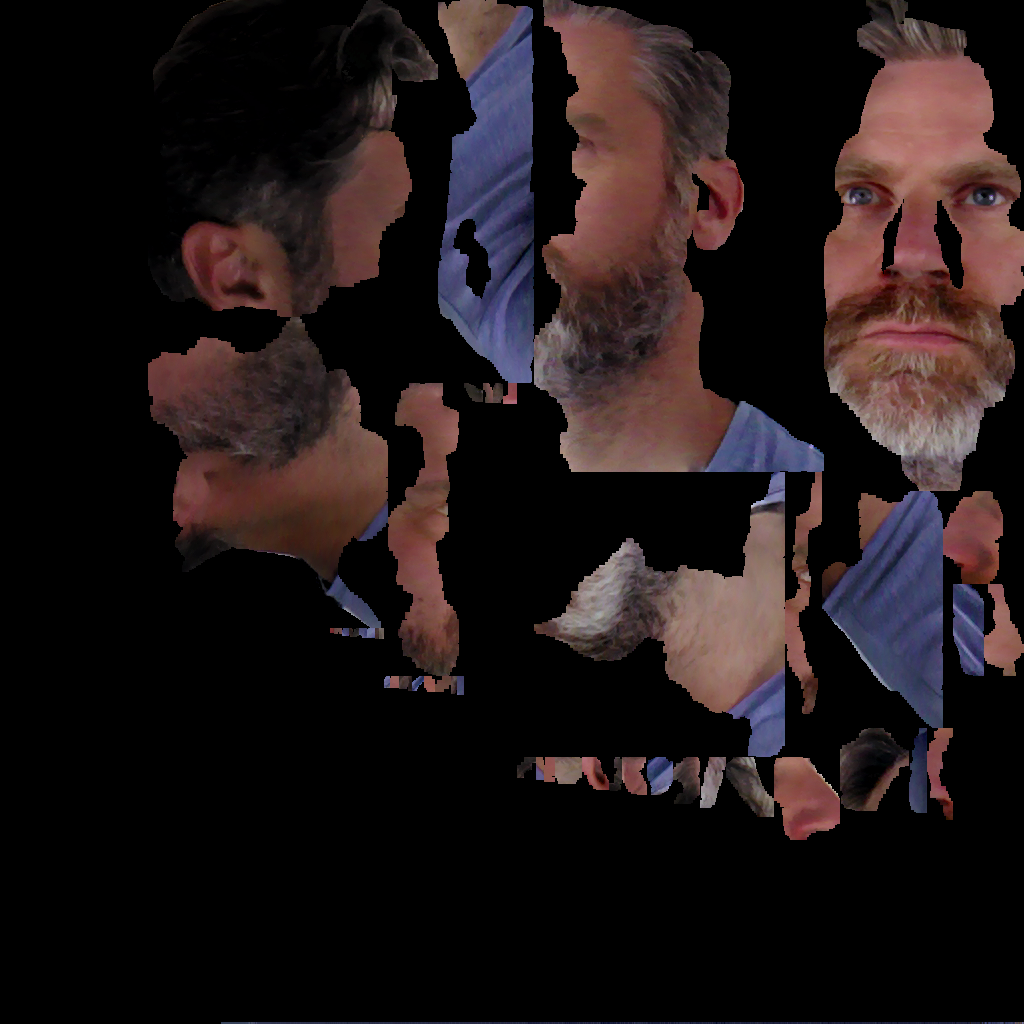
Again, a lot better than the XYZscan application. The oneven lighting is my fault, but otherwise the texture quality is acceptable, considering it’s captured with a 640 x 480 pixels (VGA) resolution camera. The separate texture map is just a 1K (1024 x 1024 pixels) .PNG, but it’s nicely filled with large islands.
As with XYZscan, there are no editing features—after scanning you simply get prompted to save the 3D model, that’s it.
The SDK app is a bit too basic for my taste and it crashed a lot.
I realize that you can only do so much for the scanning procedure itself, but since this device is clearly aimed at consumers, I expected some basic clean-up and editing tools in the XYZscan application like the software that came with the 3D Systems Sense scanner. After all many of the consumers that buy a $199 scanner to use for their 3D printing, don’t have (the knowledge to use) 3D modeling or editing software.
So I started googling if for a better application available to make 3D Scans with Intel’s RealSense hardware. And found it in a surprising place.
Scanning with Sense for RealSense
Apparently, 3D Systems not only makes the Sense scanner, but also an application called Sense for RealSense. This makes sense (pun intended), because the new Next Generation Sense 3D Scanner ($349) is based upon Intel’s latest RealSense hardware, and replacement of the F200—the SR300 (which I just received and will review soon). I thought I completely missed the announcement but couldn’t find any announcement coverage, so I guess it’s only soft-launched (somewhere around April 2015) for some reason. But let’s not get carried away by this (scoop?) and focus on the XYZ scanner, or the Intel RealSense F200 inside of it, in combination with this software.
At first the software seems to have the same consumer-focussed approach, when it welcomes you with a happy animated explainer video (which I personally like because we make similar videos at the animation studio I co-founded with Patrick). But after that it’s a great looking and well functioning (Windows-only) application, but there’s a problem when using it with the XYZ 3D Scanner or Intel RealSense F200.
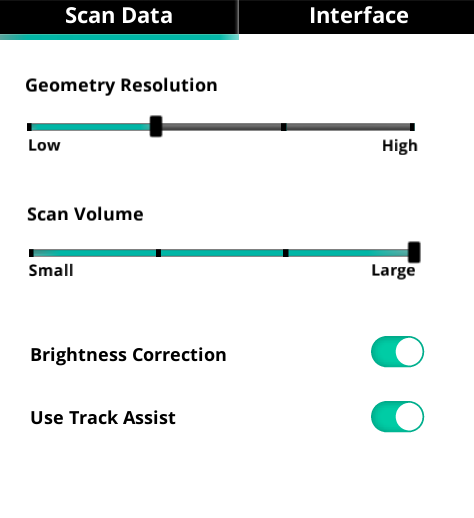
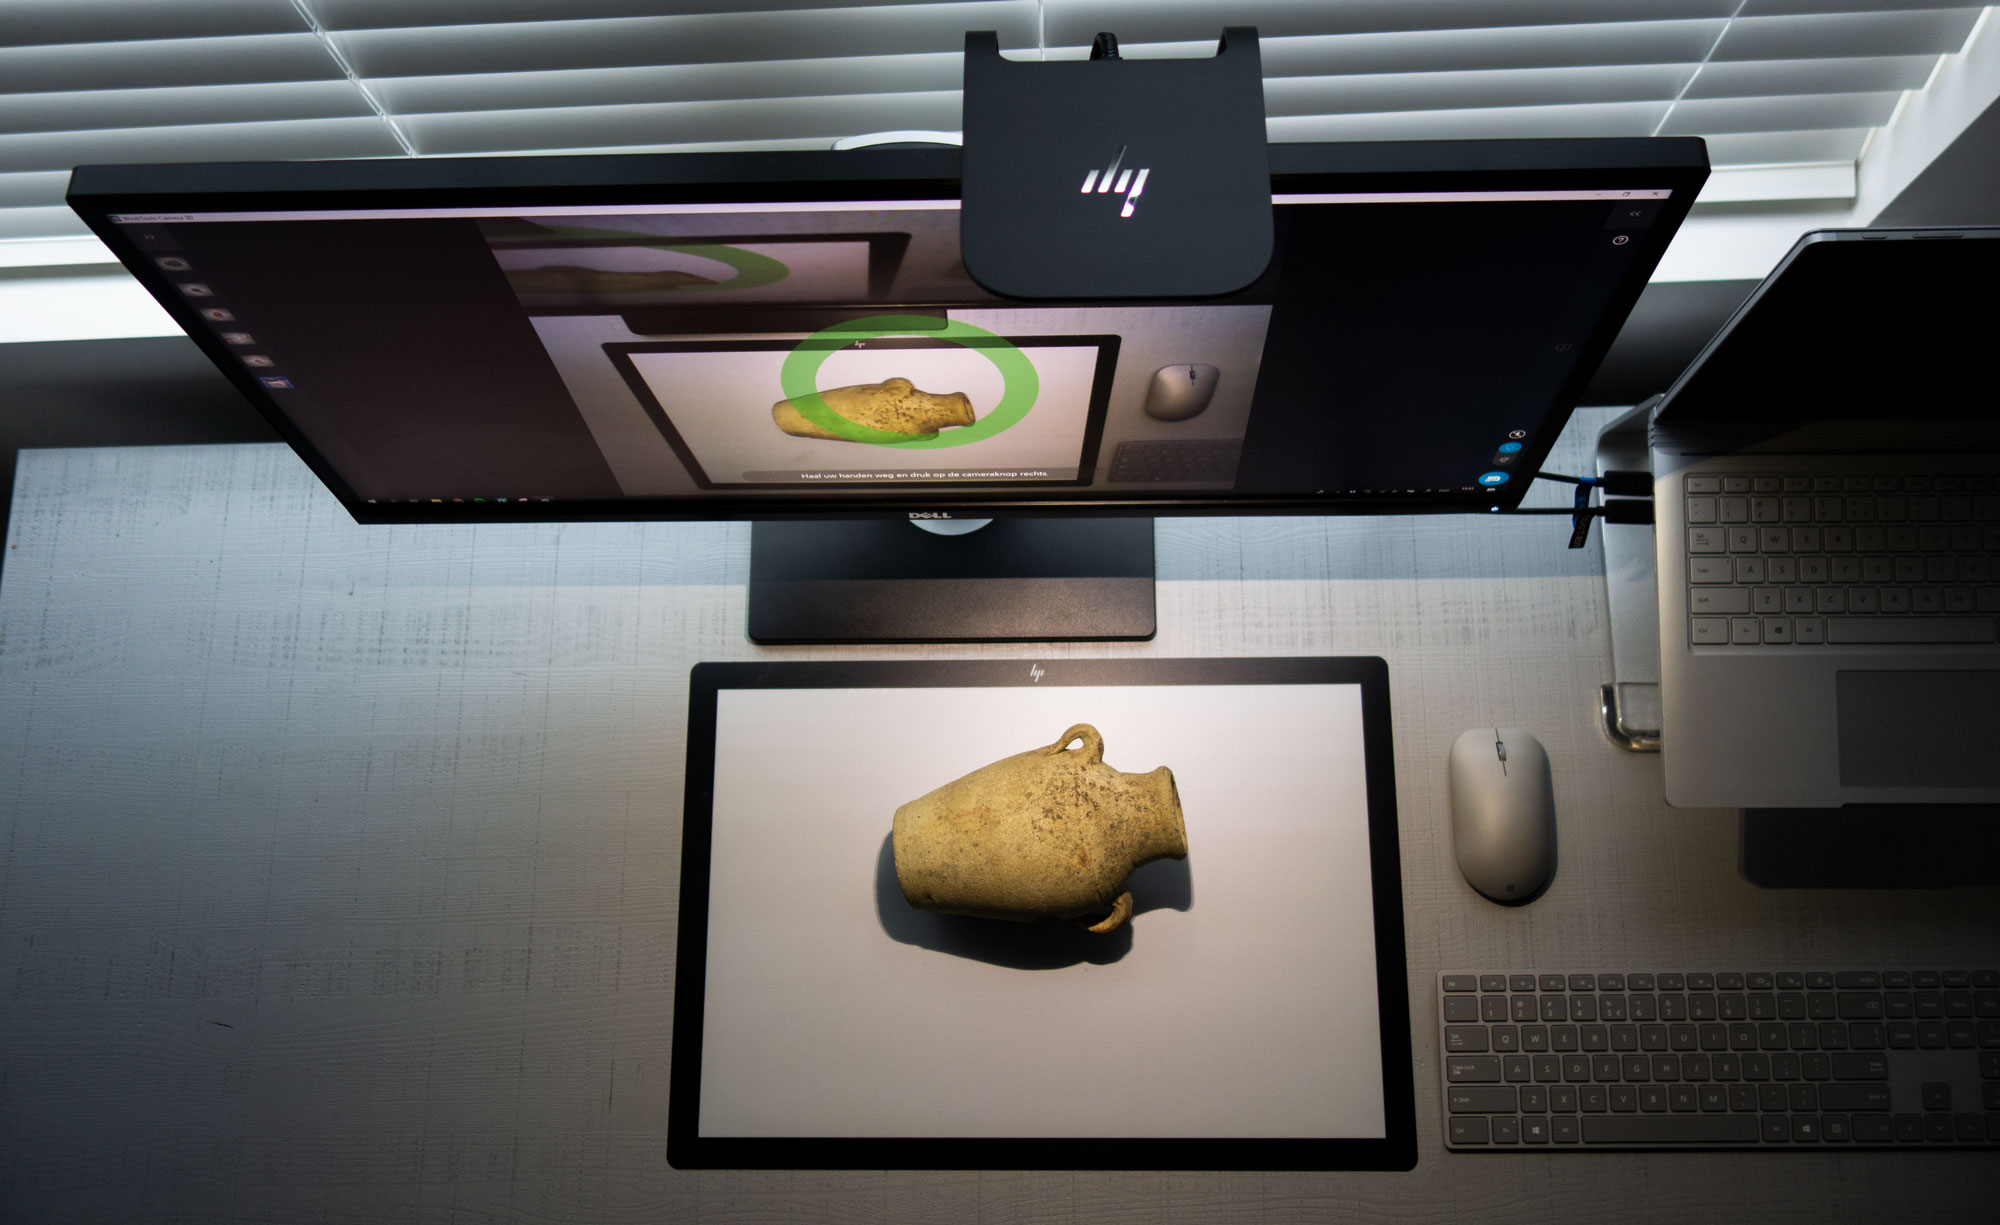
You might not have been at our studio, but I can tell you that the flat screen is on the left wall, not the right as pictured in the scanning preview above. And while the Sense for RealSense application has more settings than the XYZscan and RealSense SDK sample combined (screenshots of the Advanced Features below), it misses the crucial one of being able to mirror the camera feed (remember the F200 is a Front Facing 3D camera so its feed is mirrored by default), which makes it nearly impossible to scan away from yourself. The manual does mention a “Flip Scan View” option, but that’s only available with the SR300 hardware and just rotates the feed instead of mirroring it.

Naturally, I came up with a workaround for this. I found a free Windows application called DeskMirror by Minaware that mirrors the left half of your screen onto the right half. This way you can just scale down the Sense for RealSense window and place it on the left and you’ll have a camera feed on the right that isn’t mind bending. While testing this I also discovered that the XYZprinting 3D Scanner can be clipped to the bottom right corner of my MacBook Pro quite perfectly so I could make scans by just walking around while holding my laptop with both hands.
If you’re curious you can check out the results of the sneaker scan above with the geometry resolution set to its lowest and highest setting, but I’ll continue with my two test subjects Teddy and Patrick for the sake of comparison. Switching between scan modes is as simple as clicking one of the three always-visible buttons:

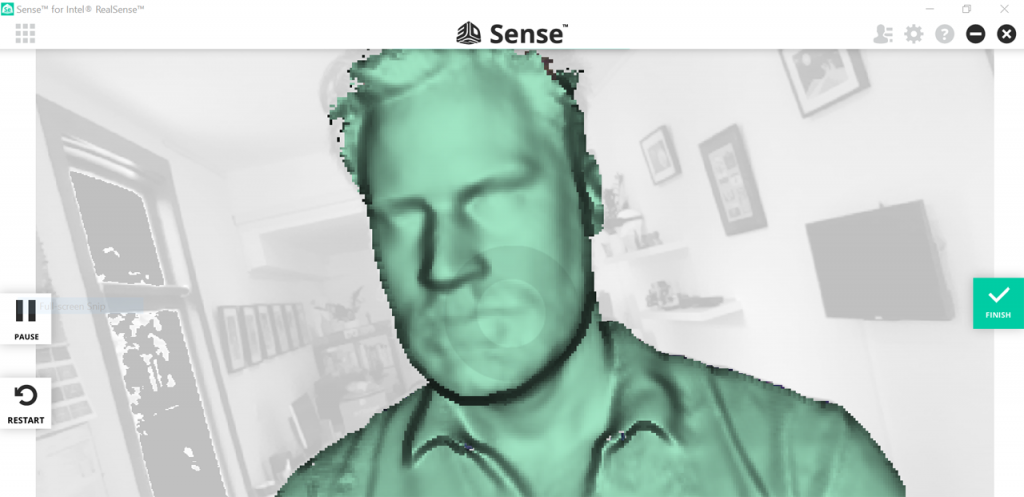
Body scanning isn’t available with F200 hardware, so I started with a head scan. The actual scanning procedure is visible in the first image of this section. I noticed that the software asks the you to hold still once in a while to “capture a good image” similar to the mobile apps I tested for my Structure Sensor Review. This is nice because this allows the camera to capture the best-possible key frames to generate the texture map. Unfortunately the camera isn’t very light sensitive, so in normal indoor lighting conditions (it doesn’t work outdoors) you’ll always have blurred textures (like the example of the sneaker above). The examples below are both taken with three soft-boxed studio lights, which greatly improves the texture quality.
After capturing and waiting for some calculations, you’ll get to the screenshot below. And yes—finally—editing features!
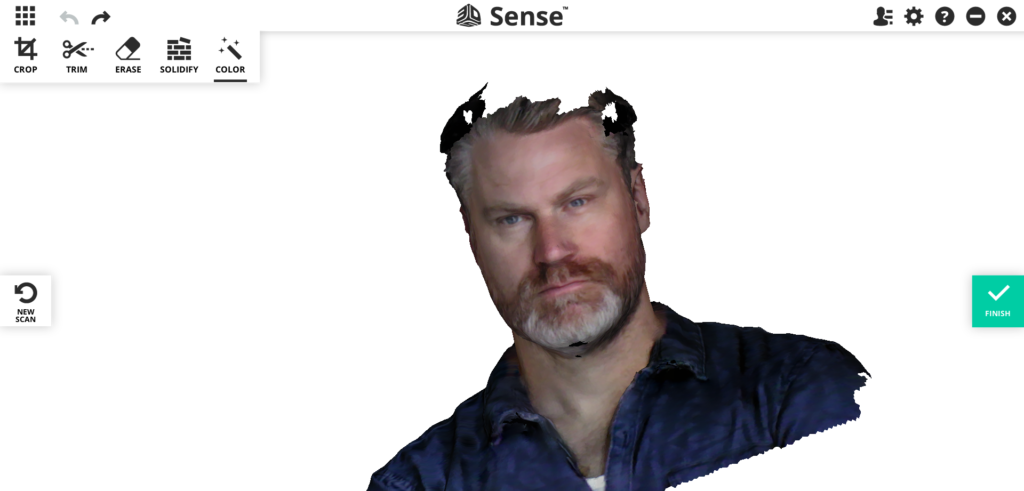
First things first: see that texture quality. It’s the best so far! And this is also scanned by attaching the scanner horizontally to the bottom right corner of my laptop screen and walking around Patrick. As you can see I accidentally forgot to scan to scan the top of Patrick’s head (that’s also hard with a complete Macbook Pro in your hands, by the way), but it’s perfect for testing the Solidify feature, that makes the scan into a watertight, or manifold, 3D mesh suitable for 3D printing. It’s completely automatic and has no settings, but it did a good job in my tests. The software tries to color the newly generated geometry in a way that blends with the rest of the texture. This works for smaller areas, but is understandably harder for larger holes.
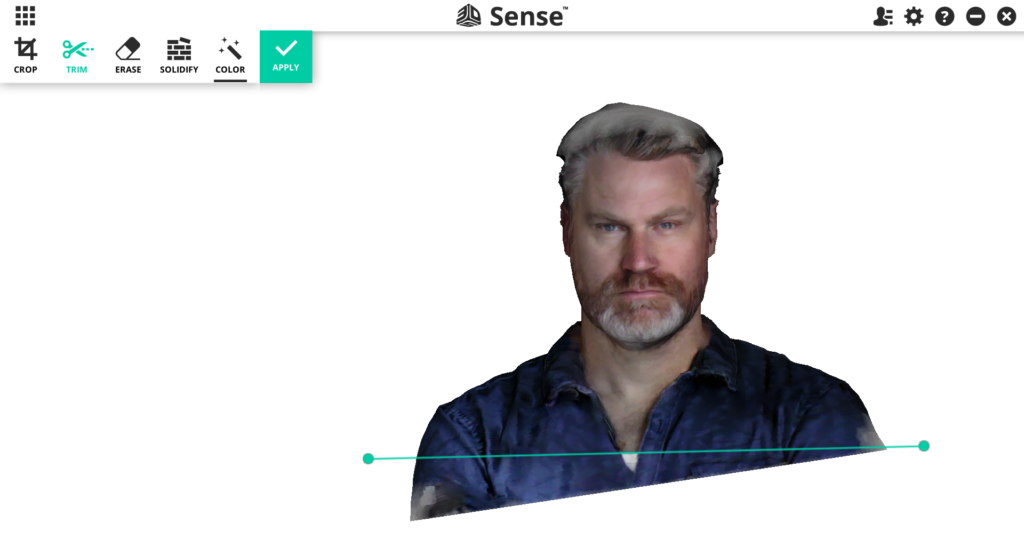
You can Crop the result, use the Erase feature to manually remove unwanted parts or use the Trim feature pictured above to make straight cuts. Which is very handy if you want to 3D print bust scans like this. Finally the Color feature let’s you tune the brightness and contrast of the model with simple sliders, but that wasn’t necessary in this case. Here’s the result as an interactive Sketchfab (you can follow me there too!) embed:
The result above was done with the Geometry Resolution set to the lowest value, delivering a polycount of just under 100K. Increasing the Resolution can double the polycount and does add some extra details in the geometry, but also more noise in the mesh. And apparently this forces the software to prioritize geometric detail over texture quality, at least with my hardware setup.
I like the “low-poly” version better and I guess Patrick agrees.
To wrap up this review I naturally had to scan Teddy one last time. And to keep the scanner as still as possible to prevent motion blur in the textures, I mounted it on a small tripod with a tie-wrap. Below you see that the device is mounted towards me, so I didn’t have to mirror the camera feed. It also show my light setup for these scans (two 40 x 40 cm softboxes with 65 Watts, 5500 Kelvin studio lights)
And since I was now seeing myself in the background, I couldn’t resist making a selfie:
I hereby declare that #DepthSensor Selfies—I’ll call them #Sensies—are the next hype!#3Dscanning #3Dscan pic.twitter.com/bXucMm3cIx
— Nick Lievendag (@NickLievendag) July 25, 2016
At this point you probably think capturing the Teddy Bear is just a quick formality to compare the quality. But I was totally surprised that the Sense for RealSense software had a really hard time capturing it. In fact, it failed! I tried it both turntable-style like above and by walking around the object like I did with the sneaker, but the software consistently lost tracking when I rotated around the side of the bear towards its back.
To find out why this was happening, I read the PDF manual and discovered that the tracking algorithm (currently) only uses geometric data—not also the RGB color information like most modern 3D scanning software packages (including, I guess, the RealSense SDK and XYZscan software itself).
However, the manual did note that the Sense for RealSense software has a special Tracking Assist feature. Depending on the size of your object, you need to print a single or dual sheet (I printed the dual sheet version on a single large A3-sized sheet) pattern with a regular printer and turn on the feature in the Advanced Settings.
But while the Tracking Assist feature looks good on paper, it didn’t solve my problem with scanning Teddy. The software still lost tracking around the 90-degrees mark when it can only see the side of the bear. Maybe this feature does work on better RealSense hardware like the SR300, but it wan’t effective for this particular test. Luckily I was able to solve this by adding some extra geometry to the scene in the form of a few Nespresso cups.
I had to put stickers on them because the cups alone are are too glossy to be detected. But… with the cups it worked at once, without any tracking problems!
The result above is captured at the higest Geometry Resolution setting (lowest-poly version here). Compared to the result from the RealSense SDK application, it’s notable that although the polycount is the about a bit lower (218K vs. 262K) it has more geometric detail. If you set the embed above to MatCap Rendering mode, you can see a hint of the knitting pattern for the first time—and check the eyes! The texture is a bit softer, but still usable.
And of course, because of the editing features you can easily remove parts of the scan you don’t need. I tried the Trim feature for this first, but drawing a trim line between the bear and the book resulted in the bear being deleted. According to the manual, the Trim feature removes the smallest part and the book and turntable probably have a larger volume. So I used the Crop tool to delete most of the unwanted geometry and removed the rest manually with the Erase tool. Then I used Solidify to close the holes in the legs.
What’s also great are the Export and Sharing options of Sense for RealSense that appear when you click Finish.

Hitting Save will allow you to name the model and save it to the Library of the application itself, which can be accessed by clicking the icon with the 9 squares in the top left corner. Exporting can be done in .OBJ, .STL, .PLY and .WRL format, so plenty of choice there too. You can also connect the software to your Sketchfab account and export directly to this great plaform for showcasing and sharing 3D models. I couldn’t test the Facebook option because it apparently supports only Profiles, not Pages (I only have a Facebook Page), but it does also upload the model to Sketchfab first and then posts that to your Timeline. Facebook supports interactive Sketchfab embeds by default, so I just copy & pasted the Sketchfab URL to my page manually:
Verdict
Firsts, let me repeat that this is a $199 device. I think it’s impressive that it’s even possible to make a 3D scanner for that price. The design of the XYZprinting 3D Scanner itself and the XYZscan software is clearly aimed at consumers, but very polished nonetheless. The device is light, small and USB-powered, so you can take it anywhere your laptop or Windows tablet goes. Those do need a recent, powerful processor to drive the scanner and the CPU-intensive scanning procedure drains the battery pretty fast.
The fact that the software is supplied on an SD Card is nice, because it would have been a large download. But despite it’s polished look, it’s underpowered in terms of both functionality and scan quality, probably partially because it’s based on an outdated version of the Intel RealSense SDK. The good news is that there are free alternatives that deliver better scanning results with more control.
Ideally you can install both the latest RealSense SDK and the Sense for RealSense software. Ironically, the latter is produced by a competitor of XYZprinting, but it’s great in many ways and offers useful editing and exporting features, but the missing mirroring feature requires a workaround. If 3D systems can add that and also upgrade the tracker to track RGB data on top of Depth data, it would be the perfect app for the XYZprinting 3D scanner, or any device with an Intel RealSense F200 3D camera.
All things combined the XYZ scanner is useful with a level of scan quality you might expect for $199—usable for some purposes, but not mind-blowing. That said it’s good to know that the RealSense F200 hardware is last-gen. It’s successor, the SR300 is currently available as a Developer Kit directly from Intel. It started with a price of $99 which has gone up to $129 (I payed that for mine) last April. But beware, the price will go up again within a few days of writing this post—on August 1st. Not sure how much it will be, but I guess $159 – $199.
Alternatively you can take a look at the $349 Next Generation Sense by 3D systems (currently ships within 2-4 weeks, according to the website) that has the RealSense SR300 built into a housing that might be a more comfortable form factor for 3D scanning. It naturally works with the Sense for RealSense software and I can confirm from my early tests that as opposed to the F200, the SR300 can be used both horizontally and vertically and it’s camera feed isn’t mirrored by default.
I will test the SR300 with the Sense for RealSense software soon to compare the scan results, but my expectations are high because according to Intel it has a better 3D scanning range (25-70 cm vs. 25-54 cm), higher RGB camera resolution (1920 x 1080 @ 30fps & 1280 x 720 @60fps vs. 640 x 480 @30fps in the XYZ 3D scanner), and better texture quality in low-light conditions due to auto-exposure.
As always, thanks for reading! If you have any feedback or questions, feel free to drop a line in the comments below or send me a Tweet.
If you want to be the first to know when the SR300 review is live, follow me on Twitter, Instagram or Facebook. And if you think this Review is useful for your friends and followers, please share it on social media by clicking one of the buttons below.


This looks like one of the better 3D scanners on the market!
Very detail and excellent review of this F200 camera.
The update better and improve version of SR300. ($149.00), third party SR300 camera: 3D Systems Sense 2 ($399.00), Creative Senz3D ($179.00), Razer Voyager ($149.00) . They all have better specs and have tripod screw mount. Can’t wait for the in depth review 3D functionality of this camera.
Here is the comparison of this SR300 vs F200
https://software.intel.com/en-us/articles/a-comparison-of-intel-realsensetm-front-facing-camera-sr300-and-f200.
Thank you for the time and thoroughness with this review. So much to consider and your vast experience helps tremendously in navigating thru the processes.
I’m new to the 3d printing hobby and i thought this would be a good primer 3d scanner to start with. From the get go it has been a headache. I’ve spent hours trying to figure out why I couldn’t get the scanners to load. Every time I tried I got the error message that an Intel RealSense device not found, when I clearly had it plugged in and my pc accepted it. I went on forums and had no luck. On a whim I went to Intel’s website and found a firmware driver for F200 devices. Loaded it, and viola, success.
Hello Nick
Can you please tell me if I can use this scanner with an i7 26##
Desktop
If so please could you send me the details please
I have just bought a refurbished i7 computer and this scanner with no avail
If possible could you please contact me as soon as possible because I need to return them to the seller if unlucky
Many many thanks
Regards Dennis J Keattch
This sensor should even work on an i5 processor. It might help to install newer versions of the Intel Depth Camera Manager which includes newer drivers. You can download it here: https://downloadcenter.intel.com/download/25044/Intel-RealSense-Depth-Camera-Manager?product=92255
I am unable to use XYZ scaner with Sense for real sense it keeps saying “No supported 3D camera detected!” although I have intalled the driver for XYZ scanner, I am new to 3D scanning and I am unable to figure out why is it giving this error. In the device manager it is showing me the scanner at com4
Does it work with the software that came with it. Otherwise it seems like 3D Systems changed the support in their software.
i did not get de sdkaart white te programm can i download it any were couldend find it