3D Scanning beyond 3D Printing — Part Two
In Part One I showed you how you can view and share your 3D scans Online and in Virtual Reality by using a service called Sketchfab. A great free alternative to expensive full color 3D prints! But there’s another technology besides VR that has caught a lot of media attention lately—AR or Augmented Reality. And I’m not talking about headset based AR (or Mixed Reality) like HoloLens, but the kind that just requires a smartphone or tablet—like Pokémon GO.
For this I’m going to use Aurasma—a free service by HP that let’s you define any image as a trigger (so you’re not bound to ugly QR codes) and “augment” digital images, videos and 3D models onto it.
Truth be told, while adding images and videos in Aurasma is a piece of cake (and really fun!) their implementation of 3D isn’t comparable to that of Sketchfab. It actually requires a few relatively complicated steps because of Aurasma’s limited 3D file support.
Before I start, you’ll need a quite few things:
- A 3D scan exported to OBJ file format with separate texture map. For this tutorial I use the same full body scan I used in the VR tutorial, made with Structure Sensor and the free itSeez3D app which exports an OBJ file through email.
- A computer program that can convert JPG files to PNG. I’m using the standard Preview application on Mac in this tutorial, but you can also use Windows alternatives or even online converters.
- A computer program that can compress files to TAR format. I’m using a Mac and the free GUI Tar. If you’re using Windows, 7-Zip is a similar solution.
- The Aurasma app for iOS or Android.
- A computer program that can import 3D models in OBJ (Wavefront) fortmat and export them to DAE (Collada) format*.
*I’ve tried many free (online) 3D file converters, but none of them seem to work for this purpose (please let me know if you found one that does!). So for this you need Blender, Autodesk 3DS Max or Maya, or Maxon Cinema 4D or BodyPaint 3D. It’s good to know that of those, only Blender is free and the rest is payed-for, but they all offer free trials. I’ll be linking to the steps for all programs, but I’ll be using Cinema 4D for this tutorial because I’ve been using that for over 10 years. These steps will also work BodyPaint 3D, which is a slimmed-down version of Cinema 4D with just the Sculpting and Texturing tools. I recommend it for editing 3D scans, because of it’s ease of use.
Step 1 — Converting the texture map
If you’ve exported your 3D scan to the OBJ file format you’ll see three files: The OBJ file that contains the geometry data, an MTL file and an image file. In my case the latter is a 4096×4096 (4K) JPG file, which needs to be converted to PNG for Aurasma. Some 3D scanning software already export PNG textures, but it’s still good to downscale the file to 1024×1024 (1K) resolution for AR purposes.
On a Mac, this is as simple as opening the file in preview and go to Tools > Adjust Size
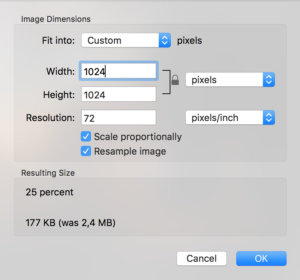
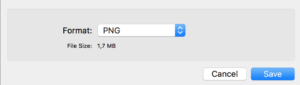
Then go to File > Export and select PNG
Step 2 — Convert the 3D file to the Collada format
Here’s where things get a bit tricky if you’re not a regular 3D software user. Aurasma only supports Collada (DAE) format. While I do understand why (it’s an open format), it’s the greatest pitfall of the software for augmenting 3D objects—at least for importing 3D scans. I’ve tested many 3D scanning applications and none of them can export directly to this format.
Almost of them can export to Wavefront (OJB) format, so you’ll have to do a file conversion. And it happens to be that Aurasma’s implementation Collada format is very—very—strict.
If you’ve access to Autodesk 3DS Max or Maya, you can use the OpenCollada Export Plugins. If you’re a Blender (which is free and can be downloaded here) user, you can use the standard export option. In any case, you should carefully read which export settings to select in this Aurasma blog post. You can continue with Step 3 after following those steps.
I’m going to continue this step using Cinema 4D / Bodypaint 3D—the latter is a slimmed-down version of the former—my 3D software of choice. Here the steps are relatively easy if your model has a single material applied to it*
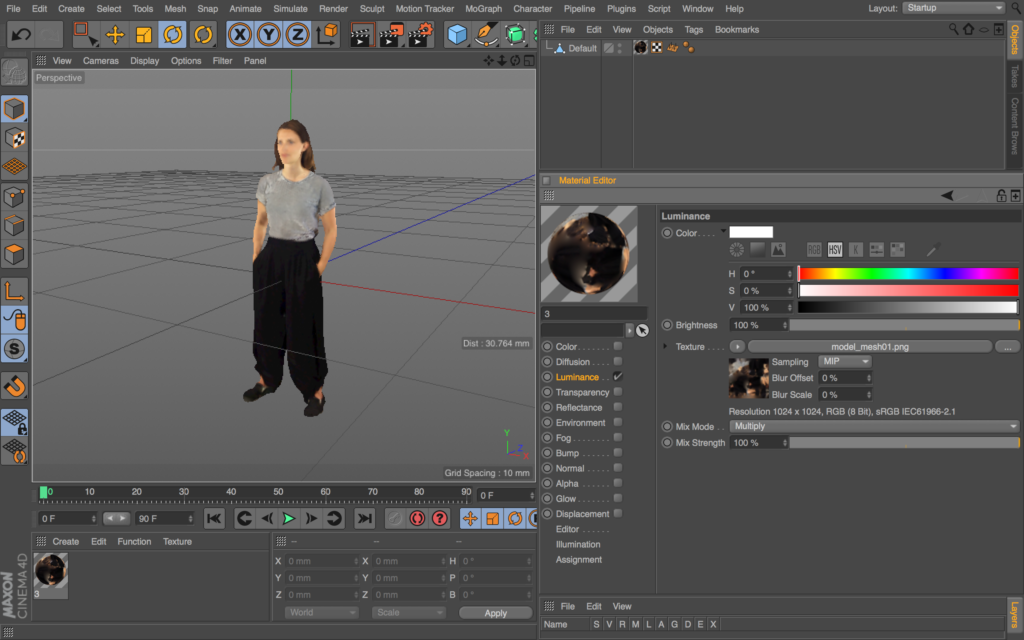
- Import the OBJ using the default settings
- In the Material Manager, double-click on the Material icon (sphere) in the that contains the texture information.
- Uncheck all boxes (Color, Alpha, etc)
- Check only the Luminance box and load the PNG texture you created earlier
Then you can export the model as a Collada 1.4 (DAE) file as shown below, using the default settings.
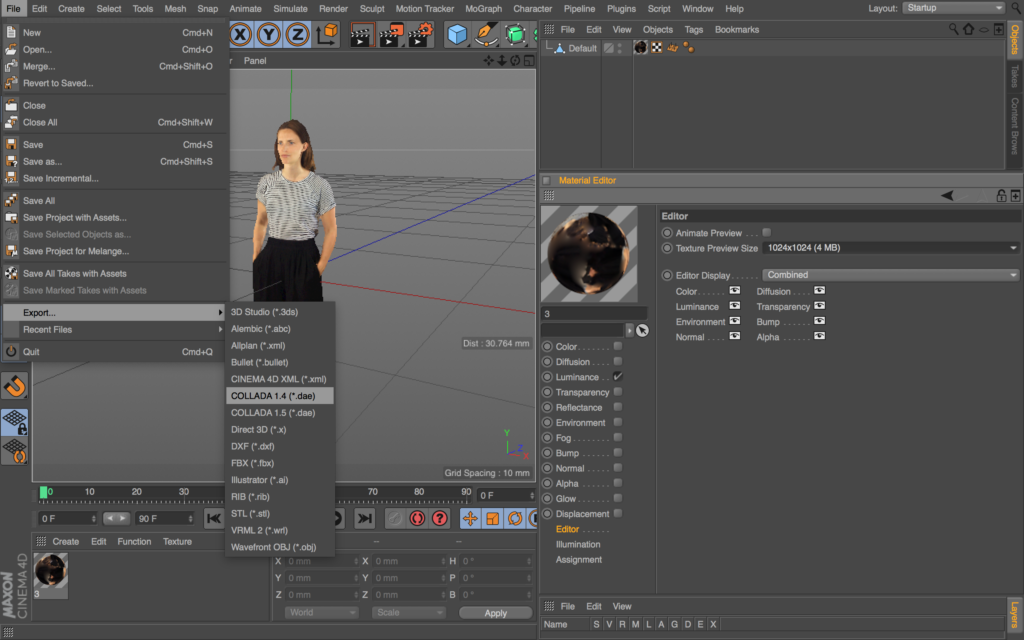
(The textures look sharper in the second screenshot because I increased the Material’s (Editor) Texture Preview Size. This is purely for viewing in C4D and won’t affect the output)
*If your model has Multiple Materials
Aurasma only supports 3D models that have a single material applied to them. Some 3D scanning solutions (especially Photogrammetry software) split textures into multiple JPG or PNG files. In some applications (like Autodesk ReMake, which I will review soon) you can choose to “rebake” the texture on export. Usually it’s also a good idea to reduce the amount of polygons through the Decimate feature at that stage—you’ll want your model to be as “low poly” as possible for mobile AR.To “bake” multiple materials into a single one in Cinema 4D / Bodypaint 3D, switch your Layout to BP UV Edit using the dropdown menu in the top right corner of the software, select your model in the Object Manager and use the Objects > Bake Object feature with the settings below:
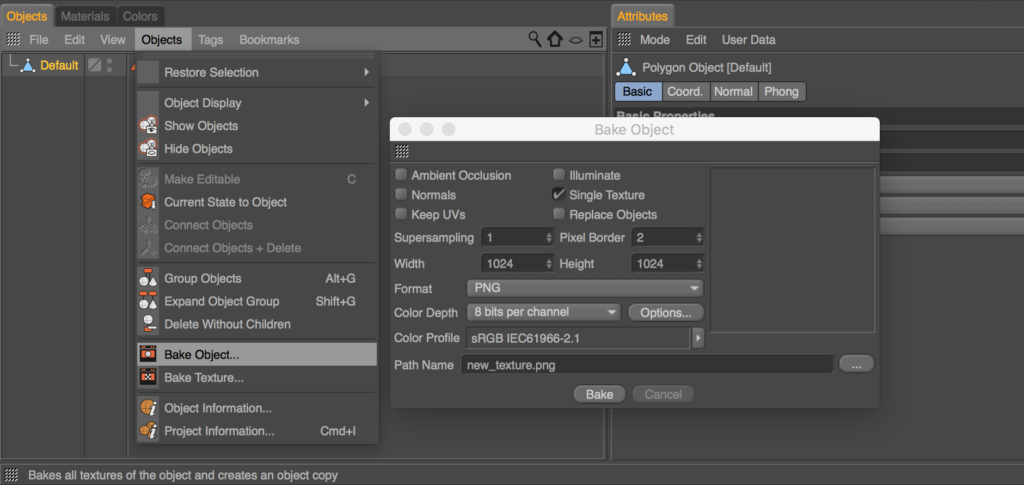
Depending on the amount of polygons of your model, this procedure can take a while. After it’s done, it will create a new object with a single material applied to it. You should delete the original before exporting.
Step 3 — Make a thumbnail file
Aurasma requires a thumbnail file to be uploaded alongside 3D models and textures. This also has to be a PNG file and it has to be named thumbnail.png. This is purely a reference thumbnail and it won’t be used for the final AR experience.
You can either duplicate the texture file and rename it to thumbnail.png or make a screenshot (or quick render) of your model while you’re still in the 3D editing software. I chose to do the latter.
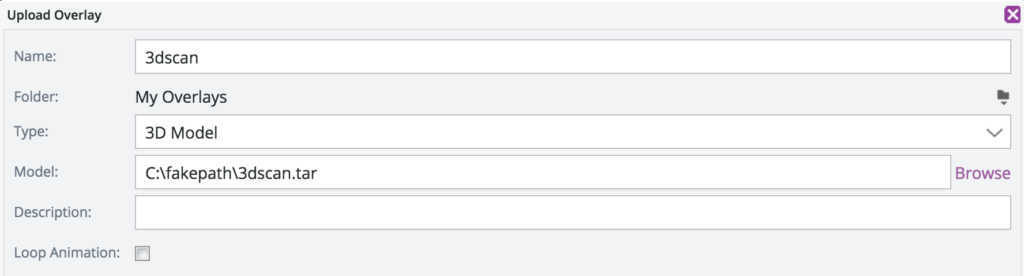
Step 4 — Pack the files as a TAR archive
On top of the the limited 3D file support, you also have to upload your files in a TAR archive—which is similar to a ZIP archive, but not a standard on Mac or Windows so again not very user friendly.
I used GUI Tar for Mac for this. If you’re using Windows, 7-Zip is a similar solution.
These are the files that should be in the TAR file:
- Your 3D Model as a DAE file (file name doesn’t matter)
- Your 3D Model’s texture as a PNG file (file name doesn’t matter)
- A Thumbnail image as a PNG file (must be called thumbnail.png)
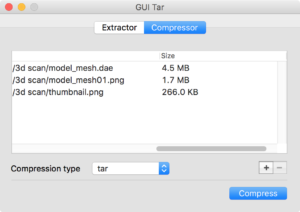
Just hit Compress and put the TAR file somewhere you can find it.
Step 5 — Setting up your “Aura”
AR projects in Aurasma are called Auras. I’ll show you how to make one step by step.
After signing up (free) and logging in, you simply hit the Create New Aura button in the top right corner.
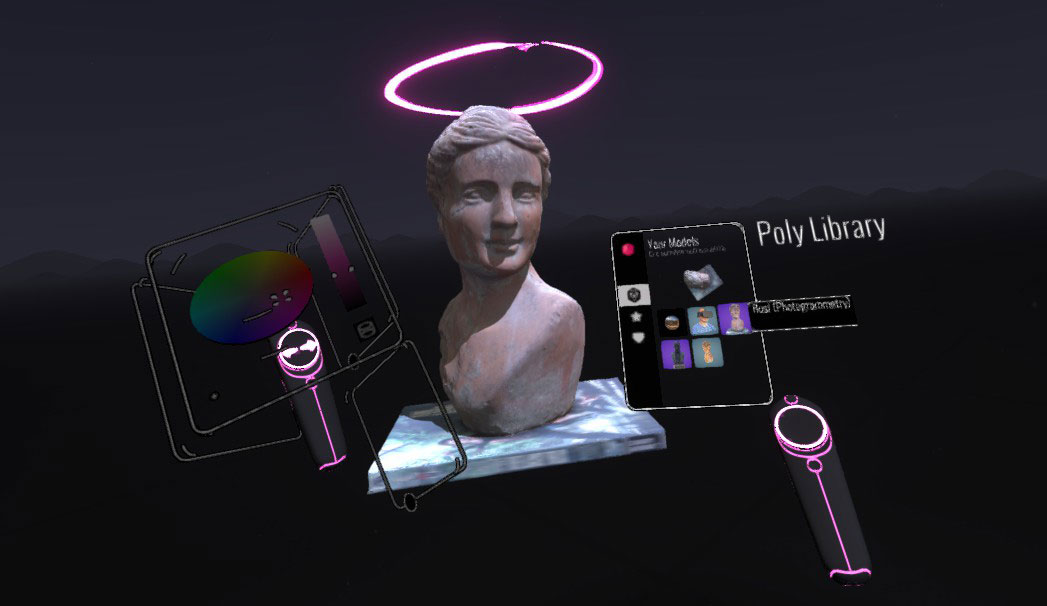
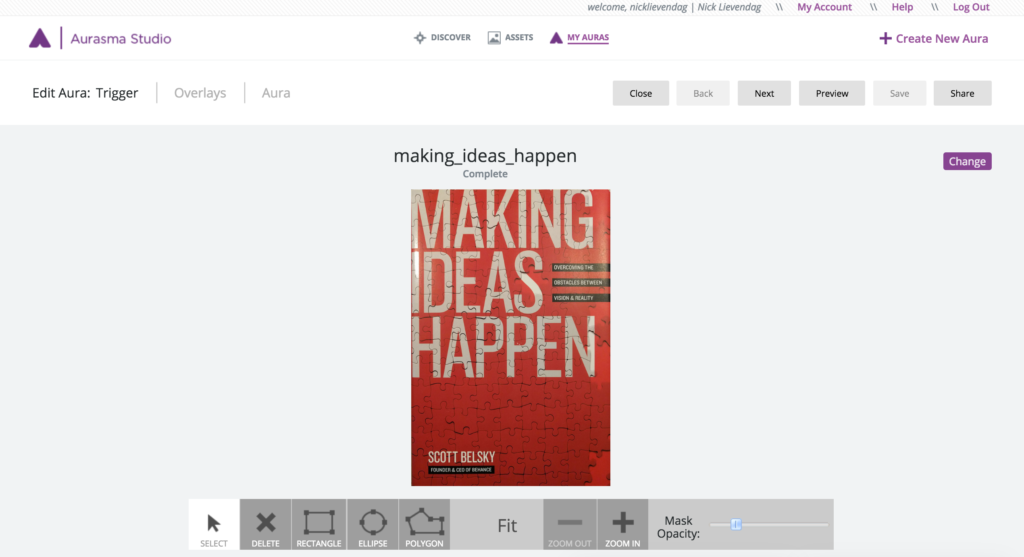
The first thing you have to do is define a Trigger. This is an image of something that exists in reality. The software wil recognize this image and “augment” your 3D model on top of it. Something flat works best. This can be something as big as a movie poster or as small as a business card (as pictured in the header image).
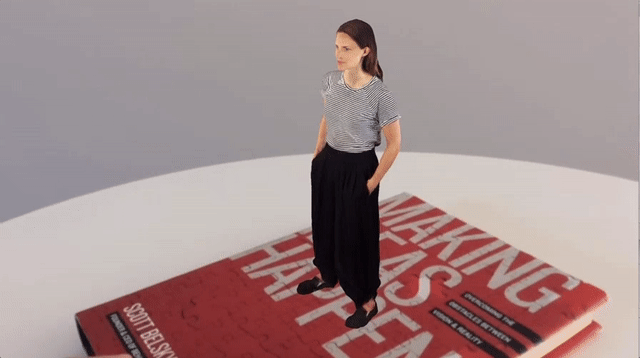
I chose the book cover of Making Ideas Happen by Scott Belsky (highly recommended!) by making a photo of it with my smartphone. I cropped away all excess from the photo beforehand, but you can also use Aurasma’s masking tools.
Aurasma will analyze your image and let you know if it’s not good enough. This usually happens if it hasn’t got enough unique visual features or someone else already used it as a Trigger image.
Next you’ll need to define Overlays. This can be an image, video or 3D model or a combination of multiple overlays. You can go pretty wild in combining stuff. It’s good to know that a 3D model can also contain animation. I tested this and it works as advertised from Cinema 4D. You can set it to loop in Aurasma. You can also include an MP3 file in the TAR archive to add sound. But to keep things simple, I’m just using a static 3D model as an example for this tutorial.
Here’s where things might get tricky. If you’re lucky: your TAR file wil upload successfully and you can continue. But there’s a big chance that you’ll get an error message at this stage. Some messages give a hint of what’s wrong, but most of them don’t. It’s pretty frustrating. You should read the Setting up Your 3D File Correctly section near the end of this post carefully. Again, all criteria here are imported and very strict.
If all goes well, you’ll 3D model will appear as a new overlay:
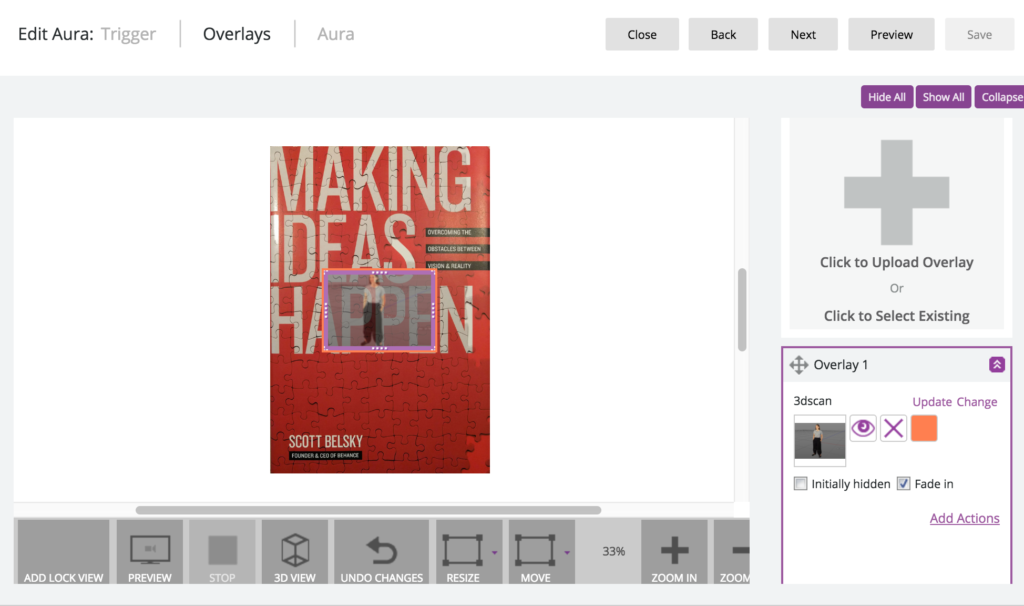
If it doesn’t open automatically, click the 3D View button on the bottom to change the settings of your 3D model. Depending on the kind of Trigger you’ve chosen, you can rotate, move and scale your 3D model (always shown as a pink wireframe) accordingly. If your Trigger image is a hanging poster, you can make your model float in front of it. In the case of my book cover, I decided that the 3D model should be standing on top of the book when it’s layed down.
Changing the 3D settings in Aurasma isn’t as intuitive as you might have read in my Sketchfab VR Tutorial, but you’ll get the hang of it. Firstly, use your mouse to orient your trigger so you can better see whats happening. Then hold the ‘H’ key to see all other shortcut keys. You should hold these as well and use the arrow buttons to change the values. Take note of the cursor that appears to see if you should use the up and down keys, left and right keys, or all four. Lowering the Step Size (‘Q’) is helpful for fine-tuning.
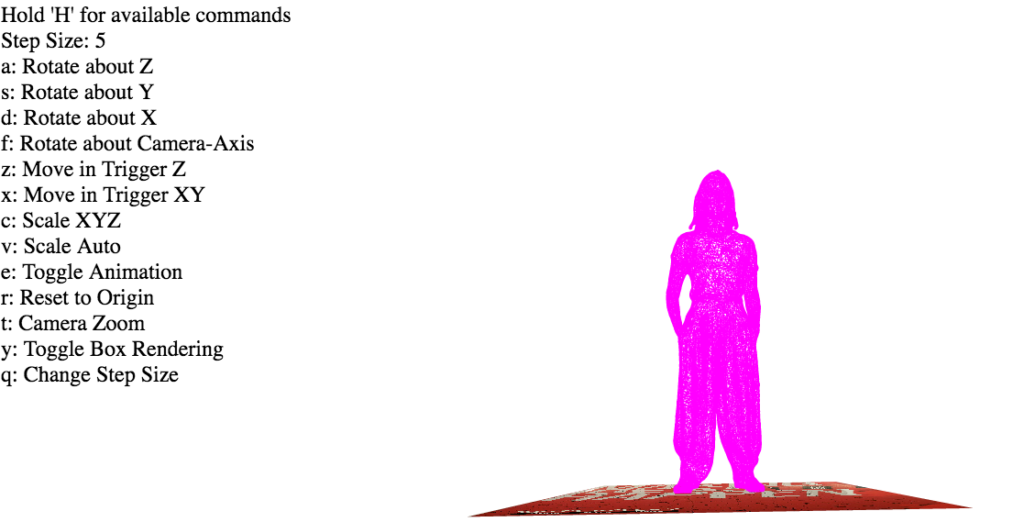
If you’re happy with your model’s scale and orientation, click OK to close the 3D viewer.
Step 6 – Preview and Share
You’re almost done now. You can preview your Aura before publishing it by using the Preview button. When the preview mode is active, you can open the Aurasma app on your tablet or smartphone, hit the viewfinder icon on the bottom and point your camera at the Trigger. Keep in mind that in Preview mode, this only works for you so you have to be logged in on the device with your Aurasma account.
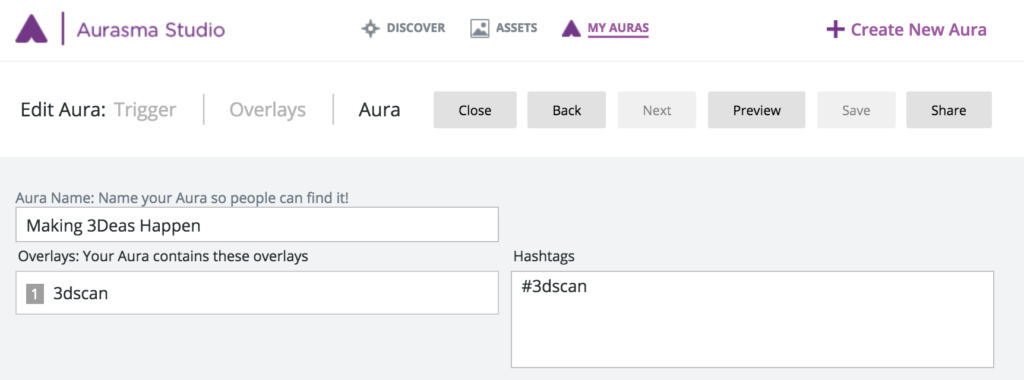
If all looks good. You can publish your project by clicking on Aura (next to Overlays), giving your project a name and some hashtags and click Share.
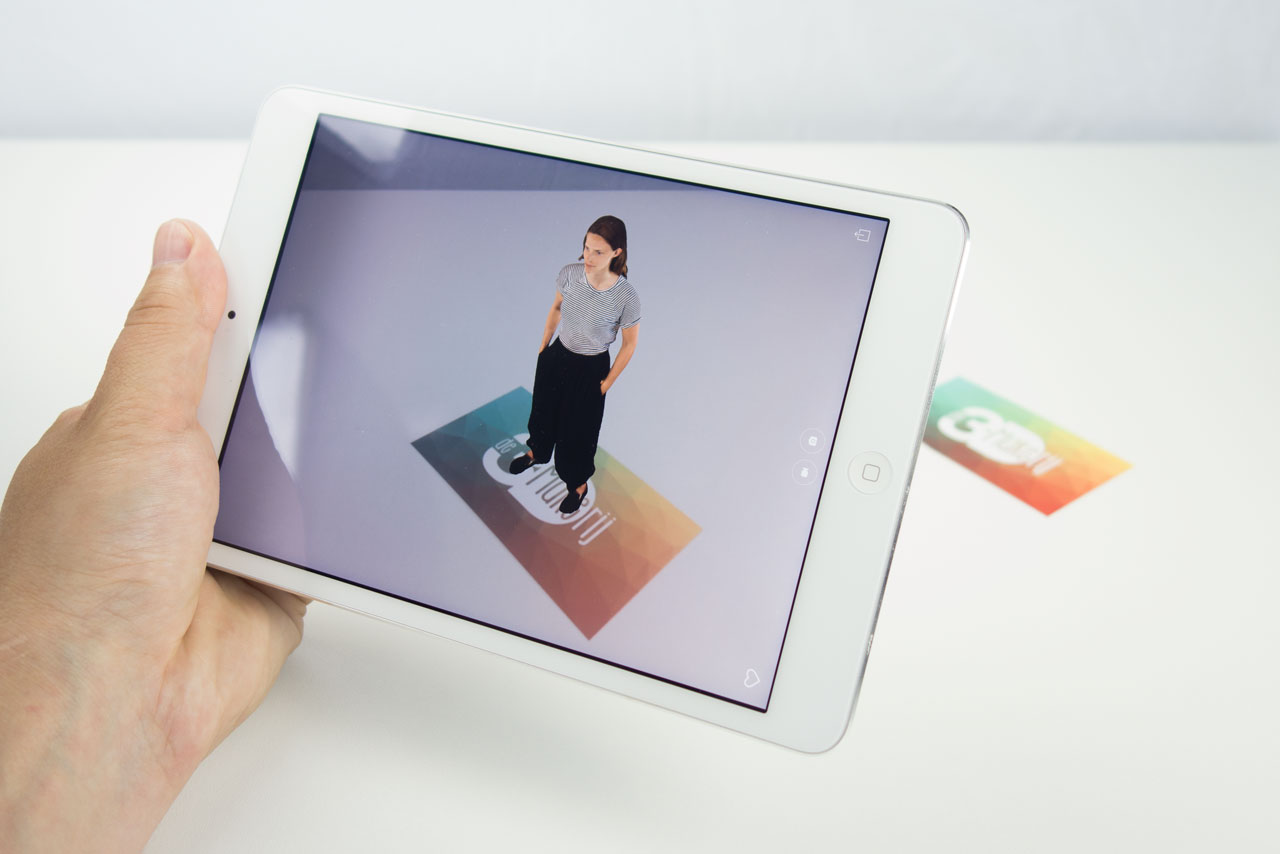
After this, everyone with the Aurasma app installed (no login necessary) can point their device’s camera at the Tigger image to see your 3D scan magically appear on top of it. Of course they need the trigger image for this. You can provide this physically (like a flyer or business card, or simply a print) or digitally. If you don’t own a copy of Making Ideas Happen, just point your Aurasma app at the image below (click for bigger image, works best if it’s on a device that lays flat):

So now you know how you can View and Share your 3D Scans through VR and AR—for Free! A lot cheaper than ordering 3D Prints of it and with more visual details.
I’m working on a lot more 3D Scanning-related content. Follow me on Twitter, Facebook or Instagram if your want to be the first to know when new posts are live! And if you think the post you just read is useful for your friends and followers, I’ll appreciate it if your share it on your favorite social network by using the buttons below