How to Remap the UV Textures of a 3D Scan in BodyPaint 3D / Cinema 4D

An increasing amount of 3D Scanners and Software can record and export color information in the form of a so called UV Texture Map. This means that each polygon is textured with a part from an image file. The letters U and V stand for the 2D texture coordinates (Y, Y & Z are already taken by the 3D system), which are “mapped” onto surface of the polygonal mesh.

Like a regular map, UV maps are usually made of a series of smaller and larger islands representing adjacent parts of the 3D model. If a human designs a 3D model from scratch, you usually make a UV map that’s both efficient and makes sense. For a character, you’d create separate faces for different body parts and pieces of clothing. For memory-efficiency, these islands are then put into a power-of-two-sized square image file (e.g. 2048 x 2048 or 4096 x 4096 pixels). Like this game character:

Source
Source: Pinterest

Unfortunately, most 3D scanner software generates completely random texture maps. Sometimes they’re efficient in terms of island size and placement but they almost never make sense for humans, making them hard to edit in a 2D editing program like Photoshop.

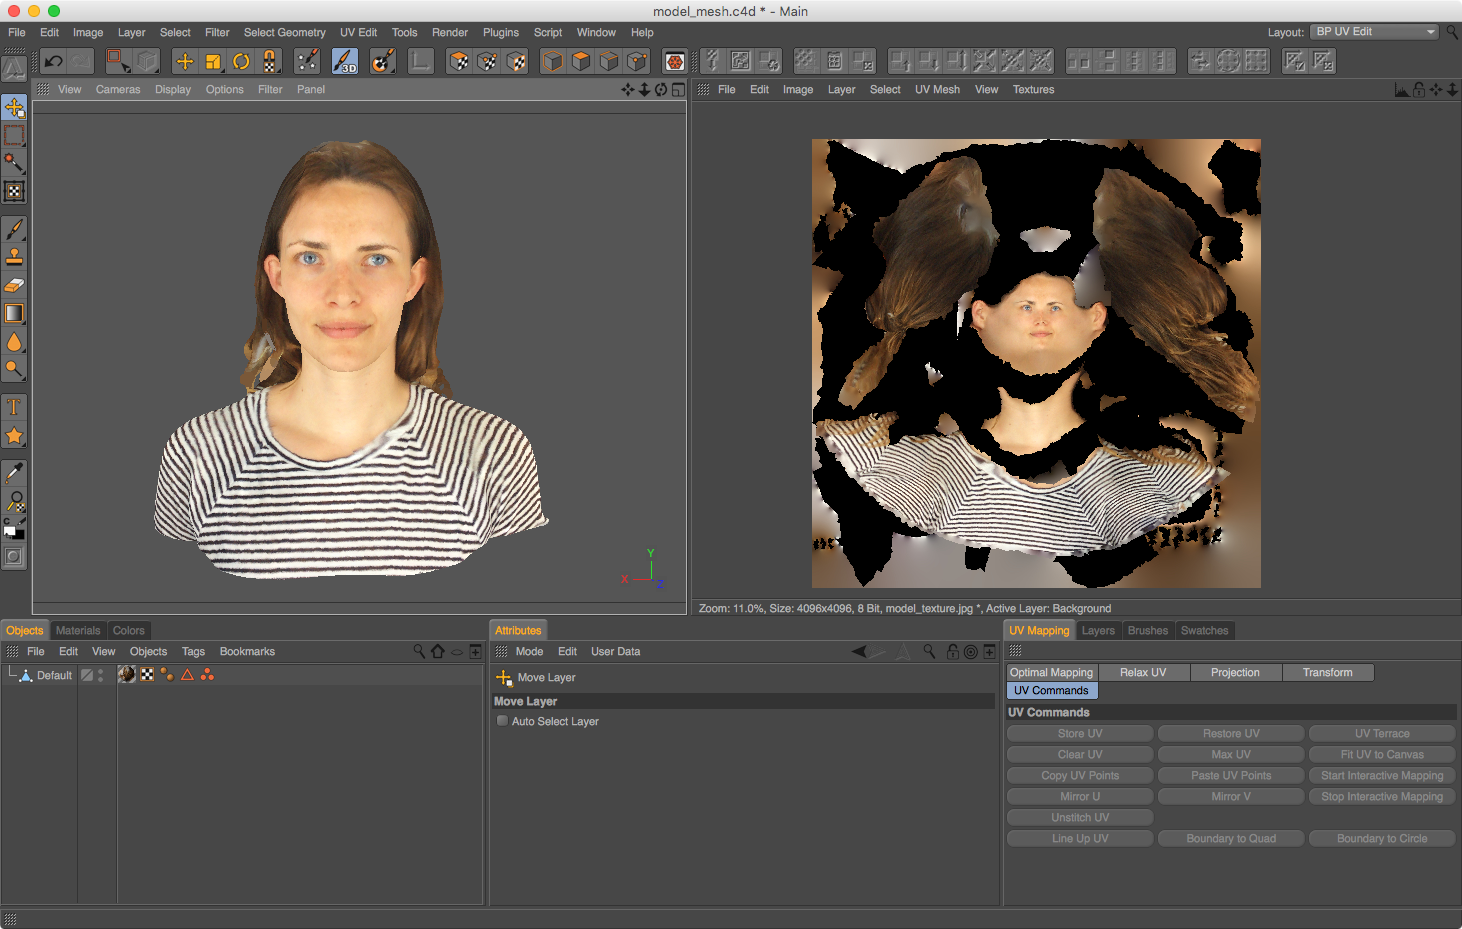
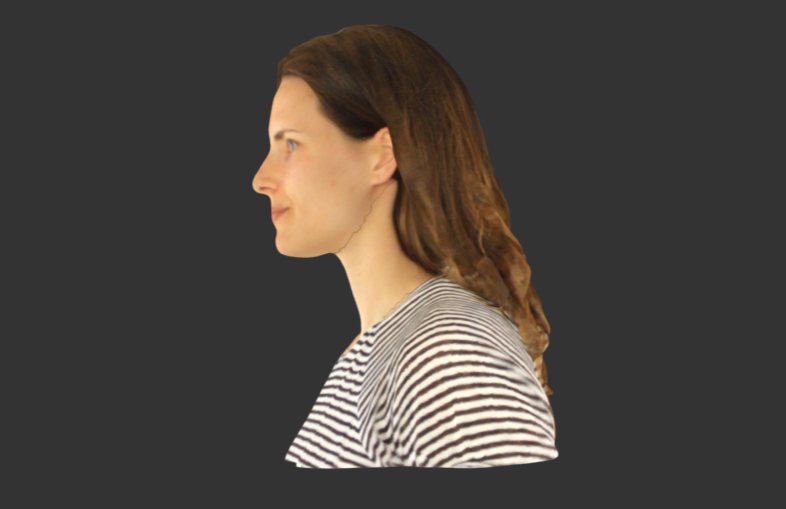
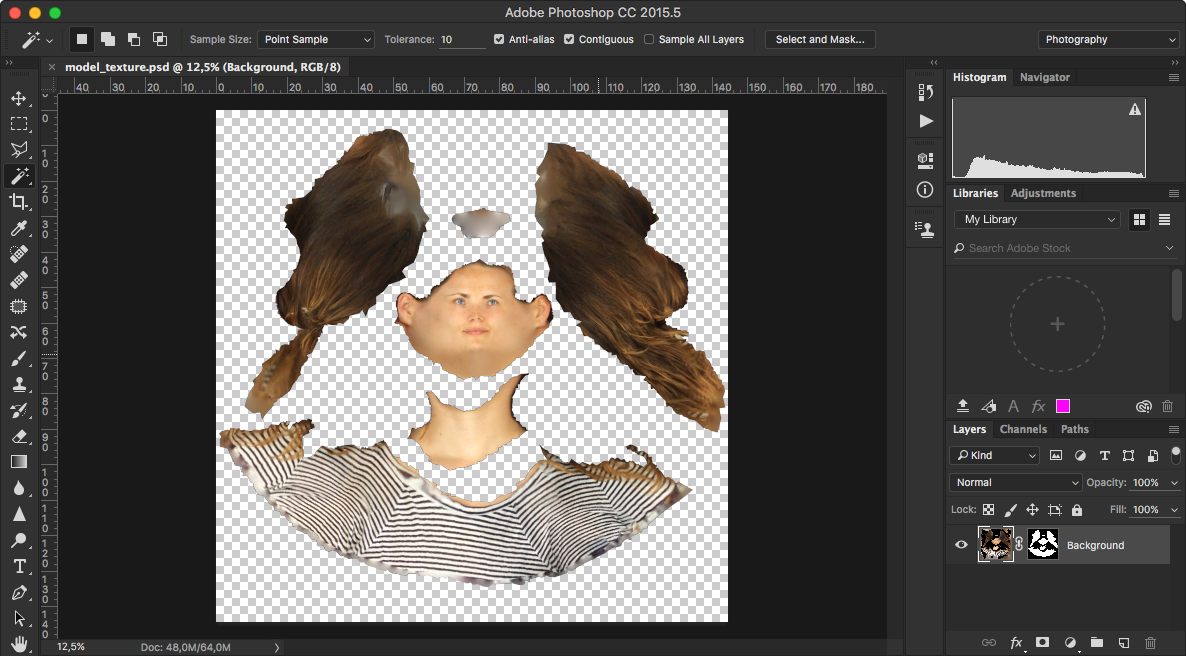
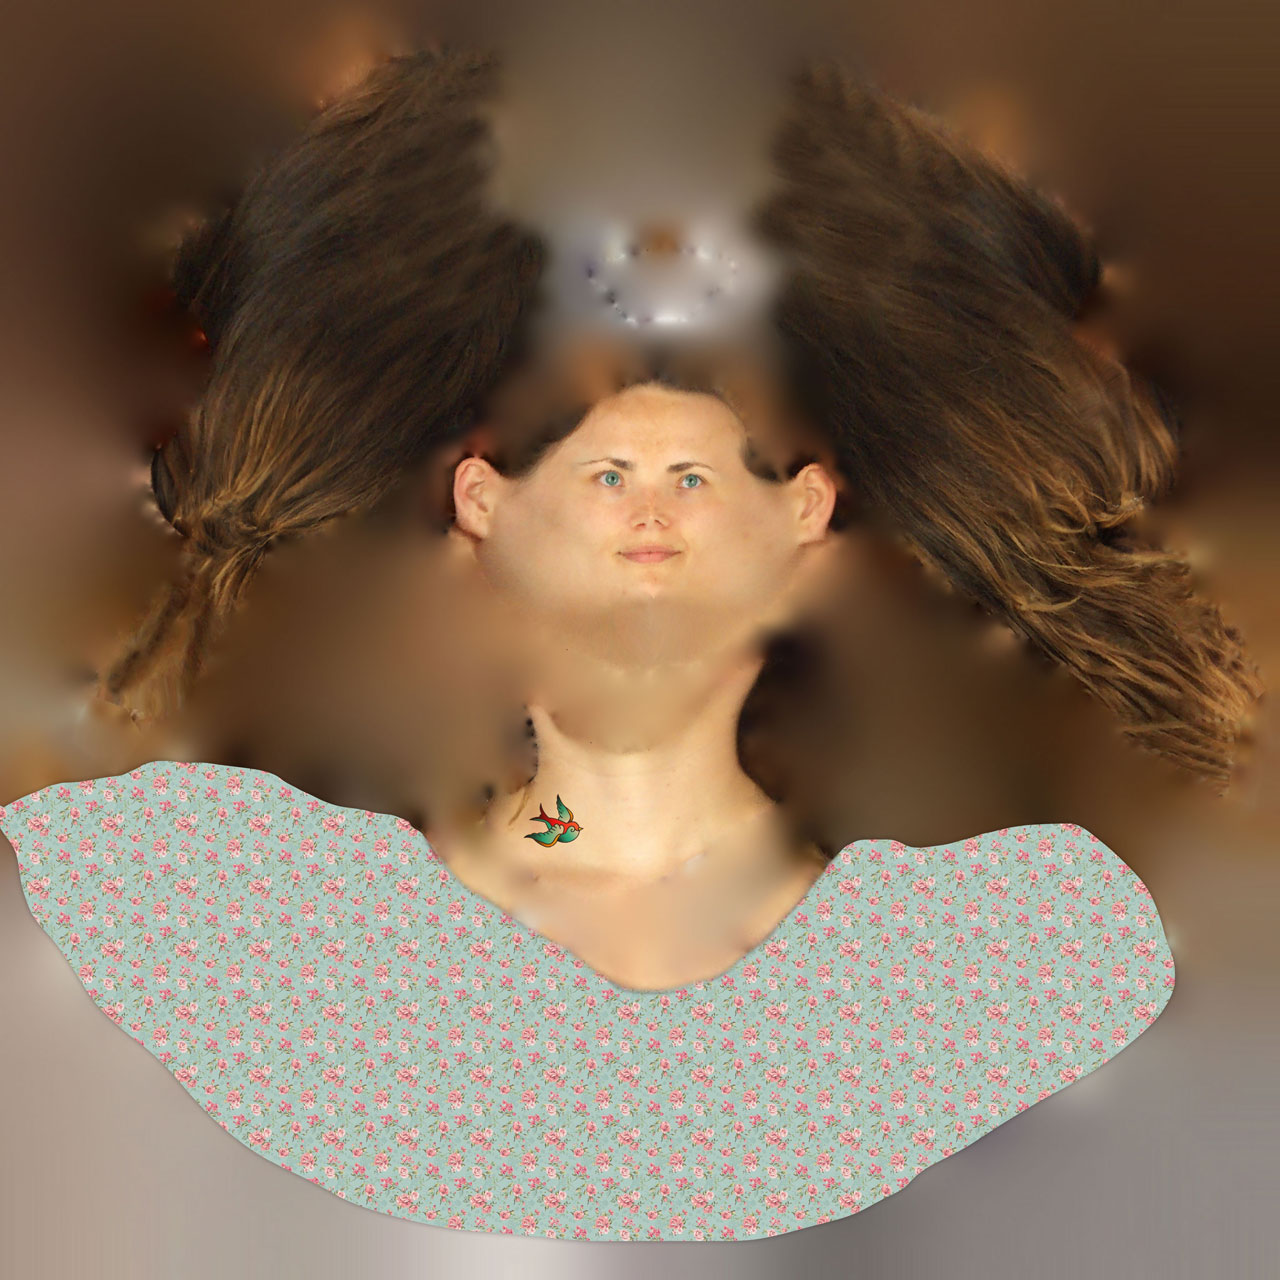
I’ve encountered some extremely bad examples of texture mapping with thousands of tiny islands when doing my 3D Scanner Reviews, but for this tutorial I’ll use one from itSeez3D, an app for the Stucture Sensor, that’s actually quite good with large islands:

c4d-3dscan-texture-remap-tutorial-original-texture-preview

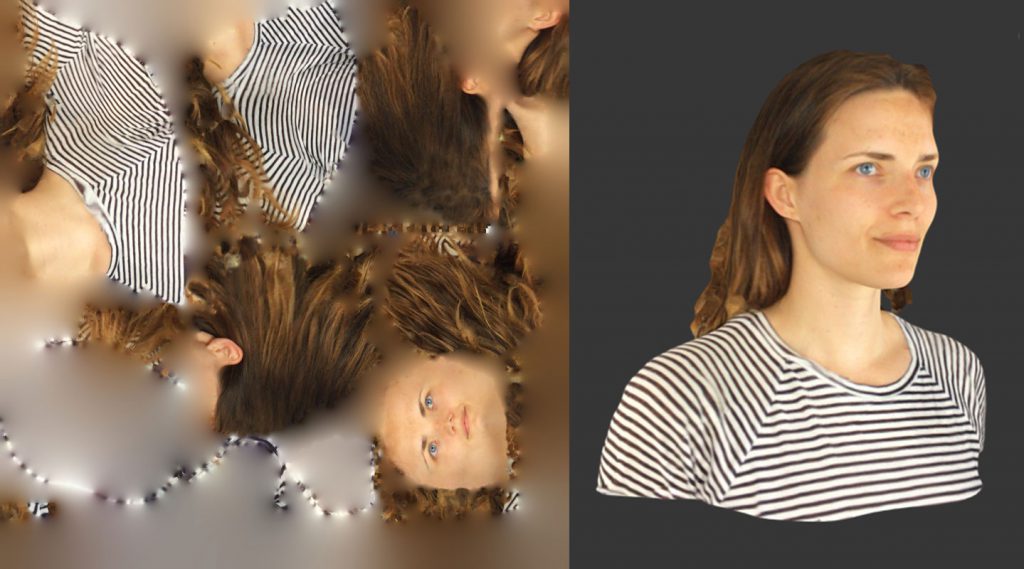
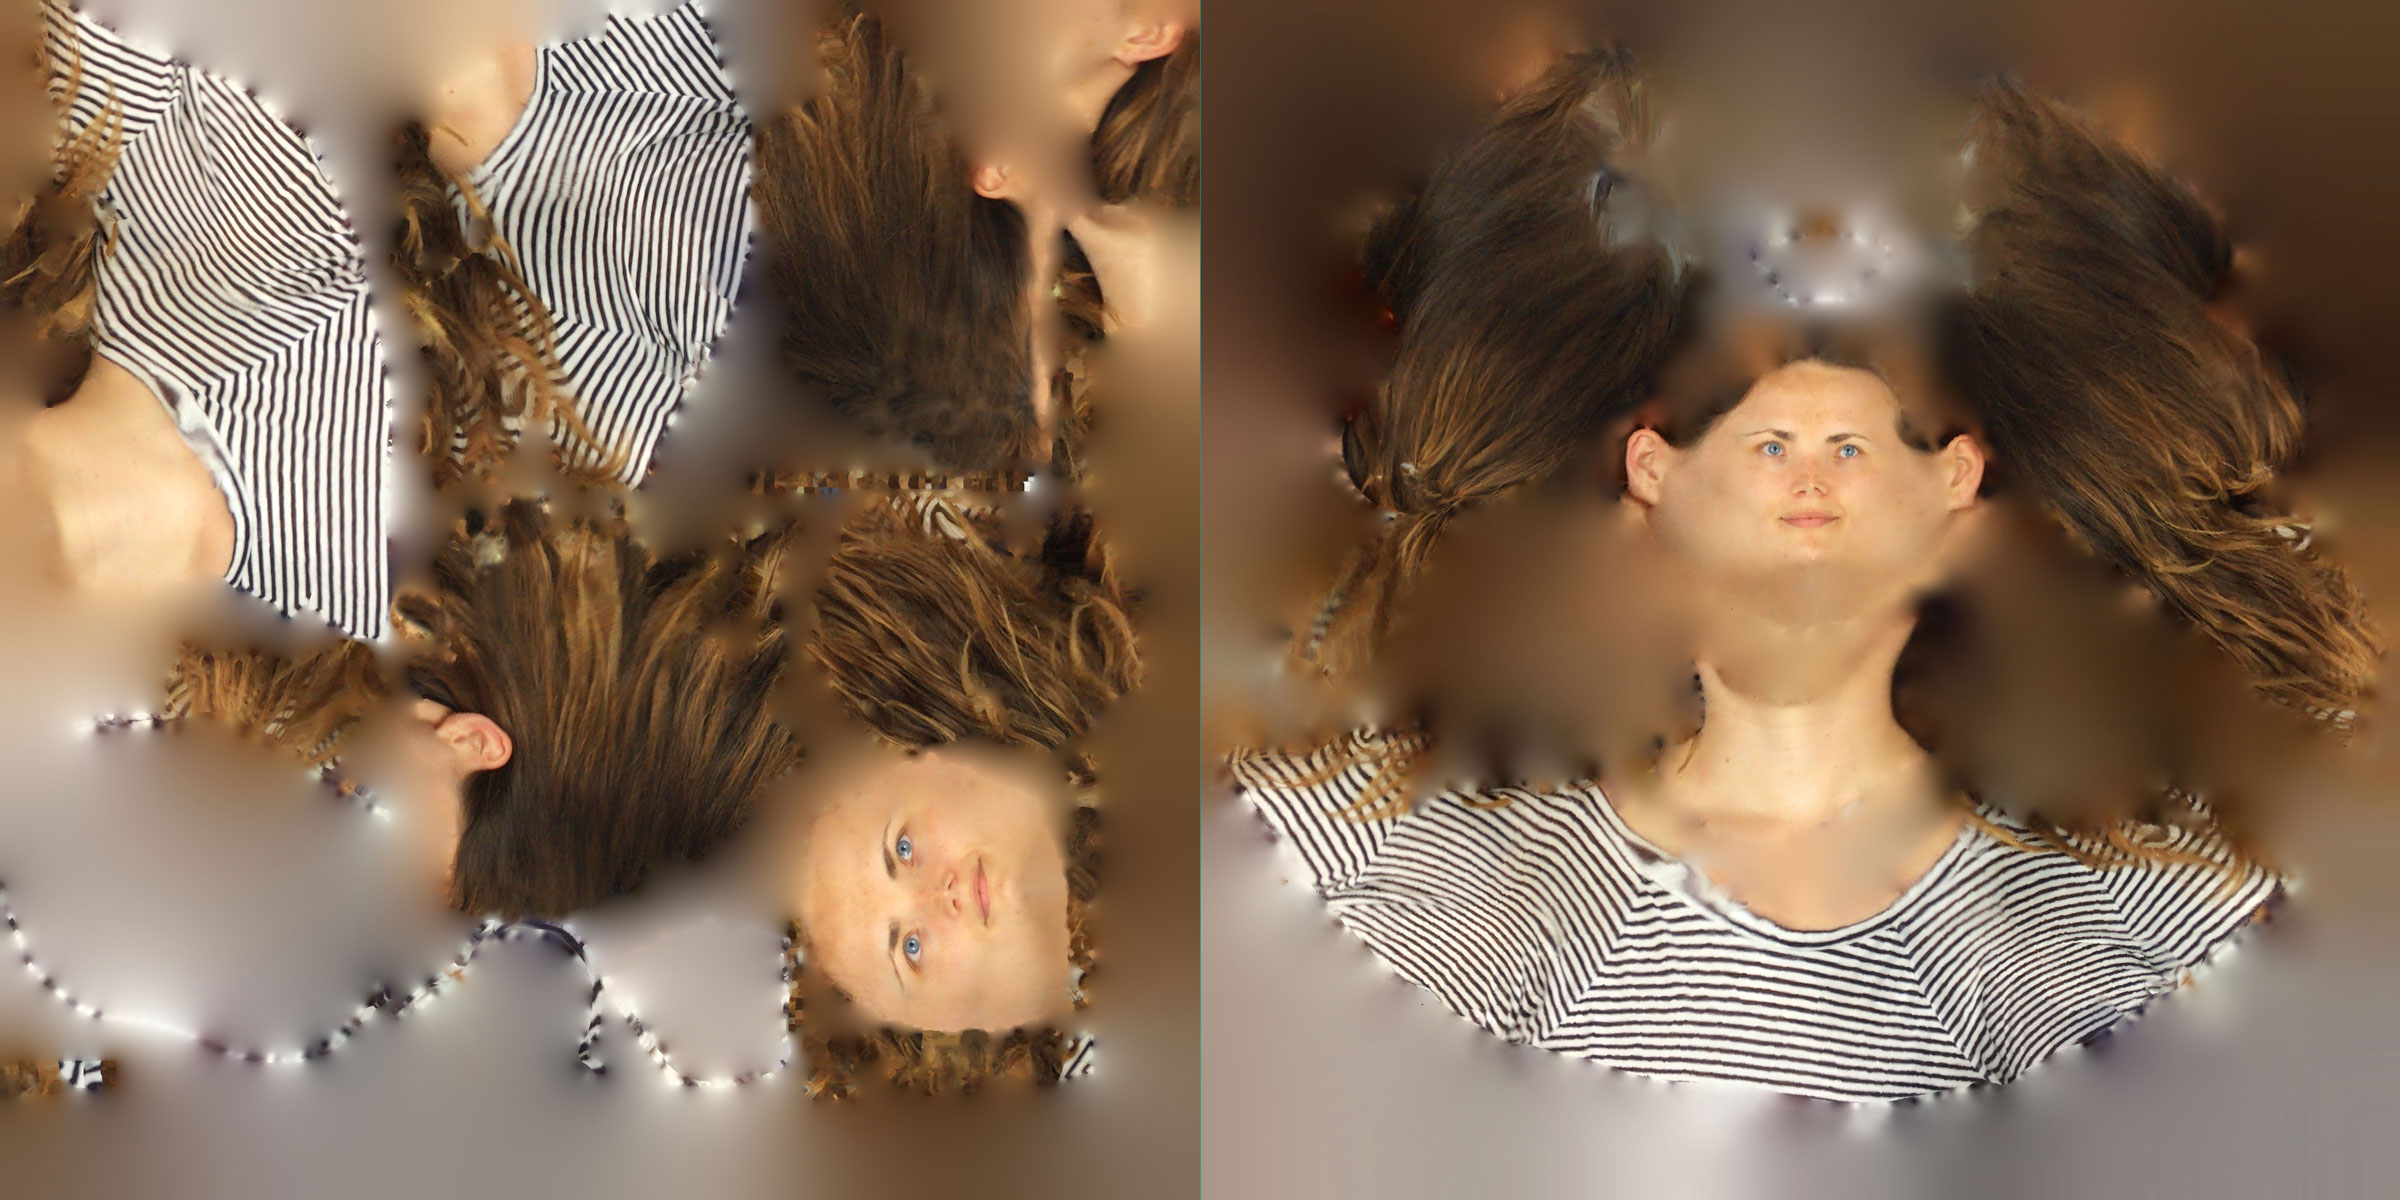
The original texture has a 4K resolution (4096 x 4096 pixels). The great thing about itSeez3D that many other applications lack is that is uses facial recognition to make sure the face texture is captured in a single photo and put onto a single UV island. But while the face is in one place, the rest of the texture is scattered around the image (try to find the ears).

The intention of this tutorial is to rearrange the texture information so it makes more sense, a process called UV Remapping. To follow the steps below, you need 3 pieces of software:

  • Maxon BodyPaint 3D — which is both available for purchase as a separate product of as part of the Cinema 4D Studio software. If you don’t own it, you can download a free 42-day Trial here.
  • Adobe Photoshop — part of Creative Cloud. Download a free 30-day Trial here.
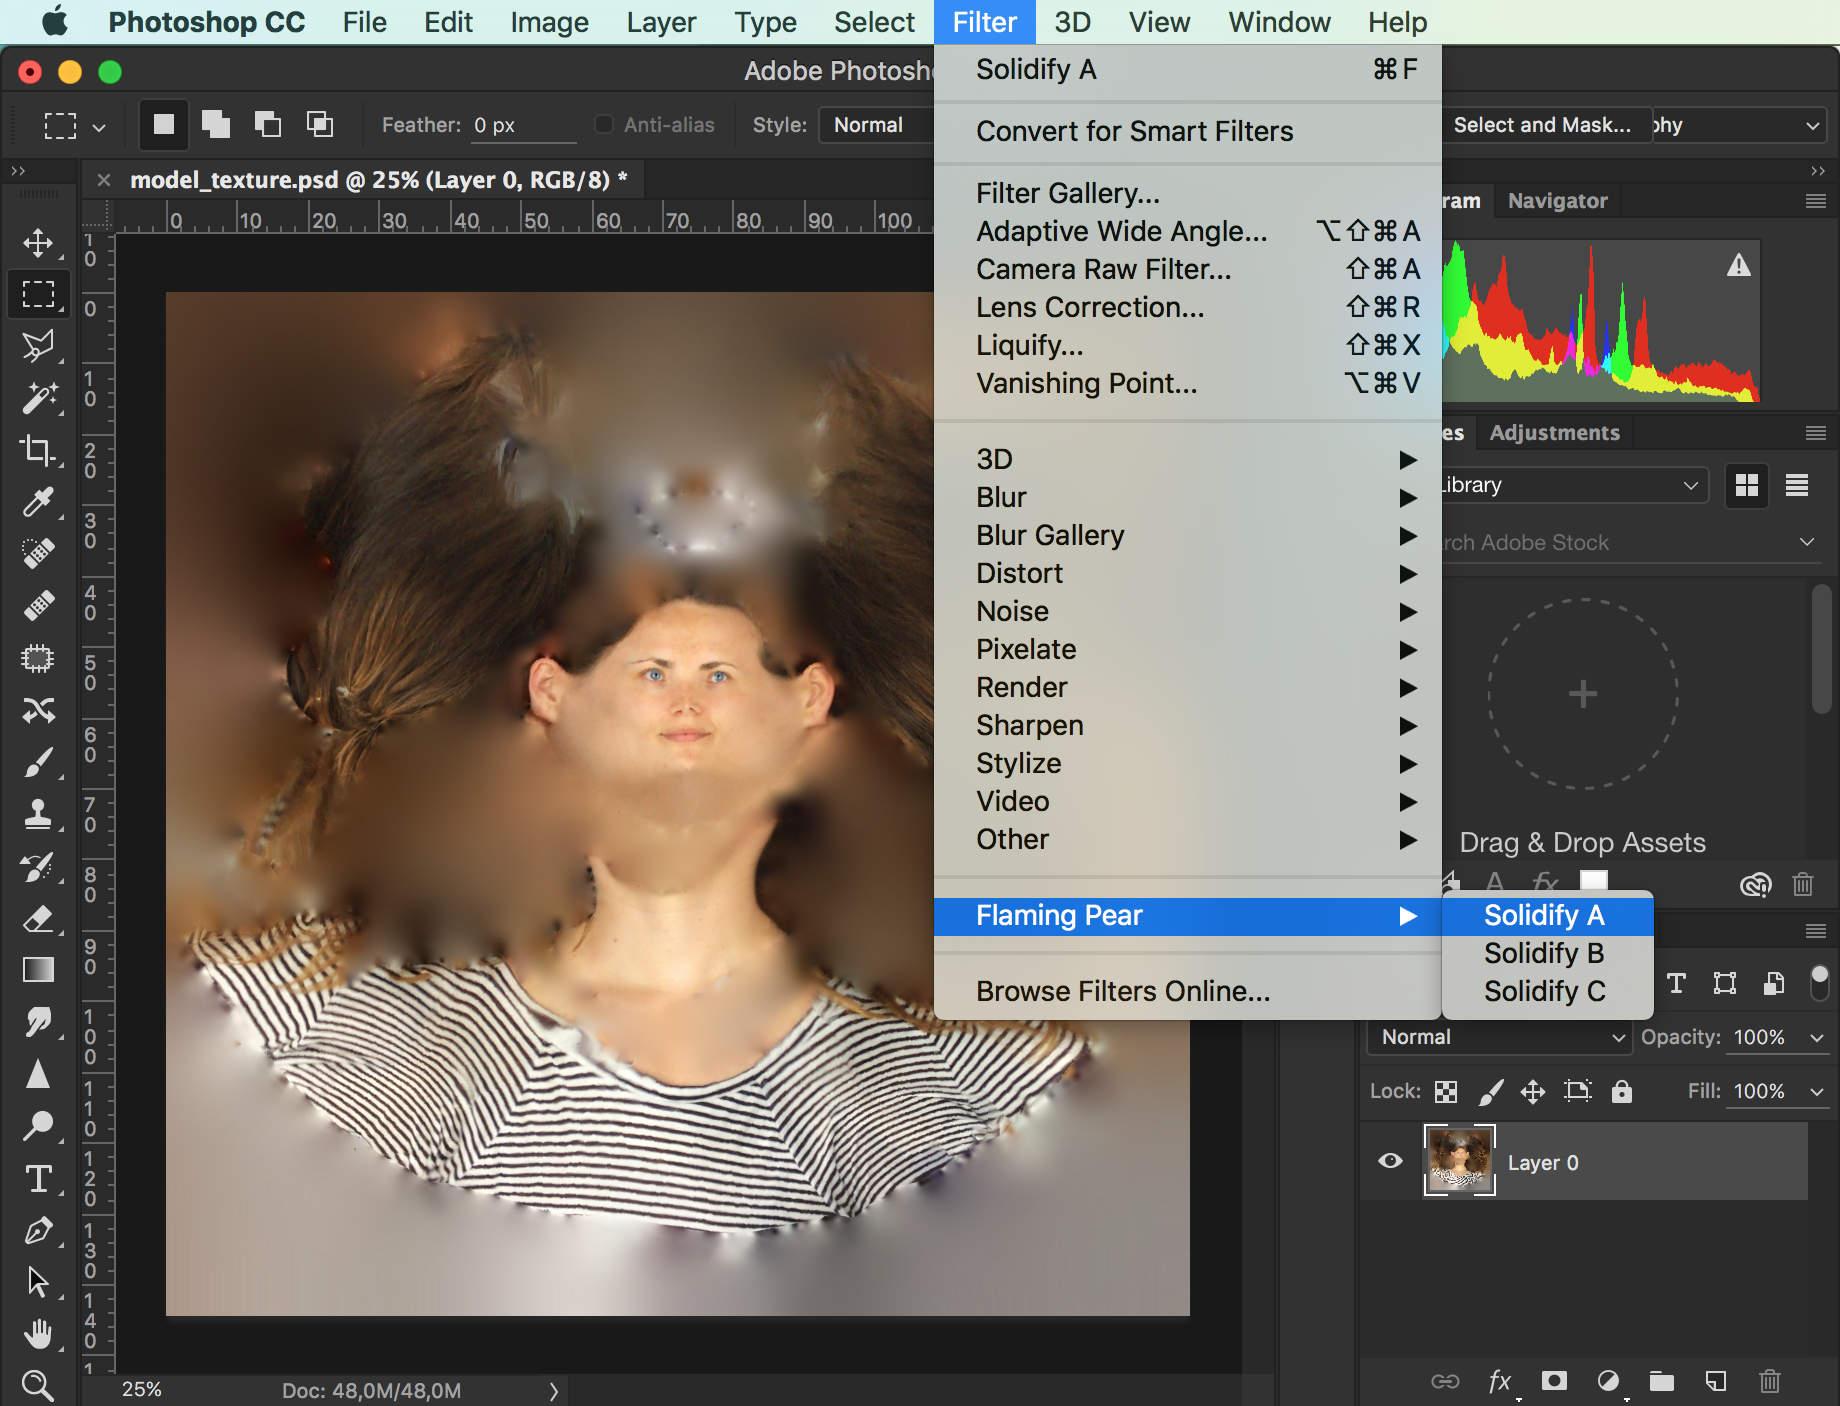
  • Flaming Pear Solidify A – a filter for Photoshop, which can be downloaded for free here.

Naturally, you also need a UV-textured 3D model. If you don’t have a 3D scanner, you can make a free model by using one of these Free Photogrammetry Apps on your Smartphone. BodyPaint 3D / Cinema 4D support many 3D file formats. For this tutorial I’ve exported an .OBJ file from itSeez3D.

Let’s get started!

[well type=””]
Tip: You can click all screenshots below to enlarge them if the caption is in the way!
[/well]


[wp_ad_camp_5]


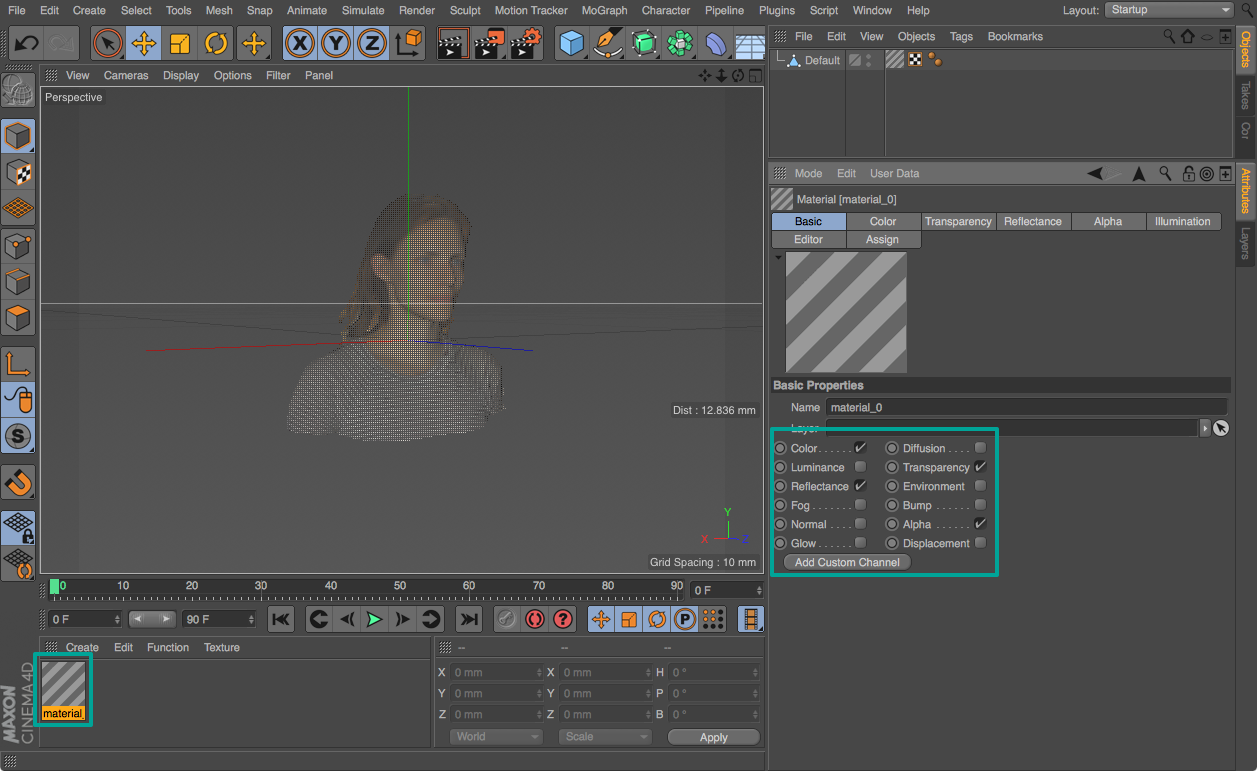
BodyPaint 3D / Cinema 4D Studio

[well type=””]
For this this Tutorial I assume that you have some basic knowledge of the Cinema 4D / BodyPaint 3D interface. One thing to know is what I call the 123456-functionality:

– Hold 1 + Drag Mouse = Pan Camera
– Hold 2 + Drag Mouse = Zoom Camera
– Hold 3 + Drag Mouse = Rotate Camera
– Hold 4 + Drag Mouse = Move Object or UV Selection
– Hold 5 + Drag Mouse = Scale Object or UV Selection
– Hold 6 + Drag Mouse = Rotate Object or UV Selection

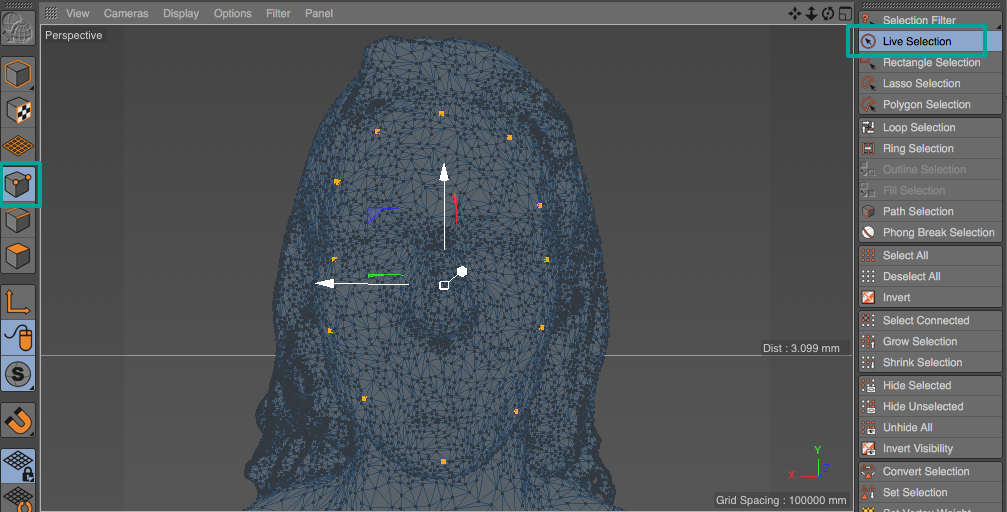
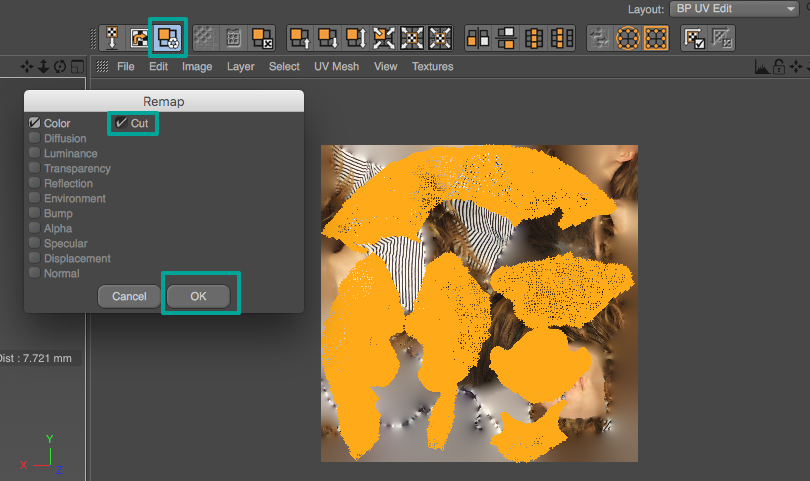
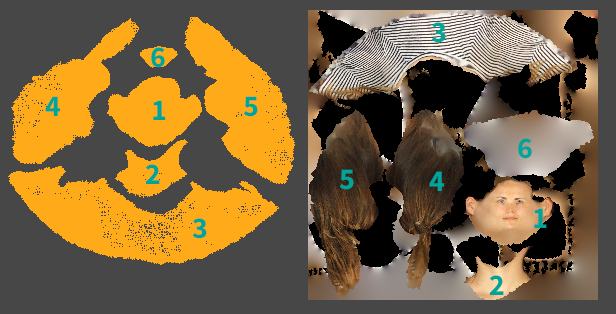
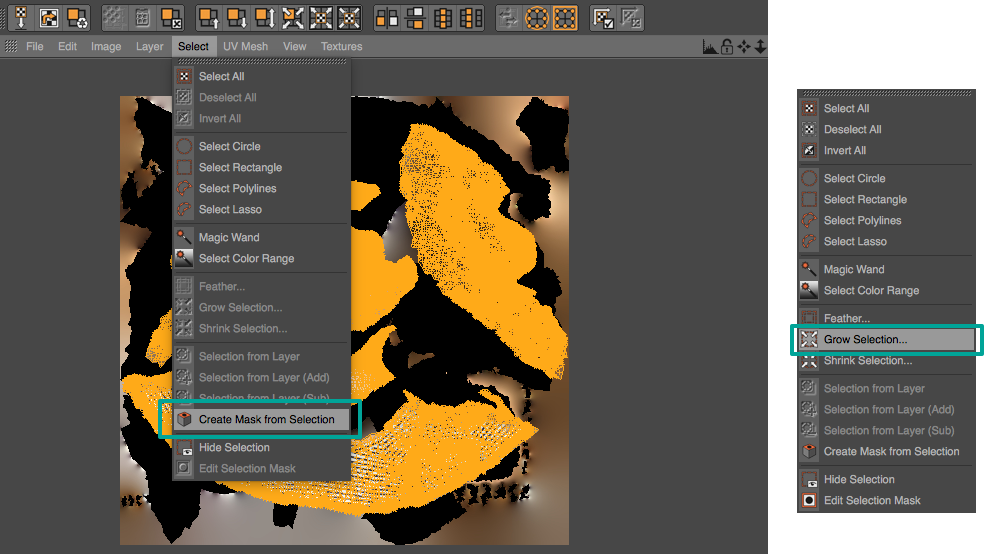
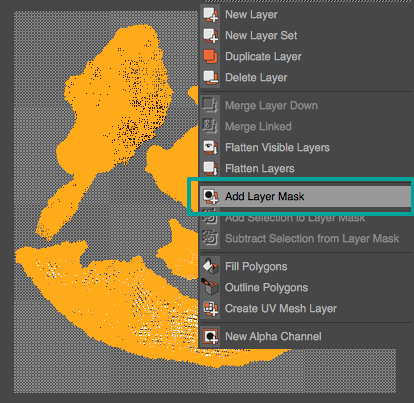
For the other functions, I’ll refer to their menu locations as much as possible so you can easily locate them. I’ve also highlighted locations in each screenshot so you know where to look.
[/well]

Open your 3D model (in this case an .OBJ file) with the default import settings. Sometimes it loads transparent.
Open your 3D model (in this case an .OBJ file) with the default import settings. Sometimes it loads transparent. In the Material Manager, double-click the material and uncheck all channels except Color.
In the Material Manager, double-click the material and uncheck all channels except Color. Now the transparency is gone, but the texture looks a bit blurry.
Now the transparency is gone, but the texture looks a bit blurry. In the Color tab, you can see this is a 4K texture. To save memory, it’s previewed in lower quality.
In the Color tab, you can see this is a 4K texture. Too save memory, it's previewed in lower quality. Go to Editor and set the Texture Preview Size to 4K to see the actual quality.
Go to Editor and set the Texture Preview Size to 4K to see the actual quality.
If parts of your model get clipped when zooming in, you can go to Edit > Project Settings the View Clipping to Tiny.
Select your model in the Object Manager and enable Edge Mode. Select the Path Selection Tool to manually selected closed (important!) paths.
Select your model in the Object Manager and enable Edge Mode. Select the Path Selection Tool to manually selected closed (important!) paths. The selected edges will serve as cuts in the texture when remapping.

[well type=””]
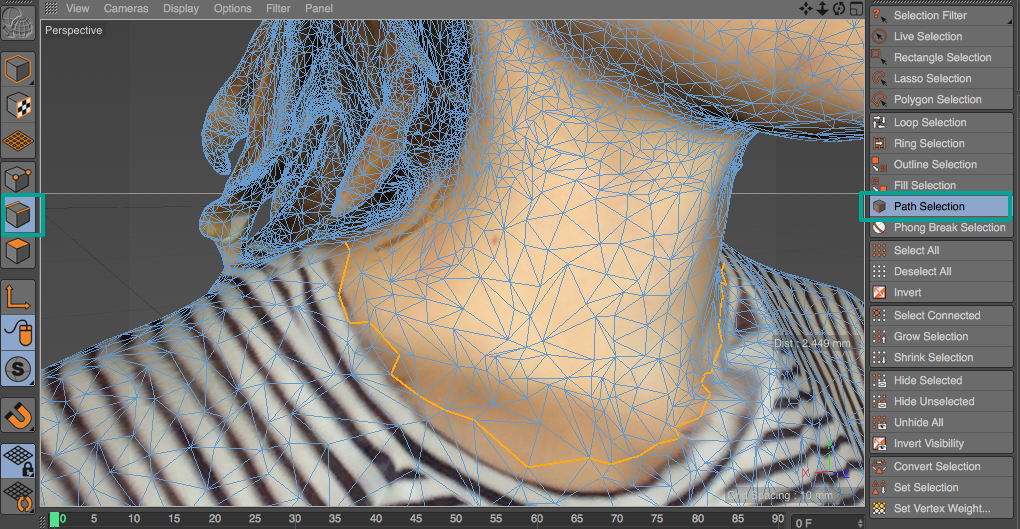
As you can see, the selection I’m making above is quite rough because the polygons are relatively large in some places. If you want a more precise selection, you can switch to Polygon Mode first, select all polygons and go to Mesh > Command > Subdivide to make the mesh denser. This way you can more closely follow the texture. For this tutorial, I left the mesh untouched for the visual clarity of the screenshots.
[/well]

[wp_ad_camp_5]

These are the Edge selections I made for this model. I made a separate selection for the face, neck, shirt and hair. Note that I've split the hair into two parts. This is because the UVs of tapered shapes will get very distorted when "relaxed". I also made a separate selection for the bottom surface.
These are the Edge selections I made for this model. Hold the Shift to add selections and hold CTRL to remove selections. I made a separate selection for the face, neck, shirt and hair. Note that I’ve split the hair into two parts. This is because the UVs of tapered shapes will get very distorted when “relaxed”. I also made a separate selection for the bottom surface.
Switch to Point Mode, rotate the model so it faces you and use the Live Selection tool (with a Radius of 1) to select points that you want to "lock". This prevents this area from stretching later. This is especially handy for faces.
Switch to Point Mode, rotate the model so it faces you and use the Live Selection tool (with a Radius of 1) to select points that you want to “lock”. This prevents this area from stretching later. This is especially handy for faces. To make this easier, you can disable the texture by deselecting Options > Texture in the Viewport. Don’t forget to enable it after your point selection is done.

[well type=””]
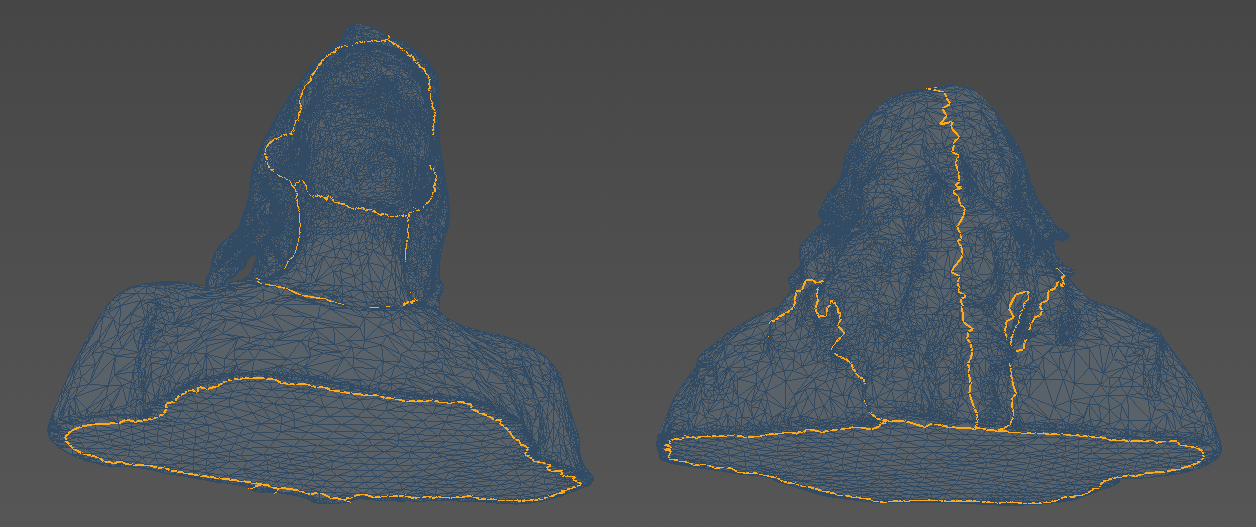
If you want, you can save both the Edge and Point selections with Select > Set Selection. This will add selection tags to the model in the Object Manager which you can use to reload selections later. This is optional and not required for this tutorial.
[/well]

Switch to Polygon Mode and Select All polygons. Then, switch the application to BP UV Edit mode with the selector in the far right corner.
Switch to Polygon Mode and Select All polygons. Then, switch the application to BP UV Edit mode with the selector in the far right corner. In the bar on the top, select the UV Polygon Edit Mode. This should highlight all UVs on the Texture Map. If you don’t see the texture itself, you can load it by clicking the red cross in the Materials Tab in the bottom left corner.

[well type=””]
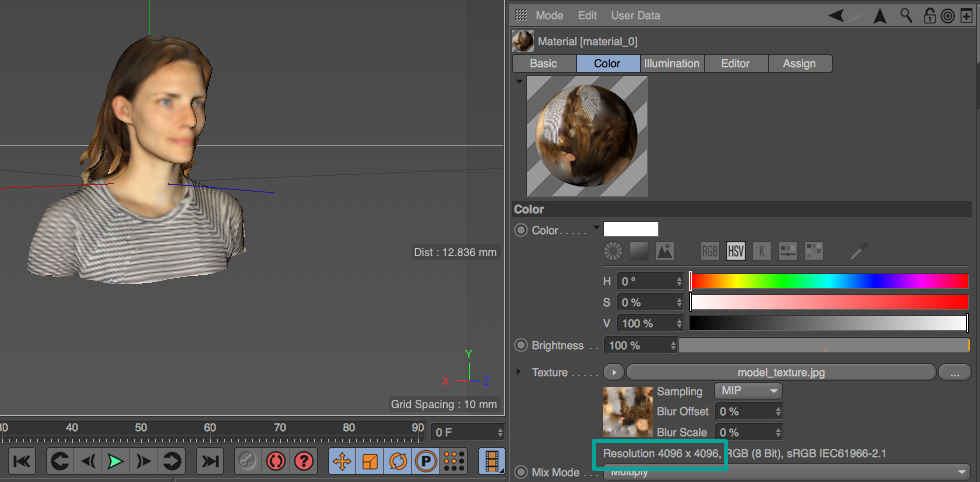
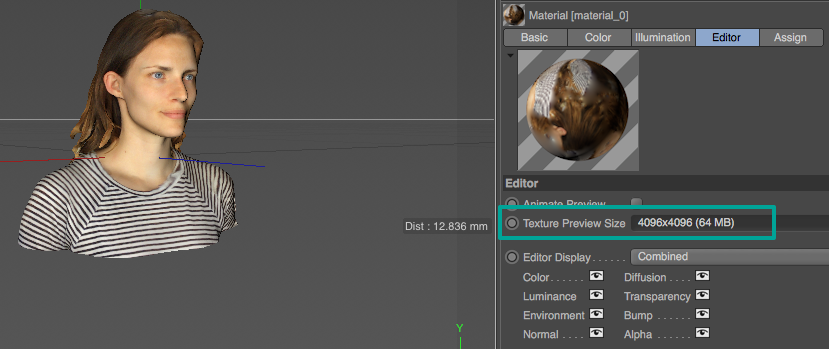
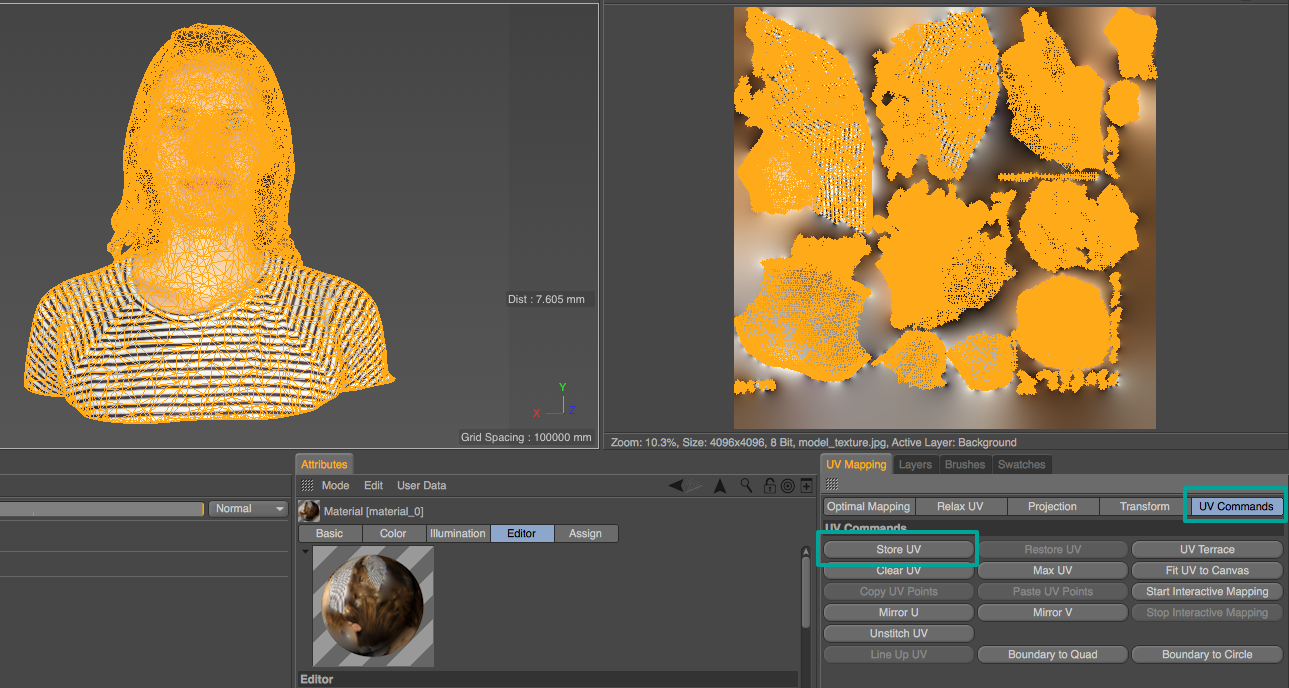
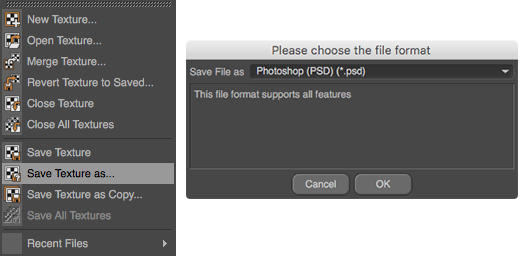
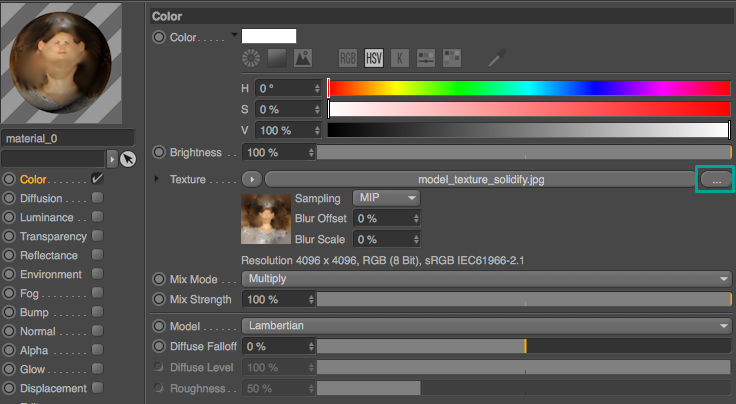
Optionally, you can increase the texture size at this moment by clicking Image > Texture Size above the texture map preview. This is advised if your texture map resolution is relatively low (2K or less) and you don’t want to decrease texture quality for complexe models when “relaxing” the UVs. For example, you’ll see that the texture of the model’s face will get slightly smaller in the next steps. I chose to keep the resolution at 4K because it’s sufficient for my purposes.
[/well]

[wp_ad_camp_5]

In the panel in the bottom right, select UV Commands and click Store UV. This records the texture information in the current UV layout.
In the UV Mapping panel, select UV Commands and click Store UV. This records the texture information in the current UV layout.
Rotate the camera in the 3D Viewport so it faces you. Go to the Projection tab un the UV Mapping panel and select Frontal.
Rotate the camera in the 3D Viewport so it faces you. Go to the Projection tab un the UV Mapping panel and select Frontal. Now the UVs are oriented like the model in the 3D Viewport. This is the initial position for the relaxing procedure in the next steps.
In the Relax UV tab, make sure Pin Point Selection is checked. This will make sure the points selected on the face will not stretch. Also check Cut Selected Edges. This will use the edge selection to create separate UV islands. You can select either the LSCM or ABF algorithm (sometimes one looks better than the other: experiment!). Check Auto Realign and hit Apply. This can take some time.
You should see that the UVs are now rearranged into islands, but the texture itself is still the same. Click the Remap icon, make sure Cut is checked and click OK. This will move the parts of the texture to their new locations.
You should see that the UVs are now rearranged into islands, but the texture itself is still the same. Click the Remap icon, make sure Cut is checked and click OK. This will move the parts of the texture to their new locations. Don’t mind the parts that didn’t move, as they were not really used on the model.
Optionally, you can select parts of the texture and move, scale or rotate them by holding the 4, 5 or 6 keys and dragging.
Optionally, you can select parts of the texture and move, scale or rotate them by holding the 4, 5 or 6 keys and dragging. IMPORANT: Before you do this, you should click Store UV in the UV Commands tab again!
c4d-3dscan-texture-remap-tutorial-6-uv-edit-6-rearrange
I personally like my textures to be logically arranged. Here I put the UVs next to the Canvas to arrange them. After that, I placed them back into the Canvas (important!) and repeated the Remap procedure.
Here's the newly remapped texture. Makes a lot more sense than the original, right? But there's more!
Here’s the newly remapped texture. Makes a lot more sense than the original, right? This will work pretty well as-is, but below are some more steps to make it perfect.

[wp_ad_camp_5]

c4d-3dscan-texture-remap-tutorial-7-photoshop-sketchfab-line
Depending on how you render the model with the new UV texture map, you might be able to see the seams, like the jawline here. Let’s fix that!


c4d-3dscan-texture-remap-tutorial-6-uv-edit-8-selection
With the polygons still active, go to Select > Create Mask from Selection. There’s a catch here, because the program will select each individual polygon (although it looks like it selects the islands). To fix this, click Select > Grow Selection and expand the selection by 1 pixel.
Go to Layer > Add Layer Mask to isolate the islands from the background.
Because JPGs can't contain layers, you should save the texture as a Photoshop (PSD) file to edit it in the next step.
Because JPGs can’t contain layers, you should save the texture as a Photoshop (PSD) file to edit it in the next step.

[wp_ad_camp_5]


Adobe Photoshop


Load the PSD into Adobe Photoshop.
Load the PSD into Adobe Photoshop. In the Layers panel, CMD (Mac) / CTRL (PC) + click the black and white mask to turn it into a selection. Then delete the mask (drag it into the waste bin), but don’t apply it!
Here you can see the black pixels that are the culprit for the visible lines in the texture.
c4d-3dscan-texture-remap-tutorial-7-photoshop-3
Go to Select > Modify > Contract. For a 4K texture, contract by 2 pixels.
Make a Mask from the contacted selection by clicking the New Layer Mask button (the white rectangle with the black circle) on the bottom of the Layers Panel. Then right-click the mask and select Apply Layer Mask.

[wp_ad_camp_5]

Select the layer and go to Filters > Flaming Pear > Soldify A. (download here if you missed it in the intro)
Select the layer and go to Filters > Flaming Pear > Soldify A. (download here if you missed it in the intro). Save the result as a JPG (recommended for compatibility) or PNG file (recommended for quality).
Go back to Cinema 4D / BodyPaint 3D and open the material in the Material Manager. In the Color channel, load the texture you just saved from Photoshop.
As you can see the seam on the jawline is now gone. You can save your model in native C4D format, or export it to an interchangeable file format like .OBJ. This format keeps the texture as a separate image file, so you (or someone else) can edit it easily.
Now that you have your easy-to-edit texture, you can unleash your creativity. And because it's 3D, you don't always have to think about shading. Here I quickly pasted a retro flower pattern onto the part of the shirt, added a tattoo and made the eyes green.
Now that you have your easy-to-edit texture, you can unleash your creativity. And because it’s 3D, you don’t always have to think about shading. Here I quickly pasted a retro flower pattern onto the part of the shirt, added a tattoo and made the eyes green.
Add some dynamic lighting and that flat-looking flower texture actually looks quite good.

That’s it! I hope I have covered everything, but if you get stuck please let me know in the comment section below.


It’s good to know that while this tutorial teaches you to make more sensible texture maps, 3D scans in this form are still far from optimal for certain purposes. For example, if you want to prepare them for use in a 3D game engine, you’ll discover that the the polygons of the mesh are randomly organized — also called the topology — which isn’t ideal or efficient.

I’ll go into techniques to retouch geometry and retopologize a 3D model in future posts. Follow @3Dscanexpert on social media to be the first to know when new Tutorials are live.

[tw-social icon=”twitter” url=”http://twitter.com/3dscanexpert” title=””][/tw-social] [tw-social icon=”facebook” url=”http://facebook.com/3dscanexpert” title=””][/tw-social] [tw-social icon=”instagram” url=”http://instagram.com/3dscanexpert” title=””][/tw-social]

  1. During “create mask from selection”, only a small portion of UV islands have been selected. Can you enlighten me on this? Many thanks!

  2. Hi. Is there a way to remap UV textures in the way you described using Blender and Photoshop? Or any other free 3D software? Would love to know if there is an alternative to Bodypaint 3D.

Leave a Reply

Your email address will not be published. Required fields are marked *

Contents