Like 3D Printing a few years ago, 3D Scanning has become affordable for consumers and small businesses. At entry level, people that are interested in capturing 3D can now experiment with Free Photogrammetry Apps or affordable 3D Scanners for Smartphones and Tablets.
Here are six tips for things to buy that will greatly improve the results of your 3D scans:
1. Light, Light & Light
While industrial-grade 3D Scanners usually have a build in LED light source, affordable infrared depth sensors — like the Structure Sensor or Sense 2 — haven’t. This means the scan quality will greatly depend on the lighting conditions. For photogrammetry the solution is simple: capture your subject outdoors, preferably on an overcast day for nice, diffuse lighting. If you have a 3D scanner that projects a visible line of laser light, scanning outside might also work. But if your scanner uses invisible, infrared light, you’re bound to scan indoors.
But in many cases you’ll want to scan indoors anyway to keep control of the lighting. In this case it’s wise to invest in a studio light setup. Not flash lights for photography, but permanent lights used for video production. The kits usually come with 3 lights with softboxes on stands. Depending on your budget, you can buy a kit with LED lights or a more affordable version with fluorescent bulbs. The amount of light you need depends on what you want to capture. Just be sure the light temperature is 5500 Kelvin (daylight).
I have three ways to light my 3D scan subjects:
[column lg=”9″ md=”12″ sm=”12″ xs=”12″ ]
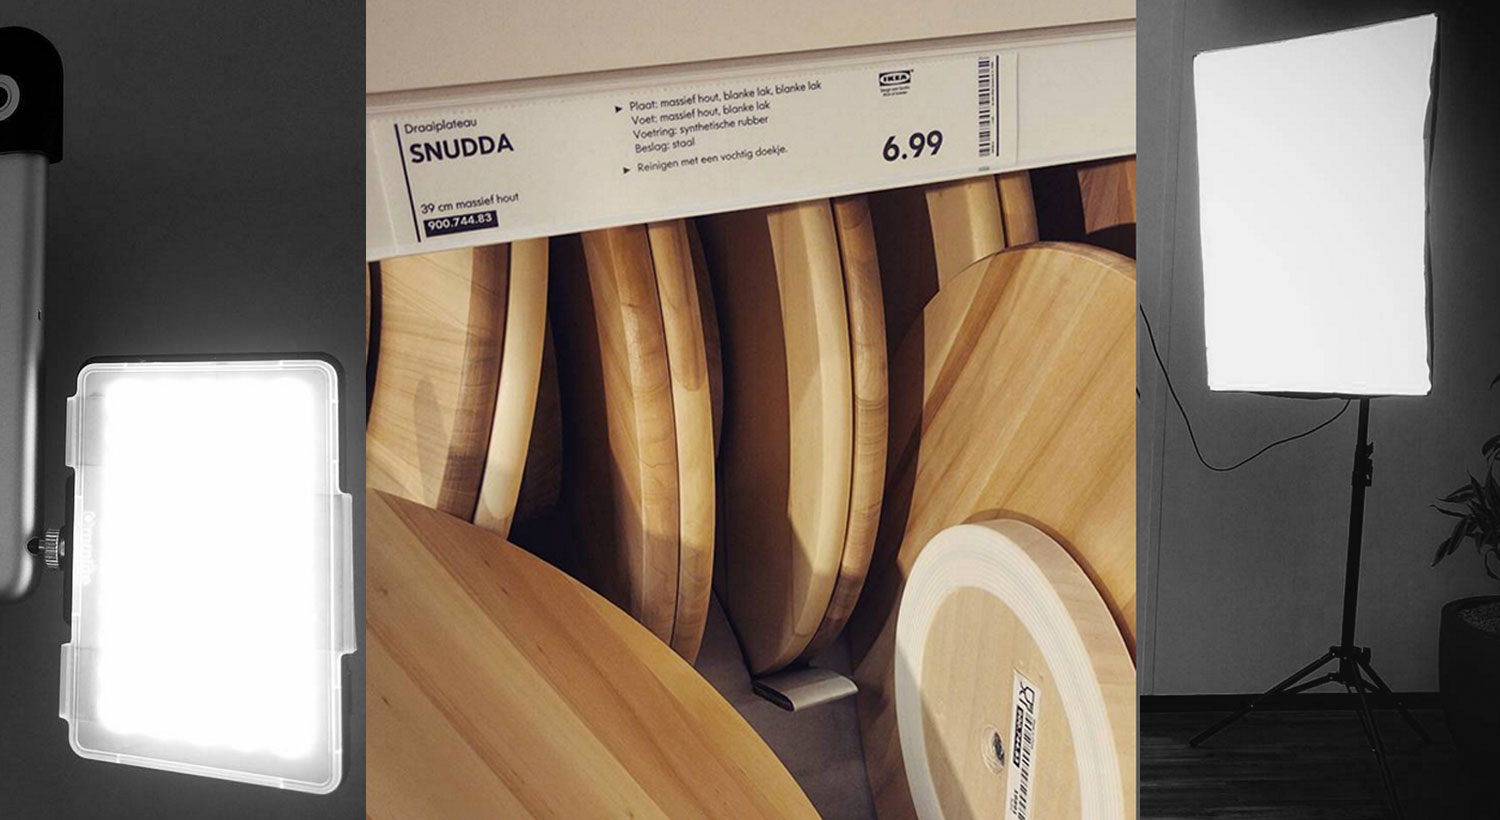
Small Light Kit
This is a very portable (they usually come with a carrying bag) kit with two or three small, single-bulb, umbrella-style softboxes. It’s good for scanning small objects like the Teddy Bear you see a lot on my blog.
They’re usually just standing in a corner of my office and I use them for most of the photography on this site as well.
[column lg=”3″ md=”12″ sm=”12″ xs=”12″ ]

[column lg=”9″ md=”12″ sm=”12″ xs=”12″ ]
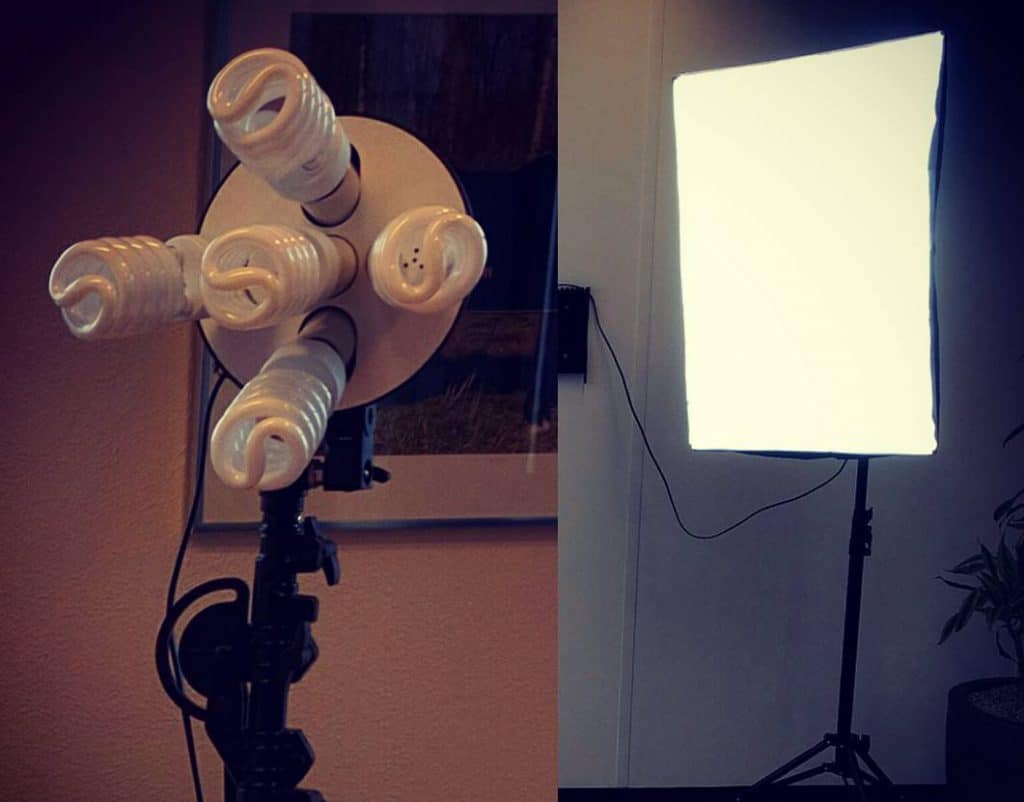
Large Light Kit
I also have a larger that can hold 5 separately switchable bulbs, totaling 2500 Watts of light. It comes with a bag, but I call it the Body Bag for a reason. That’s why I only use this set in my studio only and usually for Full Body Scanning.
I might swap that kit for an LED version one day, because that would be a lot lighter and would save a lot of electricity as well.
[column lg=”3″ md=”12″ sm=”12″ xs=”12″ ]
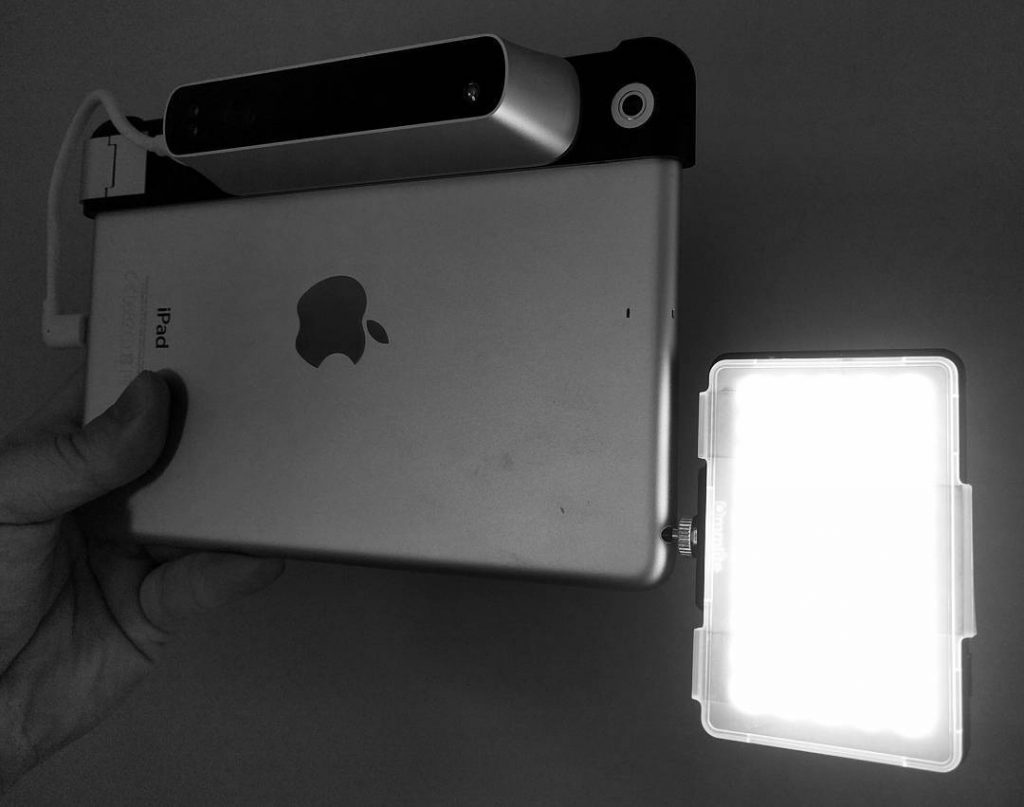
Mobile LED Light
[column lg=”9″ md=”12″ sm=”12″ xs=”12″ ]
If you want go totally portable though and use a Structure Sensor, you can also buy a small, portable LED light that you can stick onto the back of the iPad or plug into the headphone port or tripod thread. This does help in some unplanned scenarios where lighting is simply bad. I always have my Structure Sensor and one of these in my bag. It isn’t perfect, because color textures are usually captured at a wider angle than a light like this can cover and you’ll have to keep a fixed distance from your subject to avoid even more lighting inconsistencies. But it’s better than nothing.
[column lg=”3″ md=”12″ sm=”12″ xs=”12″ ]

2. A Turntable
Using a turntable has the big advantage of not having to walk around the subject. This means you’ll need less space and less lights and in some cases your 3D scanner can even be mounted in a fixed position. As a 3D (Scanning) Consultant, I do a lot of research on the technology and have come to know a great lot of people involved in it. One thing that I noticed is that almost every one of them owns a €6,99 IKEA SNUDDA Lazy Susan Turntable. And though none of them seem to be perfectly centered (I tested 20 last week…), I use mine a lot to scan small objects.

If you want to scan bigger objects or humans, you’ll have to buy something more serious. I own an electric turntable manufactured by Dutch company Pre-Motion, that can hold up to 100 kilograms. They have two versions with different fixed speeds and I tested both to discover that the slowest 0.8 RPM version works great for 3D Scanning. I modded mine by adding a simple foot-operated light switch in the power cord, so I can take my time to scan the front and head of people first and then turn on the turntable with my foot to capture the rest at a comfortable pace (the GIF below is played at 4x the original speed). A turntable like this isn’t very cheap and also isn’t very light (15.5 kilograms), but if you’re going to put people on something that rotates it better be good, right?
3. Markers
To stitch geometry from different angles together into one seamless model, all 3D capturing software use feature detection and tracking to understand which parts need to go where. Some 3D scan solutions use just the geometric features (from the black-and-white Depth Map) for this, while others also use the color information for this (referred to as RGB+Depth tracking). This means that the former method will not be able to capture perfectly smooth globe because of the uniform geometry of a sphere, but the latter can, because it detects unique features of the print.
[column lg=”9″ md=”12″ sm=”12″ xs=”12″ ]
For RGB+Depth scanning, you can solve most tracking problems by adding distinct visual features to your object. Some scanners come with dedicated marker stickers for this, but most of them usually detect any high-contrast stickers. I always have a few packs of small fluorescent stickers from Avery that you can buy in any office store. If you want to capture color as well as shape, just place the markers strategically so you can easily remove them from the texture map in photo editing software. Photoshop’s Healing Brush works pretty quick for this in most cases.
[column lg=”3″ md=”12″ sm=”12″ xs=”12″ ]
4. Matting Spray
Both 3D scanning hardware and Photogrammetry-based software solutions rely on computer vision of some kind. They either project visible or invisible light onto an object and capture the result with a camera, or they use software algorithms to estimate depth from images. In all cases, the computer tries to understand what it’s seeing. And computers aren’t smart enough yet to understand a few surface types that humans take for granted: transparency and specularity.
[column lg=”9″ md=”12″ sm=”12″ xs=”12″ ]
This basically means that see-through and shiny objects cannot be 3D captured in their original state. But if you’re just caring about the geometric shape and not the esthetics, there is a solution for this: making the object opaque and matte. This can be done using a a matte, light-colored spray. And in most cases probably temporary. There are special 3D Scanning Sprays on the market, but there are many cheap sprays that will do. From chalk spray to water-soluble glue spray or even hairspray. Just make sure you don’t use any of them on sensitive materials.
[column lg=”3″ md=”12″ sm=”12″ xs=”12″ ]
If your want to scan people, you will run into problems with people wearing shiny things like glasses. If you need a 3D model of a person that always wears glasses, you can scan them without their spectacles on and add these in post production. For this you will naturally need a 3D model of the glasses, and 3D scanning them separately is very hard. Luckily, you can find many brands and models on 3D Stock websites like Turbosquid for a reasonable price. Just be sure the file format is compatible with the 3D modeling software you intend to use.
5. Good Software
Some 3D Scanners only work with the proprietary software that comes with them, but affordable depth sensors like Structure Sensor, Microsoft Kinect or scanners based on Intel’s RealSense hardware can be used with a variety of software.
For example, while reviewing the Structure Sensor, I discovered that the third-party iPad app itSeez3D works better for scanning people, while the Scanner App from the device’s manufacturer offers more flexibility for scanning objects. And if you wan’t to have a lot more control, you use the Structure Sensor to wirelessly transfer its data from the iPad to the Skanect software for Mac and PC, which I’m currently testing a new beta version of. This software offers a lot of professional (there’s a Free and Pro version) scanning and post production features and also works with a lot of other depth sensors, like the Microsoft Kinect or the Apple-owned (but discontinued) PrimeSense Carmine.
For Intel RealSense-based 3D Scanners, like the XYZ 3D Scanner I reviewed recently, I discovered that the Free Sense for RealSense software made by 3D Systems offers a decent set of options for both scanning and post production that might be attractive for beginners.
For Photogrammetry there are a lot of options as well and most offer a free version or trial so you can test the results. If you want to go completely free and mobile, you can start by trying these free smartphone apps.
6. A Sketchfab Account
If you want to share your 3D Scans with the world (and don’t have the cash to 3D print all your scans and mail them to your friends and family), there’s only one way to do it in style: Sketchfab. The website has quickly become the YouTube of 3D Models and offers an easy-to-use way to publish and share your 3D scans through the web, social media and even in Virtual Reality. Manually uploading scans isn’t necessary in most cases, because almost every 3D scanning and photogrammetry software can directly publish the result to your Sketchfab account.
It’s free, but I can totally recommend the Pro account if you’re taking yourself and your work seriously (and want to support the development of this great service). The Pro features I use the most (Yes! You can also follow me on Sketchfab) are the ability to publish models privately and change the background to something more branded. Also, some of my scans go beyond the 50MB file size limit of the Free version.
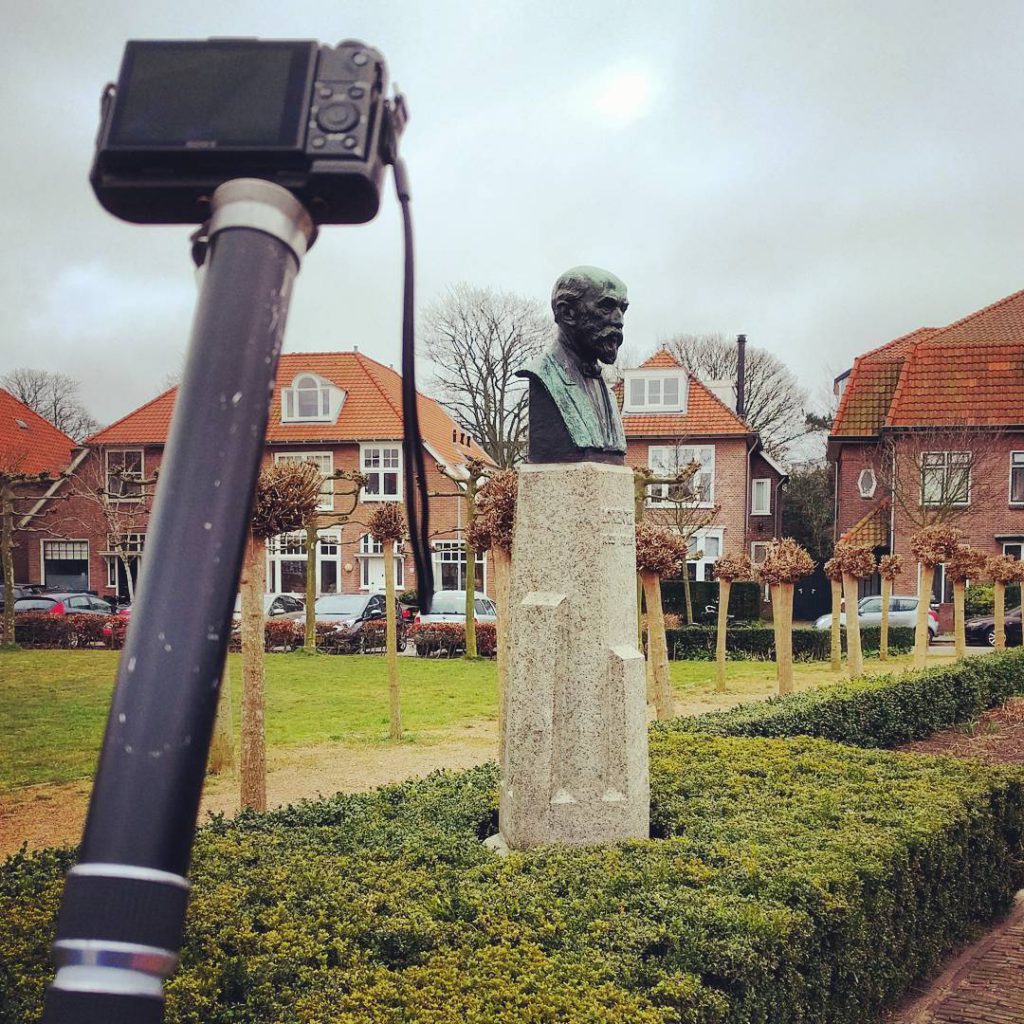
The statue above is captured through Photogrammetry using a Sony RX100 M2 camera (on a monopod) and the Autodesk ReMake Software I’ll be reviewing soon.
Thanks for reading. I hope this post is useful for you if you’re getting into 3D Scanning (which you should). If you think it would be helpful for your friends and followers, please use one of the buttons to share it on your favorite social network!


Many thanks for your sharing. It is of great help to me. In return, I would also like to share with you a fantastic website:http://www.zetarmold.com
Hello, I am a highschooler, and we have a a Makerbot Digitizer. Obviously, not the best 3d scanner, but hey its public school so you can’t blame them. Anyways, I am supposed to build a sort of “lighting box” to make it so people moving in the room don’t project shadows and screw up the scans. Are there any non-reflective materials that would work best for this type of small-space box?
Hi Trevor,
The Makerbot Digitizer is a laser scanner, so as far as I know it can work in complete darkness. Just put a cardboard box over it while it’s scanning to test. Zero interference 🙂
I am an absolutely ignorant newbie but completely fascinated. So forgive the ignorance of my question:
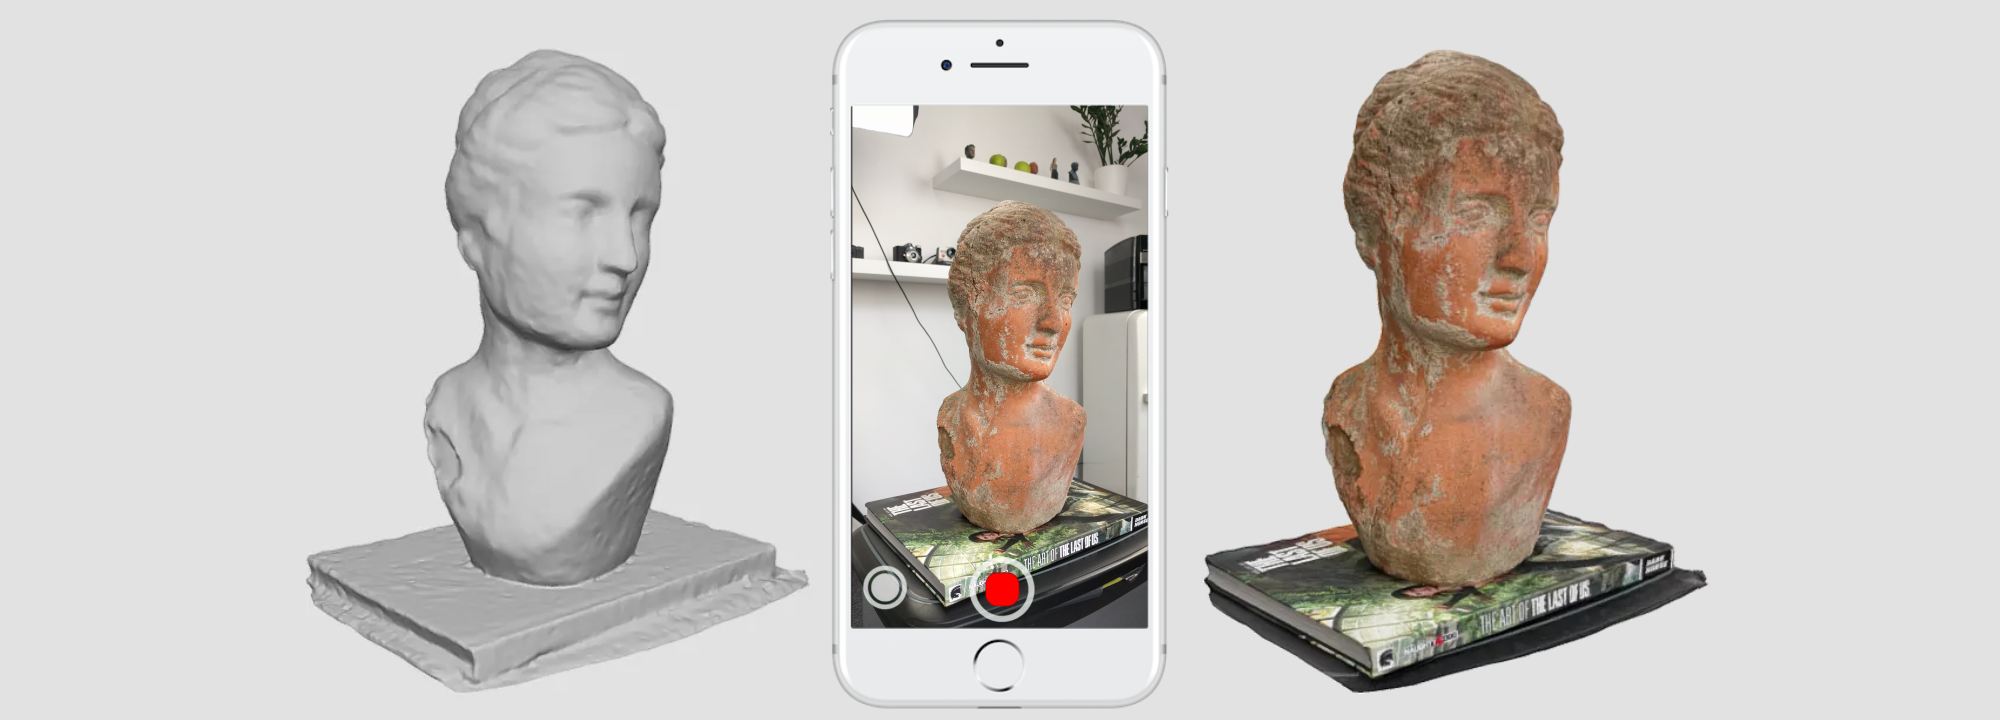
I take it from the two scans of the statues (Schaft and the one below) that you can also 3d scan with e regular (2 d) camera?
What camera, other hardware and software do you need for that?
Thanks and best regards
Hi Paul,
“3D Scanning” — or better: Reality Capture — with just a 2D camera is called Photogrammetry. You’ll just need a camera and software.
Check out my Autodesk ReMake Review: https://3dmag.com/reviews/autodesk-remake-review/
I’ll be reviewing more software soon!
Cheers,
Nick
Hello Nick,
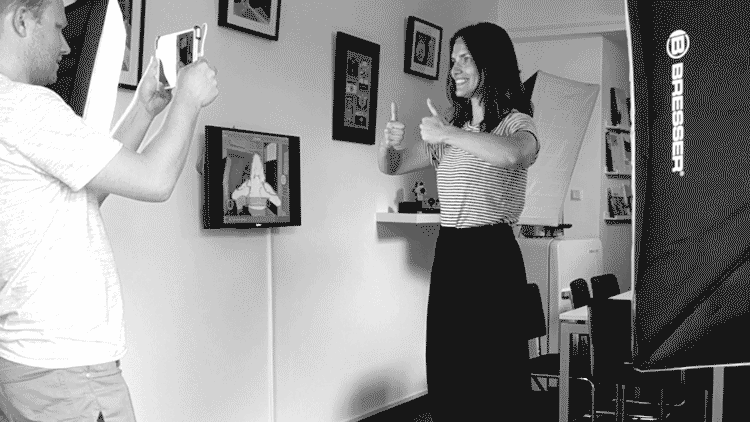
I’ve been reading your blog for a few months now, and got my structure sensor after a very good review you created. I’ve had good results so far but I feel there is room for improvements (the lighting condition plays a big role when 3D scanning). I am about to buy a turntable and a light kit, and after reading a few posts in your blog I realized that a full-body scan can be done with just 2 softboxes when the person is on a turntable. However, I am not a professional photographer so I don’t know how to setup the light kit correctly. Do I need to turn off the ambient light before using the softboxes? There is a GIF image of you performing a full-body scan using 2 softboxes and a turntable (https://3dmag.com/reviews/structure-sensor-review-part-2-itseez3d/) but the image is in black and white so I don’t know if there is ambient light in your office (if the office lamp is on for example). The main reason I want to buy the light kit and a turntable is to remove those shadows from the face and other parts of the scanned people by using diffuse light and save room space with a turntable.
Thank you.
Hi Bruno,
The trick for 3D scanning with a Structure Sensor is simply getting as much light as possible to get sharp, noiseless textures. And also as diffuse (soft) as possible to prevent shadows.
The setup in the GIF is using two large softboxes with 5 bulbs each and also a bit of daylight coming in through the windows.
If you get a light kit with daylight color temperature (5500 Kelvin), you can mix them with some actual daylight. I do advice to turn of any other office lights that are usually a lot warmer in color temperature. And fluorescent office lighting can even turn things a bit green on camera.
If you have a kit with 3 lights, one of them usually comes on a larger tripod with an arm that can be used to light the subject from the top.
There is a limit to the amount of actual daylight a depth sensor can handle. Too much direct sunlight will interfere with the infrared sensor. So scanning outdoors is usually impossible, unless maybe on an overcast day.
Hello Nick,
The GIF image I am referring to is in this post as well. Sorry for typing the URL link to another post 😉